A feature of modern electronic control systems (the so-called “brains”) is that, with all their functionality and power, they are nevertheless very sensitive to the quality of the gasoline being filled.
The working mixture is supplied to the combustion chambers of the engine through nozzles (injectors), which have an extremely small opening size. Even a small particle of dirt can completely clog one of the injectors - as a result, the quality of the fuel will decrease, and with it the engine power (usually with increasing fuel consumption). In other cases, it may even be necessary to replace the nozzle.
On cars of the Priora family (and not only on them), on the way to dirt and harmful substances there is a filtration system that prevents the penetration of dirt in three stages:
- Primary (coarse) filter, also known as a fuel pump filter (catcher mesh).
- Fine filter (sump).
- Mesh in the nozzle of the injection system.
The last filter is installed directly in the nozzle. The sediment filter is located under the bottom of the car. Primary cleaning is carried out by an element, which, in fact, is a mesh made of a plastic body with a soft material of a lattice structure. This filter is fixed in a special support, and it, in turn, is fixed in the fuel tank. Fuel, passing through such a mesh, leaves most of the large contaminants, harmful substances and other dirt on it.
Replacing this mesh installed on the fuel pump will be discussed in our material. The manufacturer recommends changing this product along with the fine filter (every 50 thousand km). In the harsh Russian realities, replacement, as a rule, is carried out more often - about once every 30 thousand. More frequent replacement may be required - if small dips begin to be observed during engine operation, the motor behaves unstably during acceleration, and the engine stalls from time to time. First of all, you should check the injector filter, as well as the fine fuel filter - if they contain dirt, then the fuel pump mesh is also seriously dirty.
You can easily perform the replacement operation yourself - on an unofficial service you will be asked to pay 400 rubles or more for such an operation. Official service will cost you even more. Catcher nets for the Lada Priora fuel pump are sold in almost any car store, their cost starts from 30 rubles.
So, let's say you bought a new mesh.
We start by driving the car into a pit or putting it on a lift.
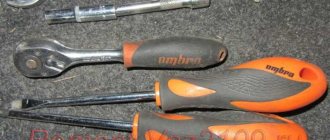
To work we will need the following tools:
- 10 mm wrench (tube or head).
- Slotted screwdriver.
- Phillips screwdriver.
- Pliers.
- Rag (rags).
Attention! All subsequent work is extremely fire hazardous due to the fact that the gas tank will be open and gasoline vapors will freely enter the air. Do not work near open flames and do not smoke!
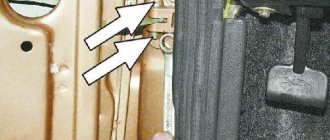
The fuel pump is located in the fuel tank - but it is accessible from the passenger compartment itself. Open the rear door, then recline the rear seat by sliding the latch.
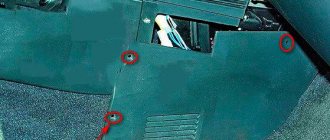
There is a hatch in which the fuel pump housing is installed. Unscrew the two screws that secure the hatch cover.
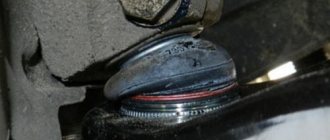
Now we see the fuel pump housing. As a rule, gasoline leaks form around it. We lay a rag or rags around the opening of the body so that the smudges are absorbed there - this is better than leaving them on the car’s paint.
Then you will need to disconnect the block with wires. The fuel pump is turned off.
Then you need to start the engine and let it run for a few minutes. This will relieve excess pressure from the supply circuit.
After this, you will need to disconnect the two plastic fittings from the fuel pump itself. To do this, you will need to press on the iron brackets holding them and move both tubes away from you.
The housing itself is held in place by 8 bolts, which should be unscrewed with a size 10 tube or head.
Then you need to pull out the iron retaining ring into which the bolts were screwed from the studs.
Next, carefully remove the plastic fittings and remove the fuel pump from its seat. Be careful not to damage the float contained in the pump.
Removed fuel pump housing.
Then the pump housing will need to be moved to some place where there is no risk of gasoline leaks - a metal table, etc. Next, you will need to disassemble the gasoline pump to get to the catch mesh. The pump body is made of plastic, so there is no need to apply excessive force during disassembly.
Thanks for subscribing!
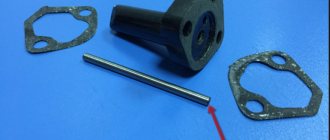
The first step is to bend the two metal wires that are responsible for fixing the level sensor, then pull the sensor up until it completely leaves the grooves. After this, using a slotted screwdriver, you need to disconnect the check valve fitting and move it to the side. The lower half of the housing is attached to the upper half using two iron pins, one of which contains a spring.
Place the housing vertically and, pressing on the top, remove the retaining rings using pliers, after which the top of the pump can be detached. Then you will need to press the latches (3 pieces), after which the pump itself can be pulled out along with the filter mesh. The catch mesh is fixed to the fuel pump pin using a simple washer. Using a slotted screwdriver, pry up the mesh and remove it.
Most likely, the old mesh will contain dirt particles. Replace the mesh with a new one, for which you will need to place it on the fuel pump and lightly hit it in order to lock the washer.
After this, it is necessary to assemble all the disassembled elements in the reverse order of the disassembly procedure.
Since there is no longer a vacuum in our fuel system, we will need to restore it using the nipple on the injection rail. If we previously turned off the gasoline supply, we will now need to remove air from the system. To do this, you better take the help of another person.
Have an assistant get into the car and turn on the ignition. There is no need to start the engine. Remove the injector valve cap, then press the valve. As soon as gasoline starts to spray, release the valve, then screw the cap on top. Ask an assistant to turn off the ignition.
Then you need to wait about five seconds, after which you will need to turn on the ignition again, but start the engine. If the engine runs smoothly and stably, ask your assistant to press the gas pedal harder, then turn off the engine.
At this point, the replacement of the catch mesh for the Lada Priora fuel pump can be considered complete.
Replacing the fuel pump mesh on a Priora
The fuel pump in a car is designed to supply gasoline from the fuel tank to the engine.
For carburetor cars, mechanical pumps are used. Due to the short distance between the carburetor and the fuel pump, fuel is supplied at low pressure. Cars with an injection-type fuel system are equipped with electric fuel pumps that supply gasoline under high pressure. The operation of such a pump is controlled by an electronic system that takes into account the throttle position, as well as the air-fuel ratio.
Basic fuel pump malfunctions
The fuel pump in the Prior may operate intermittently due to low-quality fuel. This is due to the fact that a fine fuel filter is installed here after the fuel pump.
At the inlet there is only a filter mesh that performs rough cleaning. The gasoline at some of our gas stations is so dirty that the mesh gets clogged quite quickly. The engine does not start well or stalls during operation.
The car jerks along the way and slowly picks up speed. If the filter mesh is partially clogged with debris, the optimal supply of gasoline to the engine is disrupted in different operating modes. When the pump is unable to maintain the required pressure in the fuel system 3.7-4.0 atmospheres , improper mixing of air and fuel occurs. As a result, the car loses speed.
In addition, even a well-warmed-up engine after a short stop can then start only after prolonged operation of the starter.
Unstable operation of the power unit is most often a consequence of a faulty fuel pump. First of all, you need to check the pressure level in it.
If after stopping the engine the pressure in the pump drops too quickly, then there is obviously damage to the diaphragm, as well as the sealing gasket. In this case, the gasket should be replaced, and the diaphragm should be reinforced with a special film.
There may also be foreign bodies in the fuel system, in which case the fuel pump must be disassembled and thoroughly washed. To do this, use the following tool:
- flat screwdriver;
- pliers;
- set of open-end wrenches;
- Phillips screwdriver;
- set of heads.
You can do this type of repair yourself in your own garage. Before you start, you should once again make sure that the fuel pump is not working as it should. To do this, you need to start the car and pay attention to the idle speed.
If it floats, then this is already one of the arguments in favor of carrying out repair work. In addition, you can go out onto the highway and sharply press the gas at about 3000 rpm. If the car starts to twitch while accelerating, then there is a second argument for making repairs.
Procedure for replacing the fuel pump mesh
The procedure for replacing fuel filters looks like this:
- Purchase of spare parts.
- Choosing a workplace.
- Preparing the tool and vehicle for disassembling part of the fuel system.
- Removing the electric fuel pump and installing a new filter.
If the gasoline pump mesh is not changed in time, the suction pipe may become clogged with dirt.
Since the FTO is located on the bottom of the car, replacing it will require a lift, inspection hole or overpass. Replacing the fuel pump mesh can be done by simply placing the car on a flat surface. In this case, the gas tank must be at least half empty. Otherwise, when manipulating the FGO, you can spill fuel on the casing, and a persistent smell of gasoline will appear in the cabin.
Preparing for work
You can dismantle the electric fuel pump in any convenient place, observing fire safety measures.
The following tools will be required:
To dismantle the electric fuel pump you will need a minimum set of tools
Preparing the car involves providing access to the top hatch of the gas tank. To do this, the rear seats are removed and the surface under them is cleaned with a vacuum cleaner. This will prevent debris from entering the tank.
The hatch under the seats is covered with a layer of dust that needs to be removed
Then the fuel supply system releases the pressure that remains after the engine stops. If this is not done, then when you remove any tube, gasoline will splash out. Pressure can be relieved in three ways:
- The electrical connector is disconnected from the fuel pump. The engine starts and runs until it stops completely.
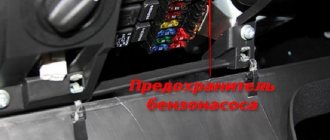
- The fuel pump can be turned off by removing the corresponding fuse. The car starts and runs until the remaining fuel in the lines is completely exhausted.
- A universal option is to relieve pressure through the diagnostic fitting on the ramp. The hood opens and the cap is removed from the valve at the end of the ramp. The pressure will decrease when pressing on the spool with a screwdriver - in this case you need to place a small container. The cap is then screwed into place.
The valve is a regular spool closed with a plastic cap
Procedure for removing the mesh
To get to the metal hatch located under the rear seats, you need to fold back the floor flap at the right (in the direction of travel) door. Further operations are performed in the following order.
- Use a Phillips screwdriver to unscrew two self-tapping screws that press the cover to the bottom of the car. The hatch is removed and moved to the side.
The hatch covering the fuel pump is screwed on with two self-tapping screws. - The bolt on the negative terminal of the battery is loosened, and the battery is disconnected from the on-board power supply. The plastic tab on the fuel pump power connector is bent and the block is disconnected.
The block is easily removed from the socket - The fuel hoses are disconnected. On the supply hose, the plastic stopper is first unlocked, then the wire lock. The return hose is secured with a metal clamp, which must be carefully squeezed with pliers to remove the pipe.
To remove the tubes, you need to bend the wire retainer - The eight nuts holding the mounting flange are unscrewed, and the washers are removed from the studs (they may get lost). The flange is dismantled.
The flange holds the pump housing and is secured with eight nuts - Having remembered the correct position of the plastic cover, the electric fuel pump is removed from the tank. When the body is halfway out of the opening, tilt the tank and pull out the float. To prevent debris from entering the tank, cover the hole with a clean rag.
When demolishing, the electric fuel pump housing rises up and then tilts to the side - To remove the suction pipe with filter from the glass, the internal connector is disconnected. Then you should simultaneously press on the ends of the four plastic latches and pull out the pipe.
The glass is attached to four plastic latches that must be pressed simultaneously - The contaminated mesh is removed from the tube and replaced with a new one. Fitting the filter is accompanied by a characteristic click.
The mesh is put on the suction pipe by hand and fixed - The inner surface of the glass is cleaned of dirt. Assembly of the unit is carried out in the reverse order.
Having removed the hatch cover at the very beginning of disassembly, pause and clean all the dust from the opened opening. Otherwise, some of it will inevitably end up in the tank.
Assembly should be performed carefully, preventing foreign objects from entering the gas tank. After installing the pump flange, attach a ground wire to any stud. After removing traces of fuel, you need to check the tightness of the connections. When the ignition is turned on, the operating pump will begin to increase pressure, and gasoline may leak out through loose joints.
After replacing the mesh, the engine is started and its operation is checked in different modes.
The technology for replacing FGOs on engines with 8 and 16 valves is absolutely the same. There is only a minor difference in the location of the fuel rail diagnostic fitting, which does not affect the procedure.
Video: replacing the fuel pump mesh
Removing and disassembling the fuel pump
The fuel supply mechanism in the Priora is located in the gas tank, so to get it you need to:
- Remove the rear passenger seat. The latches holding it in place are on the sides.
- There is a hatch in the bottom of the car, secured with two self-tapping screws. Having removed it, we gain access to the fuel pump, which is fixed in the fuel tank with a flat metal ring.
- Remove the ring, which is held in place by nuts screwed onto eight threaded pins spaced evenly around the hole in the gas tank.
- We remove the two fuel hoses and remove the retaining ring.
- We disconnect the electrical connector through which power is supplied to the pump located in the plastic casing.
- We take out the housing; this must be done carefully so as not to damage the float, thanks to which the filling level of the gasoline tank is shown on the instrument panel.
- The next step is to pull out the pump itself, bend the four latches located on the body, and take out the fuel pump, at the bottom of which there is a coarse mesh.
As a rule, the entire mesh looks quite dirty, and its central part is literally clogged with various debris. To remove the old mesh, you just need to grab it on all sides with your fingers and pull it towards you, or pry it with a flat-head screwdriver.
It comes out of its seat relatively easily. After this we install a new mesh. A mesh for the Lada Priora fuel pump can be bought in a specialized store or on the market. It costs about 50 rubles .
There is usually also a lot of debris at the bottom of the plastic cup in which the pump was located. It needs to be rinsed well and wiped with a dry cloth.
Then everything is put together in reverse order. After replacing the mesh, the engine picks up speed smoothly and runs stably. While driving on the highway, the car no longer jerks and accelerates normally.
Replacing the fuel pump and fuel pump mesh for Lada Priora
1. Replacing the mesh in the fuel pump of the Lada Priora
2. Replacing the fuel pump on a Priora
Replacing the mesh in the fuel pump of Lada Priora
Today I decided to change the strainer on the fuel pump. First, I removed the back seat and unscrewed two bolts on the cover that leads to the fuel pump.
We disconnect the wires going to the fuel pump and get behind the wheel. We start the car and let it idle until it stalls, thereby releasing the pressure inside the pipelines. Be sure to bleed.
Disconnect the wiring harness.
We disconnect the two pipelines that are attached to the fuel pump. Removed by pressing on the iron bracket and, pushing away from you, disconnect the pipeline from the fuel pump
Disconnect two pipelines
Unscrew the eight nuts by 10.
Next, remove the fuel pump holder ring and put it away so that it does not interfere with us.
Then, carefully removing the pipeline hoses, holding them with your hand, we pull the fuel pump itself out of its seat, most importantly, without excessive effort, and carefully so as not to damage the float on the fuel pump.
After removing the fuel pump, disconnect the plastic pipe. Without removing it we will not be able to disassemble the fuel pump
Remove the two small retaining rings on either side of these guides.
Then we disconnect the plastic fasteners (there are three of them) by detaching them, we can get to the mesh itself.
We got to the mesh, as we can see, there are some shavings on it, which means the filter is working well. Next we will remove it to exchange it for a new one.
Using a screwdriver, pry up the mesh and remove it from the fuel pump seat.
Side view of the mesh here you need to insert a screwdriver
So we removed the strainer from the fuel pump to replace the old one with a new one.
Removed mesh from fuel pump
Installing a new mesh on the fuel pump and reassembling in reverse order.
Replacing the fuel pump on a Priora
Repair of priors and revision of the fuel system.
After the fuel level sensor (FLS) failed, I went for diagnostics, where it turned out that my fuel pump on the Priora did not hold pressure. The needle twitched and the mechanic said that the fuel pump would break very soon. So, in connection with replacing the sensor, you need to replace the Priora fuel pump motor, fuel filter and coarse filter.
All this is discussed in this article.
Bosch fuel pump motor for Lada Priora
Fuel level sensor DUT K2
Fuel filter SCT (article ST 342) Priora coarse filter 16V
We begin to disassemble and remove the Priora fuel pump.
— First of all, we reduce the pressure in the fuel system. We lift the rear sofa, unscrew the fuel pump cover and pull out the plug that goes to the fuel pump. After this, we start the car until it stalls on its own.
— Remove the terminals from the battery. This must be done before any repair of the priors
(optional) Vacuum to prevent dirt from falling into the fuel tank
— Remove the hoses (direct and return) going to the fuel pump
Using a regular 10mm wrench, unscrew the nuts and remove the iron and plastic rim
— pull out the fuel pump sideways, being careful not to catch the FLS.
We disassemble the pulled out fuel pump of the Lada Priora
-remove the retaining ring from one of the guides.
-Disconnect all the wires, pull out the plug from the housing, the plug from the fuel pump motor and disconnect the wire
-Unbend the 3 latches and take it out along the plastic guides
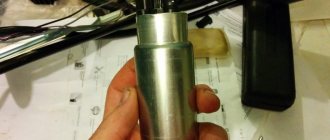
-Remove the mesh from the motor
Pull back the latch and take out the motor
This photo is so that you can put everything back in place. Here you can clearly see the location of the motor and corrugated hoses
There is dirt on the mesh at the bottom of the fuel pump.
The Priora comes with FLS 11 from the factory. But according to reviews, FLS K2 is better.
Fuel level sensors are completely identical and interchangeable.
On the left is an old fuel pump. on the right is a new Bosch fuel pump for a Priora
This is what the Priora fuel pump looks like when disassembled:
We carry out assembly in reverse order.
We insert the motor into the stand along the guides, put on the mesh from below, simply pressing it against the motor.
We connect the new FLS and do not forget to plug in all three plugs.
This is what the new assembled Priora fuel pump looks like