Removing Kalina steering column levers
Required tool: Phillips screwdriver.
- Remove the lower screw and upper self-tapping screw connecting the upper and lower steering column housings on the left side.
- And then on the right side.
- Lower the steering column adjustment lever down and remove the upper steering column cover.
- Unscrew the 3 screws securing the lower casing.
- Remove the lower casing.
- Disconnect the wiring harness connector from the left steering column switch.
- Squeeze the fasteners at the top and bottom with your fingers and remove the left steering column switch.
Similarly, remove the right steering column switch, additionally disconnecting the block from the on-board computer of the instrument cluster.
Installation of the Kalina steering column switches is carried out in the reverse order.
How to turn on the high beam on a viburnum
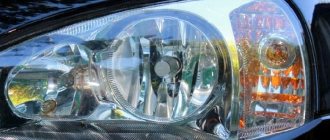
The Lada Kalina car uses a headlight unit that combines high beam, low beam, direction indicators, and side lights. This article describes the operation of low and high beams in a car. Next, in order to understand the circuit diagram of turning on the lights in a car, look at the diagram.
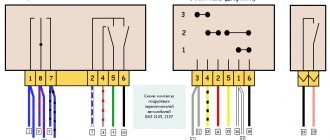
Fig. 1 Schematic diagram of switching on low and high beam headlights in a Lada Kalina car.
The low beam headlights are turned on using switch 5 and the ignition switch. So the current from contact “A” passes through the ignition switch, through switch 5, through the distribution block fuses F12 and F 13, the low beam fuses of the right and left headlights, respectively, and is supplied to the headlight block. The high beam headlights are turned on through the ignition switch, switch 5, then the current flows to switch 4, where through contact 56a the blue and white wire going to the contact relay coil K7 is fed. When relay K7 is turned on, current flows through its contacts (contacts 3 and 5 of the mounting block) then through fuses F14 and F 15, the high beam of the right and left headlights, respectively, and is supplied to the headlights. At the same time, the control LED indicating that the high beam 2 is on is also powered.
To power the low and high beam lamps, the headlight unit already has a permanent connection to the negative wire (grounding). Contact 3 headlight unit.
On Lada Kalina cars in the simplest “Standard” configuration, low and high beams work separately. AvtoVAZ claims that this operating mode complies with the illumination standards prescribed by UNECE Regulation R112. Let's talk about a simple modification to Kalina's headlights, which will improve road illumination.
You will need to remove the steering column cover by removing four mounting screws (two on the bottom and two on the side). Now we disconnect the white-blue wire from pin 56b of the left steering column switch and connect it to the green wire on 56 .
Now, when the high beam is turned on, the low beam will not go out, that is, the operating mode will be exactly the same as on the “Norma” and “Lux” trim levels. The combined operation of low and high beam headlights allows you to better illuminate the road. Let us remind you that when replacing lamps in headlights with LEDs, you will also have to resort to modifications.
Electrical circuits of various parts of the Lada Kalina car - VAZ 1118 (VAZ 1117 and VAZ 1119). The beginning of the description is a diagram of the connection of the harnesses, see here. To enlarge the image, click on the diagram and save it to your PC. All materials are provided free of charge.
Wiring diagram for the driver's door VAZ 1117, VAZ 1118, VAZ 1119
1 - to the rear wiring harness; 2 - to the left front speaker; 3 — electric window lifter motor; 4 — left front lock; 5,6 - to the switch block; 7,8 — wiring harness block of the switch block.
Wiring diagram of the right front door VAZ 1117, VAZ 1118, VAZ 1119
1 - to the rear wiring harness; 2 - to the right front speaker; 3 — electric window lift motor; 4 — right front lock; 5 - to the power window switch; 6 — power window switch.
Rear door wiring diagram VAZ 1118
Removing the Kalina steering column switch connector
Required tool: 8mm socket.
- Disconnect the block with wires from the connector.
- Use a 8-mm socket to loosen the coupling bolt of the connector.
- Remove the connector from the Kalina steering column.
The connector is installed in the reverse order. We put the connector on the steering column until it stops and position it so that the contact connectors of the steering column switches are located horizontally.
Replacing the turn switch on a VAZ 2113, VAZ 2114, VAZ 2115
Welcome! Turn switches - most of them are made mainly of plastic and therefore these switches very often break, in most cases, as happens, you stop somewhere, for example, you need to turn around and you immediately start turning the steering wheel sharply so as not to interfere with the movement and then bam and you hit it , this very switch and even with average force it breaks, but few people know how to replace it, but in fact everything is very simple, so so that you can easily replace these parts in the future, then in this case, read our article which is aimed at replacing the turn switch, as well as replacing another side switch (the windshield and rear window wiper switch of the car)
How to replace the steering switch on a VAZ 2113-VAZ 2115?
Note! Both switches are replaced absolutely identically, so we did not write instructions for replacing both switches, but wrote instructions only for replacing one of the most frequently broken ones, the turn switch!
Removal: 1) At the very beginning of the operation, remove the upper and lower casing from the steering column. (For information on how to remove the upper and lower casing, read the article entitled: “Replacing the steering column casing on a VAZ”)
2) Then, when the casing is removed, look for two plastic latches at the top and bottom thanks to which this switch is held in the saddle, so to speak (For more details about where these latches are located, see the bottom in the section: “For beginners!” they there are indicated by arrows in the photo), and when you find these latches, carefully take them by the bottom with your hand and press them to the side towards the very base of the switch and thereby simply pull it gently and it will come out.
3) When this switch comes out of the saddle, on the back side of it (you will immediately see) a large block with wires will be connected, so carefully disconnect this block from the switch by pulling it, thereby it will come out.
Steering columns from Kalina, Priora and Chevy Niva
Note. On the VAZ 2110 you can easily and simply install switches from Lada Kalina, Chevrolet Niva or some foreign cars.
Features you need to know about
Replacing the steering column switch for a VAZ 2110
Let's look at some features of steering column switches from other cars that we want to install in the VAZ 2110:
- The main thing is the connector, which must match the VAZ 2110 and then there will be no problems.
- It is also recommended to pay special attention to the shape of the switch. For example, the steering column shifters from the Priora become further from the steering wheel than the tenth shift paddles. In this case, you have to lengthen the steering shaft or install another one from the same Kalina.
Steering column switches VAZ 2110
Note. There is another way: bend the steering column switch and cut off the excess part, and then glue it at a different angle, but this is not entirely correct. We need to think about safety, but a glued-on steering column does not fit in with this. Therefore, if we change the steering columns from Priora, Kalina or Niva, we will have to put up with a large distance of levers.
Conventional DIY installation of steering column stalks
- Disconnect the positive wire from the battery.
- Now remove the lower steering column casing by unscrewing the 7 fastening screws.
- Lower the steering column down.
- Remove the upper steering column casing.
VAZ 2110 replacement of steering column switches
- We find two plastic clips and squeeze them to remove the windshield wiper switch (see Replacing windshield wipers on a VAZ 2110 on your own) from the base.
- Disconnect the block with wires.
- We now remove the turn signal and headlight switch, again, squeezing the two plastic clips.
We take a test lamp at 12 and connect it to the corresponding contacts:
Replacing steering column switches VAZ 2110
- If the lever is in the first position, then everything is turned off.
- If the lever is in the second or third position, then the numbers of closed contacts will be 49a-49aL and this is a left turn indicator.
- If the lever is in the fourth or fifth positions, then this is a right turn indicator and the numbers of closed contacts: 49a-49aR.
- If the lever is in the sixth position, then these are low beam headlights and the numbers of closed contacts: 56-56b.
- If in position seven, then this is a high beam alarm and the numbers of closed contacts are 30-56a.
- High beam is position eight and the contact numbers here are 56-56a.
Steering column switches Lada Kalina
The steering column switch is a long-standing problem with front-wheel drive cars. Lada Kalina was no exception and therefore it is difficult to avoid breakdowns in this regard. Most often, the steering column switches on the Lada Kalina break down gradually, let’s put it this way.
When driving with the low beams on, the high beams will occasionally turn on and flash. If you find such a problem, you need to replace the switches. You can do this yourself. However, if the replacement did not help much, the best solution would be to turn to a professional.
Important! The list of tasks of the steering column switch includes not only controlling the headlights, but also the washers, wipers, turn signals and the on-board computer as a whole.
- Preparation for replacement and necessary equipment
- Replacement and assembly
- Lada Kalina steering column switch connector and its replacement
- Bottom line
Possible causes of malfunction
So, if the low beam in one of the headlights of a Lada Kalina does not light up, then the reason most likely lies in a burnt-out light bulb. Replacing it will not be difficult for every car owner.
However, unfortunately, there are a number of other reasons for this malfunction, the most common of which are the following:
- The contacts in the plug block are oxidized or burnt;
- The fuse has blown;
- Open circuit;
- The relay has failed.
Below we will look at how to fix all these problems.
Replacing the lamp
Replacing the low beam on Kalina is quite simple. Moreover, you will only have to spend a few minutes of your time on this.
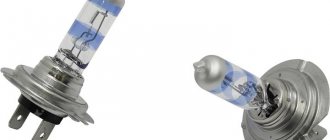
The only thing is that before replacing old lamps, you need to purchase new ones of the H7 standard. It is advisable to install new bulbs on two headlights at once so that they provide the same glow.
Note! On sale you can find several types of H7 standard bulbs - halogen, xenon and LED, for example, for fog lights on a VAZ 2110. All their types have different prices, but the main thing is that they have different characteristics. On our portal you can familiarize yourself in detail with the features of all these lamps.
Replacement instructions are as follows:
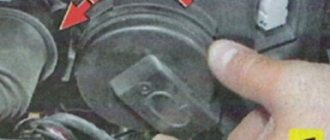
- First of all, you need to remove the rubber plug located on the back of the headlight. To do this, you must first open the hood.
- Then you need to remove the positive and negative terminals from the contacts.
When replacing light bulbs, you need to pay attention to the quality of the contacts. If the contacts are oxidized or burnt, they must be cleaned.
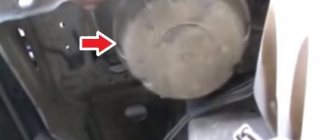
Replacing the fuse
If, after replacing the lamps, the low beam headlights in the Lada Kalina still do not work, you should check the fuses. They are located in the mounting block under the steering wheel.
The lamps are protected by different fuses:
- Right lamp – F12
- Left lamp – F13
It must be said that it is not always possible to visually identify a blown fuse. Therefore, even if it has no external defects, you should check the voltage at the terminals with a test lamp or multimeter.
Note! If, after replacing the fuse, the lighting turned on, but after a while it disappeared again, it is necessary to measure the voltage that the generator produces. It is advisable that when the engine is running it does not exceed 14.4 volts. If the voltage is higher, you can try replacing the control relay.
Open circuit
If the fault cannot be eliminated, then you need to find an open circuit.
You can do this as follows:
- If there is no voltage at the fuse terminals, you need to ring the wire that goes from F13 to contact No. 56 of the lighting control unit, since you can turn on the low beam headlights on Kalina using switch No. 5.
- If the wire is intact, but 2 headlights do not light, then switch No. 56 must be replaced. However, you should first check whether voltage is supplied to the switch itself.
- If voltage is supplied to fuses F13 and F12, you should check whether there is voltage at the relay output. Let us remind you that the low beam relay in the Lada Kalina is located in the mounting block.
- If there is no voltage, you should check the area from F12 to contact No. 56 of switch No. 4, which is located on the steering wheel, as well as the area from terminal No. 56a to terminal 1 of relay K7. It is also quite possible that switch No. 4 or the relay itself is not working.
Replacing the latter is not difficult, since it is simply inserted with contacts into the socket.
As we can see, finding an open circuit or a faulty part is not difficult. To do this, you only need a low beam circuit on Kalina and a multimeter or test light. These are, perhaps, all the main reasons for this malfunction on the Lada Kalina car.
Preparation for replacement and necessary equipment
To replace the old switch you will need a Phillips screwdriver, a dry, clean cloth or thick napkins. And, of course, a new detail. Before changing the Kalina steering column switch , you have to carefully get to it, since such procedures are usually carried out rarely. Don't forget to disconnect the negative battery terminal.
The first stage of preparation is removing the steering wheel. First, move it to the lowest position. Using a Phillips screwdriver, carefully unscrew the 7 fasteners of the plastic casing. We remove first the lower and then the upper part.
The second stage is dismantling the old switch. It does not include anything complicated - you don’t even need tools, everything is attached with latches. For example, we will take the right lever, which is responsible for the on-board computer and wipers. Disconnect the small plug with the wires by pressing the latches and pulling towards you. Now, guided by the same principle, we pull out the large plug. You may have to make an effort here.
Replacement and assembly
Installing the right and left switch completely repeats the above steps, but in reverse order: take the part, connect the large and small plugs, and then put the casing in place. Replacing Kalina steering column switches with a sufficient level of experience and skill can take place in just a few minutes.
What other problems may arise in the steering column of the Lada Kalina? For example, your horn may stop working. It helps you communicate with other drivers quickly and efficiently, so a signal failure can be fatal. Therefore, you need to replace the steering column switch connector.
Lada Kalina steering column switch connector and its replacement
Remove both switches as described above. Now, if the car has an airbag, you need to disconnect the block with wires from the slip ring.
The connector can be removed along with the slip ring, but it is better to describe the complete disassembly process. Therefore, to remove the ring, unscrew the nuts using a screwdriver. You should be careful here, since the slip ring is a very delicate element of a balanced system. If you turn something incorrectly or roughly, there is a chance of disturbing the centralization of the ring during assembly.
Next, you need to disconnect the horn wire block. Use an 8 mm socket to loosen the tension and calmly remove the connector.
We install a new connector for the steering column switches. Next, we carefully assemble the system:
- Tighten the bolt with an 8 mm socket very gently;
- We install the connector in a position in which the central fastening screw of the lower masonry could be screwed in;
- We install the lower masonry in its rightful place and adjust the position of the connector;
- When the desired position is found, remove the bottom cover and, without moving the connector, tighten the fasteners;
- Next, we assemble the system using the reverse principle in relation to disassembly.
Pinout of Kalina steering column switches is a simple matter for a person who has at least once taken on the task of repairing or at least disassembling the steering column space. Be careful and don't be overconfident.
Lada 2109 just nine. › Logbook › Steering column switches from Kalina)
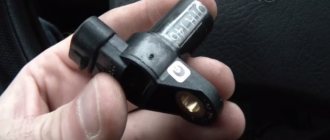
Hello again, yes the button accordion, but what to do the other day, the stock switches, which have been around for 5 years, began to sharply wear out, you turn on the collar in the evening, and it shoots at you from afar) we cry for a replacement, but if you install new ones, then from Kalina, they cost 25 rubles more)
Actually, the switches themselves are shorter than the standard ones, and less extended towards the driver, which means you will have to get used to it a little, to the fact that the ring finger is working, and the middle finger can be used in nasu kalupatso)
he stubbornly refused to come out) Then, having overcome him, I first removed the block of wires from the left switch, and took out the switch itself:
I fiddled with the right switch a little, but then it dawned on me that it was better and more convenient to pull it out together with the wire block, and then disconnect it, because the ignition switch prevents you from doing this as on the left side
We reassemble in reverse order, and are happy with the final result)
I didn’t test it on the road, but after installation I dabbled with them a little, everything works well, in my opinion the sales are even better than stock)
Also today I carried out a ritual of reviving my fog lights, which mysteriously went out a couple of days ago, and since I’m not a boom boom guy in electrics, first I checked all the fuses, everything was intact, then I cleaned all the contacts on the relay, all possible wires located in the fog lights circuit, nothing works, then a couple of swear words and oh miracle! the fog lights turned on and are working again) I’m shocked, this probably only happens with our cars) apparently the contacts were oxidized and didn’t work)
Don't blame me for the photos, I know the quality...
GOOD LUCK TO ALL! Love your cars and they will love you back!
source