What does code P0134 mean?
OBD II error code P0134 is defined as "Oxygen Sensor Circuit - No Activity Detected (Bank 1, Sensor 1)" and is set when the control unit (ECU) does not detect signal voltage from the oxygen sensor.
In engines with two cylinder heads, "Bank 1" refers to the cylinder block that contains the No. 1 cylinder, and "Sensor 1" refers to the oxygen sensor located upstream (upstream) of the catalytic converter.
Oxygen sensors (OS) play a decisive role in the process of fuel supply, ignition timing and valve timing calculated by the control unit.
The ECU collects information from various sensors on the engine to calculate the most appropriate fuel/air ratio, ignition timing, and VVT/VCS (Variable Valve Timing System) settings to ensure the engine produces the most power for the least amount of fuel, depending on speed and load.
Oxygen sensors, designated "1", measure the flow of exhaust gases before they enter the catalyst. Based on the amount of oxygen in the exhaust gas, these sensors generate a signal voltage that is used by the ECU to make changes to various settings to maintain maximum performance at all times.
That is, from a practical point of view, if the primary sensor (oxygen sensor No. 1) does not generate a signal voltage because it is inactive, the control unit is deprived of the information necessary to effectively control the engine.
In most cases, the ECU receives a base signal voltage of about 450 millivolts when the sensor is cold. As the heater control circuit heats the sensing element to drive the sensor into action more quickly, the resistance—which is typically around 8 ohms—begins to drop, allowing the sensor to generate signal voltages proportional to the amount of oxygen in the exhaust gases.
If the control unit detects that the DC sensor is taking more than 60 seconds or so to warm up, or that the signal voltage is within the range of 390 to 490 millivolts, it considers the oxygen sensor inactive. Code P0134 will set and the CHECK ENGINE indicator will turn on.
The values given here are indicative only. Check the repair manual for your specific vehicle for more accurate values.
Some Japanese cars, such as Toyota, do not use conventional oxygen sensors. Instead, they use MIXTURE that measure the fuel to air ratio in the exhaust stream. This type of sensor is NOT interchangeable with conventional oxygen sensors. Refer to the appropriate manual for this type of sensor for proper diagnosis, testing and repair.
Common causes of violation
Error P0134 does not occur very often. There are few probable reasons for the occurrence of such a violation, and they all indicate an incorrect signal from a specific sensor. Based on this, you can determine the most popular options for the occurrence of error P0134:
- Presence of a short circuit;
- Oxygen sensor malfunction;
- Broken wires and oxidation of contacts.
During diagnostics using special equipment, the causes of the malfunction are identified quite quickly and accurately. In most cases, this violation is provoked by a breakdown of the oxygen sensor and in 5% of them the malfunction is directly related to a short circuit, an open circuit and the presence of oxidation processes in the contacts.
In situations where, along with the error in question, the presence of errors with code P0171 is also displayed, we can conclude that there is a possibility of a break or short circuit. The second error in most cases appears when the air-fuel mixture entering the engine is too lean. It is often accompanied by error code P0134, since in the exhaust circuit the first oxygen sensor is directly responsible for the supply. When the information supply stops, the ECU spontaneously reduces the fuel consumption. Thus, the air-fuel mixture becomes lean.
This is interesting: How to replace the hydraulic mounts of a Ford Focus 2 engine with your own hands?
Common Causes of P0134
Causes of P0134 can also be caused by oil/fuel additives that contain silicone-based compounds and/or internal engine problems caused by electrical faults in the signal voltage circuit. The illustration below shows some causes of P0134 that are not related to wiring or other electrical problems.
Other possible causes of P0134 include the following:
- Damage to the wiring in the heater control circuit, which may affect the time it takes the sensor to reach operating temperature - approximately 6000 °C.
- Damage to signal circuit wiring and/or connectors.
- The fuse in the heater control circuit has blown. In these cases, a code associated with “low input voltage” may also be present.
- Faulty oxygen sensor.
- ECU failure. Please note that this is a rare case. Before changing any controller, the fault should be looked for elsewhere.
Necessary tools for troubleshooting
- Multimeter.
- OBD2 scanner and adapter.
- Electrical contact cleaner.
- Car charger.
- Oscilloscope.
P0134 oxygen sensor circuit error, the one before the converter - no signal activity. Essentially, the first lambda probe does not work, since the 02 B1S1 sensor circuit is passive.
P0134: O2 Sensor Circuit No Activity Detected (Bank 1 Sensor 1) error code. What does it mean that there are no changes in the data from the oxygen sensor?
- Error P0171 - what it means, symptoms, causes, diagnosis, solution
When diagnosing with a car scanner, the computer displays the error: “P0134 Oxygen O2 Sensor Circuit No Activity Detected (Bank 1 Sensor 1).”
Unlike error p0135, when the oxygen sensor heater fails and this can affect the behavior of the car, error code p0134 can only be read as a computer error, since it does not particularly affect the driving performance of the car, the dynamics are the same, there is no problem, fuel consumption remains unchanged , except that it may become dull during acceleration.
What are the symptoms of code P0134?
In some cases, there may be no symptoms other than a stored DTC and CHECK ENGINE light. On the other hand, some consequences may be so severe in other cases that the vehicle becomes undriveable.
Also keep in mind that the severity of one or more symptoms may vary from vehicle to vehicle.
- Serious problems while driving: severe loss of power, unstable acceleration, the car may even stall unexpectedly.
- Increased fuel consumption, which can range from slight and barely noticeable to significant.
- Black smoke from the muffler.
- Difficult start.
- Reduced spark plug life.
- In extreme cases, reduced engine longevity is caused by an excessively rich fuel mixture, which washes away the protective lubricant film from the cylinder walls.
On what cars does it occur?
It cannot be said that error P0134 is a typical problem for a particular automaker or the vehicle models it produces.
But if you look at the statistics of calls to car services when error P0134 was diagnosed, then among the most common cars we can distinguish the following brands and models:
- domestic cars of the VAZ series, including VAZ 2110, 2112, 2114 and 2115;
- newer models under the Lada brand, including Priora, Kalina and Granta;
- Chevrolet cars made before 2012;
- some Mazda models;
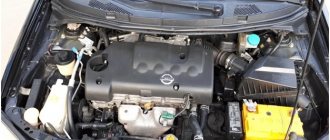
- Nissan budget representatives;
- most small cars from Peugeot;
- domestic favorite Lanos;
- previous generations of Hyundai Accent;
- some Opel models;
- Mitsubishi cars, mostly before 2013, etc.
It is impossible to say that error P0134 will definitely appear on these machines, but not on others. Much depends on the quality of the sensor itself, operating conditions, the condition of the exhaust system, the fuel being poured, the condition of the engine, etc.
Diagnosis of error P0134
If error P0134 still appears and it was possible to read it with a scanner, diagnostic and repair work must be carried out. In most cases, error P0134 can be resolved on your own. But sometimes you have to seek qualified help.
How to troubleshoot P0134?
Before attempting to electrically diagnose the P0134 code, ensure that the engine is running and that there are no air leaks or serious exhaust leaks that could affect the operation of the oxygen sensors.
Also, make sure there are no rich or lean conditions and that the engine oil is not contaminated with antifreeze. If any other codes are present along with P0134, troubleshoot those issues first before attempting to diagnose P0134.
In a properly functioning oxygen sensor, any change in throttle will result in an almost immediate change in signal voltage. However, the speed at which changes occur (depending on the efficiency of the sensor) is best assessed using an oscilloscope.
Keep in mind that while an oscilloscope can identify emerging problems, interpreting the resulting waveforms requires expert knowledge and verified reference data for each vehicle being tested.
Therefore, in order to identify a faulty DC (if there is no oscilloscope), it should be enough that there are no changes in the signal voltage during a discernible period.
Step 1
Take a diagnostic scanner or adapter and read the information from the car. Record all stored trouble codes and available freeze frame data. This data can be useful if an intermittent error is later diagnosed.
Step 2
Visually inspect all wiring associated with the damaged sensor. Look for burnt, shorted, or otherwise damaged wires and connectors. Restore them if required.
Step 3
If there is no visible damage to the wires, check resistance, input (reference) voltage, ground, and continuity in all circuits associated with the damaged sensor.
Before checking the wiring integrity, be sure to disconnect the sensor from the ECU to prevent damage to the controller.
Since the P0134 code indicates a problem in the signal voltage circuit, as opposed to the heater control circuit, pay special attention to the resistance and continuity values in the signal circuit between the ECU connector and the sensor. These values must correspond exactly to those specified in the repair manual.
Try to avoid signal circuit repairs - it is best to always replace the associated harness to avoid problems with poor connections and high resistance that can arise from poorly executed repairs.
Make sure that the sensor is receiving full voltage from the battery. Keep in mind that in some cases the heater circuit voltage comes from the ECU, in which case the circuit is not protected by a fuse. Look in the repair manual to see how voltage is supplied to the DC heater.
Since the sensor has a heated element, it is possible that low battery voltage, poor grounding, or other resistance issues could affect the time it takes for the element to heat up, which is one reason why the code may set. P0134.
It goes without saying that the voltage/condition of the battery should also be checked. However, in cases of low battery voltage, codes related to low input voltages to the heater control circuit may be present along with P0134.
Step 4
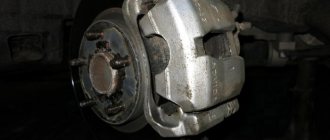
If all data obtained is within the manufacturer's specifications, unscrew the oxygen sensor from the exhaust pipe and inspect it for discoloration or the presence of any type of deposits that may reduce the effectiveness of the sensor. In general, the correct color of the oxygen sensor should be the same color as a healthy, properly functioning spark plug.
Compare the sensor to the pictures at the top of this article, but keep in mind that the DC cannot be cleaned of deposits. The only reliable remedy is to replace the sensor rather than use any additives.
If the DC does not show discoloration or deposits, measure the sensor resistance and replace it if its resistance is outside the manufacturer's specifications.
Replacing the sensor does not make sense if it shows signs of “poisoning” with oil or antifreeze. In these cases, the underlying problem must be resolved to prevent the P0134 code and its associated symptoms from recurring.
Step 5
If you have checked all associated wiring, all electrical parameters specified in the manufacturer's specifications, and replaced the appropriate DC, test the vehicle to ensure the repair was successful. Sometimes a fault code returns. There may be an intermittent (intermittent) error present.
Detecting and correcting intermittent faults can sometimes be very difficult and in extreme cases may require the problem to worsen before an accurate diagnosis and permanent repair of the fault.
Replacing the lambda probe
In most cases, a part such as a lambda probe cannot be repaired, as evidenced by statements about the impossibility of repair from many automobile manufacturers. However, the inflated cost of such a unit from official dealers discourages anyone from purchasing it. The optimal way out of this situation could be a universal sensor, which costs much less than its native analogue and is suitable for almost all car brands. Also, as an alternative, you can purchase a used sensor, but with a warranty period, or a completely exhaust manifold with a lambda probe installed in it.
However, there are cases when the lambda probe operates with a certain error due to severe contamination as a result of combustion products deposited on it. In order to make sure that this is really the case, the sensor must be checked by specialists. After the lambda probe has been checked and its full functionality has been confirmed, it must be removed, cleaned and reinstalled.
This is interesting: How to replace the cylinder head gasket with your own hands
In order to dismantle the oxygen level sensor, it is necessary to warm its surface to 50 degrees. After removal, the protective cap is removed from it and only after that you can start cleaning. It is recommended to use phosphoric acid as a highly effective cleaning agent, which can easily cope with even the most stubborn flammable deposits. At the end of the soaking procedure, the lambda probe is rinsed in clean water, thoroughly dried and installed in place. At the same time, do not forget about lubricating the threads with a special sealant, which will ensure complete tightness.
The structure of a car is very complex, so it needs constant maintenance and timely preventative maintenance. Therefore, if there is a suspicion that the lambda probe is faulty, it is necessary to immediately diagnose its performance and, if the fact of failure is confirmed, replace the lambda probe. Thus, all the most important functions of the vehicle will be maintained at the same level, which will guarantee the absence of further problems with the engine and other important elements of the car.
Replacement problems
When replacing, the old sensor may stick to the pipe. In this case, proceed like this:
- Apply wd-40 generously and try to unscrew
- Turn on the engine, heat the exhaust system and unscrew the sensor
- We try to heat (being careful) the sensor itself and unscrew it
- Tap lightly with a hammer and try to unscrew it again
- If that doesn't help, try thermal shock. Pour cold water onto the well-heated sensor. Try unscrewing it again.
Oxygen sensor price
The price of an oxygen sensor will vary by region and model. It ranges from 1000 to 3000 rubles . Buy a lambda probe in specialized stores and only with a guarantee.
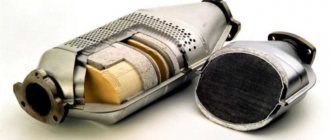
Signs of a bad catalytic converter
Any mechanism or device, no matter how durable it is, will sooner or later fail, especially if it has to work in critical conditions. The catalytic converter, which is responsible for cleaning exhaust gases from pollutants, operates at fairly high temperatures. However, a damaged or clogged converter has a negative impact on vehicle performance, which a vigilant driver cannot fail to notice.
Power Loss
For a person who is not particularly familiar with the structure of a car, the most important symptom is a loss of engine power while driving up a hill. At the same time, there is a clear feeling that the engine is running under high load. Even a novice driver can recognize such a sign of a clogged catalytic converter as increased fuel consumption.
Damage due to thermal shock
Inspect the outside surface of the catalytic converter for visible damage. Discoloration and/or deformation of the neutralizer body are clear signs of thermal destruction of the substrate as a result of overheating. Such damage is most often caused by the fuel mixture supplied to the engine being too rich, resulting in unburned fuel entering the catalytic converter. This fuel burns out in the neutralizer itself, simultaneously melting its substrate, which leads to blocking the operation of the component.
Blockages prevent gases from passing through the catalytic converter, causing back pressure to build up in the exhaust system, which negatively affects engine efficiency. Thermal shock can also occur when a hot catalytic converter comes into direct contact with ice or cold water, as this can crack the internal substrate, again leading to clogging and increased temperature in the converter, ultimately reducing engine power.
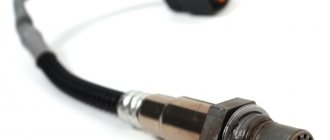
An oxygen sensor is a device that helps the control unit evaluate engine performance. It is installed in the exhaust manifold and is designed to determine the composition of the fuel mixture, that is, whether it is too rich or lean. The sensor sends a corresponding signal to the control unit, after which the control unit regulates the composition of the air-fuel mixture supplied to the engine (the ideal ratio of air to gasoline is 14.7:1). A faulty oxygen sensor may send incorrect data to the control unit, resulting in damage to the catalytic converter.
Rattling sound due to mechanical damage
Sometimes rocks and debris thrown off the road can hit the catalytic converter and damage its internal components. Such damage is identified by dents on the outside of the converter. If the ceramic part of the catalytic converter is cracked or completely broken, a rattling sound will occur. Over time, this will block the catalytic converter and build up back pressure in the exhaust system.
Smell of gases
If the exhaust gases coming out of the exhaust pipe have a sulfurous odor, reminiscent of the smell of rotten eggs, this clearly indicates a clogged catalytic converter. When someone doubts that a decrease in engine power is due to a clogged converter, he only needs to sniff the exhaust gases. The cause of this problem is the improper composition of the air-fuel mixture. Unfortunately, this symptom is the last to appear. Finding a problem this late usually means the catalytic converter cannot be repaired. The car owner will most likely have to fork out money for a new converter.
Debugg
In any case, troubleshooting begins with the wiring of the DC and its connector, then the voltage value of the sensor signal is checked. And depending on the technical characteristics of the lambda, changes in parameters should occur within appropriate limits. And if it is possible to see the operation using a diagnostic tool, then we warm up the engine to operating temperature, watch for voltage changes, no, we take a multimeter in our hands and, connecting the probes to the corresponding contacts of the sensor, check the serviceability of the input signal circuit (measure between the positive contact of the sensor and mass). Then, having disconnected the power supply, we check the voltage for a minute; jumps should occur in a certain range depending on the operation of the engine. If this does not happen or the value is outside the limits, the oxygen sensor is faulty and must be replaced.
When changing the oxygen sensor, do not forget that you need to remove the terminal from the battery.
After replacing the sensor (by the way, you should remember that not all cars can replace the original DC with a universal one), clear the error programmatically or by removing the battery terminal for 10 minutes and let the car run for several minutes at full and partial load to make sure the error is eliminated, so It’s quite rare, but it still happens that P0134 is not associated with a failure of the lambda probe or a break. Then an analysis of the operation of other electronic circuit systems is required.
Author: Ivan Matieshin
Interruptions in the exhaust system of a car interfere with the stability of the engine. If error 0134 appears on a VAZ 2114, the driver should know that this is a faulty oxygen sensor. If he understands what this error means, knows how to identify the signs, and knows what to do, then in the event of a breakdown he can easily cope with the problem that has arisen.
How to resolve error P0031?
To correct the P0031 code, you need to get the diagnosis correct. To do this, you need to check the wiring and connectors leading to the oxygen sensor.
Also, if you have a heater relay and fuse, you might want to check those. Use a digital multimeter to:
- check for the presence of 12 volts at the input of the heater circuit (to do this, disconnect the sensor and check the voltage at the connector);
- check the continuity of the grounding circuit;
- measure the resistance of the heater circuit (checks the sensor itself);
- measure the resistance and voltage of the wiring.
Check your service manual to find out the correct specifications (volts, ohms) for your vehicle. On some Toyota vehicles, this code is triggered when the heater circuit resistance is below 0.8 A.
With that said, a common way to correct this error is to replace the No. 1 oxygen sensor on bank 1.
Please note that OEM (Original Equipment) sensors are recommended. Aftermarket DCs may be less reliable and of lower quality (not always, but often).
What happens if you ignore the problem?
If repairs are not made, the motor will become unstable. Black smoke will come out of the exhaust pipe. An unpleasant odor may appear in the cabin. Increased wear on spark plugs. These and other problems can lead to serious car damage.
Owners of a VAZ-2114 car may sooner or later encounter error P0134 appearing on the dashboard. What to do in this case? And what does this indicate? This indicates a malfunction or unstable operation in the oxygen sensor (and in some cases, other problems in the operation of the car).