Work progress
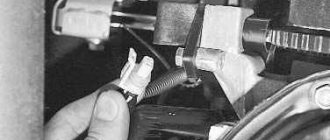
- Using a thin screwdriver, press the trim of the window handle away from the socket and move it so that the protrusion on it disengages from the socket. Remove the trim and window handle.
- Remove the socket.
- Using a screwdriver, carefully press out the lock of the plug and remove it from the inner handle of the armrest.
- Remove the two screws securing the inner armrest handle.
- After pressing the inner lock handle, turn the armrest handle up and remove it, moving the lock handle out of the armrest handle hole.
- Unscrew the lock button.
- Unscrew the screw securing the outside rear view mirror control mechanism handle and remove it from the lever.
- Remove the triangular trim by removing the two pistons that secure it from the door holes.
- On the rear door, unscrew the three fastening screws and remove the trim.
- The upholstery is secured with eight pistons, the location of which is shown by arrows on the front door and...
- ...on the back door. To remove the upholstery...
- ...using a screwdriver, press the upholstery so that the fastening pins come out of the holes in the door. Insert the screwdriver as close to the pistons as possible, otherwise you may tear the pistons holders away from the upholstery.
- Remove the spacer sleeve from the window lifter shaft.
- Replace damaged door trim fastening pins. To replace the piston, cut it off, then insert the protrusion of the new piston into the hole in the holder and, pressing the piston, turn it until it is fixed in the holder.
- Install the upholstery in the reverse order of removal. In this case, the threaded end of the lock lock rod should fit into the hole in the upholstery.
- Secure the pistons in the door with gentle blows of your fist.
- If the edge of the seal gets under the upholstery, carefully pull it out.
- If it is necessary to remove the front door pocket, unscrew the three lower and one upper screws (the upper screw is short) securing it and remove the pocket from the door. Install the pocket in the reverse order of removal.
Removing the tailgate of VAZ-2111 and VAZ-2112 cars
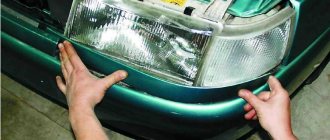
Replacing glass on VAZ-2110, 21102, 2112
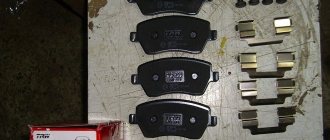
This is interesting: How to replace the front brake pads of a VAZ 2110
Replacement options
Drivers have several options for replacing door trim, each of which has its own advantages and is chosen based on taste:
- Eurocard;
- European cladding;
- panels from the manufacturer;
- independent re-upholstery.
Factory trims from AvtoVAZ are replacement kits for the original trim. They are made of plastic and additionally covered with decorative inserts. The advantages are the exact overall dimensions, ease of installation of clips, and compliance with the door dimensions. Frequently used sheathing kits Lux 1 or Lux 2.
With European cladding, the door lining is made of high-strength polymers and comes in a variety of colors. Manufacturers are small companies specializing in car tuning.
Self-upholstery does not require large investments and is within the capabilities of every driver. The material you can use is textiles, natural, artificial leather, velor, etc.
Options
There are several options for replacing door trim. Each of them has its own characteristics, advantages and, of course, the final appearance.
- Lux 1 and Lux 2. These are ready-to-install cards designed specifically for the domestic top ten. Depending on the design, these door cards are made entirely of plastic or with inserts made of fairly good quality fabric.
- Europanels. For some reason, in online stores such products are called Lux 2 door trim, although this is actually a little different. Regardless of the name, this trim looks great. But it has a serious drawback - high cost.
- With my own hands. The most budget option for replacing door trim. If you approach this issue competently and consistently, you can easily cope with the task without outside help. Today we will talk about them in more detail.
Required Tools
Any work involving repair or modification of a car begins with the search for the necessary materials and tools.
This list is mandatory; without it, it will be impossible to carry out work on replacing the door trim.
- Fabric or artificial leather, that is, vinyl. Buy them at fabric stores. Don’t forget to make replacements and calculations first to determine the exact amount of upholstery material needed. IMPORTANT! There should be an allowance of 5 centimeters on each side of the door. This significantly affects the total amount of fabric.
- Glue. Choose a proven adhesive that is sure to hold your new upholstery. It could be Moment, Master, Titan or something similar.
- Scissors. They will be used to cut upholstery material.
- Stationery knife. Something will definitely have to be cut off. In this case, a sharp stationery knife cannot be replaced.
- Construction hairdryer. It’s not worth buying it for one event to modify the car. Today this device can be rented.
- Brushes with high-quality bristles. One should be narrow, and the second should be a little wider.
- Antenna cable.
- Mounting clips. With their help you will attach fabric or leather. Be sure to buy extra, as these caps may break during installation. Also keep in mind that there are 8 pistons for each door.
- Self-tapping screws. Their size depends on the selected panels. If these are handmade products, you will need short, standard self-tapping screws. If we are talking about Euro panels, then purchase long screws.
- Speakers. New pre-fabricated panels include holes for speakers. So, in Lux 2 their size is about 17 centimeters. This is an excellent reason to install a new audio system in the cabin.
Article on the topic: How to change the release bearing on a VAZ 2109
How to remove the door trim of a VAZ 2110
Very often situations arise when you need to remove the door trim of a VAZ 2110. Either in order to install sound insulation, or to see why the window regulator does not work, or to install a speaker in the car door. So, in this article I want to show you how to do this quickly and without much difficulty.
I’ll say right away that performing this action is very simple, and you won’t need mountains of tools. Prepare only a knife (or flat-head screwdriver) and a Phillips screwdriver. I would like to warn you right away that it is advisable to buy new clips for the door trim, as they may break when removing the trim. Moreover, if you have already decided to remove the door cards, it would be a good idea to work on eliminating their creaking. You can read how to do this here.
Lada 2110 kinder surprise › Logbook › New Priora door on the VAZ 2110, as always with nuances =)
Hello everyone dear friends! It's been a while since we've met, I've become extremely lazy lately, so I've started procrastinating on new entries, but the work is slowly going on. As you know, after I finished with the body, my driver's door remained untouched. It was almost impossible to bring her into human form, and if you bothered and still made it, it would have cost more money than buying a new one. As we know, a new one costs 12k, I, like many, started by looking for a used one. I visited all the advertisements in my city, and the best thing I could find and buy looked like this:
I paid 3k for it. I bought it only because there really wasn’t anything better. After I looked at it all in more detail at home, I of course realized that I had made a mistake, that it didn’t suit me and I wouldn’t install it on my car. This option is for those who need to pour and sell. Yes, it can be sanded down, restored as I restored my 3 doors, but I confess to you after 1.5 years of building my car, I’m just tired of all this. In short, I put it aside and ordered a new door in color)
We begin the installation, remove the old door:
We rake out the entire braid of wiring that was previously placed on the ESP block
We throw it through the new door.
We adjust the gaps, set the locks, and check the color match.
It doesn't take an expert to not notice that the color of the new door is darker, but I knew what I was getting into. The reason for this is that I used diamond silver as a base, which gives a more saturated color, it’s just a primer. But the main thing is that the interiors are painted, and if anything happens, I’ll repaint the exterior if I get tired))) Now I needed to install something quickly, since it’s not comme il faut to drive with a rotten one. You can see that the factory took care of our comfort and added vibration isolation to our door)
But we are insatiable people, this is not enough for us) Katam to the fullest)
READ How to install a typing program on your computer
Source
Tools and materials
To reupholster yourself you will need to prepare:
- Sheathing material.
Experienced drivers recommend using vinyl, but keep in mind that the material shrinks significantly. Before purchasing, you must take measurements and leave at least 10 cm for allowances and internal bends. If genuine leather or suede is used, allow up to 5 cm for allowances.
- Scissors with a long blade.
- Glue. For repairs they use Moment, Master, Titan.
- A construction knife with a small blade and a sharp end.
- Construction or household hair dryer. It is not recommended to use a heating lamp as it may deform the material.
- Glue brushes: thin, wide.
- Set of clips.
For the VAZ 2110 they produce special sets of fasteners, the cost of a set of 10 clips is 30 rubles. Each door will require 8 clips. It is recommended to buy latches with a reserve. During installation, several clips often break, since the fasteners are consumer goods and the quality of the fasteners is not regulated.
- Self-tapping screws. If you use independent re-upholstery of the cladding on the old casing, then use standard short self-tapping screws; when installing factory casing or Eurocard, purchase a set of long self-tapping screws.
- Crosshead screwdriver.
- A thin screwdriver with a wide blade.
Lux 2 panels and Euro casings have standard places for speakers with a diameter of 17 cm. If the standard Lada audio system has smaller speakers, then you will need to select it to fit the size of the hole or add a rubber or plastic insert to the part to fit the speaker tightly to the mesh.
Dismantling
At a service station, a mechanic spends no more than 15 minutes to disassemble door panels. Self-replacement will go quickly if you adhere to the order of work and do not change the sequence.
Front doors
The work algorithm for the front and rear doors of the VAZ 2110 is slightly different. Before work, you must disconnect the negative terminal from the battery. If the standard trim is reinstalled on the Euro trim, then it is necessary to remove the window lifter lever.
How to remove the front door trim of a VAZ 2110 step by step:
- Wrap the screwdriver in a rag or cover the tip with electrical tape.
- Using a screwdriver, press the trim of the window handle away from its socket.
- Guide the screwdriver so that the panel comes out of the grooves.
- Dismantle the cladding and remove the socket.
- Using a screwdriver, press out the lock of the driver's door armrest plug.
- Remove the clamp.
- Unscrew the two screws that hold the handle.
- Press the inner handle of the armrest, turn it up, and remove the part.
- Unscrew the screw that holds the mirror mechanism and remove it from the lever.
- Remove the two fastening clips from their seat and remove the triangular trim.
- Carefully slide the screwdriver under the panel and unfasten the 6 clips.
If the driver's or front passenger's door is equipped with a power window, then after removing the handle lock, you need to disconnect the plug.
Rear doors
The differences in work when removing the door trim are based on the fact that power windows are rarely installed for rear row passengers. Removal of the rear door trim is carried out in the following steps:
- Use a thin screwdriver to pry the trim on the door handle and remove the part from the grooves.
- Unscrew the two bolts located under the trim.
- Carefully move the handle to the side, remove it from its seat, and pull it out.
- Unscrew the three screws securing the lower rear door trim panel.
- Remove the bottom panel.
- Unscrew the latch blocking the door from the inside.
- Pry off the cladding panel with a screwdriver; you can use a wooden wedge, bend it back and snap off the fastener clips.
The plastic clips must be reinstalled with new ones when assembling the updated door card.
This is interesting: What is the purpose of a turbine in a car?
Self-upholstery
Before directly reupholstering, it is recommended to check the condition of the inner door panel, remove pockets of corrosion, check or replace sound insulation, replace rubber seals, so the doors will open better. For VAZ 2110, the service life of door seals is up to 3 years. The process of re-covering a door part yourself step by step:
- Clean the outside of the card. You can sand it with fine-grain emery for better adhesion of glue and leather.
- Attach the door card to the material, cut around the perimeter, leaving at least 7 cm around the edges.
- Treat the outer surface with glue and the inside of the future cladding with glue. Apply glue according to the manufacturer's recommendations. If an adhesive composition is used, then after coating you need to wait up to 10 minutes.
- Place the vinyl on the door card, constantly heating the material with a hairdryer, and level the surface so that the leatherette fills all the curves of the part: the space for the speaker, for the central panel, the recesses for the handles.
- Cut out all the holes that are covered with vinyl in the door card from the center and not reaching the perimeter, carefully wrap it on the wrong side, making sure that the edges of the fold do not exceed 2-3 cm. Trim off the remaining vinyl.
- After gluing the card, trim off the remaining vinyl, leaving at least 3-5 cm on the inside of the card perimeter.
After the glue has completely dried, install the door card on the car in the reverse order, having first changed all the clips.
Installation of a ready-made kit
Re-upholstering the cladding yourself does not always help save time or money. If you don’t have time to do this yourself, then you can use ready-made cladding.
The set of door elements Lux 2 from AvtoVAZ has additional sound insulation, a set of standard fasteners, mesh for speakers and screws. Installing a finished panel takes up to 20 minutes for an inexperienced driver. When choosing a casing, choose original replicas; if the set contains only four panels, then the speaker grids, caps and screws must be purchased separately.
The lower part of the door trim needs to be screwed in only with long screws; if the standard kit offers short ones, then you need to change the screws yourself.
Installation of Lux 2 cladding in steps:
- Remove the old card.
- Attach a new panel, check the gaps and the alignment of the fastener locations.
- If the car is equipped with a mechanical window lift, then the panel needs to be modified. Lux 2 does not have a hole for the handle of a mechanical lift.
- Secure the trim to the clips.
- Tighten all the bolts and secure the outer trim panels.
Lada 2112 White Cloud › Logbook › Entry forty-three. Coverings from Priora part 1
I came across an advertisement - they offered to exchange the prior skins for stock 2112. I wrote to the guy, met, exchanged. Previously, I studied the question of whether the skins from the Priors are suitable for the 10th family without modifications? The answer is no! Arriving at the garage, I began to clean them and disassemble them. Here's what we have:
I cleaned, disassembled the rear trims, and painted them with matte black for the first time. The rear ones installed without problems. I took the front ones, installed them, and this is what I discovered. The trim prevents the door from closing completely.
I covered the torpedo with masking tape and started heating the casing. Having heated part of the casing and quickly closed the door, I got the following:
Then he repeated the “heat and close” procedure several times, took off the skin, and began sanding, puttingty, sanding again, puttingty. The putty was on plastic.
After all the sanding and puttying, I put the trim on and the door closed. Great! I took it off, took it apart, cleaned it, and also painted it matte black.
I did the same with the driver's trim. Result:
There is still a lot of work to do with them. I hastily painted it with a black matte so that the factory gray color would not be an eyesore. The next step is to reupholster the fabric insert and, most likely, paint the cards with liquid rubber. You also need to buy door handles from Priora. Move the ESP to the door, but to connect there are 2 options - either pull the wiring from the under-torpedo prior and install a “comfort block”, or buy a Kalinovka ESP block made by “Avar”. Naturally, I stop at the latter) Still to come)
Smooth roads everyone, and subscribe to dvinashka)
Source
Cost and types of finished skins
At a specialized service station, the cost of reupholstering a door trim starts from 3,000 rubles. excluding the cost of the door card. Depending on the model, in 2021 the following prices for ready-made kits for the VAZ 2110 remain:
- factory replicas from AvtoVAZ and KAMAZ - from 2300 rubles;
- Luxury cladding panels – from RUB 3,200;
- door cards Lux 2 for 16.8 cm speaker – 3500 RUR;
- plastic trim linings - from 300 rubles. thing.
Clips and nets for speakers must be purchased separately.
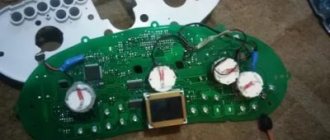
Tuning the dashboard and front panel
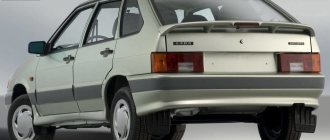
The front panel of the VAZ 2110 has been asking for a knife for about 20 years now. Oddly enough, even in 2114 the panel turned out more elegant. Therefore, many, without even understanding why, try to somehow put the panel in order. Of course, the most drastic method is to install a panel from Priora. It is not much better than the tenth one, but it looks a little fresher. True, this will require more serious investments than reworking the stock panel. Another, more budget-friendly option is to install the front panel from an Opel Astra from the early 90s.
It looks more functional, and no special modifications are required. Only one problem. Installing a non-original, non-Tolyatti panel immediately entails replacing the door cards. And this will make such a rework even more difficult financially. In principle, there is nothing complicated about this. You can fit both Opel and Prior door cards, if you wish. In the photo of the VAZ 2110, the interior tuning was carried out using this method as well. Moreover, if you carefully fit the Opel panel, the mosquito will not undermine your nose.
The dashboard is a completely different story. It ties it to the main panel not only in size, but also in shape. And you can change the appearance of the tidy with the help of new dials, at a minimum, or by completely replacing the instrument panel, of which there are quite a few in stores of this type. You can also experiment with lighting the tidy with LEDs. In the photo you can see several interesting solutions.