The starter in a car is designed to temporarily rotate the crankshaft until the engine starts. In good condition, the motor will seize within 2–3 turns.
The design of the starter is simple, and the principle of operation is intuitive. The main modules of the “starting device”: traction relay, drive system, electric motor.
Of all the units installed on a car, the starter is the most energy-intensive. At the engine starting stage, the mechanism consumes current up to 400 - 450 Amperes.
Problems with the starter, ways to solve them on Lada Kalina
Faults are divided into two categories according to the nature of their occurrence:
Electrical
Problems in the electrical power system are one of the most common breakdowns. We are talking about the section of the line from the battery to the starting device directly.
- Slow rotation of the rotor;
- Lack of response when current is supplied to the starting device (hereinafter referred to as PU);
- The control unit clicks, but does not turn: interturn short circuit, broken wiring, short circuit of the solenoid relay;
- Washing brushes;
- Anchor wear.
To exclude a number of other related breakdowns, you need to check:
- presence of charge in the battery;
- fixing the terminals on the battery contacts;
- integrity of electrical wiring in the area from the battery to the control unit;
- proper operation of the ignition switch core.
Mechanical
No cranking of the crankshaft when the launcher is running. In most cases, the problem is a faulty ring or overrunning clutch lever. Less commonly, defects in the flywheel and pressure spring.
A metallic grinding sound can be heard when the launcher is running - the flywheel teeth have been considerably worn out, worn out, or broken.
The most common failure is the continuation of rotation of the launcher after starting the motor. Cause:
- jamming, jamming of the spring, starter does not start;
- contact sticking;
- relay defect;
- jamming of the drive shaft;
- bearing wear.
Typical signs of unstable operation
- the starting device starts but not the first time. Reason: burning of the contact board of the traction relay;
- The launcher turns, but with great difficulty. Reason: wear of the brush assembly, wear out of the bearing;
- Delay of shaft disengagement. Reason: wear of the shaft teeth, bendix.
What is an engine starter
Any gasoline internal combustion engine is equipped with a part called a “starter”. This unit, that is, the starter, is a conventional electric motor. The voltage “+12 Volts” is supplied to it via one electrical cord. The body acts as the second wire.
There is always voltage at the supply terminal
A relay is mounted inside the starter, the contacts of which conduct the supply current. When you need to start the internal combustion engine, the contacts close. Let us immediately note: the voltage on the power wire always remains as long as the battery is charged. Therefore, before dismantling, be sure to remove the negative terminal from the battery.
Auto electricians know: when working with any equipment, the battery is completely disconnected from the network. It is easier to do this by disconnecting the negative terminal (you will need a flat key “10”).
If the battery is charged, but the starter does not turn, then first you need to check whether there is voltage at the contacts of the Ka-3 relay. This element is fixed in a single mounting block, and it is called: “Additional starter relay.”
Originals, analogues, articles and prices
The first modifications of the Lada Kalina were equipped with a starting device with the catalog number “21120-3708010-00” (KZATE). It was fixed to the block wall with three nuts.
After the release of the Lada Kalina with a cable-controlled gearbox, the method of fixing the PU changed to a screw one.
Original indexes:
- 21120-3708010-00;
- 21901-3708023-00;
- 21120-3708045-00 (KATEK, KZATE, ZiT);
- 21901-3708051-00 (VALEO) (8 valves);
- 21902-3708056-00 (VALEO) (16 valves).
For automatic transmission type: Jatco – 21902-3708135-00.
The cost of PU varies depending on the modification. Base price from 3100 rubles. On models with a new type of fixation from 3400 – 3500 rubles.
Foreign analogues are no better in quality than domestic ones. The cost is 10 - 15% more expensive. Manufacturers: Blue Print, Bremi, Febi, Bilstein, Fenox, Glaser (see photo).
Where is the starter installed in a Lada Kalina car?
Many car enthusiasts wonder where the starter is located. As in many other brands, the PU is installed in the engine compartment, fixed at the end of the block on the flywheel side.
Starter relay Kalina: checking the circuit yourself
The car starter is an important component, as it is responsible for starting the power unit. In this case, it is the starter that consumes the largest amount of electric current coming from the battery. Of course, in order to avoid problems with the battery, as well as with the process of starting the internal combustion engine, it is necessary to periodically check and inspect the starter.
If malfunctions in the operation of the starter are noticed, it is necessary to promptly respond to the symptoms of problems and eliminate the malfunctions. As practice shows, the starter can fail on different cars, regardless of class and manufacturer.
However, most often breakdowns occur on budget foreign cars and domestic cars. Next, we will look at what to do if the Kalina starter does not work, as well as how to check the starter relay, power circuit, etc. on a VAZ Kalina.
Lada Kalina: starter and checking its power circuit
So, in the case when the driver turns the ignition key to position II (start), while the starter does not work, in such a situation, breakdowns of both the starter itself and its activation circuit are possible. To check this, turn off the ignition, then disconnect the wire block from the terminal of the starter traction relay windings.
Then, using a screwdriver, you should bridge the output of the windings of the traction relay, as well as the tip of the wire, which is connected to the “plus” of the car battery. Please note that sparks may appear in the area where the terminals are shorted. It is important not to short the screwdriver to ground when the terminals are shorted.
So, if the engine crankshaft rotates, this will indicate that the starter itself is in full service. In other words, the starter can be completely excluded from the list of possible faults, since the problems arose in the starter activation circuit. If the starter does not turn the crankshaft, then the breakdown should be found in the starter or in the starter traction relay.
- Let's move on. Having detected a circuit malfunction, the Kalina starter circuit must first be studied. Afterwards, you can turn on the ignition, close the terminals and thus start the engine. Thanks to this method, it is possible to get to a service station or garage on your own.
If you plan to do a DIY repair on site or in a garage, a malfunction in the starter circuit may be caused by the following reasons:
- starter relay;
- power circuit;
- relay control circuit;
- ignition switch contact group;
It is quite obvious that it is necessary to accurately determine the reason why failures occurred and there is no current in the starter circuit. Let's start with the relay. Taking into account the fact that not all drivers know where the Kalina starter relay is located, we note that you must first find the mounting blocks (Kalina fuses and the starter relay mounting block). The block on Kalina is located on the left under the steering column at the bottom of the instrument panel.
Next, you should remove the starter relay from the block, after which the operating relay 902.3747-11 is installed for testing. Such a relay is located nearby in the block (window lift relay). If after installing the relay the starter starts to work, then the starter relay has failed. The problem can be solved with a simple replacement.
If the problem is not with the relay, you will need to check the power circuit, as well as the starter relay control circuit. To check the power circuit, the relay must be removed from the block. Afterwards you need to take a piece of wire for a jumper, which is inserted into the relay contact sockets (numbers 30 and also 87). Now you need to turn the ignition to the “start” position.
When the starter turns on, this will indicate that the power circuit is normal. If switching does not occur, the circuit needs to be checked. To do this, use a tester to check whether there is 12 volts in socket 30 of the starter relay when the ignition key is in the “start” position. As for the “minus” of the probe, on Kalina it is convenient to connect it to the bolt securing the door opening limiter.
If there is voltage in socket 30, then using a tester you need to check the serviceability of the circuit from socket 87 of the starter relay to the tip of the traction relay control wire. If there is no voltage at socket 30, it is necessary to check the circuit from terminal 50 of the ignition switch to socket 30 of the relay.
If the circuit is normal, the ignition switch contact group should be replaced. Note that if the starter power circuit is OK, you need to check the starter relay control circuit.
To perform such a test, the tester probe must be inserted into socket 86 of the starter relay, and the second probe must be connected to ground. Then you will need to turn on the ignition and perform a test. It is important to determine if there is 12V from the engine management system main relay in socket 86 of the starter relay.
Afterwards, the tester probes are inserted into the socket numbered 86 and 85, which allows you to check the “ground” in the relay socket 85 connected to the controller output (number 50). If the result is negative, you need to check the starter relay control circuits. The test involves diagnostics from the main relay of the control system and the output of the controller 50 to sockets 86 and 85 of the starter relay.
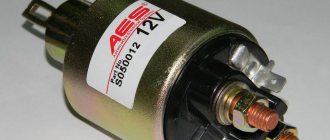
Lada Kalina: starter and traction relay
The diagnostics discussed above make it possible to determine whether it is necessary to replace the starter on Kalina or whether the problem is in the power and control circuits. However, that's not all. In addition to circuits and power relays, there is also a so-called starter traction relay, which can fail.
Please note that on Kalina the starter is not in the most convenient place, and the traction relay is installed on the starter itself. The main task is to synchronize the starter circuits when starting the internal combustion engine, as well as redistribute the current between the starter motor and the relay electromagnet.
This relay also supplies the Bendix gear to the teeth on the flywheel crown. After the engine starts, the relay moves the Bendix gear to its initial position. For this reason, the starter solenoid relay is often called a solenoid relay.
- As for malfunctions, the starter relay operates with high voltage, which sooner or later disables it. The contacts of the starter relay burn out, the holding or retracting winding may break, the return spring is deformed, a short circuit occurs in the windings, mechanical damage occurs, etc.
Replacement and installation of starter
After we clearly understand the location of the part, we proceed to dismantle it. We check the availability of a set of tools, rags, additional lighting, lubricants, screwdrivers.
For the convenience of carrying out work, we install the machine on an inspection channel; it can be hung with a hydraulic lift, if available.
- Open the hood, disconnect the terminals to avoid a short circuit on board;
- We unscrew the air filter cover, remove the element, and also dismantle the plastic housing. It is fixed at the bottom with three screws around the perimeter;
- Using a key set to “13”, unscrew the nut from the positive terminal. Remove the terminal;
- Using a “15” wrench, unscrew the three nuts that press the PU to the wall of the block. We remove it through the engine compartment.
Some craftsmen practice removing the starter from under the bottom of the car. As they say, “it’s not for everyone”, depending on who is more comfortable and depending on the design of the technical device.
After dismantling, we install a new control unit and assemble the structure in the reverse order. There is an alternative option: dismantling the faulty starting device, carrying out troubleshooting, and installing it in its original place.
The last method is the most economical, since purchasing a new starter is not always rational and not everyone can afford it. Sometimes it is enough to replace the brushes and the PU is working properly again.
Replacement technology
Bushings
If the replacement is not the first time, then the bushing can be inserted quite easily by hand. But during long-term operation, this can lead to it turning in the mounting hole. Over time, the mounting hole will break up, forming the so-called eccentricity, and the starter shaft may become misaligned. This means that the starter will stick and the engine will not be able to start. However, this is quite easy to fix. To do this, it is necessary to determine the size of the so-called eccentricity. Then you need to machine or order from a specialist a bushing with a larger outer diameter just to fit the eccentricity. You should solder some solder on the side of this bushing. After this, the bushing will fit in with a slight interference fit.
How to start a car without a starter
If the starter on your car is faulty or the battery is dead, then the car can be started in other ways.
You can try to start the car from a tow, from a hill, etc. turning on the ignition and second gear, this method is relevant for both a dead battery and a broken starter. These manipulations can only be performed with a manual transmission.
If the starter rotates but does not turn the engine, then the solenoid relay is most likely faulty. With such a malfunction, the engine can be started quite simply, just turn on the ignition and bridge the contacts on the solenoid relay, as shown in the picture, and the engine will start.
Prices for the original Lada Kalina starter can reach or even exceed 4,000 rubles. There are a large number of analogues on the market at prices starting from 2000 rubles, but the quality of such parts leaves much to be desired.
Removal and disassembly of the starter
Many experienced motorists practice dismantling the starter on Kalina from under the car.
The following tools and devices will be needed for work:
The process of dismantling the device.
Installation should be done in reverse order.
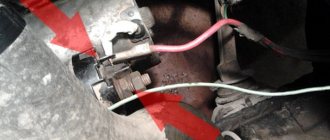
Important point. The wire to the traction relay is connected not with a screw connection, but with a regular Soviet connector. This is a big drawback, since such a terminal is not protected from moisture in any way, and the wire itself is too short and strained. The consequence is that it constantly breaks off or oxidizes.
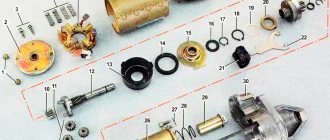
Disassembly and reassembly
In most cases, the starter is disassembled for cleaning or replacement:
Disassembly is done like this:
Next you need to carry out proper troubleshooting. First of all, inspect the anchor. You should check its winding and the external condition of the lamellas. Carefully treat areas with charred parts with fine grain sandpaper. If there are many traces of burning, the anchor will have to be replaced with a new one. Scratches and minor scratches are recommended to be sanded using the same sandpaper.
Advice. The surfaces of the lamellas can be effectively processed if you hold the anchor in an electric drill or screwdriver and run it with sandpaper at low speeds.
Using an ohmmeter, measure the core and windings for breakdown. Pay careful attention to the ends of the coil - they should not be torn from the lamellas or damaged. Windings with traces of burning or separated varnish insulation - urgently need to be replaced! If the technical cardboard inside the stator is wet, you need to dry it with a hairdryer.
You should also replace the brush holder assembly if there is wear on the holder, tension system or brushes. Be sure to clean the structure from old dirt - solvent helps in this matter. Brushes are considered normal if their size is within 6-7x13 mm. Installation of new elements into the holders may be complicated by the influence of the retaining springs.
Disassemble the solenoid relay and clean the nickels. You need a powerful soldering iron for large parts. The main difficulty of this operation is reassembly. It’s important to remember what was there and where. In some cases, nickels are turned backwards.