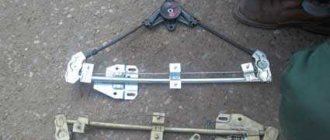
The standard configuration of the VAZ 2109 does not include a cabin filter. The air is directly captured by the stove fan from the air supply box.
Because of this, the heater becomes filled with large debris, for example, fallen dry leaves. Smaller particles easily enter directly into the cabin. Road dust and pollen settle on the dashboard and other elements inside the car, and the driver and passengers are forced to breathe unfiltered air.
To solve the problem, some car owners put a plastic grille with a small filter element on the heater fan casing. This cleaner from the VAZ 2115 does not fight dirt well and quickly clogs. Therefore, most car owners make their own or purchase a ready-made special adapter. A regular or carbon cabin filter from another vehicle is inserted into it. As a result, the driver only needs to periodically blow out and change the filter element.
DIY adapter for cabin filter
Greetings!
I probably won’t surprise anyone with this post, but I’ll try to reveal some points and nuances... Having read about what a useful thing the cabin filter adapter is, I decided to make it myself, especially since all the components for this are available. During the manufacturing process I made some changes that I came up with myself. The adapter is made of used galvanized steel with a thickness of 0.5 mm, it had a little traces of rust, which I cleaned off with a flap wheel on a grinder, treated thoroughly with a converter, then primer and paint 2 layers. The seal used is E-shaped with self-adhesive.
All parts were fastened together with 3 mm bolts, the parts were connected with 4 mm bolts. The fastening to the body is the same screws that secured the stock visor. Of course, I had to spend a lot of nerves, especially during installation))). In the end I was very pleased))). I should note that all changes and adjustments were made in relation to a Ukrainian-made car))).
Costs: filter - 60 UAH, seal (2 meters needed) - 10 UAH.
To begin with, I printed out the drawings provided by TsarOff-Kh at a scale of 1:1. Then I transferred it to cardboard (for making a model) in a slightly non-standard way - using a needle using the *puncture* method))). This achieved minimal distortion.
Everything was used - cardboard for tights. It is convenient to connect the holes from the needle with a handle, it turns out quite accurately.
All details are cut out.
Rear part assembled.
The middle part with the frame. The red circle shows a unit that was assembled incorrectly; everything is corrected in the photo below).
Front part, or frame.
From a different angle.
The pieces were then transferred to metal and cut out. For bending, I used 2 corners with smooth edges and clamped them in a vice. He bent it through a straight birch strip, hitting it with a hammer. The quality of the bends is excellent. Before priming, the parts were pre-assembled to make sure everything fits properly. Then I took it apart and primed it.
Small modifications - I rounded the corners on the frame so as not to scratch anything, I bent the *tails* on the parts a little to make something like a *lock*. To do this, when cutting out metal, add 5 mm in advance. stock.
Painted it. Here it should be noted that due to the fact that the parts were carefully cut out and precisely joined, there were no gaps between them, which made it possible to do without sealants and silicones))). It was enough just to paint over the joints of the connection so that there would be no hint of gaps.
As a sealant I used auto plasticine, which was on an old plastic visor.
Assembled. When trying it on, it turned out that the adapter did not want to fit into its place; if the back part somehow fit, then it was impossible to fit the rest. The red lines show where I ground off 3 mm. At the bottom I had to grind only on the left. In the circle - where to bend it, because it rests on the bulges of the engine compartment shield.
Assembled, E-seal in place.
Filter with seal.
Before installation, I immediately removed the plastic grille, sealed the edge of the metal underneath it, as well as the surface of the adapter seat and around it, since during the fitting process I slightly scratched the protective layer.
This side of the adapter is slightly higher in relation to the windshield frame (this is how the car is designed), so it is in this place that you need to lift the frame by approximately 10 mm in order to place the outer part of the adapter under it.
Here he is finally in his place. All that remains is to put a piece of seal on top, but it’s not there yet...
Well, for dessert, a small revision of the drawing (if I allow myself to get smart))). 1. It is not clear why the size of the folded shelf is only 6 mm, it seemed small to me, I made 10 mm, which I did not regret at all, a larger contact area means better sealing. 2. The meaning of the 7.5 mm cutout is unclear. wide and rectangular in shape.
I made it trapezoidal to avoid straight sharp corners. After trying it on, it turned out that it was not necessary to do it at all, again due to better *adhesion* of the adapter surface to the installation surface. But it was already too late, I didn’t want to redo it. All recommended changes are green))).
Author; Dmitry Zobov Alchevsk, Ukraine
How to replace the cabin filter?
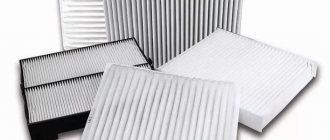
The cabin filter is a rectangular frame that can be made of high-density cardboard, plastic or non-woven material. In the middle of the frame there is a filter element made of different materials, for example, paper or fine-fiber non-woven material. And along the perimeter of the frame there is a seal.
Experts and car manufacturers recommend changing the cabin filter every 10,000 kilometers. They explain this by saying that over time, a layer of dust accumulates on the surface of the filter paper, which is an obstacle to the heater fan drawing in the required amount of air.
So, the fact that your cabin filter is dirty may be indicated by the lack of fresh air in the cabin, fogging of the windows in the car, poorly functioning air conditioning in the summer, or poor supply of warm air to the deflectors in the winter.
This happens less often in foreign cars due to the fact that many automakers, especially Japanese ones, simply do not install a cabin filter in their cars to avoid glass fogging and other problems.
But this does not mean that there won’t be dirt - there will be, it will just penetrate deeper - into the air conditioner evaporator, and installing a cabin filter yourself won’t help here anyway. The only thing that can be done in such a situation is to dismantle the air conditioner and clean it, having first pumped out the freon from it.
If the cabin filter is present in your car and is dirty, then it is better to replace it with a new one.
How to replace the cabin filter with your own hands, instructions
The first step is to start by dismantling the windshield wiper arms and plastic “protection”. For injector “ten” engines, you initially need to remove the sound insulation (it’s located on the left), located between the engine compartment and the heater, but on the right side, dismantling is not required.
Then you should get rid of the mounting brackets, for which we unscrew the two screws located at the bottom and move the air collector cover to the left and remove it.
On the front side of the heater you will see a rounded protrusion, which is located in the center, and at the top there is an air collector hole. Older car models in this location have a recirculation switch cover, which also needs to be removed. Now you can begin to directly remove the old cabin filter and install a new one.
Replacing the cabin filter video
Installing a cabin filter on a VAZ 2109 and improving it
A filter for the air entering the car interior through the ventilation system (or air conditioning system) has long been present in all modern cars. Unfortunately, the VAZ 2109 does not have a cabin filter. The air is taken directly by the heater fan from the air supply box, also called the “swamp,” and therefore fallen leaves and other debris flying from the road fill the heater. And smaller particles - poplar fluff and simple road dust - also fly straight into the cabin, which is why the instrument panel in the Nine is constantly dusty, and the passengers and driver breathe in all this. There’s no need to even talk about foreign odors like car exhaust.
How often should you change the cabin filter?
A dirty and clogged filter not only contributes to the formation of an unpleasant odor in the cabin, but also reduces the service life of the heater fan motor. Therefore, replacing the cabin filter of the VAZ 2109 must be done on time. The filter installed inside the cabin well protects the inside of the car from plant pollen, and this reduces the likelihood of an accident. This is due to an allergic reaction of dust to a driver suffering from such a disease. When you sneeze, you lose control of the car, which can lead to an accident. The filter instructions indicate signs of product replacement:
- The air flow is greatly reduced, which leads to poor interior cooling in summer and unsatisfactory heating and fogging of the windshield in winter.
- The cabin filter usually has the shape of a rectangle, and is located in a frame or without it.
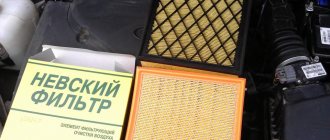
What does a VAZ 2109 cabin filter look like?
In nature, there is some kind of cabin filter for cars from the VAZ 2109 series: this is a plastic grille with a filter element attached to it, put on the heater fan casing at the air intake point. This filter is standard installed on VAZ 2114, 2115.
However, it would be hard to call this design a full-fledged cabin filter - with the filter installed, the air flow from the heater deflectors is significantly reduced, and it mainly protects only from large particles. That is, in fact, this device works as an anti-dust filter. Therefore, the idea arose to find a more suitable device that could perform the functions of a cabin filter in the VAZ 2109 or improve its performance.
Replacing the cabin filter in a VAZ 2114 car
Filters are very important elements of any car. Periodically, the oil, fuel, and air filters must be changed to ensure normal operation of the machine.
Every modern car is equipped with a cabin ventilation system. It is designed to ensure that people in the car breathe clean air. It is sucked in by a fan from outside and circulates throughout the cabin. As you know, street air contains a lot of impurities. And if it arrived at the salon in this form, then comfort would be lost. To prevent dust and foreign odors from entering the ventilation system, a cabin filter is designed.
1 Cabin filter: when to change?
The VAZ 2114 car is equipped with such a filter, unlike some models of the domestic automobile industry. Over time, the cabin filter becomes dirty and needs to be changed. Indications for replacement are:
- air flow from the vents has become weak;
- the appearance of dust in the car interior;
- unpleasant odor when the fan is operating;
- constant fogging of windows.
It is better not to wait for these unpleasant signs to appear, but to change the cabin filter in a timely manner. The instruction manual for the Lada Samara does not say anything about the frequency of replacing the filter element or about the cabin filter itself. Accordingly, there is also not a word about how to change the filter insert.
Based on the experience of other car owners, the filter must be replaced every 7–8 thousand kilometers. You can do this yourself without resorting to the help of specialists. Everything is quite simple, but a little inconvenient. Let's talk about the whole process in order.
2 Replacing the standard cabin filter
The cabin filter is located under the hood, namely in the central part under the windshield. It is worth noting that filters were not installed on the old Lada Samara 2114 (until 2007). Therefore, if there is no black cover in the indicated location, then your car is not equipped with an air purifier.
Similar articles
Before replacing the filter element, you need to prepare the following set of consumables and tools:
- New filter. The article number for paper consumables is 2114-8122010, for coal consumables - 2114-8122020. You can purchase imported analogues instead.
- Phillips screwdriver.
- Sealant.
When everything is ready, you can start working. It can be done both in the garage and outdoors. The whole process takes up to 20 minutes and consists of several steps:
- It is necessary to clean the casing and the engine compartment next to it from dust and dirt. This can be done with a brush or vacuum cleaner, or better yet, use both.
- After this, you need to remove the frill (the strip under the wipers) and the rubber seal.
- Then, using a screwdriver, you can unscrew the bolts around the perimeter of the casing. Next, the plastic plugs are removed.
- Now you can remove the cabin filter housing.
- The filter element, which is located in the upper part under the casing, must be removed and discarded. There is no point in cleaning it.
- A new element is installed in place of the old element.
- Everything is put together in reverse order. A sealant must be applied to the area where the casing comes into contact with the body.
Why do you need an adapter, how to make it yourself and install it
A solution was found: this is a cabin filter adapter from a VAZ 2110 for a VAZ 2109. This adapter can either be ordered online from the manufacturer, or you can design it yourself. For those who want to save money, here you can get drawings and patterns for making an adapter with your own hands.
Installing the adapter is simple: it is installed instead of the standard stove motor casing using standard mounting holes. It consists of two parts for ease of installation in limited space in the air supply box. A VAZ 2110 cabin filter is installed in the installed adapter. The area of the hole through which air is drawn into the cabin is larger for such an adapter than for the standard casing, and therefore the weakening of the air flow going into the cabin, if noticeable, will be very small .
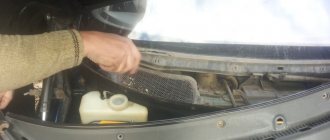
Before installing a purchased or home-made cabin filter adapter, it is advisable to clean the entire heater of debris: if you did not have any protection on the standard casing, there may be quite a lot of it there. You can remove accumulated debris from the bottom of the stove body using a home vacuum cleaner by removing the stove motor and inserting the vacuum cleaner pipe into the opened air intake hole. Then you should install a filter or replace the existing one.
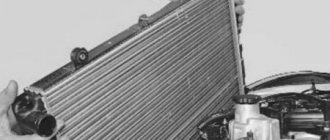
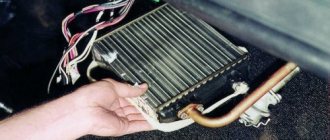
If you have a type “B” heater (see figure), in order to reach the bottom of the stove, you need to move the central damper to the “hot air” position. It would also be a good idea to clean the heater radiator - if the radiator is clogged and there is a cabin filter, the windows in the car may fog up.
Video about replacing the cabin filter and installing a new one in the adapter unit
How to solve a problem
Obviously, polluted air inside the VAZ 2109 is a serious problem for car owners. In such a situation, it is impossible to leave everything as it is. Measures must be taken to eliminate this deficiency.
An adapter was developed especially for nines - this is an analogue of a cabin filter, presented in the form of a plastic grille with filter elements attached to it. Installation is carried out on the heater fan casing in the area where air is taken in.
Adapter
Many people believe that installing an adapter is a complete replacement for a standard cabin filter. But how can you completely replace something that is not in the car?! This is a kind of modification that will lead to a narrowing of the air flows coming from the stove deflectors. This measure will protect against large debris, that is, we get an anti-dust component.
The positive qualities of the adapter include its accessibility, effective resistance to dust, and protection against the accumulation of deposits on the dashboard, upholstery, and glass.
Adapter Location
Cabin filter VAZ 2109
The standard configuration of the VAZ 2109 does not include a cabin filter. The air is directly captured by the stove fan from the air supply box.
Because of this, the heater becomes filled with large debris, for example, fallen dry leaves. Smaller particles easily enter directly into the cabin. Road dust and pollen settle on the dashboard and other elements inside the car, and the driver and passengers are forced to breathe unfiltered air.
To solve the problem, some car owners put a plastic grille with a small filter element on the heater fan casing. This cleaner from the VAZ 2115 does not fight dirt well and quickly clogs. Therefore, most car owners make their own or purchase a ready-made special adapter. A regular or carbon cabin filter from another vehicle is inserted into it. As a result, the driver only needs to periodically blow out and change the filter element.
How to solve a problem
Obviously, polluted air inside the VAZ 2109 is a serious problem for car owners. In such a situation, it is impossible to leave everything as it is. Measures must be taken to eliminate this deficiency.
An adapter was developed especially for nines - this is an analogue of a cabin filter, presented in the form of a plastic grille with filter elements attached to it. Installation is carried out on the heater fan casing in the area where air is taken in.
Adapter
Many people believe that installing an adapter is a complete replacement for a standard cabin filter. But how can you completely replace something that is not in the car?! This is a kind of modification that will lead to a narrowing of the air flows coming from the stove deflectors. This measure will protect against large debris, that is, we get an anti-dust component.
The positive qualities of the adapter include its accessibility, effective resistance to dust, and protection against the accumulation of deposits on the dashboard, upholstery, and glass.
Adapter Location
Article number and cost of filter for VAZ 2109
The simplest option for air purification is to install a plastic grille with a filter element. It is attached to the place where the air is captured by the fan. This filter is standardly used on older generations of VAZ, for example, 2114 and 2115. The price for such a consumable is about 100 rubles, but its air purification efficiency is extremely low. In this case, the filter becomes clogged very quickly and often requires replacement.
If the car owner has installed an adapter, then the filter element is selected in accordance with the seat. The most common consumables with catalog numbers are:
- 11180-8122010-00;
- 11180-8122010-03;
- 11180-8122010-01;
- 11180-8122010-82;
- 11180-8122010-08.
The article number of the cabin filter used may differ depending on the seat in the adapter. The cost of consumables fluctuates around 300-500 rubles. You can find out more about the possible options for filter elements in the table below.
Table - Cabin filters suitable for VAZ 2109
How to clean the air inside a VAZ 2109 car
A device resembling a cabin filter is built into the VAZ 2109 car. This is a plastic grille with filter elements attached to it. It is put on the heater fan casing in the place where it takes in air. Such filters are installed standard on the VAZ 2114, VAZ 2115 models. But it cannot be said that such a device is a complete replacement for the cabin filter on the VAZ 2109. In this case, the air flow from the heater deflectors is greatly narrowed, and it only protects from large particles. In fact, the device is an anti-dust filter. Replacing the cabin filter on a VAZ 2109 with an adapter from a VAZ 2110 car has become the most acceptable solution to the issue of cleaning the air in the cabin. The adapter can be purchased from the manufacturer or made by yourself. The device retains dust well and prevents its deposition on the control panel, the inner surface of the glass, and the upholstery. And most importantly, the driver and passengers will breathe clean air, free of dust and odor.
It will be useful: Replacing the hall sensor of a VAZ 2108
How to install an adapter on a VAZ 2109 car
The device is installed instead of the standard heater motor casing. Existing fixing holes are used for installation. The product consists of two parts, which facilitates its installation in the limited space of the air intake box.
Tip: When installing the adapter, the interior fan does not need to be removed.
Work order:
- The hood lid rises.
- The screws securing the frill are unscrewed.
- The side of the frill is removed from the visor.
Replacing the cabin filter of VAZ 2109
- The rubber seal is removed from the partition that separates the air intake box and the engine compartment.
- The screws securing the standard casing are unscrewed.
- The casing is removed.
- The back of the adapter is installed in place.
- The front part of the device is mounted.
- Both parts are fastened with fastening brackets.
- The frill side is put in place as shown in the photo.
Installing a frill side on a VAZ 2109 car
- The adapter is attached with self-tapping screws to the seat.
- A rubber seal is placed on the side.
- A filter is inserted into the adapter.
Why is replacement needed?
The main reason for replacing the cabin filter is dust. The most active period of pollution is summer and spring. The weather is dry, and therefore a very large amount of dust forms on the roads and on the street.
Obviously, the replacement is carried out in order to increase the efficiency of cleaning the air that we breathe while inside the car. If you ignore the need to change the filter element, you will soon begin to inhale large amounts of dust and microparticles that can cause diseases of varying degrees of complexity.
Young children can develop serious allergies if they constantly drive a car with an old cabin air filter. Therefore, this is primarily a health issue.
Price issue
This entails the need for certain costs to purchase two filters per year. But there is no need to worry, since the price of a regular filter component is only 150 rubles. A higher quality carbon filter costs a little more - 300 rubles. It's a small price to pay to stay healthy and comfortable inside your car.
Signs for replacement
If the filter becomes dirty or clogged, it will no longer be able to protect against dust, dirt, and unpleasant odors inside the car. Plus, a worn filter element negatively affects the heater fan motor; it wears out faster.
All this indicates the need for timely replacement of the device. If this is not done, you risk developing an allergy, as well as soon spending money on repairing other components that directly depend on the condition of the cabin filter.
If, after replacing the filter, unpleasant odors still continue to appear inside the cabin, you can use chemical compounds that are poured into the system and forcefully remove dirt. If this does not help, you will have to completely disassemble the system, manually clean it and put it back together.
Impregnated with activated carbon
Adapter
Alas, the quality and efficiency of the standard cabin filter provided for the VAZ 2114 leaves much to be desired.
Essentially, it is a strip of filter material that is located between two plastic grilles. The effectiveness of this design is insignificant, which forces car owners to take certain measures.
The best measure is to install a filter adapter. Making it yourself is not difficult, although there are other ways to obtain this design.
Adapter drawing example
Thanks to the adapter, it becomes possible to install a truly effective air purifier for the cabin, which retains the smallest particles and does not allow the driver and passengers to breathe dust.
Externally, the adapter is an improved housing for the interior ventilation system with a filter built into it. The design consists of two elements - the rear and the front. A filter is inserted into the rear component, and the joints between the adapter parts are sealed with rubber gaskets. This ensures the necessary tightness. The design nuances will allow you to avoid moisture penetration even when washing the car.
When planning the installation of the adapter, experts strongly recommend using a pleated cabin filter borrowed from the VAZ 2110.
The simplicity of the adapter design makes it possible to replace the filter with your own hands in the shortest possible time. And during installation you do not have to remove the heater. So this is an ideal solution to significantly improve the ventilation system of your VAZ 2114.
Options for obtaining an adapter
If you have made the right decision that you want to get an adapter for your VAZ 2114, you need to decide how exactly you will get it.
There are three main options for this.
Option
Advantages
Flaws
Buy a device in the online store
You get a high quality device, made of thick metal and powder coated
The high cost of the product itself, plus equally expensive delivery
Order from those who make them with their own hands
The purchase will be much cheaper compared to an online store
If desired, you can make such a device yourself, spending only on consumables. Quality may be poor
Do it yourself
Significant financial savings, the ability to produce a truly high-quality adapter. You will know what it is made of and how
You will have to spend a lot of time and effort on manufacturing
You should start making your own adapter only if you are completely confident in your own abilities. Spend the money you save on purchasing a high-quality carbon filter from a VAZ 2110.
Making the adapter
The instructions for creating an adapter with your own hands are quite simple. Another question is how accurately you can implement your plans.
- Find diagrams to create an adapter. Now there are many of them on the Internet. Just keep in mind that you need an adapter specifically for the VAZ 2114.
- Make a layout out of paper so that you understand exactly where each part goes and how they are connected to each other.
- Stock up on the required amount of stainless or galvanized steel. Some people use plastic, but it is a little more difficult to work with, plus it can cause problems when getting bends.
- Cut out the necessary adapter elements from the material, guided by the drawing and layout.
- Use a vice and mallet to make bends. The walls will be thin, so do not use a metal hammer. It is better to take a wooden or rubber mallet.
- The parts are connected using M3 bolts or rivets.
- The advantage of rivets is that you do not need to drill holes in the metal. But they also have a drawback - a high probability of damage to a thin sheet of metal.
- At the last stage, carefully treat all joints, connections and holes with sealant. This will allow the structure not to make unnecessary noise while driving.
Finished design
The manufacturing process will take at least 6 hours. Plus, you will additionally have to spend time studying diagrams, drawings and creating a layout. So be patient.
Installing the adapter and filter
Well, now you can proceed directly to installing the entire structure with a new effective carbon filter.
Installation with adapter
- Wait for the sealant on your adapter to dry completely.
- Select a cabin filter that suits your requirements or financial capabilities.
- When choosing between a reusable and disposable filter, experts advise choosing the latter. Although reusable ones can be cleaned, disposable ones have a long service life, plus the cost is significantly lower. Buying reusable filters is an imaginary savings that negatively affects the quality of air purification.
- Remove the old filter. To do this, you need to lift the hood and disconnect the rubber seals from the clips.
- Using a screwdriver, remove the mounting screws and remove the plugs.
- Remove the frill.
- Remove the mesh from the plastic element.
- Take out the old filter.
- Clean the seat so that your insert fits firmly and securely.
- Treat the adapter with glass sealant, taking care to seal all cracks. Otherwise there will be no point in installing it.
- The installation sites, or rather the contact between the adapter and the body, must be treated with automotive sealant. Just don't use silicone compounds.
- Next, install the rubber seal over the adapter, which will protect the hood trim.
- Insert a brand new cabin filter into the stainless steel structure.
- Perform the reassembly procedure.
The new type of filters are designed for approximately 30 thousand kilometers. But if the operation of your car involves regular driving on dusty roads, it is better to change it more often - twice a year.
Such modernization of the air purification system in the VAZ 2114 cabin significantly increases its efficiency. You breathe truly purified air and stay healthy.
Unfortunately, many consider this an unimportant point. But when every time you get into the car, you start coughing, sneezing or choking, inhaling dust, you will probably think about the need to change not only the filter, but also install an adapter for it.
Types of cabin filters
There is no official classification of products designed to provide high-quality protection of the car interior from dust and other pollutants that are abundantly present in the atmospheric air. However, experts distinguish two large subgroups of cabin filters:
- conventional dustproof ones, the main task of which is to prevent microparticles of a certain size from entering the cabin;
- coal, designed, among other things, to prevent external odors and substances harmful to human health that are in a gaseous or suspended aggregate state from penetrating into the car.
Conventional filters are made from special paper or synthetic fibers. The first such car filters were single-layer, but now the de facto standard is the presence of two layers: the first carries out rough cleaning, preventing small twigs, insects and other contaminants of similar sizes from penetrating further. The second layer performs final cleaning of the inlet air flow from fine particles and dust.
The advantage of carbon filters is their ability to resist the penetration of unpleasant odors from outside. This is achieved through the use of certain additives and activated carbon in the third layer. As is known, activated carbon is an excellent adsorber that qualitatively absorbs a wide range of volatile substances. It also does not allow the passage of the smallest particles of soot present in car exhausts, as well as powdered rubber - the result of abrasion of car tire treads on the road surface. A carbon filter can be distinguished from a regular one purely in appearance: it has a darker color, while a regular one is made from white synthetic fiber or special paper.
Domestic car enthusiasts are used to saving on everything they can. Even if he belongs to the category of very disciplined drivers, accustomed to performing all maintenance operations on time. In particular, it is not uncommon to reuse cabin filters after cleaning and washing them. There are also individuals who do not want to spend even 500 rubles on this consumable, preferring to make it from available materials - foam rubber, padding polyester and the like. Such a replacement of the VAZ-2112 cabin filter, as a rule, is characterized by extremely low efficiency - homemade filters retain no more than 20-30% of dust, which makes such an operation pointless.
Cabin filter adapter for VAZ 2114
Owners of VAZ 2114 cars often complain about the carelessness and short-sightedness of the domestic manufacturer. In their opinion, some systems of the fourteenth Samara model have specific shortcomings. Take, for example, the cabin filter of a car, which receives the most complaints. It consists of a strip of filter material placed between two plastic grids. The configuration of such a flimsy filter is capable of retaining only the largest debris, allowing all other small particles of dirt and various gaseous compounds to enter the cabin.
Types of cabin filters
These products are usually divided into two large subcategories:
- conventional dust filters designed to filter the external air flow from small debris and dust. They consist of two layers of special filter paper or synthetic fiber: the first is for rough cleaning, the second is for finishing. Such filter elements cope with their task perfectly, preventing dust from entering the cabin;
- Carbon filters contain a third protective layer containing activated carbon. Thanks to this, such a filter is able to retain (adsorb) many volatile substances and microorganisms, protecting the interior from the penetration of unpleasant odors from the outside, and also preventing many pathogenic bacteria from entering the car.
The efficiency of cabin protection of modern filter elements is about 95%, and this is a very good indicator. It is almost impossible to achieve absolute purification by filtration, since as the density of the filter paper increases, its ability to pass air deteriorates.
By the way, with the ventilation system turned on, in just one hour about 200 thousand liters of air pass through the VAZ-2114 cabin filter - you can imagine the load placed on it and why it is so important to maintain good throughput of the filter element. Unfortunately, over time, filtered debris inevitably clogs the pores of the paper, which becomes the reason for the need to periodically replace the cabin filter.
Note that many owners of 2114 consider the original filter element to be insufficiently effective, upgrading it by installing an additional fabric layer. This certainly improves the quality of filtration, but at the same time it worsens the air flow, and this causes more harm than good.
So such experiments should be abandoned. Moreover, if you are not satisfied with the original filter, it is quite possible to purchase a non-original product
Moreover, a filter element from another brand or model may well be suitable - the main thing is that it matches in size (critically important - in width and height, the thickness may be slightly smaller or larger). Due to its low cost (around 200 rubles), most VAZ-2114 owners prefer the VF-014 product, which is not a carbon filter
What does the cabin filter adapter look like and what functions does it perform?
The cabin filter adapter allows you to install a modern cleaning element in your car that will retain dust and prevent it from settling on the inside of the windshield, dashboard and interior trim.
The product is a modernized casing for the cabin ventilation system with the function of integrating a cabin filter from VAZ 2110 cars. It has a detachable metal structure, consisting of two parts - front and rear, into which the filter is installed. The joints of both parts of the adapter are sealed with rubber gaskets, which improve the tightness of the structure and prevent moisture from entering the interior blower fan. The lower plane of the adapter is also treated with the same seal. The sides of the front part are responsible for keeping the filter dry when it rains or when washing the car. The location of the adapter in the car ensures that the filter is installed forward in the direction of travel of the vehicle. This orientation of this design allows the installation of a pleated cabin filter of the tenth Samara family. At the same time, removal and installation of the filter component for its periodic cleaning and replacement can be done in a few seconds. The adapter can be installed on cars with various modifications of the standard casing, and all thanks to the universal fastening of the adapter. There is no need to remove the heater fan during installation.
How to solve a problem
Obviously, polluted air inside the VAZ 2109 is a serious problem for car owners. In such a situation, it is impossible to leave everything as it is. Measures must be taken to eliminate this deficiency.
An adapter was developed especially for nines - this is an analogue of a cabin filter, presented in the form of a plastic grille with filter elements attached to it. Installation is carried out on the heater fan casing in the area where air is taken in.
Adapter
Many people believe that installing an adapter is a complete replacement for a standard cabin filter. But how can you completely replace something that is not in the car?! This is a kind of modification that will lead to a narrowing of the air flows coming from the stove deflectors. This measure will protect against large debris, that is, we get an anti-dust component.
The positive qualities of the adapter include its accessibility, effective resistance to dust, and protection against the accumulation of deposits on the dashboard, upholstery, and glass.
Adapter Location
Advantages of the VAZ 2110 cabin filter
It’s not for nothing that we say that it is better to install a filter of the tenth Lada family on a VAZ 2114 car. A reasonable question arises: what are its advantages over the “Samarov” filter?
Even if you just look at these two filter elements, you can already see that the working surface area of the VAZ 2110 interior compartment is much larger than that of the Samarovo one. To be more precise, 6 times. This configuration of the cabin filter allows, with significantly lower air resistance, to improve the filtration of polluting particles through more dense packing of the paper element. According to filter manufacturers, the efficiency of filter material in filtering out dust particles up to 1 micrometer in size is 95%. Mechanical contaminants measuring 2 micrometers are retained by 98%. Thus, installing an adapter can allow you to enjoy all the benefits of a modern cabin filter without significant loss of air volume.
Replacement frequency
The cabin filter installed on the VAZ 2109 gradually becomes clogged, so over time it becomes necessary to blow it out or replace it with a new one. The resource of a consumable is directly related to external environmental factors. On average, the filter element must be replaced every 30 thousand km. In some cases it is recommended to reduce the frequency, for example if:
- the car travels a lot on dusty dirt roads;
- there is a large amount of sand and foreign particles in the air;
- The road passes through an area with abundant pollen.
Where can I get a cabin filter adapter for a VAZ 2114?
You can purchase a cabin filter adapter for a VAZ 2114 in three ways.
The simplest of them is purchasing a product in an online store. For example, on the website adaptech.spb.ru/order.htm they offer to purchase an adapter for only 1,600 rubles.
The advantages of this method: The original adapter is much better - thick metal, powder paint.
Cons: Painfully expensive delivery, and the price is too high.
The second way to acquire a treasured item is to buy it through the same ubiquitous Internet from the St. Petersburg Samodelkins.
The advantages of this method: Low price
Cons: You can also get confused yourself.
Well, and finally, the third way to get the desired spare part is to make your own interior adapter.
The advantages of this method: Savings and a sense of personal satisfaction from the work done to improve your “pelvis”.
Cons: 8 hours of effort and preliminary preparation of the necessary materials.
But we are not afraid of difficulties, right? And we can modernize our bird ourselves in our garage. And with the money saved, we’d better buy a new carbon filter from the “ten”.
Step-by-step instructions for making a cabin adapter
- So, before you start working with metal, you should make templates for parts from paper. We print out drawings of the parts of the structure and glue them together. Here's what we got:
Printed from Compass 3D V12 1:1
- After this, we take the resulting stencils, metal scissors and cut out the galvanized parts.
- Next, we bend the parts in a large vice, using a wooden mallet so as not to spoil them.
- Then we drill holes with a drill, metal drill bit 3.
- We fasten the parts with M3 bolts.
- Next, you can install our craft. First, the part for the motor. Then on top is the part with the frame for the filter.
- To make installation easier, the plastic grille to protect against leaves was removed.
- We treat the adapter itself with glass sealant, carefully coating all the cracks and joints so as not to siphon, otherwise the whole point of the installation will be lost.
- We also treat the places where the adapter comes into contact with the car body with auto sealant (silicone will not work)
- The final touch is a rubber seal on the top of the adapter to protect the hood trim.
- Now you can install a cabin filter of the new tenth sample.
Bottom line: if you wish, you can also paint the resulting upgrade and begin to fully enjoy the clean air of the cabin!
Sources:
https://xn—-7sbgjfsnhxbk7a.xn--p1ai/adapter-svoimi-rukami-dlya-salonnogo-filtra https://tuning-lada-2109.ru/salonnyj-filtr/ https://zapchasti.expert/vozdushnyj -filtr/salonnyy-filtr-vaz-2109.html https://luxvaz.ru/vaz-2114/203-salonnyy-filtr-i-adapter.html https://filtrzamena.ru/adapter-salonnogo-filtra-na -vaz-2114.html