We remove the VAZ 2110 torpedo and install the trim: detailed instructions with photos
In the interior of the VAZ 2110, the dashboard is the most noticeable part. Every driver wants to sit in a stylish and well-maintained interior. But the standard panel looks angular and gray. This is especially noticeable after long-term use, when abrasions, scratches and cracks appear on the panel. Motorists solve this problem in different ways - some install another standard dashboard from a VAZ 2110, other drivers prefer to install a Europanel - this is the name of the trim from a third-party manufacturer. The trim allows you to transform the interior and turn the “ten” into a foreign car, at least on the inside. Whatever you choose, removing the panel is a must. In this material we will tell you how to properly dismantle the standard panel and install the Euro version.
Soundproofing panel VAZ 2110
To soundproof the “tens” dashboard, they mainly use bitoplast, modelin, sealant and even polyurethane foam.
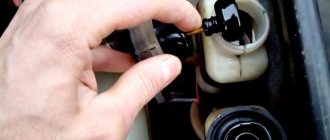
Bitoplast and modelin are used to cover plastic panels on a disassembled dashboard, which eliminates squeaks and improves sound insulation. Something like this in the photo below - Bitoplast is glued to a special glue, when installed in place in the right places, this material is compressed where necessary. It is recommended to paste over the panel naturally from the inside.
Some craftsmen turn the front panel into an impregnable fortress for vibrations and squeaks using ordinary mounting foam. However, it is not recommended to use such a radical method without some experience. As a result, this is what sticks out from under the torpedo -
In addition to soundproofing the VAZ 2110 panel, it is necessary to carry out a similar procedure with the floor, roof, and doors. Such comprehensive sound insulation will ensure maximum acoustic comfort in the cabin.
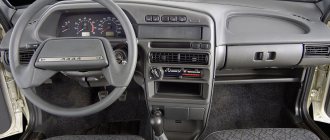
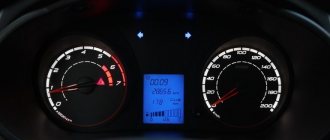
In conclusion, I would like to say that there are two panels installed on the “ten”, old and new models. Photos of the old version can be found at the beginning of our article. A photo of the new version of the panel is attached below.
The most interesting thing is that a new-style panel or a Europanel for the “ten” can be installed instead of the old-style panel. In principle, they are interchangeable, but it is worth considering that along with the installation of a new panel, you will have to install a new instrument panel assembly, another ACS unit (automatic control system for interior heating) and add an electric heater damper drive. The mounting points of the old and new panels themselves are the same, so there are no problems with installation.
Alternative torpedo
The alternative dashboard is softer than the standard “tens” dashboard, but the main advantage is the absence of unpleasant grinding and squeaking. Motorists decide to get rid of the standard one precisely because of the squeaking. For the VAZ 2110 car there are several types of panels that differ in design.
The panel is sold as a set:
- The panel itself, which is an alternative to standard plastic.
- Buttons, brackets and inserts for blowers and instrument panels.
- A set of wires and a block for a double switch.
- Buttons for low beam, heating, dimensions and fog lights.
- Plugs for buttons are installed in places where keys are not needed.
The experience of the owners of the “Ten” shows that proper removal and installation of the Europanel improves sound insulation, increases airflow and changes the appearance of the VAZ 2110 interior for the better.
How to properly remove a torpedo on a VAZ-2110 without damaging it: step-by-step instructions
Installing EUR and GUR on a VAZ 2110 with your own hands
In the design of the VAZ-2110 car, the torpedo is the most revealing part. Every driver wants to sit in a beautiful and expensive interior while driving. But the factory panel has a moody, angular appearance. This becomes especially noticeable after using the car for a long time, when abrasions and scratches begin to appear on it.
Each driver solves this problem in his own way, some purchase a new factory dashboard, others install a panel from foreign car manufacturers. A beautiful trim from a third-party manufacturer allows you to decorate the interior to the level of a foreign car. Whatever option is chosen, you initially need to know how to remove the dashboard on a VAZ-2110 car in order to install another one.
The material from which the pad is made is much softer than the factory panel and is not surprising at the presence of a grinding noise while the machine is moving.
In most cases, motorists dismantle the standard panel precisely because of grinding and squeaking. There are several options for the updated panel for the VAZ-2110, which differ in their design. The panel is available for sale as a set:
- New version of the panel, significantly different from the factory design.
- Brackets, buttons, instrument panels and air vent inserts.
- Set of wires and block for switch.
- Buttons for low beam, fog lights, dimensions and heating.
- Special plugs that are installed in places where there are no buttons.
Removing the dashboard takes a lot of time, since there are a huge number of wires under it, through which electricity is distributed throughout the cabin. The fastenings on the dashboard of the VAZ-2110 car are fragile, so every action during dismantling must be careful. If the fastenings are damaged, it will be impossible to firmly install the panel in its original place, and squeaks and noise during movement will increase significantly. In most cases, to improve the design there is no need to completely remove the panel; it is enough to dismantle only the upper part, but there are non-standard situations, so the article offers a description of a complete analysis.
We remove the torpedo
Removing and installing a new torpedo on a VAZ 2110 takes a lot of time, we also advise you to be patient, since there are dozens of connections and wires in this part of the interior. Each action must be careful, since the VAZ 2110 mounts are very fragile and can be easily broken. After this, the panel will no longer fit properly, and the car will noticeably increase in squeaking while driving.
In some cases, it is not necessary to completely dismantle the standard panel. Our article provides a description of a complete analysis.
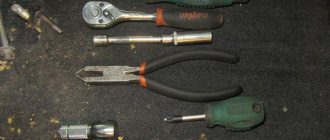
Necessary tool
To remove the case, you should have in your arsenal:
- Labels with adhesive backing.
- Marker or pencil.
- Set of screwdrivers and keys.
The main assistants in this work will be a 10 mm wrench and a Phillips screwdriver. We need a pencil or a washable marker in order to mark the removed elements. This also applies to self-adhesive labels. There are too many wires and parts, after disassembling you will already forget where each component is located. Markings and stickers will remind you of the location of wires and parts.
Preparatory work
Some people prefer to disassemble without dismantling other components of the interior, but this significantly complicates and prolongs the work. We recommend preparing the interior as you will need room to maneuver. Remove the seats and steering wheel - follow this sequence. It is also worth dismantling the floor tunnel.
To do this, you need to unscrew the screws and move the VAZ 2110 part back. We perform the same operation with the lower part. The next step is to dismantle the glove compartment, now you can remove the mounting block and relay. During the process, each wire must be labeled. You need to be especially careful when handling speedometers.
Removal - step by step instructions
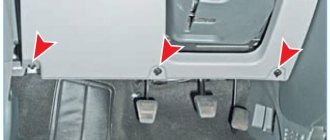
- We find the central panel, on the right side of it there are two self-tapping screws - unscrew them. We do the same with the opposite side. Now we dismantle the shield on both sides, as shown in the photo.
That's it, the torpedo is dismantled, you can replace its individual components, install another panel from a VAZ 2110, or carry out tuning using a Europanel. Assembly proceeds in reverse order. Will there be an overlay installed instead of the standard panel? Then move on to the next section.
Installing the dashboard trim
The cover will be installed after complete disassembly - it’s easier and more convenient. The instructions say that the trim must be cut around the perimeter. Now you can assemble the case: we place in it the accessories and instrument connectors that came in the kit. Carefully lay out the wiring from the base of the cover. All joints of the new VAZ 2110 panel must be glued with anti-creak.
We attach additional harnesses to the standard wires and tighten them with zip ties. Please note that there are additional buttons on the cover - standard connectors must be connected to them. The cover is attached to the original panel using self-tapping screws. Now you can carry out the installation in reverse order.
VESKO-TRANS.RU
AutoNews / Reviews / Tests
- Home
- Auto garage
- How to Remove the Top Panel of a VAZ 2110
How to Remove the Top Panel of a VAZ 2110
Europanel on VAZ 2110 instead of an old torpedo
A frequently asked question is where to buy and how to install a Euro panel or dashboard cover on a VAZ 2110 . This is not surprising, the ancient panel of dozens is already tired and the hunt is to somehow update the interior. In this article I will show you what is needed in order to change the old VAZ 2110 torpedo to the euro and many important issues that you will encounter when replacing the old torpedo.
How to install a Europanel on a VAZ 2110 instead of an old torpedo
A frequently asked question is where to buy and how to install a Euro panel or dashboard trim on a VAZ 2110 with your own hands. This is not surprising, I’m already tired of dozens of ancient panels and want to somehow update the interior. In this article I will show you what is needed in order to change the old VAZ 2110 torpedo to the euro and many important issues that you will encounter when replacing the old torpedo.
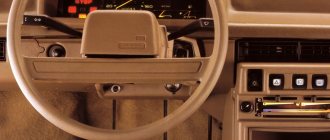
First, let's define what “installing a torpedo on a VAZ 2110” means. In fact, only the panel overlay is different, and the lower part of the panel remains the same. It turns out that the torpedo is collapsible and consists of 3 parts. We are talking about the very top trim, so installing it is not as difficult as replacing the entire dashboard of a car.
To change the torpedo trim, it is not necessary to remove it completely!
So let's get started, let's look at the panel overlays, which are divided into:
Euro-1, another name is Caprice and has the index 21104. The features of this lining are that it does not have a passenger shelf.
Euro-2, index 2110L, cover but already comes with a passenger shelf.
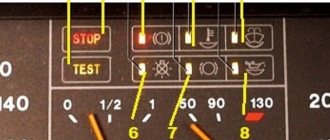
Euro-3, a cover without a shelf, but under the instrument panel of Kalina, Priora, and has a climate control module with 3 knobs and an emergency stop button.
There are also exclusive panel that make the VAZ 2110 similar to the Nissan Primera, where the instrument panel is in the center.
In addition to these Euro-overlays, there are overlays that are installed on top of them. For example, the overlay of the Chestnut panel.
It is not difficult to install the Kashtan overlay on the dashboard, so we will not dwell on this, but changing the old panel overlay to the Euro one is already more difficult.
The euro overlay for the panel consists of:
- On the masonry itself
- Inserts for buttons (small insert 2110L-2120031, large 2110L-2120032)
- Air ducts (2114-81080623)
Replacing the torpedo lining of a VAZ 2110
Replacing the torpedo lining of a VAZ 2110
.
How to remove the ponnel on a VAZ 2110
our group on VK.
- Device panel trim (2110L-5325124)
- Double button for turning on the headlights and low beam
- Key for turning on the rear fog lights (with fixation)
- Rear window heating switch (latching)
- Key pads 2 pcs.
- Plugs instead of keys 6 pcs.
- Wiring harness for connecting the dual side position switch and low beam headlights
- Block
- Device panel fastenings
- It may be necessary to purchase separately different keys for the VAZ-2114 and pads for them.
The cover gives the impression of a high quality product. It is softer than the old pad and, as the developers say, is more injury-proof. They also promise improved air flow to the side windows.
Now we are moving towards installation, and here we can distinguish 2 methods, each of which has its own advantages and disadvantages:
Panel covers for VAZ 2110
Now there are several types of overlays on euro panels:
- Euro - 1, it is also called whim, that is, it is identical to the regular dashboard of the VAZ 2110, only there is no shelf on the passenger side.
- Euro - 2, and of course, you can find Euro - 3, but they are more suitable for modern VAZ cars.
But still, this version of the lining can be installed. If we talk about the quality of such linings, then they are high-quality and soft, unless, of course, you buy a fake.
When purchasing, you should pay attention to ensure that the pad has a complete package of components:
- The pad itself.
- Instrument buttons.
- Instrument panel.
- The design is different, so it is worth purchasing plugs.
- All buttons and pads.
- Air ducts.
- Fuse panel mounting.
Installing the Euro trim without removing the dashboard
In this option, you need to have a drill and screws on hand.
Rely on the lining mounting diagram and start in order:
- Remove the dashboard.
- Open the glove compartment and unscrew the three screws from the inside (positions 1,2,3 in the diagram). Trying to unscrew the screw (pos. 9) from the inside near the windshield is difficult, but doable.
- Remove the 4 keys (next to the control module) and unscrew the screws from the inside (pos. 4.5)
- Unscrew or loosen the fastening by adjusting the backlight (pos.

- Open the fuse module and unscrew 2 screws from the inside (pos. 6 and 7)
- Now the panel overlay is held in place only by screws, positions 10 and 11. They cannot be unscrewed, so we break them out or lift the overlay by the right edge and cut them off with a file. (Note: the Euro trim will cover the entire top of the panel up to the windshield, so you don’t have to worry about the appearance when you cut or break the screws)
- Remove the old dashboard trim.
Let's prepare a new dashboard trim for installation
To do this, we cut off the remaining material of the Euro lining. There is no need to cut out any space under the dashboard, otherwise there will be a gap between the control column and the trim. In this place you simply need to make 2 cuts on the sides so that this part of the lining can be slightly bent as needed. Also, there is no need to cut off 10 mm from the sides of the lining in the area of the side air ducts; these places must be adjusted to the location.
We measure the panel overlay and adjust it as necessary. At this step, it is recommended to use anti-creak (soundproofing the panel). This way, you will insure yourself against squeaks in the future.
To install the dashboard in the Euro trim, you can use one of the methods:
- Use fasteners from the Euro lining kit.
- Use fasteners from an old lining (from drilling).
- We connect connectors and Europanel keys according to the instructions:
When the overlay is ready, let's try to install it. Fastening the Europlate in positions 1-7 of the diagram. We fix 35mm screws on top, which are then hidden under a plastic cover.
The advantage of this method is time. If you dismantled the panel, then you will spend no more than 3 hours changing the lining. If this is the first time you are faced with a similar type of work, then about five hours.
Tools
In order to completely remove the housing, you will need:
- a set of keys and screwdrivers;
- marker;
- adhesive based labels.
The main work will involve a 10 mm wrench and a Phillips screwdriver. You will also need a water-based marker, since it washes off easily, it is necessary so as not to mix up the removed parts. This also applies to adhesive labels. There are too many parts and wires, so you shouldn't rely on memory. Stickers and bullet points will help you remember the starting place of all the components.
Preparatory work
Some are satisfied with dismantling without removing the remaining components of the interior, but this takes extra time and complicates the process as a whole. In order not to add more work to yourself, it is recommended to clear the interior for free movement. Strictly observing the sequence, you need to remove:
- armchairs;
- glove box;
- steering wheel;
- disassemble the floor tunnel. To do this, you need to unscrew the screws and move the part back a little.
We dismantle the lower part in the same way. The next step is to remove the glove compartment, after which you should remove the relay and mounting block. As you disassemble, you need to mark all the wires. Particular attention should be paid to the speedometer.
How to Remove an Old Model VAZ 2110 Torpedo
How to properly remove a torpedo on a VAZ-2110 without damaging it: step-by-step instructions
Each driver solves this problem in his own way, some purchase a new factory dashboard, others install a panel from foreign car manufacturers. A beautiful trim from a third-party manufacturer allows you to decorate the interior to the level of a foreign car. Whatever option is chosen, you initially need to know how to remove the dashboard on a VAZ-2110 car in order to install another one.
The material from which the pad is made is much softer than the factory panel and is not surprising at the presence of a grinding noise while the machine is moving.
In most cases, motorists dismantle the standard panel precisely because of grinding and squeaking. There are several options for the updated panel for the VAZ-2110, which differ in their design. The panel is available for sale as a set:
- New version of the panel, significantly different from the factory design.
- Brackets, buttons, instrument panels and air vent inserts.
- Set of wires and block for switch.
- Buttons for low beam, fog lights, dimensions and heating.
- Special plugs that are installed in places where there are no buttons.
Dismantling
Removing the dashboard takes a lot of time, since there are a huge number of wires under it, through which electricity is distributed throughout the cabin. The fastenings on the dashboard of the VAZ-2110 car are fragile, so every action during dismantling must be careful.
If the fastenings are damaged, it will be impossible to firmly install the panel in its original place, and squeaks and noise during movement will increase significantly.
In most cases, to improve the design there is no need to completely remove the panel; it is enough to dismantle only the upper part, but there are non-standard situations, so the article offers a description of a complete analysis.
Instagram egor_khodyev VK group I'm on VK.
Tools
- a set of keys and screwdrivers;
- marker;
- adhesive based labels.
The main work will involve a 10 mm wrench and a Phillips screwdriver. You will also need a water-based marker, since it washes off easily, it is necessary so as not to mix up the removed parts. This also applies to adhesive labels. There are too many parts and wires, so you shouldn't rely on memory. Stickers and bullet points will help you remember the starting place of all the components.
Preparatory work
Some are satisfied with dismantling without removing the remaining components of the interior, but this takes extra time and complicates the process as a whole. In order not to add more work to yourself, it is recommended to clear the interior for free movement. Strictly observing the sequence, you need to remove:
- armchairs;
- glove box;
- steering wheel;
- disassemble the floor tunnel. To do this, you need to unscrew the screws and move the part back a little.
We dismantle the lower part in the same way. The next step is to remove the glove compartment, after which you should remove the relay and mounting block. As you disassemble, you need to mark all the wires
Particular attention must be paid to the speedometer
Removing the torpedo step by step
- We find two screws on the central panel on the right and unscrew them. We perform the same action on the other side on the left. After this, carefully remove the shield from both sides.
- Using a flat-head screwdriver, pry off the plug, which is located on the central tunnel. We unscrew the tunnel fastenings located on the sides and behind it. Unscrew the screws holding the central panel.
- This part of the interior can already be removed completely. We see that there is access to the cigarette lighter. We mark the wiring and disconnect it, then remove the cover from the gearbox handle.
- The next step is the air duct. We take the key for 10 and dismantle it. There is access to the central panel, which is held on a mount in the front and rear. Unscrew the screws and remove the panel. After dismantling the central panel, you can move on to the main body of the torpedo.
- The glove compartment was removed in advance, as it interfered with the overall process. All that remains is to disconnect the backlight and unscrew the fastener on which it was held.
- Carefully pry up the air duct with a screwdriver and then remove it. There is still a nut on the dashboard that needs to be unscrewed. Now the panel can be easily removed by lifting it up and slightly pulling it towards you. Now it will easily slide off the stilettos. We take out the plugs, not forgetting to mark them with a marker.
The torpedo has been dismantled and can easily be replaced by installing a new panel from a VAZ-2110 or tuned using a more prestigious panel. Assembly must be done in reverse order.
There is a special offer on our website. You can get a free consultation with our corporate lawyer by simply submitting your question in the form below.
Removing the torpedo step by step
- We find two screws on the central panel on the right and unscrew them. We perform the same action on the other side on the left. After this, carefully remove the shield from both sides.
- Using a flat-head screwdriver, pry off the plug, which is located on the central tunnel. We unscrew the tunnel fastenings located on the sides and behind it. Unscrew the screws holding the central panel.
- This part of the interior can already be removed completely. We see that there is access to the cigarette lighter. We mark the wiring and disconnect it, then remove the cover from the gearbox handle.
- The next step is the air duct. We take the key for 10 and dismantle it. There is access to the central panel, which is held on a mount in the front and rear. Unscrew the screws and remove the panel. After dismantling the central panel, you can move on to the main body of the torpedo.
- The glove compartment was removed in advance, as it interfered with the overall process. All that remains is to disconnect the backlight and unscrew the fastener on which it was held.
- Carefully pry up the air duct with a screwdriver and then remove it. There is still a nut on the dashboard that needs to be unscrewed. Now the panel can be easily removed by lifting it up and slightly pulling it towards you. Now it will easily slide off the stilettos. We take out the plugs, not forgetting to mark them with a marker.
The torpedo has been dismantled and can easily be replaced by installing a new panel from a VAZ-2110 or tuned using a more prestigious panel. Assembly must be done in reverse order.
How to remove the Europanel on a VAZ 2112 + video
The average owner of a VAZ 2112 rarely faces the need to remove the instrument panel of his car. The main reason why you have to dismantle the Europanel is body repair, electrical repair or repair of devices installed directly behind the instrument panel. Since it can be very difficult or even impossible to get to such devices without removing the instrument panel, in such cases you have to remove the entire europanel.
Removing the instrument panel is also required when eliminating squeaks and other noises that occur while driving a car, or when installing additional sound insulation for the interior. In addition, even with careful handling of the car, over time the instrument panel may lose its appearance and require replacement with a new one.
In this article we will try to cover the main stages of removing the europanel from a VAZ 2112 car. The “Euro” instrument panel can be found on cars of the VAZ 2110, VAZ 2111 and VAZ 2112 line. Therefore, everything that will be said below about dismantling the VAZ 2112 europanel is also true for the rest models. In addition, it should be noted that the fastenings of the Europanel are identical to the fastenings of a conventional instrument panel, so this step-by-step instructions can also be used when dismantling a conventional panel.
So, when removing the Europanel from a VAZ 2112 car, the sequence of actions should be as follows:
For safety reasons, it is necessary to turn off the power to the vehicle's on-board network. To do this, you need to disconnect the negative terminal from the battery.
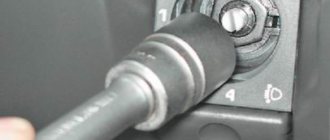
The steering wheel needs to be removed. To do this, use a flat screwdriver to pry up and remove the decorative trim with the inscription “LADA” from the steering wheel. Next, using a Phillips screwdriver (PH2), unscrew the two screws that are located in the recesses under the removed cover. After this, remove the horn switch cover.
Now you need to fix the steering wheel. This can be done in two ways: turn the steering wheel all the way to the left or remove the key from the ignition switch and turn the steering wheel in any direction until it clicks when it locks. After this, you should unscrew the central nut holding the steering wheel. To do this, you will need a socket wrench with a 24mm head (for convenience, it is advisable to use a socket wrench with a ratchet).
For safety reasons, there is no need to immediately remove the central nut - it should be left on the last 3-4 turns of the thread. After this, set the steering wheel to the middle position (the front wheels should be parallel to the longitudinal axis of the car). In order not to waste time finding the correct position of the steering wheel when installing it, before removing the steering wheel, you can apply coaxial marks on the steering wheel itself and the upper plastic cover of the steering column.
Next, you need to use medium-force blows on the rear of the steering wheel from the left - right and from above - from below to knock it off the splines of the steering shaft. After this, you can completely unscrew the central nut and remove the steering wheel.
The process of removing the steering wheel from VAZ 2110-2112 cars is shown in detail in the following video:
Now you need to remove the side panels on the left and right sides of the center console. Each shield is secured at the rear with two screws, which must be removed using a Phillips screwdriver (PH2).
Next, use a Phillips screwdriver (PH2) to unscrew the screws securing the glove compartment, located underneath the glove compartment at the front wall of the car interior. Having removed the glove compartment from its place, it is necessary to disconnect the wires going to the glove compartment illumination lamp. After this, the glove compartment can be completely removed.
The next step is to use a Phillips screwdriver to unscrew the screws securing the instrument panel. One of the screws is located in the glove compartment niche, the rest are along the edges at the bottom of the instrument panel.
Now you need to use an 8-mm open-end wrench and a Phillips screwdriver to unscrew the screws securing the instrument panel in the area of the center console.
After this, remove the protective grilles of the air ducts located along the edges of the instrument panel. To do this, just pry them off with a flat-head screwdriver.
Next, use a socket wrench to unscrew the nuts located under the removed air duct grilles.
Remove the instrument panel from the studs by lifting it up and pulling it towards you. After this, you need to disconnect all the connectors on the wiring harnesses going to the instrument panel, having previously marked them for subsequent assembly. Now the instrument panel can be completely removed.
The process of removing the instrument panel from a VAZ 2112 is shown in the following video:
We hope our instructions will be useful for you!
How to easily and quickly remove the dashboard on a VAZ 2110 with your own hands?
Without a doubt, the dashboard is the most noticeable interior detail in a car, because it is located right in front of the eyes of passengers and drivers. The need to remove the dashboard on a VAZ 2110 may arise for car owners for a variety of reasons.
So, by removing this part, you can get full access to all the electrical components of your vehicle, replace the burnt-out wiring with a new one, connect additional devices or lighting, install a Euro trim or sound insulation.
Options for replacing the standard VAZ 2110 panel:
If desired, you can cover the dashboard with various materials of your choice, thereby making the desired changes to the interior of the cabin.
I would like to say right away that removing and replacing a torpedo on a VAZ 2110 will require a lot of time and patience from you. In addition, all repair work must be carried out extremely carefully and carefully so as not to accidentally break the fastening, since the dashboard will not fit back as it should and will creak when driving.
Improvement and tuning of the dashboard on the VAZ 2110
One of the most popular ways to improve the dashboard on a VAZ 2110 is its sound insulation. In order to do this, you must perform the following steps:
- We remove the tidy, I already told you how to do this earlier
- Next we foam, but under no circumstances should you pile up a huge pile of foam at once, it won’t dry out in a week.
- Don’t forget to try it on so that later it doesn’t turn out that your steering wheel touches it, or it’s just too high.
- In principle, all the work consists of two things, you cut, foam, cut again and so on many times.
- Next, we apply the cheapest putty we could find.
- Next we cover the dashboard with Shumka.
- We install the torpedo back.
Removal instructions
It is recommended to remove the VAZ 2110 torpedo in the following sequence:
- Interior details. Before starting work directly, it is necessary to prepare the interior, since disassembling the front panel of the VAZ 2110 is best done with room for maneuvers. Therefore, the first thing we do is remove the front seats and steering wheel of the car. It is advisable to carry out dismantling in exactly the same sequence as indicated above, since otherwise it will be extremely difficult to remove the driver’s seat. In order not to break anything, consider your strength when pulling the wheel out of the column splines; to do this, loosen the steering wheel nut a little, and then pull it towards you while loosening it from side to side;
- Transmission tunnel. After the salon is prepared and there is a place to work, we are faced with the next task - dismantling the floor tunnel in the salon. Simply unscrew the screws and push the top of the part being disassembled back. Then do the same with the bottom of the tunnel;
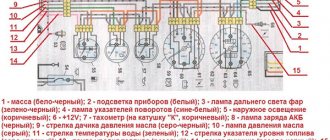
- Steering wheel and steering column. Unscrew the screws on the steering column casing of the VAZ 2110, and then remove the steering column switches. Mark all the wires and connectors released during disassembly with a marker or labels; this will later work to your advantage when, when assembling the torpedo, you end up with a large number of wires of different colors. It is recommended to use the marking especially for owners of cars that are already equipped with an audio system and alarm system;
- Glovebox. The next stage of work will be to dismantle the glove compartment, after which it is necessary to remove the relay and mounting block. Don’t forget to mark the wires as you work and take special care with the fragile speedometer and other dashboard elements that also require special treatment;
- Torpedo. And now we can move on to the immediate purpose of the repair - we have to remove the dashboard. To do this, it is necessary to unscrew the screws in the resulting void behind the glove compartment and unscrew the fastenings. After that, use a screwdriver to hook the air duct on the left side and remove it. Then all that remains is to unscrew the nut, holding the torpedo with your hand, the torpedo and pull it out from the studs, at the same time do not forget to mark the wires with a marker so as not to get confused.
The dashboard has been removed, we have disassembled everything that needed to be disassembled, all that remains is to carry out the repair work, for which the whole procedure was actually started.
Finally, I would like to advise - take the opportunity, do not be lazy and clean the ventilation ducts, sooner or later they will still become clogged and you will have to remove the dashboard again.
Removing and installing the instrument panel on VAZ 2110, 2111 and 2112
Before you begin this repair, you must do the following:
After this, you can proceed to further actions. We immediately remove and remove all the elements of the panel, such as: the standard clock, the heater control unit, the display unit, as well as the central deflector, and do not forget about the buttons with the radio. As a result, we get approximately the following picture:
Next, using a screwdriver, pry up and remove the plugs at the upper corners of the instrument panel mounting. In reality it looks like this.
On the other side, we do the same, after which, using a socket and an extension, we unscrew the nuts securing the instrument panel in the upper part.
Now let's move on to the remaining attachment points. At the bottom, in the left and right parts of the panel - in the corners, there is also one screw that needs to be unscrewed. The first one is shown below.
The second one is located on the right side of the panel in the same place - at the bottom in the corner. Also, immediately unscrew the self-tapping screw that secures the diagnostic block:
Now we move on to the side fastening points of the frame, which are located in the center on each side - the photo below shows the left side:
On the right everything will be the same. Next we move on to the internal frame fastenings, which are located in the following places. The first one is under the fuse mounting block, to get there we open the cover and look inside the panel:
The second one on the right is visible when the glove compartment lid is open:
Of course, the mounting block will also have to be removed so that it remains intact with the sub-panel wiring.
We thread it inside with the instrument panel pulled back; you will also have to cut off some of the wiring fastening clamps, for example, in this place, which is shown in the photo:
Now we are trying to remove the VAZ 2110 panel, moving it to the side on both sides, evenly, without much effort or sudden movements.
In the photo above you can see that the headlight hydraulic corrector tubes were cut off, since in my case they were simply not needed. If you need to save them, do everything carefully and remove them by pulling the control unit out of the instrument panel. Next, we finally remove the panel, of course, after first disconnecting all the wires that will interfere with this.
Installation occurs in the reverse order, connecting all wires and connectors to their places, blocks and switches, as well as other elements that were removed as a result of this procedure.