Tuning the instrument panel lighting on a VAZ 2106
The instrument panel is a non-demountable structure consisting of a steel frame filled with polymer foam and covered with a polymer film. Using removable elements, control devices, controls, a radio receiver and a heater are attached to the instrument panel.
Tuning
High-quality tuning of the instrument panel must be carried out, starting with the removal of the instrument panel, so that during work it is convenient to get all the components and components of the product, right down to the illumination of the VAZ 2106 panel, which can also be made beautiful and modern. The preparatory stage is the dismantling of the front driver's unit, located under the instrument panel, which simply facilitates access and visibility of all elements and electrical wiring of the product, to change the appearance of which you need to make it or buy it yourself in car stores.
First of all, this applies to replacing the sensor dials with white components. The contrast of the dark scales of the VAZ 2106 instrument panel will give the instruments a modern look. They can be done using paints and varnishes. For a beautiful interior, you can cover the instrument panel, the price of which is affordable, with beautiful leatherette, and if funds allow, then with leather.
At the initial stage, the VAZ 2106 instrument panel, a photo of which is posted on our Internet resource, requires cleaning its surface, applying an even layer of special glue, pressing the leatherette to the surface and waiting for the drying process to complete. In the final version, it is necessary to bring the edges of the glued material into an aesthetic appearance.
The LED instrument panel is very popular among car enthusiasts, the light emanating from it simply transforms the interior of the vehicle. The only thing to remember is that large instrument panel indicators require the installation of two LED-type elements, while for small-diameter products the integration of one element is sufficient.
A good addition to instrument panel tuning are LED lighting bulbs. For small sensors you can use one bulb each, but for the speedometer and tachometer you will have to install two pieces each.
Cigarette lighter connection diagram at the link.
Overlays
For installation, it is advisable to remove the dashboard from the car, as this will greatly simplify the process of installing the trim and will allow it to be done much better.
First, you need to degrease the surface of both the dashboard itself and the lining; this is best done by thoroughly rubbing the dashboard with anti-silicone, which is used when painting a car. To improve the adhesion of the glue to the surface, I would recommend rubbing the surface with sandpaper, this will create a groove that the glue will easily grab onto. If you're going to be more specific, use primer on the plastic; I used Mobihel primer.
I would recommend that you glue with construction adhesives, this could be “Moment”, “Liquid Nails”, also a very good and inexpensive “Dragon” glue made in Poland.
I would recommend fastening it as securely as possible, in inconspicuous places with self-tapping screws, since despite all the advantages, the cover is prone to squeaking, so it must be firmly glued and screwed with self-tapping screws.
After a year and a half, I can say that the color of the trim has not changed, the shine has not disappeared either, only the trim above the instrument panel was slightly deformed due to the high temperature...
Scheme
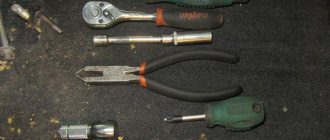
How to remove
The dashboard installed on the VAZ 2106 car is almost completely similar to the dashboard that was equipped with the VAZ 2103 model. Accordingly, the process of removing the panel is valid for both the VAZ 2103 and the VAZ 2106.
1. Disconnect the negative terminal from the car battery.
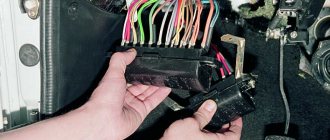
2. Using a Phillips screwdriver, unscrew the screws securing the storage shelf. After this, unscrew the screws of the lower fastening of the radio panel: one on the right side and one on the left. We also unscrew the screw on the top fastening of the radio panel.
3. Using a flat-head screwdriver, carefully pry the bar with the controls out of the radio panel. Disconnect the wires from the buttons and switches.
4. Unscrew the screws securing the radio console. And we remove it completely.
5. Unscrew the screws securing the decorative trim of the right windshield pillar and remove it. Similarly, we dismantle the left pillar trim.
6. Remove the decorative and protective casing of the steering column shaft. To do this, unscrew the five screws and carefully separate the top and bottom covers.
7. Using two straight screwdrivers, pry off the retaining plates that secure the instrument cluster. Pull out the instrument panel.
Replacing Light Bulbs in the Dashboard of a VAZ 2106
Everyone knows that the illumination of our instruments (speedometer, tachometer, etc.) leaves much to be desired. It actually works very poorly. I would even say disgusting - in the dark it is impossible to look at the devices without tears.
The appliances are very dimly lit, and this despite the fact that there are quite consuming incandescent light bulbs installed there. And our task is to fix this - say no to the dim lighting of the devices on the five.
There are several drastic solutions here, including replacing the instrument cluster with a “Volgov” one from the GAZ-3110, but this is not a budget option and not everyone can afford it. Therefore, today we will correct this efficiently, but at the same time on a very budgetary basis.
So we buy these BLUE LEDs (you can either white or green, to your taste)
Pay attention to the LED lens made in the form of a funnel; such a lens scatters the light of the LED and it is advisable to use just such diodes. Why blue? With blue LEDs there is a very interesting effect - it seems as if the needle and instrument scales are glowing - like in foreign cars. There is no such effect with white diodes.
I don’t know about the other colors. How many diodes will be required? I have a modified instrument cluster (it costs a tachometer and oil, gasoline, temperature from a VAZ 2106, you can read about it HERE) for small instruments I used one diode each, and for large ones (speedometer and tachometer) 4 diodes and one diode lamp.
A diode lamp looks like this
And remove the glass from the device. There are two nuts or screws on the back of the device; unscrew them and remove the device from the housing. Next, we study small instruments (in the case of a five-piece torpedo, this is a voltmeter), the visible part of the scale, or rather the scale and the black plate above it. There is a distance between them into which we will push the diode.
We take a drill with a drill bit of 7 and make a hole like this from the very bottom of the scale.
And we glue the LED onto the second black cover with sealant. Like this
and in the body of the device we drill a hole in order to bring the wires from the diode into it. Then, once the sealant dries (in order for it to dry faster, I used a regular hair dryer), we assemble the entire structure. The hole we drilled will not be visible, just like the diode. It is hidden under the cover.
We put glass with rings on the device. And clamp the chrome ring. To do this, it is better to use the same screwdriver; I do not recommend using pliers because... they will damage the outer side of the chrome ring. Next, we connect the wires from the diode to the standard backlight wires on the devices, and throw out the standard light bulb - we don’t need it and it’s even contraindicated. Let's test what happened.
So the halo at the bottom in the photo is just the camera’s high sensitivity to light. Well, in fact, this halo is not visible. But the scale and arrow can be seen very well. Yes, and it’s beautiful in my opinion. Now we disassemble large devices. They are disassembled in the same way as small ones. We solder 4 LEDs on the wires and glue them with sealant into the housing.
I had a blue filter in the tachometer housing, so I left it. If yours is green, then break it out. I taped the outer ring of the visor on the inside with tape foil
This is not necessary, but if possible, it is better to glue it - it will reflect light better.
We drill a hole in the housing and insert the wires from the diode into it and bring them out, and also connect them to the wires of the standard light bulb. Instead of the standard light bulb itself, we install a blue diode lamp.
- By the way, in the speedometer housing near this lamp I had a partition, I broke it out so that the light would be better distributed inside the device.
- Let's check it in action.
- Well, all the devices are in action
I'll repeat it again. All halos and glare in the photo are camera errors. In reality, everything is visible very well, nothing dazzles your eyes. The backlight is generally very soft and does not strain the eye, but only pleases it. It really feels like you are sitting in a foreign car.
And it happens that you need to change light bulbs for a completely banal reason - one of them has burned out. Today we will look at the process of replacing the backlight and alarm lamps of the VAZ 2105-07 panel.
It is these two Zhiguli models, because their devices are similar.
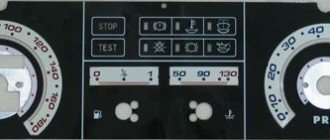
What lamps are installed in the instrument panel of the VAZ 2107
First of all, before you start replacing, you need to find out what kind of light bulbs are used on classic VAZ models. Because it will be a shame to buy the wrong one, or with a different base. And find out after the device is completely disassembled.
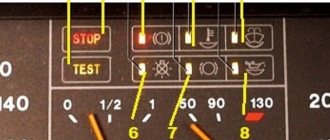
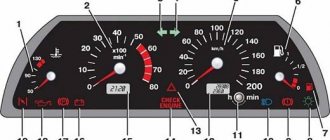
- Lighting for the speedometer and tachometer and the entire panel as a whole: power 3 Watt, base type – T3W,
- Signaling lamps for turning on the dimensions, high beam, parking brake, opening the air damper (choke for carburetor modifications), low battery charge, oil pressure, direction indicators: baseless linden lamps W1.2W, power 1.2 W.
In some modifications, older models, alarm lamps with a T3W type socket with a power of 3 Watts can be installed in the dashboard. Here, unfortunately, you can’t guess.
Standard sizes of lamps installed in the VAZ 2107
- First of all, we remove the “Seven” tidy to gain access to the mounting board where they are installed
- We dismantle the burnt lamp.
She removes it from the board by turning its socket 90 degrees. Turned and removed from the instrument panel - If you are using a lamp with a W1.2W base, then simply pull it towards you and it will “come out” of the socket. If the type of lamps installed is T3W, then removal from the socket is carried out by turning it 90 degrees.
Install new light bulbs in reverse order. If you are the happy owner of a dashboard with W1.2W lamps, then in the markets you can buy light bulbs assembled with a socket. It is enough to mount it into the board without bothering with its removal from the socket.
Because there were cases when baseless lamps, type W1.2, got stuck in the socket and it was impossible to remove them, or their seat was damaged.
Thus, you can not only replace a burnt-out lamp, but also modernize the instrument panel of the VAZ 2107 by installing LED lamps in them. But you need to do this wisely, because there are some nuances that we will talk about in the following articles.
Good luck to everyone on the roads.
Replacing light bulbs in the composition of VAZ-2113, 2114, 2115 devices
Now we will talk about such a widespread dilemma as the failure of dashboard lamps on a VAZ-2114. The VAZ-2114 model is good for many people, it is aesthetically pleasing and lively, has good technical characteristics, but the dashboard leaves much to be desired in terms of quality and reliability. We will tell you how to change the panel lamps in this article.
The dashboard provides the driver with a lot of useful information, allowing him to monitor the condition of the car, the driving process, diagnose breakdowns in time and correct them. So, the panel light comes on for the following reasons:
- The battery is not charging.
- For one reason or another, the handbrake is stuck.
- Not enough fuel in the tank.
- The oil pressure has decreased (which indicates the need to urgently stop the engine to avoid more severe consequences).
- Excess water in the filter. To prevent water from entering the pump, which could lead to damage, it is necessary to drain excess water from the filter.
- The fuel system is malfunctioning.
- There was a failure in the propulsion system and almost everything else.
As you can see, the panel lamps allow you to find what is wrong in the car; if the lamps themselves fail, then you can miss a very important breakdown, which can even lead to an accident. That’s why it’s so important not to delay replacement (lamps cannot be repaired).
How to upgrade the backlight of a VAZ 2106 car
The classic backlighting of the “six” instrument panel is quite dim and does not satisfy many car owners. This makes it difficult to control instrument readings, which is unsafe on the roads at night. Let's consider tuning the instrument panel of a VAZ 2106 car by installing light scales and increasing the backlight intensity. The main tasks that should be performed by tuning the lighting of VAZ 2106 devices:
- increase in brightness;
- decorating the instrument panel.
Tuning the classic VAZ 2106 dashboard begins with the acquisition of the necessary components: white scales, LEDs, metal sockets, paint for the arrows, self-adhesive white film, cable. The process of upgrading the instrument panel is a fairly simple operation that can be completed independently, without the involvement of specialists.
- To gain access to the sensors, remove the shield.
- Remove all arrows. The speedometer needle is removed in this way: unscrew the bolts and turn the scale to the left; wait until the arrow freezes and place a mark with a marker. This position must be fixed so that after assembly the speedometer shows accurate speed parameters.
- Unscrew the bolts, remove the scales and cover them with new white parts.
- To prevent the arrows of classic parts from blending into the new background, paint them in a bright, contrasting color.
- The next step is to remove the filter.
- Metal sockets are mounted along the edges of the instrument panel. To make the upgraded backlight better perceived by the driver, apply white self-adhesive tape to devices with a dark body.
- Using the VAZ 2106 wiring diagram, connect the LEDs using a cable.
Simple tuning will make the interior of your “six” more modern. The lighting will look more impressive if you install multi-color LED bulbs.
Modernization ideas: headlights and everything else
Headlights are the eyes of the car. Over time, glass becomes dull, turns yellow, or even becomes unusable. But this is not the reason for their modification or complete replacement, but the desire to turn the VAZ into a beast with bright, powerful headlights.
Oddly enough, a simple way to improve is complete replacement. It is worth noting that body parts for the VAZ 2106 are similar to BMW parts, so we will replace the old headlights with new ones from BMW.
The process will not take much time. Open the hood and, having completed the necessary steps, take out the old headlights. We try on the new headlight and drill the holes necessary for installation, after which we install it and tighten the fasteners. All that remains is to properly adjust the light, and the work is completed.
If you have not found spare parts for the VAZ 2106 from foreign brands, but still want to update the headlights, you will need to visit a car store and purchase several diodes that will diversify the appearance of the car.
Angel eyes give 2106 brutality to the domestic auto industry
Working with the dashboard
To shock others and give yourself pleasure, we will tune the instrument panel of the VAZ 2106 using LEDs.
A popular accessory is LED strip. It is not difficult to install it yourself, and the wide range of colors and brightness attracts car owners.
The backlight is connected in two ways: directly to the battery and to the wires leading to the car’s dashboard. The first method attracts with its reliability, while the second captivates with the ability to turn on the backlight immediately during ignition.
Make sure you have two wires, switches and a fuse
When installing the latter, please note that it should be close to the battery. After soldering the first wire, put a protective tube on it, then connect the second wire to the battery
But the tuning of the VAZ 2106 is not finished yet.
Installation of double glazing
Most car owners dream of installing double windows on their VAZs. Why dream if it’s easy to realize your idea?
Since the second glass is tinted. it is located from inside the car. We cut it from the bottom edge so that during installation the corner of the glass remains visible and there is a distance of about 1 mm between the two glasses, otherwise the surfaces will be scratched against each other. Do not forget that when installing the second glass, the weight of the door will increase.
Brave car enthusiasts will not forget about tuning the VAZ 2106 bumper; it allows you to realize all your ideas and express the character of the car owner with the help of all kinds of drawings or even entire scenes on the bumper. Painting it yourself is not easy, so it’s better to contact a service station.
Don't be afraid to experiment, and then the car will become the most noticeable on the road.
- Airbrush
- Painting defects
- Body repair
- Materials
- Equipment
- Spray booth
- Salon
- Painting theory
- Tuning
- Do you want to know how to remove dents on your car in different ways?
- You don’t know how much material is needed to paint a car: a painter’s secret
- How to remove corrosion and rust from a car
- Removing rust from a car body: a simple solution
- I made and adjusted the air pressure switch for the compressor myself: find out how
- July 2017
- March 2017
- August 2016
- July 2016
- June 2016
- May 2016
- March 2016
- February 2016
Tuning the illumination of the “six” devices
Typically, tuning the backlight of VAZ 2106 instruments is carried out in order to improve the driver’s perception of the parameters of the instrument panel indicators and to decorate the instrument panel.
Such work should be carried out independently, in order to avoid unnecessary financial costs and to implement your own version of the VAZ 2106 instrument lighting design, which will be a unique and unique project.
As an option for making the illumination of the VAZ instruments of the “sixth” model with your own hands, you can, together with replacing conventional light bulbs for lighting the instruments, retouch their instrument scales to bright colors that are dissonant with the color of the car’s dashboard. This color scheme includes neutral white, bright red and calm blue. The color can be chosen depending on the taste preferences of the vehicle driver.
If the car enthusiast has chosen the option of multi-color LED instrument lighting bulbs for the VAZ 2106, which are offered in seven colors, then an LED strip and a private control unit are installed, which is controlled remotely, and the light range can be changed daily or as needed.
Such an LED “garland” can be found in specialized retail outlets that sell products of this type. The price of such an LED chain of lights is low. All that remains is to select a color palette and start replacing.
Installation of such lighting for VAZ 2106 devices can be viewed in a video on our Internet portal.
Tuning the interior of the “six”
Most Russian fans of this car believe that the “six” is very convenient for tuning the interior, because a sufficiently large volume of internal space has been structurally created in it
This is extremely important for replacing seats, as an element of finalizing this modification of the Lada. Installing, for example, “Scorpion” seats from such a Ford model, will give the interior the interior of a sports car, and this impression will be enhanced by installing a stylish “dashboard” and steering wheel
You can purchase these elements of the car interior at salvage yards, and their price will be reasonable due to the low popularity of such spare parts among buyers.
When tuning the interior of a VAZ sixth model, it is very important, if the vehicle has already been modernized in some style, to continue decorating it in this design direction. For example, if the tuning of the six’s interior is close to retro style, then the modernization of the components of the interior compartment should continue in a similar direction
The same applies to the design of tuning the interior of the Zhiguli 2106 in a sporty style, especially since the Scorpio seats will complement the sporty style and create the illusion of driving a sports car. When tuning the interior of a VAZ 2106 with your own hands, you can use the free volumes of the “six” interior, and the installed interior components, selected in one style solution at dismantling yards and auto shops, will significantly change its appearance and design.
When upgrading the interior of a Six with your own hands and installing seats, you may get the false impression that rearranging the seats will not be difficult and it’s just a matter of unscrewing the fasteners. We warn you that this is quite a large job, because you will have to change the seat guides, because... The regular ones from the “six” are not adapted for foreign cars.
Modernization of the dashboard
In most foreign cars, this part is quite functional and looks quite presentable. Alas, the same cannot be said about the interior of the VAZ-2106. The “six” torpedo is made very “clumsily”, which forces the owners to modernize it.
The most popular option is to replace the standard element with a modern analogue. Installing an updated panel will not only change the external part of the car, but will also add functionality. The disadvantage of such manipulation is its high cost (from 5-6 thousand rubles, taking into account all materials and components).
General tuning aspects
The simplest tuning of the VAZ 2106 dashboard is to purchase a ready-made set of accessories and replace standard instruments. You can install it yourself using the instructions included with the kit. More labor-intensive is the tuning of individual devices, which involves replacing stickers and arrows.
When changing arrows and stickers, you need to be careful, as these parts are very fragile.
Tuning the VAZ instrument panel can be done by replacing the meter dials with white ones and installing overlays on the panel. You can cover the panel with artificial leather or leather if you have sufficient funds. Before stretching the material, the surface of the shield must be cleaned and then adhesive must be applied in an even layer. Next, press the leather or substitute over the entire surface and wait until the glue dries. At the last stage, you need to process the edges, giving it an aesthetic appearance.
Self-tuning of the dashboard
Improving the dashboard of a VAZ 2106 with your own hands is not so difficult. First, release the torpedo placed underneath it. Prepare car instruments with fashionable white dials. A car enthusiast can make dials with a whitish color on his own: you can find the necessary samples on the World Wide Web and reproduce them on a printer using photo paper. Holes are cut out in the scale, and instrument hands are painted with dark varnish to contrast with the white dial.
Once released, the dashboard is covered with flock or faux leather. This will make her more attractive. It is carefully cleaned, coated with Moment glue, onto which the leatherette is attached, the material is smoothed, after which the panel is left for a while to allow the glue to dry.
Improved dashboard
During the drying process, excess leatherette is trimmed, the remains are folded and glued again. You can use electric backlighting consisting of blue light diodes, replacing the old filter at the same time. Diode bulbs are a good addition to the tachometer and speedometer, and one diode is enough to illuminate small sensors and instruments.
Using a felt circle cut out for the edging of the dials will give the LED backlight a vibrant look. Holes are cut in the panel for the measuring sensors, all excess is removed, then the sensors are inserted and connected to the existing wires.
Instead of a clock on the “six” dashboard, it is best to install a voltmeter with a white dial, choosing it so that it is similar in appearance to other sensors. The work of transforming the “six” dashboard is considered very painstaking, but the monetary costs for its implementation will be very small.
LED illumination of the “six” instruments
As a tuning option, diode lighting of devices is also installed, during the installation of which LED strip and lamps with diodes are also used. Some car enthusiasts are interested in how to make illumination for VAZ 2106 devices of this type and what is required for this.
So, to install LED backlighting for devices, you need 10 -15 cm of tape with diodes of the selected color, several diode lamps of the selected color and a soldering iron.
The order of work is as follows:
- We disconnect the negative contact of the battery and dismantle the instrument panel, disconnect from the connections the board with the instruments where the speed indicators, engine speed indicators, etc. are located.
- We take out the factory backlight bulbs for the instruments of the VAZ 2106 contour arrangement (4 pieces) and for convenience we dismantle the speed and speed indicators;
- We carry out preventive preparation of wiring and diode-type tapes, tested and suitable for use, measure the wires in sections of 3-5 cm, cut and clean the edges for connection, prepare for soldering and solder pieces of wiring with tapes and lamps;
- We prepare places for fastening LED strips and diode lamps, then we stretch the wiring on which the lamps are attached, and glue the tape and prepare the board for soldering;
- After checking the functionality, we assemble the backlight. We recommend the direction of the lamps in the following order: I – vehicle mileage indicator, II – limit (red) line of the power plant speed indicator.
Steering column switch VAZ 2106
On classic Zhiguli cars, the steering column switch is located on the steering column and consists of three levers. On the left side of the column there are switches for the direction indicators “A” and the head optics “B”.
The steering column switch lever “A” can be in one of the following positions:
Lever “B” is activated by pressing the exterior lighting button on the dashboard:
On the right side of the steering column there is a windshield wiper and washer switch “C”.
Switch “C” can operate in the following positions:
How to disassemble
The steering column switch is a non-separable mechanism and must be replaced if problems arise. However, if you wish, you can try to repair it yourself. The essence of the procedure comes down to dismantling the rivets, carefully disassembling the device, replacing damaged springs, and repairing contacts. The performance of the repaired unit directly depends on the correct assembly. If you want to save yourself from this procedure, just buy a new device and install it on your car. The cost of such products ranges from 700 rubles.
How to replace
Replacing the steering column switch on the “six” may be necessary in the following cases:
Any of the listed problems require removing the switch from the steering shaft. The tools you will need are a Phillips and slotted screwdriver, and the procedure itself is carried out as follows:
When reinstalling the steering column switch, you must remember to put the rubber seal on the ignition switch.
Disassembling and replacing the instrument panel
This technological operation is carried out in the following sequence:
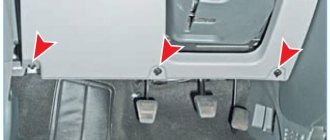
- Remove the front box from the bottom of the instrument panel.
- Pull back the lower locking latches.
- Disconnect the wires and mark each wire as belonging to it.
- Remove the instrument panel.
- Remove all sensors and carefully sort them. This will make it possible to correctly assemble the products.
- When disassembling speed indicators (speedometer) and speed indicators (tachometer), bent scissors used in medicine are used.
A standard replacement of the VAZ 2106 instrument panel is carried out in the event of a defect in one of the sensors, which may fail. Let's consider the question of how to remove the instrument panel using the fuel sensor as an example; other instruments can be replaced in a similar way using a screwdriver and pliers.
The procedure for replacing panel sensors: 1. We remove the instrument panel. 2. Dismantle the fasteners and the fuel sensor grower. 3. Remove the mounting bracket for the instrument panel sensor and remove the sensor from the workplace. 4. Mark the instrument panel diagram of this sensor with a marker and open the electrical circuit. 5. Remove the instrument panel backlight sockets from the body part. 6. Installation is carried out in reverse order. 7. To replace the speedometer on the instrument panel, it is necessary to remove the product fasteners and the trip meter reset button from the outer plane. 8. Then press the counter and remove it from the shield. 9. Remove the two speed indicator fasteners to the fasteners. 10. Remove the fasteners and speed sensor, and mark the working sockets of the warning lamps with a marker. 11. Remove the lamp sockets from the holders in the speed sensor. 12. If necessary, disconnect the device cable. 13. Installation is carried out in reverse order. 14. The tachometer on the instrument panel is replaced in the same way and then connected.
Torpedo VAZ
How to modernize a VAZ 2105, give it some zest and functionality using the instrument panel?
The torpedo (correctly - torpedo) is the upper part of the front panel of the car. The lower part (where the gearshift knob and radio is located) is called the BEARD. The torpedoes of old VAZ models are distinguished by their asceticism and unpretentious design, which is why many car owners have a desire to improve them.
There are several methods to improve them.
1. The most radical thing is to replace the VAZ torpedo with a torpedo from a foreign car, or from an older VAZ model. This will be explained in more detail below.
Here is a video of a torpedo on a VAZ 2101 from a Mercedes 123
2. Painting the torpedo - this method is the least common, due to this. That the surface of the torpedo is not hard and is difficult to paint correctly. Also, the painted surface of the vase torpedo often does not look as attractive as other methods.
3. A new method, not yet widespread, but very promising - covering the torpedoes of vases with vinyl film. Vinyl films come in carbon, matte, glossy and any colors.
— Pros: applied in one piece to the complex surface of the vase torpedo; looks great; easy to use and durable.
— Disadvantages: difficulty in application and some exceptions in the torpedo material. There are some types of plastics on which application is impossible - the film will not stick.
4. Covering the vase torpedo with leather. The most expensive and most aesthetically attractive method. Correctly covering a vase torpedo with leather is a complex process that requires certain skills and knowledge, but the result will exceed your wildest expectations.
5. Flocking (flocking). A relatively inexpensive and aesthetically attractive method of renewing the coating of a vase torpedo. Beautiful, inexpensive, durable. I've had it for 3 years now - it's faded a little, but the surface is fine.
Locked torpedo on VAZ 21099 - video
VAZ 2101 torpedo. First generation of VAZ torpedoes. Interchangeable with VAZ 2106, VAZ 2107, VAZ 2105.
VAZ 2106 torpedo. The main disadvantage of this torpedo is the insufficiently thought-out blowing system. That is, it does not have airflow on the side windows, and in cold weather the windows fog up or freeze. It is solved by installing a torpedo from a VAZ 2105, or a VAZ 2107, where air ducts are provided for the side windows, as well as blowing the windshield. All classic torpedoes, due to the similarity of designs, can be replaced with similar ones from other models.
The VAZ 2107 torpedo is the best and most convenient of the torpedoes of the classic VAZ models.
There is also the possibility of installing a torpedo from a foreign car, for example a BMW E30, in a classic VAZ. But there are a lot of alterations: installing electric windows, moving the gearshift lever and many others.
In conclusion
Knowing how to tune the instrument panel on a Zhiguli car yourself, you can save a lot. In addition, any owner approaches the processing of his cars responsibly at every stage. The cost of similar services in specialized centers is much more expensive, and the quality is not always guaranteed. The simple manipulations and recommendations given above will allow you to radically change the “tidy”. In addition to improving the appearance, you will receive additional protection and some useful options that will be useful for the domestic “six”.
Stages of work
At the initial stage of improving the illumination of VAZ-2106 instruments, it is necessary to dismantle the panel panel, as a result of which access to the indicators becomes available. Next, remove all index arrows. Then unscrew a couple of small bolts and remove the scales. To remove the speedometer indicators, unscrew the screws and turn the scale to the left. At this stage, the gauge needle will drop slightly and begin to dangle. After it freezes, you need to mark the position with a marker. This is necessary for subsequent accurate operation of the speedometer.
After dismantling all the scales, they begin to paste them. New white elements are applied over the standard equipment. To prevent the background from blending in with the arrows, they are highlighted in a different color. To improve the backlight, you will need to remove the light filter, then you can begin installing the LEDs. For these purposes, metal bases are used, which are heated and mounted on the side parts of the panel. If there are VAZ-2106 devices in dark-colored cases, it is advisable to lighten them using white “self-adhesive”.
At the final stage, the LEDs are connected by connecting them to the main wiring of the vehicle through wires. As a result, you will be able to change the color of the scales and arrows, as well as improve the backlight, which is immediately noticeable when driving at night. Most representatives of the domestic “classics” will be improved in a similar way.
Dismantling instructions
Removing the VAZ 2106 instrument scale may be necessary when repairing and replacing its elements, tuning and modification. Dismantling is not difficult and will require a small set of tools: wrenches and screwdrivers.
The removal procedure consists of the following steps:
- First of all, you need to remove the front box from below the tidy.
- Then you need to unscrew all the fasteners and pull out the lower latches.
- Remove the radio plate.
- Next, remove the casing from the steering column.
- The next step is to disconnect the wires. Each one needs to be marked to make assembly easier.
- Now you can dismantle the shield by disconnecting all connectors.
- After removing the sensors, they need to be sorted in order to assemble correctly.
After upgrading the instrument panel, assembly is carried out in the reverse order (the author of the video is Nikolay).
Stages of work
You will be interested in: “Lada-Kalina”: electrical diagram, technical characteristics
At the initial stage of improving the illumination of VAZ-2106 instruments, it is necessary to dismantle the panel panel, as a result of which access to the indicators becomes available. Next, remove all index arrows. Then unscrew a couple of small bolts and remove the scales. To remove the speedometer indicators, unscrew the screws and turn the scale to the left. At this stage, the gauge needle will drop slightly and begin to dangle. After it freezes, you need to mark the position with a marker. This is necessary for subsequent accurate operation of the speedometer.
After dismantling all the scales, they begin to paste them. New white elements are applied over the standard equipment. To prevent the background from blending in with the arrows, they are highlighted in a different color. To improve the backlight, you will need to remove the light filter, then you can begin installing the LEDs. For these purposes, metal bases are used, which are heated and mounted on the side parts of the panel. If there are VAZ-2106 devices in dark-colored cases, it is advisable to lighten them using white “self-adhesive”.
At the final stage, the LEDs are connected by connecting them to the main wiring of the vehicle through wires. As a result, you will be able to change the color of the scales and arrows, as well as improve the backlight, which is immediately noticeable when driving at night. Most representatives of the domestic “classics” will be improved in a similar way.
In conclusion
Knowing how to tune the instrument panel on a Zhiguli car yourself, you can save a lot. In addition, any owner approaches the processing of his cars responsibly at every stage. The cost of similar services in specialized centers is much more expensive, and the quality is not always guaranteed. The simple manipulations and recommendations given above will allow you to radically change the “tidy”. In addition to improving the appearance, you will receive additional protection and some useful options that will be useful for the domestic “six”.
vote
Article rating