April 29, 2016 Lada.Online 97 149 14
The dashboard of Granta or Kalina can be called modern. This can be confirmed not only by its appearance, but also by the use of LEDs, rather than lamps, to highlight readings and indicators. Let's look at how you can change the standard green color of the instrument panel backlight.
Description and location of indicators and instruments on the panel
Thanks to the tidy, the driver receives information about the condition of the car and the speed of movement.
Tidy Lada Kalina 2
A novice car enthusiast should know about the purpose of warning lights from the very first days.
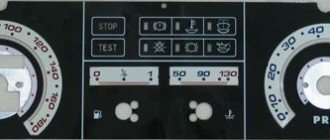
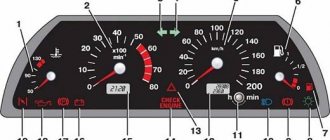
1 - tachometer - a device showing at what frequency the crankshaft rotates; 2, 4 - direction indicators, left and right, respectively; 3 - speedometer, displays the actual speed of the vehicle; 5 - coolant temperature indicator; 6 - indicator showing fuel level in the tank;
7 - fuel reserve warning lamp; 8 - button, which resets the daily mileage readings; 9 - lamp indicating that the emergency lights are on, during which the side lights and turn signals flash, indicating a car malfunction; 10 - electric power steering lamp. Goes off when the ignition is turned on.
16 — immobilizer warning light; 17 — liquid crystal screen displaying information from the on-board computer; 18 — seat belt malfunction indicator; 19 — battery charging lamp; 20 — emergency brake fluid level indicator; 21 — electronic brake force distribution lamp, red light indicates a malfunction ;
After the engine starts, the indicators light up orange. If everything in the system works normally, then they go out after 1-2 seconds.
Tidy Lada Kalina
Standard on-board computer Lada Granta/Kalina 2
The liquid crystal display is an electronic device that displays trip information collected and processed by the trip computer. Depending on the configuration, three types of trip computers are installed on the car, differing in the amount of information displayed.
The display shows the following information:
- line 1 displays the current time or (in a variant) the gear shift prompt indication mode, as well as the automatic transmission operation indication mode;
- Line 2 displays your choice of total or daily mileage;
- line 3 displays the outside temperature or (in an optional version) the functions of the on-board computer;
- line 4 displays the fuel level.
Source
Without removing the dashboard and panel
Read:
Another way. dismantle the “furnace” without removing the torpedo. Sequencing:
- Coolant drain.
- Removing the radiator cap and gas pedal. Unscrew the three nuts by 10. To remove the heater without disassembling the torpedo, you need to unscrew the cover
- Removing the retaining ring on the brake booster rod. Removes brake pedal rod with retaining ring
- Cut out the panel behind the radiator so you can pull it out without removing the dash. The radiator is removed through the split shell
- Removing the radiator with the brake pedal depressed. Before removal, the nozzles in the engine compartment are disconnected.
Finally, the radiator is removed!
The above method is good because it produces less labor and time wasted, but then it will be necessary to fix the hole left in the shell using soundproofing material or vibroplast.
Priora: how to remove the panel?
1) On the back of the dashboard, unscrew the 4 screws (asterisk). 2) Remove the glass from the instrument panel.
3) Place molar tape on the pad and mark the position of the arrows with marks. All instrument panels are calibrated, this procedure will help us accurately set the position of the needles during assembly.
4) Remove the arrows. The arrows must be pulled perpendicularly upward, while simultaneously scrolling them against the direction of travel.5) Remove the standard lens
6) Remove the metal screen holder. On the back of the instrument panel, we unsnap the metal latches of the screen.
9) In order for our scale to glow with the color we need, it is necessary to erase the green filter from it; this is done using cotton swabs, solvent or alcohol (do not use acetone). If desired, the red divisions can be left. After this procedure we get a clean pad.
10) A similar procedure must be done with the screen diffuser.
11) It is necessary to enlarge (drill out) the holes in the plastic light diffuser and paint their inner edges black (a black marker is suitable for this), this is necessary in order to install wells for illuminating the arrows. The light of the arrows will thus not illuminate the main scale.
Wells are made from any plastic tube (syringe), adjusted in diameter as shown in the photo, or thick paper folded in several layers and wrapped in black tape.
13) We begin to install the boards themselves, to do this we solder the wires according to the following diagram: a) In the version without soft ignition, you need to solder 2 wires: GND from the backlight board to 19 (ground) contact of the instrument panel, IG from the backlight board to 18 (light control ) instrument panel contact.
b) In the version with soft ignition, it is necessary to solder 3 wires: GND from the backlight board to 19 (ground) contact of the instrument panel, IG from the backlight board to 21 (ignition) contact of the instrument panel and ILL from the backlight board to 7 (dimensions) contact of the instrument panel .
If you installed a version without soft ignition, then there is always the opportunity to modify the board by installing a soft ignition unit on it.
DETAILS: Replacing the front wheel bearing of Lada Kalina
When the negative wire is connected to the -CH1 pad, the screen will light up simultaneously with the arrows; when the negative wire is connected to the -CH2 pad, the screen will light up along with the scales (applies to boards with a soft ignition unit installed).
On the reverse side we glue the adjustment buttons of the smooth ignition unit onto double-sided tape.
14) We install our wells, fixing them if necessary with a drop of glue, and install the standard light diffuser in place.
If you want to install sound insulation in your Lada Priora or tune the interior, to do this you will first have to dismantle its dashboard.
You can do this yourself if you follow our instructions.
How to set the time of Lada Granta FL
After restyling, the Lada Granta FL acquired not only a new appearance, but also an updated dashboard, on which new functions and controls became available. The readability of the on-board computer has also been improved, and its setup has become easier.
The time settings on the dashboard may differ depending on the configuration of the Lada Granta FL, let's consider them in order.
If the equipment of your Lada Granta does not include control buttons located on the steering column wiper switch, then all time adjustment will be done using one button on the dashboard. After switching to the time setting mode (as written above), with short presses we change the numbers on the dashboard. After setting the desired hour, wait 5 seconds and then you will proceed to editing the minutes. Every five seconds of inactivity, a transition will be made to editing the next functionality, after minutes you will be able to set the time zone, and after waiting another 5 seconds, exit the time setting mode.
It is worth noting that sometimes it is enough to set only the time zone value for the time to be displayed correctly. In this case, the time zone in which you are located will be displayed on the dashboard. This function will only work if the signal from the GLONASS/GPS systems is constant and stable.
Source
Possible faults
The following malfunctions are possible with the dashboard:
- Fuel level or temperature gauges do not work. The reason may be faulty sensors or damaged wiring.
- When the tank is full, the fuel level needle drops to the zero position.
- The arrow on the fuel level indicator moves abruptly and often drops to the zero position.
- The fuel reserve indicator does not go out.
- If any indicators on the device do not light up, the reason may be burnt out light bulbs, insufficient contact between the light bulb socket and the printed circuit board, oxidation of contacts, broken wires, or a malfunction of the indicator sensor.
- If the speedometer is not working, the reason may be in the flexible drive shaft of the device: the nuts are poorly tightened, a break, mechanical damage, etc. (video author - RasH19).
Lada Granta - dashboard soundproofing without removal
After purchasing a new Lada Granta, 2-3 months later, various crickets and rattles appear in the interior, and the dashboard is no exception. The main reason is the terrible build quality and cheap plastic. To get rid of rattles and crickets, we recommend doing the soundproofing of the dashboard yourself without removing it.
There can be many sources of rattling and creaking dashboards on the Lada Granta, let's look at the most common ones:
The radio or radio plug is rattling
Solution: use anti-creak or sealant.
Recommendations for changing the oil in the engine of a VAZ-2109 car yourself
The cable is rattling
The outside air (recirculation) control cable rattles. It rests against the airbag plug and rings from engine vibration.
Solution: Place a piece of yellow double-sided tape at the point where the shell and the “beard” come into contact. Secure the cable to the windshield defogger duct with a black tie. Or wrap the cable in anti-creaking material.
The air duct is rattling
The air duct rattles at the point of contact of the windshield blower nozzle.
Solution: use silicone sealant or anti-squeak.
Note that if you want to do a full range of work, we therefore recommend removing the dashboard and getting to the engine panel, which must be soundproofed.
How to remove the instrument panel on a grant video
Airbag plug squeaks
Solution: when installing the plug, coat it with sealant, or use bitoplast (5mm or 10mm).
Panel trim creaks
Solution: Remove the dashboard trim and glue the places where it touches (on the panel and on the trim itself) with bitoplast or anti-squeak.
The dashboard creaks on the Lada Granta. Solution: The solution to the problem of panel rattling must be comprehensive.
1. It is recommended to weight the dashboard using vibration materials (for example, 1 sheet of STP Gold 250 RUB/sheet is enough). Heat the pieces with a hairdryer and glue the panel with a “vibra” using a hard roller. A heavier Granta panel will produce less extraneous sounds.
2. Wrap the under-torpedo wires with anti-squeak.
Lada granta station wagon
3. Treat all removable elements with anti-squeak (panel trim, airbag cover, glove compartment, etc.)
4. Tighten all possible panel mounting nuts.
Soundproofing the dashboard is a modification that must be done at the factory, but the Volzhsky Automobile Plant provides car owners with the opportunity to do this with their own hands.
How to remove a torpedo on a Lada Kalina
Owners of a Lada Kalina car sometimes think about how to remove the dashboard in order to remove unnecessary noise or replace the heater radiator. Today I want to show you detailed photographs of the process of removing the panel with my own hands.
I would like to immediately clarify that I will remove the torpedo without draining the antifreeze (without removing the stove).
How to remove a torpedo on a Lada Kalina with your own hands:
1. Bend the front door seal. We pull carefully.
2. Remove the decor (plastic casing) from the front roof pillar. It is held on by 3 clips. In the photo I have already pasted over the lid.
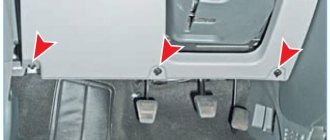
3. Here are the actual mounting points.
4. Find two screws that secure the trim in front of the glass and the air duct grilles, and unscrew them on the right and left sides
Attention! You will need a short-handled Phillips screwdriver
5. Then you can remove the black plastic trim in front of the glass. We carefully pull it towards us. This front cover is attached to these iron clips.
Attention! When I removed these clips, almost all of them went under the panel. Some were found, the rest were either behind the panel or not all of them were installed at the factory
6. Now you can remove the side nozzles on the air ducts. There you need to interestingly unscrew the screws. Those who understand it will understand.
7. Now we remove the “beard”.
8. Open the ashtray, unscrew the four screws, and take out the ashtray. Now we pry two side plugs from under the ashtray, which are on opposite sides of the emergency light button.
9. Unscrew the two screws that are under the plugs that secure the “beard from below.” Well, let’s carefully pull the “beard” towards ourselves. We turn off all the chips, not forgetting where they were.
10. Remove the cover on the steering wheel. There should be a total of two bolts and five screws.
11. Remove the cover on the dashboard by unscrewing the two black screws.
12. The end result should be something like this!
13. Unscrew the panel from above. We will need a 10mm tubular wrench. Unscrew all the nuts (there are about 7-9 of them).
We see that the air duct of the stove near the lobovuha is mounted on peculiar lock washers. What are we doing? Are we trying to remove them in the hope that we can put them back together later? I do not advise! The plastic rods will come off anyway. It’s better to tear them off right away, and then you can connect the panel with the air duct simply by using self-tapping screws (there is a regular place for them).
14. It is not necessary to remove the steering wheel. The panel will be slightly inconvenient to remove, but it is possible. Who wants to remove the steering wheel - please! I couldn't get it off.
15. Now we are looking for the remaining screws on which the panel is attached in all places (in all sides, niches).
16. Pull the panel towards you. She must come off. If it doesn’t work, it means some screws are not unscrewed. We look for these places and unscrew them.
17. Remove the panel by pulling it out into the right opening of the passenger door.
When you have already started repairing, I advise you to at the same time adjust the clutches on the Lada Kalina with your own hands.
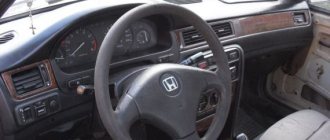
Brief characteristics of the dashboard and dashboard
In general, 39 devices are conveniently and concisely placed on this panel, which is not so much. Everything looks very good. If it were not for the branded Lada badge on the steering wheel, one would get the impression that this is not a domestic car at all. By the way, the steering wheel of the car is adjustable in one or two options (this depends on the configuration of the Lada Granta).
The main instruments that the driver pays the most attention to are the speedometer and tachometer. In this version they are designed very simply and concisely. Thanks to large numbers, the data is easy and convenient to read. During night driving, a pleasant green backlight turns on, the brightness of which is not distracting at all. Soft light is another plus of this brand.
Between the two main instruments: the tachometer and the speedometer, the on-board computer display is conveniently located.
It can be used to track fuel consumption and distance traveled. The dashboard of the Lada Granta includes 4 air blowers. Their arrangement is as follows. One air duct is located on the driver and passenger sides. Two more are located in the central part of the shield.
As standard, not to mention the Lada Granta Lux, there is an airbag in the steering wheel.
There is also a multifunctional radio in the central part of the dashboard. If we talk about the Standard and Norma configurations, they also have a special compartment lid for the tape recorder.
Car owners should not have any questions about how to remove it. Everything is done in such a way that everyone can figure out how to detach the part and then install the audio system.
Source: 1ladagranta.ru
Adviсe
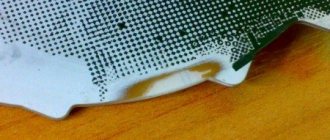
Antifreeze leaked into the cabin
To prevent problems with the heater core, you need to carefully monitor it. For example, from the first days of buying a car, periodically look under the car to see if there are dark spots there. And in the engine compartment it would be a good idea to observe the condition of the cooling system hoses. If you notice traces of antifreeze in any of these places, you need to immediately seek help, or carry out repairs yourself.
If possible, the hoses for connecting the heater radiator should be replaced with new ones, having coated the connection points with sealant. But some do not agree with this opinion. After all, sealant from the hose can get inside the cooling system and cause damage to the pump. As a result, the timing belt will break and the valves will meet the pistons.
How to remove a panel on a viburnum
Removing the instrument panel assembly with heater Lada Kalina
How to remove the panel on Kalina? This question is asked by almost all car enthusiasts who have purchased a new or used AvtoVAZ car. Lada Kalina is an almost legendary car; there are a lot of jokes and stories about it. Of course, listening to all this is quite exciting, but when you yourself are faced with one of the comic problems, it’s no longer funny.
Kalina has many different flaws, and one of them is the dashboard. At the factory, its installation is carried out manually, which can later cause squeaks, unpleasant noise and other annoying sounds during a trip.
They check exclusively the gaps, and rarely pay attention to the quality of the torpedo connection. Because of this, many owners try to remove the panel themselves to eliminate the source of the noise. But this is not so easy to do either.
But this is not so easy to do either.
Removing the instrument panel is carried out in several stages, and everything should be disconnected extremely carefully
Disassembling the panel
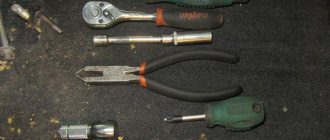
To dismantle the instrument panel in Kalina, you should arm yourself with a set of high-quality screwdrivers and patience. To work you will need:
- crosshead screwdriver;
- slotted screwdriver;
- 10mm wrench with round head;
- marker or tape to indicate disconnected wires.
Disassembly begins from the sides. How to remove a torpedo? The sequence is:
- The first step is to disconnect the rubber seal that prevents the panel from being removed. Using a flat-head screwdriver, bend it to make room for dismantling.
- Next you need to remove the plastic casing with three clips. It is located on the front pillar of the cover. Again, a flat-head screwdriver will come in handy, which can be used to pry off the socket.
- The next step is to detach the trims in front of the glass. You can unscrew them using a Phillips screwdriver by unscrewing the fasteners on both sides.
- After this you will be able to remove the black trim under the glass. It is secured with iron clips and screws, so there is no need to rush. Slowly pull towards you until it comes loose. It may happen that the clips get stuck under the panel or some of them will be missing altogether.
- We unscrew all the screws that are nearby and remove the covers from the side air ducts.
After removing all the side and side elements, you can begin to dismantle the central part.
Removing the console
Now we need to start sequentially disassembling the panel in Kalina into parts. How to disassemble the panel?
- Remove the ashtray: pull it towards you as far as it will go and unscrew the 4 screws that secure it.
- After this you can get to two plugs. They are located on the sides of the emergency lights. Use a flathead screwdriver to pry it off and set it aside.
- We unscrew the screws that are located under the plugs. These fasteners from below hold the console.
- After the two screws are removed, pull the console (shield) towards you, but slowly so as not to break the wiring. We disconnect the wiring, first marking the wires so as not to confuse which is which later.
- Now unscrew the steering wheel cover. It is held in place by 2 bolts, for which a 10mm wrench is useful, and 5 self-tapping screws.
- Next, disconnect the instrument panel cover. There are only 2 screws here.
- The top panel is secured with nuts. There must be at least 7 of them.
- As you can see, the stove air duct is tightly fixed. What to do? You will have to rip off 2 lock washers and unscrew the remaining screws, which, in fact, secure the panel in place. Only self-tapping screws are enough for fastening.
- Next, you can try removing the steering wheel. If it doesn’t work out, you’ll have to work a little harder and find the remaining fasteners. In any case, we look for all the hidden screws and unscrew them to the last.
- Pull the panel towards you. If it gives in, it means everything is unscrewed. If somewhere she doesn’t want to move away, we arm ourselves with a screwdriver and unscrew the hidden fasteners.
- After this you can disconnect it.
That's all the instructions on how to remove the instrument panel in the Lada Kalina.
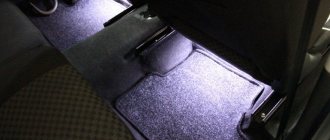
Tuning the instrument panel is one of the main reasons why a torpedo and its adjacent parts are disassembled. Lada Kalina is not distinguished by its bright design and interesting design. What can you do about it? Install panel lighting. This solution will help improve the visibility of indicators. In addition, the perception of the interior will change. You can also change the panel to another one or repaint its parts. Such tuning of the instrument panel is a radical measure, but absolutely justified. The plastic the panel is made of is simply terrible.
Dismantling the panel is a painstaking task, but the hardest thing is to then put it all together so that the panel does not creak.
You need to fit the parts well and tightly, then no sounds will occur. If you first mark the wiring, then connecting all devices should not be difficult.
Tuning the instrument panel of Grant and Kalina 2
| To change the backlight of the instrument panel of Grants or Kalina 2, you will have to try, the old way (as on the VAZ 2110 or Priora/Kalina) will not work to change the backlight due to the different design of the part. However, if you know how to hold a soldering iron in your hands, tuning the instrument cluster is not a problem. |
You will need : disassemble the instrument panel, prepare a soldering iron with a narrow tip and a desoldering pump.
After the instrument cluster board of the Lada Granta or Kalina 2 (they are the same), we check the display. If it turns out to be soldered (soldered legs are visible, not holes), then we desolder it using a desoldering pump so that the display legs (iron soldered antennae) move freely in the seats.
As a result, we have access to all the dashboard LEDs:
- blue - display LEDs
- red - arrow LEDs
- white - scale LEDs
- green - low beam indicator LED
- purple - high beam indicator LED
We replace the necessary LEDs with our own ones of a suitable color and check their operation before assembling the instrument panel; to do this, just connect the board to the cable and turn on the ignition.
When reassembling, the display antennae must fit exactly into the grooves, otherwise they will break and you will have to build them up with copper wire. Before installing the device, it is recommended to glue the panel with anti-squeak.Before tuning the instrument panel of Grants or Kalinas of the 2nd generation, once again evaluate all the pros and cons. During the modification process, there is a possibility of breaking the instrument panel. In addition, such tuning of the instrument cluster may bring problems with the warranty.
Dismantling the console on Kalina
This stage involves removing the Lada Kalina torpedo into its component components.
- Remove the ashtray: pull it towards you and unscrew the 4 screws. They keep her in her nest.
- Next we get to a pair of plugs, which are located on both sides of the emergency button. They need to be pryed off with the same screwdriver and put aside.
- Let's move on to the screws located under the plugs. It is these mounting components that hold the console underneath.
- Having unscrewed a couple of screws, we begin to pull the console towards us. We do it slowly in order to avoid a break in the electrical connections.
- We disconnect the cable blocks from the sockets of the current collectors, simultaneously marking them.
- It's time to unscrew the steering column cover. It is held in place by a pair of size 10 bolts and five screws.
- We unscrew the screws (2 pcs.) holding the casing of the panel itself.
- The upper section of the panel is held in place by nuts, the number of which should be seven. We “defeat” them.
- Removing the stove air duct is problematic. To “surrender” it, we tear off two lock washers, and then unscrew the remaining list of screws. During subsequent installation of this particular small unit, it is enough to use only screws.
- We look for all the “hidden” screws around the perimeter and “sentence” them to unconditionally unscrew them.
- Only now can you carefully pull the panel towards you. If she “listens” to you, then everything was done correctly. If any obstacles appear, it is not difficult to find the “hidden” fastening element.
Let's check: are all electrical connections disconnected? If yes, then the dismantling procedure on the LADA Kalina model has come to an end.
Lada Granta dashboard and multimedia firmware
Firmware MMS 2190 for the multimedia system in the balanced LADA Granta model allows you to significantly expand the functional potential of the built-in device.
Note that the standard version of the multimedia complex, present in the LADA Granta car in the “Standard” and “Norma” versions, does not allow you to perform the list of actions given in this material. To successfully update the dashboard firmware, only the head unit, which is equipped with the Lada Granta in the “Lux” version, is suitable.
The procedure when flashing MMS 2190 firmware provides for the presence of the “GPS” option, and more specifically, the modification of the “Globalsat BU-353S4” receiving module. In addition to it, the “head” must have a 3G modem in the Huawei E1750 model from the Megafon operator.
All designated devices are available for purchase on eBay, which is cheaper compared to offers from alternative retailers.
For domestic cars, the navigation option and the Internet are incompatible phenomena, since to ensure their full functioning, you will need to use a USB signal splitting device “DNS ATH-08”.
Nuances of multimedia firmware Grants (2190)
It is quite easy to carry out the firmware itself when installing the mms 2190 firmware. To do this, it will be necessary to use an SD card.
Among the common flaws that occur after the dashboard firmware is installed, even if it is the latest version, is the Lada logo freezing on the display of the head unit.
Modernization of the dashboard of the Lada Granta car
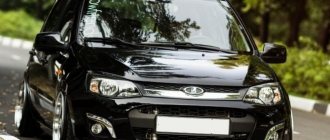
Car interior Lada Granta Luxury
Lada Granta is the flagship model of the AVTOVAZ production concern. And although only 3 years have passed since the appearance of this car on the market, it has already managed to win the love of most of the population of our country. This happened because when designing this car, the largest domestic automaker finally took into account the opinions of consumers and eliminated most of the shortcomings that existed in previous models.
Compared to the Lada Kalina, created on the same platform, passive safety was improved, the cheapest version featured an airbag in the steering column, and the instrument panel was covered with non-creaking plastic, making it less hazardous to injury. In addition, for the first time in the history of the domestic automotive industry, a domestic car with an automatic transmission (automatic transmission) became available to buyers.
Lada Granta is the kind of car that you want to tune not in order to bring the car to normal condition, but in order to impress other people. Let's consider options for improving the Lada Granta instrument panel.