VAZ cars use a clutch cable with automatic adjustment. The machine itself is a separate unit, which is fixed near the pedals. Clicking or crackling noises when the machine operates can be considered normal. But if the pedal begins to sink and the clutch does not disengage completely, then the automatic system will no longer help - you need to forcibly reduce the length of the cable. A threaded tip is provided for these purposes. That is, clutch adjustment on the Lada Grant can be done manually. Let's look at all the steps in more detail.
How can the clutch pedal click? Find out in the video.
general information
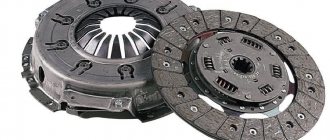
Like the vast majority of modern cars, the Lada Granta is equipped with a fairly simple clutch, which contains only a few elements.
The clutch (also called the clutch basket) includes a housing, a driven disc, and a throwout bearing. The casing, in addition to itself, also includes a pressure disk; in addition, a complex part is the driven disk, consisting of a damper, friction linings and a ring.
Each Granta is equipped with a closed-type single-plate clutch, which has a special element designed to dampen vibrations generated during rotational moments during shifts. The coupling is ensured by dry friction between the driven disc and the friction linings, which is why this type of clutch is called dry.
In addition, clutches on Grants are devoid of gaps between the release bearings and the legs of the pressure springs located in the casing, which is their main distinguishing feature compared to all previous modifications.
Replacement and repair of the AMT clutch actuator on LADA
The main distinguishing feature of an automated transmission (AMT or “robot”) from a mechanical one is the electric actuators produced by ZF, which change gears at the command of the electronic “brains”. The manufacturer claims that the actuator unit is maintenance-free and cannot be repaired, but craftsmen have found a way to repair it with their own hands.
If the car’s warranty has already expired, then replacing the clutch release mechanism actuator yourself will cost tens of thousands of rubles (article numbers: 21820160901200 and 21820170501200). In an attempt to save money, you can try to repair it.
Types of faults
All types of clutch malfunctions installed on Grants are divided into the following groups:
- The clutch cannot be completely disengaged. The reasons for this type of breakdown lie in incomplete pedal travel, vibrations and possible jamming in the driven disk hub, warpage and distortion in the pressure disk, loose rivets and faulty friction linings. In addition, such a problem is often caused by a malfunction of the drive cable, a breakdown of the compensation mechanism, or disturbances in the mechanism that compensates for the wear of the driven disk linings.
- The clutch cannot be fully engaged. This breakdown can occur due to wear of the friction linings or due to their oiling. Other reasons for this malfunction include an oily surface of the flywheel and clutch basket and jamming (or damage) on the clutch drive.
- The clutch works with jerks. This violation is caused by oily friction linings, as well as an oily flywheel and clutch basket, a stuck drive and a damaged pressure plate surface.
- An increase in noise level when the clutch is engaged is caused by a malfunction of the damper springs.
- An increase in noise level during clutch disengagement is caused by a leak from the release bearing, as well as its damage or wear.
As a rule, if the clutch pedal fails and clicking and creaking sounds are detected during its operation, most often you just need to replace the clutch cable. Exactly how this procedure is performed will be discussed below.
Preparation for repair
To remove and subsequently replace the clutch, prepare a set of tools consisting of:
- center punch;
- extension cord;
- funnels;
- heads (8, 10, 15, 17, 19 and 30 mm);
- high head (13 mm);
- heads Torx E12 and Torx E14;
- Phillips and flat screwdrivers;
- pliers;
- curved spanners (8 and 13 mm);
- straight spanners (17 and 19 mm);
- two adjustable stops;
- metal brush;
- ratchet wrench;
- caliper;
- stands;
- hammer;
- jack;
- balloon wrench;
- torque wrench;
- centering mandrel.
In addition, you will need to apply certain parts and consumables. So, you will need CV joint-4 lubricant, a guide pin M12×1.25 mm, transmission oil, wood blocks, a technical container, a hose, rags and the clutch itself.
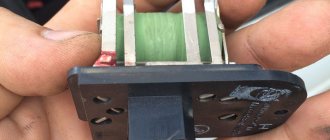
Replacing the AMT clutch actuator
How to remove the actuator
:
- Disconnect the negative terminal of the battery.
- The engine air filter has been removed.
- Remove the screw securing the wiring harness.
- Remove the three screws securing the AMT actuator unit.
All that remains is to disconnect the connector (press the fasteners, the direction is indicated by the arrow) and pull the actuator out through the top.
Install actuator 1, Figure 8-6, clutch release on bracket 3 and tighten three self-tapping screws 2. Screw tightening torque 7. 12 N.m (0.7. 1.2 kgf.m) (replaceable attachment Torx T30, knob, torque wrench).
Attach block 4, Figure 8-5, of the additional wiring harness to connector 2 of actuator 1 of the clutch release mechanism and secure the harness to bracket 3 with two fastening brackets 6.
Install actuator 3, Figure 8-4, clutch release assembly with bracket and additional wiring harness on the gearbox, install the outlet hose bracket on the actuator bracket and tighten, without tightening, two bolts 2 and nut 4 of the fastening (replaceable head 13, knob).
Adjust the extension of rod 6, Figure 8-7, of the actuator, for which you need to:
- move the actuator 5 in the direction of the arrow until the rod 6 touches the clutch release fork 7 and mark the position of the bracket 4 relative to the gearbox using a non-stress method.
- using the mark, additionally move the actuator in the direction of the arrow by an amount of 6±2 mm and finally tighten two bolts 1 and 2 and fastening nut 3. The tightening torque of the bolts and nuts is 16...25 N.m (1.6...2.5 kgf.m) (replaceable head 13, wrench, torque wrench, ruler or caliper).
Figure 8-7 — Installation of the clutch release mechanism actuator: 1,2 — bolts securing the actuator to the gearbox; 3 — nut securing the actuator to the gearbox; 4 — actuator mounting bracket: 5 — clutch release actuator; 6 — actuator rod; 7 — clutch release fork
Connect the additional wiring harness connectors to the gear shift actuator connectors, the control controller connector, and the input shaft speed sensor.
Secure the additional wiring harness with brackets built into the harness to the radiator outlet hose, to the left engine mount bracket and to the fan housing.
Also, the process of removing and installing the clutch release mechanism actuator is described in TI 3100.25100.20583 (download).
Removing the clutch
Replacing any part begins with dismantling the old one. When performing this manipulation, the car must be placed on a lift, after which the gearbox is dismantled. Then you should mark the marks on the flywheel, and the bolts securing the clutch should be unscrewed; at this time it is recommended to hold the flywheel with a screwdriver. Next, the clutch basket is removed from the engine flywheel together with the driven disk.
The final stage of work is removing the release bearing. First, pry up the ends of the spring holding it with a flat-head screwdriver, and then remove the part from the guide sleeve. Next, the bearing and coupling itself are removed, then the spring that previously held it should be removed.
Sequence of actions when removing and replacing the Lada Granta clutch with cable drive
- After removing the manual transmission (the process is described above), we mark the location of the basket and flywheel with marks. In the event that we do not plan to replace the basket or pressure plate. The decision is made by the repairman based on the diagnostic results.
Removed manual transmission
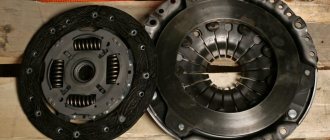
- Unscrew the bolts and remove the basket with the pressure driven disk.
Cart with disc
Note to the driver. We loosen the tightening of the bolts evenly, according to the diagonal principle, one turn of the key.
- Remove the discs from the clutch basket.
Removing a disc from the bin
- We carry out troubleshooting of parts, adjacent mechanisms and elements.
What to pay attention to when troubleshooting:
- cracks, breaks in parts;
- depressions of more than 0.2 mm;
- check for cracks on the diaphragm spring;
- We inspect the support rings; there should be no signs of wear, visible or obvious defects on them;
We replace worn elements with new ones as necessary.
Do-it-yourself clutch installation on a Lada Granta
- Using a mandrel, we install the driven disk, basket, and centering pins.
- We fix the basket to the flywheel with three bolts. We tighten the bolts evenly according to the diagonal principle with a force of 37 N.m. We use a torque wrench.
- We remove the frame and install the manual transmission.
- We fix the clutch drive on the manual transmission.
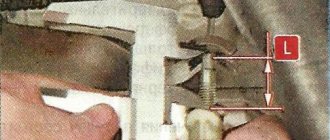
- We adjust the distance from the plastic bushing to the drive fork. It should be equal to 27 mm. We adjust the key value to “10”.
We measure 10 mm
Where is the cable clutch mechanism of the Lada Granta?
In cars of the Lada Granta family, the clutch is installed under the flywheel housing at the junction of the engine and the manual transmission housing. To carry out maintenance work, it is necessary to completely/partially dismantle the transmission.
Selection of components
The clutch life on Grants depends on the operating conditions in which the car is located, and therefore can have significant differences. When using the car sparingly, the clutch is changed after 100,000 km. One of the most common types of clutch installed by the Volzhsky Automobile Plant is LUK clutches.
As a rule, clutches are sold in the form of kits, which include a clutch disc and basket, as well as a release bearing. The approximate cost of clutches for Granta starts at 2,000 rubles and can vary significantly in a particular region.
To purchase an original kit and not a counterfeit, buy parts only in specialized retail outlets, based on real customer reviews, or order the kit directly from the manufacturer (for example, using the Internet). Sometimes clutches are assembled from components made by different manufacturers.
Lada Granta clutch adjustment
» Articles » Lada Granta clutch adjustment
VAZ cars use a clutch cable with automatic adjustment. The machine itself is a separate unit, which is fixed near the pedals. Clicking or crackling noises when the machine operates can be considered normal. But if the pedal begins to sink and the clutch does not disengage completely, then the automatic system will no longer help - you need to forcibly reduce the length of the cable. A threaded tip is provided for these purposes. That is, clutch adjustment on the Lada Grant can be done manually. Let's look at all the steps in more detail.
How can the clutch pedal click? Find out in the video.
The device of the "VAZ" clutch cable
If you open the hood, you will notice that the cable sheath is held by bushing 5. Tip 2 is inserted into the slot of the clutch fork. Leash 1, made of plastic, can be screwed or twisted from the tip. This is how the “effective length” is adjusted.
Cable device with automatic adjustment
Automation can also adjust the length of the cable. But the limits of “auto-tuning” are small.
The ability to change the cable length “manually” was provided by the factory. And that means we must take advantage of this opportunity.
All steps from start to finish
Open the hood and find the gearbox. The starter will be located nearby. All nodes are covered with a filter that needs to be removed:
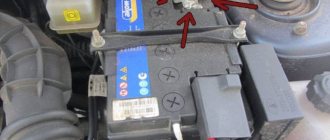
- Disconnect the negative terminal of the battery (key “10”);
- We disconnect in turn: the mass air flow sensor connector (oval), the adsorber valve (we press the tongue from below).
We also loosen and remove the fastening tie for the “thick wire”; Getting rid of unnecessary details - We remove the rubber supports from the slots and tilt the body to the side.
Replacing the clutch cable
To replace the clutch cable, you will need to perform the following manipulations sequentially:
- unscrew the nut that secures the cable to the pedal assembly (it is located under the panel);
- remove the stopper from the braid pin;
- then use pliers to remove the locking clip;
- then remove the pedal axle;
- remove the pedal bracket spring;
- Use pliers to remove the tip stop;
- release the pedal from the cable end;
- Next, you need to remove the cable sheath seal from the engine compartment;
- pull the end of the cable connected to the fork towards you, and then remove it;
- dismantle the tip driver;
- dismantle the guide bushing;
- to complete the work, it will be necessary to pull the cable through the hole located between
- engine compartment and car showroom.
Before installing the cable, it is lubricated, and a small amount of machine oil is poured between its shell and itself. Install the cable, carrying out actions similar to its removal in the sequence directly opposite to dismantling.
Clutch installation
Before you begin assembling the clutch, you must wash each removed element in kerosene. Then apply a thin layer of CV joint-4 lubricant to the guide sleeve of the release bearing and to the spline of the input shaft. The installation of parts begins with the release bearing, after which the clutch fork, spring and bushing are installed.
Next, the clutch is centered using a special frame inserted into the hole in the crankshaft end, while the driven disc is placed on the frame so that the protrusion located on the hub faces the gearbox. After this, the clutch basket is installed, and the centering frame is removed. Then you will need to install the gearbox in its proper place.
After installation, check and monitor the gear shifting process; they should turn on clearly, without clearly audible extraneous crunching sounds. In addition, ideally the car will move away without jerking.
Lada Granta SE › Logbook › Replacing the clutch on AMT
There has been no news from me for a long time. The car drives and performs its function. The mileage approached 105 thousand km. Problems began with the transmission. AMT doesn't let you get bored
I was driving at rush hour on busy streets, a gear caught fire, the car continued to drive, and after 2-3 km it stopped altogether. I turned it off and started it, it seemed to drive, but the gears engaged very poorly. After 1-2 km of travel, the car finally stopped in the middle of the road. I had to ask people to push her to the edge of the roadway.
Nothing helped, not even resetting the battery terminal. The gear was burning, the car even stopped starting (the actuator was completely silent). I was afraid that I had “arrived” at the actuator. I decided to look at the box errors using the OpenDiag application and there were 3 current errors in front of me: P0811
- Excessive clutch slip
P080A
- Clutch position not learned
P0901
- Clutch drive circuit signal out of range
After waiting about an hour, the problem went away and I very carefully moved towards the house. In the evening, with caution and a “spare car” (in case I had to drag it on a cable), I went to the neighboring city, everything was fine, no problems. Then periodically history repeated itself. The car twitched and then shifted incomprehensibly with freezing speeds, jolts, and kicks. It was scary, something had to be done. Resetting current errors using OpenDiag was not always successful.
After surfing the Internet and collecting a small amount of information (in general there is not much information on this problem), I decided to try changing the clutch in the hope that everything is fine with the actuator. A lot of articles were found, we had doubts about which set would be suitable. I contacted a person working at a Lada dealer, he advised me to purchase a Sachs
for 2110. He said that they practice installing such kits on Vesta 1.8 and everything runs smoothly.
Ordered a Sachs
(art. 3000951033), but there is a small problem, the release bearing is included in the kit for the old gearbox, I had to buy an
Ina
(art. 2181-1601180-01). The clutch is good, made in Slovakia.
I started looking for where to change it, the dealer charged around 5000 rubles for the work. As a result, a person working at that same dealer came to the rescue and did it at home, also training the actuator, for only 2000 rubles.
It was not in vain that I changed the clutch; my old set was already maximally worn out. It is not entirely clear why the wear is so uneven.
After the replacement, I drove more than 2000 km at an intense pace around the city (in 2 weeks). I didn’t write in the bulletin board right away, I wanted to check everything thoroughly and now I can say with confidence that it’s definitely worth installing this clutch kit. The car drives a little differently than the factory one. Now you can even start from a standstill with wheels slipping. It has not been possible to do this with the original clutch kit since the moment of purchase. In traffic jams nothing jerks or jumps, the clutch firmly withstands all the hardships of using the car. I am satisfied with the work done, and the price turned out to be very reasonable.