Removing the instrument panel on VAZ 2110, 2111 and 2112 cars is not an easy task. But at the same time, it is possible to carry out this repair yourself, if you have the necessary tools at hand, as well as clear instructions. Regarding the action plan, there are not many detailed guides on the Internet for removing and installing the instrument panel, and all this is due to the fact that the procedure has a number of difficulties and subtleties that not everyone can remember when writing such an article.
However, I will try to make material that will at least 90% help give the overall picture and the main points that should be taken into account when removing the panel on a VAZ 2110-2112. To perform the repair you will need the following tool:
- Phillips screwdriver, both short and long.
- The head is 10 mm, preferably deep.
- Ratchet handle or crank.
- Wire cutters or sharp knife.
- Flashlight if necessary.
Installation of LED light bulbs
Quite often, conventional lamps are replaced with LED ones. This is due to the following points:
- Diodes last much longer than regular lamps. That is why, by making just one change, you can eliminate the possibility of violating the integrity of the structure.
- Diodes tend to be smaller in size at high levels of illumination. Diodes tend to be brighter at smaller sizes.
- Electricity consumption is significantly reduced. By replacing all conventional lamps, you can significantly reduce the load on the electrical cable, generator and installed battery.
In general, we can say that installing LEDs leads to a significant change in the appearance of the dashboard. The work is quite simple:
- The dashboard is being dismantled.
- Selected LEDs are installed instead of conventional lamps.
In general, we can say that VAZ 2110 instrument panel tuning in this case will significantly change its design. The work does not take much time and money.
| Engine | 1.6 l, 8kl (Euro-2) | 1.6 l, 16cl (Euro-2) | 1.6 l, 16cl (Euro-3) |
| Length, mm | 4265 | 4265 | 4265 |
| Width, mm | 1680 | 1680 | 1680 |
| Height, mm | 1420 | 1420 | 1420 |
| Base, mm | 2492 | 2492 | 2492 |
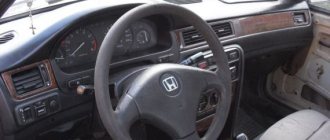
How to remove a torpedo on a VAZ 2110 with your own hands
VAZ 2110 owners pay attention not only to timely maintenance and vehicle serviceability. Appearance, interior trim, and instrument panel play an important role.
Sometimes it becomes necessary to disassemble the front inner lining of the car.
The article will help car enthusiasts independently remove, replace individual elements, change the interior, torpedoes of a VAZ 2110 car, and perform the necessary repair and maintenance work.
Types of torpedoes on the VAZ 2110
The VAZ automobile plant produces a number of different modifications of the VAZ 2110. The differences concern not only the power unit, transmission, systems, and mechanisms. The surroundings of the cars are undergoing changes. The main options for completing the front panels are known.
Basic old sample. Simple strict design. The instruments are located opposite the steering wheel.
Overlay panels "Chestnut":
- with a standard layout (reminiscent of the first issue);
- The dashboard is in the center, to the right of the steering wheel.
Home craftsmen contribute to the decoration and replace the cladding using spare parts from other car models. The landing mounts of the released panels and torpedoes match. It remains to pay close attention to the wiring and establish the correspondence of the signals.
Why is it necessary to remove the torpedo?
In addition to the aesthetic component, dismantling a torpedo has the following goals:
- gaining access to on-board electrical wiring - repair, replacement of electrical wires, connectors;
- connection of additional devices,
- air duct maintenance;
- prevention, installation of insulation of the interior from engine noise;
- elimination of vibration, squeaks of panel components, torpedoes.
Preparing to remove the torpedo on a VAZ 2110
To work you will need:
- standard set of wrenches (open-end, socket, ratchet wrench with a set of heads),
- flat blade screwdriver, Phillips head,
- mount,
- marking tags (sign connectors),
- attentiveness, patience (there is delicate, painstaking work ahead).
It is necessary to remove the driver's, passenger's seats, and steering wheel.
Procedure for removing the torpedo
If you decide to start replacing the torpedo on a VAZ 2110, then follow these steps:
- Unhook the torsion bars from the front under the seat (take them out of the fixing brackets, pry them up with a pry bar);
- unscrew the four nuts;
- remove two fasteners, release the front stop;
- from the rear seat side, using a 10mm ratchet wrench, unscrew the three bolts securing the seat to the runners;
- push back, tilt the seat back;
- unscrew the 2 front bolts securing the guide skids;
- remove the seat from the car, do the same with the second seat;
- pick up and remove the silver “Lada” plate on the steering wheel;
- unscrew two self-tapping screws;
- remove the top cover;
- lock the steering wheel;
- Using a 24 mm socket wrench, unscrew the nut in the center of the column;
- Lightly tapping the wheel from bottom to top with the heel of your palm, swaying left and right, remove the steering wheel from the splines. The salon is ready.
Step-by-step instructions for removing the VAZ 2110 dashboard
- If you decide to start working on removing the torpedo with your own hands, then first read the step-by-step photo guide; if you have any questions, below there is a description of the steps in text.
- Work that involves tampering with the vehicle's electrical wiring (disconnecting connectors, devices) begins with disconnecting the negative terminal of the battery.
- Remove the steering column trim, disconnect the steering switch plug, remove the switch, ignition switch, block with wires.
- Disassemble the floor tunnel:
- On the left and right of the tunnel, facing panels with slots are secured with four self-tapping screws (through them warm air is supplied to the feet of the driver and front passenger). Use a Phillips screwdriver to remove the cladding elements.
- There is a rectangular plastic plug between the handbrake and gearshift levers. Using a flat blade screwdriver, carefully pry and remove the tunnel cover part.
- Remove four self-tapping screws securing the tunnel lining, in pairs, two on the right, 2 on the left.
- Lift the facing box from the rear edge and move it back a little.
- Disconnect the cigarette lighter and window controls (if the car is equipped with an electric window system) from the on-board power supply (plastic connectors), and mark them.
- Turn the cover to one side and, from the inside, disconnect the fastener holding the gearshift lever housing. Place the lid aside.
- Using a wrench, unscrew the nut securing the metal air duct to the floor on the passenger side. Remove the heat pipe.
- The base of the tunnel is held in place by four nuts: two in the middle, the rest in the rear. A 10mm socket wrench will help remove the fastening. Remove the box from the car.
- Remove the glove box.
- Unscrew the self-threaded fasteners on the hinge brackets with a screwdriver.
- Disconnect the backlight wires, hold the structure from below, and remove the box.
- Press the latch button and easily fold the fuse box down.
- Unscrew the self-tapping screw and remove the latch.
- Lift, turn the block over, disconnect the wires, take it out. Don't forget about labeling.
- Detach the compartment door.
- In the depths of the opened niches, screws are visible that secure the instrument panel. Remove them with a screwdriver with a cross on the end. Do the same with the lower side screws.
- The instrument panel is screwed to the controller bracket with two screws. While holding the head from turning with a screwdriver, unscrew the nuts with an 8-mm open-end wrench.
- Pry and remove the grilles of the side air exchange nozzles in the cabin.
- Two nuts secure the panel at the top. Using a ratchet wrench and a 10mm socket, remove the fasteners.
- Using both hands, remove the structure from the studs and bring it into the salon.
- Arm yourself with marking material, sequentially disconnect and mark the pads.
- Unhook the headlight hydraulic adjustment.
- Remove the dashboard.
- Use a tool to separate the air duct from the air distributor.
- Carry out the necessary work. Assembly occurs in reverse order. Plastic latches require careful handling. Tighten the screws gently. Lubricate threaded connections.
Source: https://vaz-2110.ru/kuzovnoj-remont/kak-snyat-torpedu-na-vaz-2110-svoimi-rukami.html
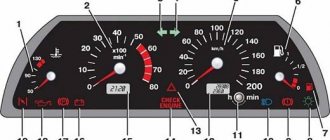
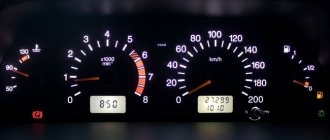
Changing odometer color
You can significantly modify the dashboard by removing the protective film from the surface of the screen. This is due to the fact that such a film is green in color. The work consists of the following stages:
1. The structure will be installed in order to get to the screen. 2. The next step can be called removing the film. As a rule, it is attached to the surface of the screen using special glue. 3. After removing the film, you should spend a lot of time cleaning the adhesive. To perform this type of work, you should use a knife.
In the standard version, the instrument panel has a greenish tint; after carrying out the work in question, it will become bluish. Whether to carry out such work or not is everyone’s choice.
Changing the color of the instrument panel scale
If desired, you can also change the instrument panel by changing the color of the scale. Such modification will also not take much time and effort. Let's consider the following features of performing such work:
- To begin with, as in previous cases, you need to dismantle the structure. By completely disassembling the structure, you can significantly change it.
- You can change the dial by removing the previously applied scale. This can be done using a knife. However, it is not possible to remove everything mechanically - you need to use a solvent. With a careful approach to solving the problem, you can completely remove the old scale without significant damage to the base.
- After the base has been changed, the LED strip is attached. In our case, a green ribbon was chosen. We fasten the tape and connect it directly to the light bulb socket.
- White goes well with green. That is why it is necessary to dismantle the hands, clean them of green color and apply white varnish. If there is no special varnish, then you can use the one that is used for applying to nails.
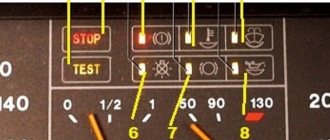
Sidebar: Important: The tuning in question can significantly increase the readability of the dashboard: during the day, all values are quite clearly visible, at night the backlight does not hurt the eyes. That is why the combination of white and green can be chosen when upgrading the instrument panel.
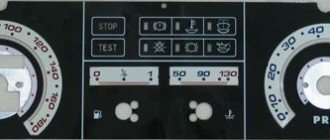
Vibrant variety of colors
Today, the fashion for changing the dashboard lighting is gaining fantastic momentum. Almost everywhere cars have neon lighting or internal LED illumination. However, all these innovations are not a cheap pleasure, which not everyone can afford. The situation is different when replacing the factory backlight with a multi-colored one.
You can, no doubt, use ready-made tuning options, but this will also cost a lot. It is best to do it yourself. In this situation, the main thing is to have the necessary materials and patience. First you have to disassemble the “tidy”. The protective glass must be removed. Next we remove the arrows. To do this, you need to use a screwdriver and hard cardboard.
It should be placed under the arrow, and then pry it off with a screwdriver. Then you need to carefully and slowly lift it to the top. Next, remove the backing. A utility knife will be useful for this. It must be inserted between the panel and the substrate and a layer of sealant must be cut in a circle. Then remove the backing. Let's disassemble the panel and get started.
1. Remove the filter layer using a utility knife. A filter is a colored layer of paint. It is applied from the back of the substrate and gives color illumination to the speedometer numbers and other sensors. To completely get rid of the filter, you can use acetone or another liquid that contains alcohol.
2. Next, change the backlight color. First, you can change the odometer backlight. To do this, you will need to dismantle the odometer screen, and then remove the blue film and remove the backlight bulb. It should be replaced with a multi-color universal LED. He can change colors. We connect the LED to the socket of a standard light bulb. Reinstall the odometer screen.
3. Now you can start completely replacing the backlight. We attach the LEDs to the “tidy” frame. Such LEDs can be purchased complete with a color switch. We install them in place and attach them to the standard dashboard backlight contacts.
4. Let's move on. Now we need to make sure that the arrows have the ability to change the backlight. To do this, remove the layer of red paint from the arrows. For this operation, you can use a stationery knife and acetone. Once the arrow is clean, it can be painted using white nail polish. The main thing is that the arrow is white, since this color conveys the color scheme of the LEDs.
5. Before the final stage, you need to attach the LED color switch to the panel. Such a switch can be installed, for example, in the lower right corner of the dashboard. After this, you can install everything in place. First, the substrate is installed. For greater reliability, you can use a sealant. After this, we put the arrows in place. We insert the protective glass. After that we admire the result.
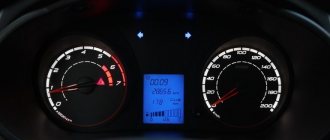
Adjustable backlight
Modern foreign cars almost always have adjustable dashboard lighting. This design option allows you to adjust the brightness depending on your own preferences. VAZ 2110 instrument panel tuning also allows you to modify the design and make the backlight adjustable. If desired, you can change the backlight design as follows:
1. You can leave the standard one and create a blue backlight in order to diversify the design as much as possible. 2. This function works as follows: if you turn on the backlight, it lights up in blue, if you reduce the brightness, the color changes to standard green. The blue color is quite attractive, and when you get tired of it, you can change it to the standard color.
A similar change can be made by installing additional blue diodes, as well as an electronic regulator.
Installing a dashboard from another car
Every year, more advanced dashboards were created. An example is the Priora model, which has a rather attractive design and navigation screen. If necessary, you can adjust the dashboard to the vehicle in question. In general, we can say that it is possible to install the instrument panel from the Priora practically without changing it. The only thing to consider is:
- You need to match the power supply to the navigation screen.
- To control the active unit, a special joystick is installed, which is installed under the steering wheel on the right side.
- In order for navigation to work, you must install an antenna and connect it to the unit.
All the difficulties lie in connecting the power. The VAZ 2110 does not provide for the installation of a screen, which determines the absence of a feature. Therefore, you should understand the features of the car’s electrical system and select the necessary cables and chips.
Dismantling algorithm
So, let's begin:
- We remove and remove the front seats from the interior so that they do not interfere with the disassembly;
- Disconnect power from the battery;
- We lower the steering wheel of the VAZ 2110 to the lower position;
- Unscrew the screws that secure the panel covers. These are two screws on both sides of the tunnel. Now you can remove the shield;
- We remove the plug on the tunnel in the center by prying it off with a screwdriver;
- We unscrew the screws of the central tunnel to remove it. Before doing this, disconnect the wires from the cigarette lighter;
- We remove the air duct for heating the interior of the VAZ 2110. To do this, having disconnected the cover from the gearbox, you need to pry off the latches with a screwdriver, then remove the air duct;
- We remove the central panel by unscrewing it from the floor;
- Now it is possible to disassemble the torpedo. First, unscrew the mount that holds the glove compartment, disconnect it from the backlight, and take it out;
- In the hole where the glove compartment was located, we remove the screws on both sides, as well as directly behind the glove compartment;
- We unscrew the VAZ 2110 torpedo mount with a key and a screwdriver;
- Near the left pillar we pull out the air duct by prying it with a screwdriver;
- With special care you need to remove the torpedo, supporting it with your hands while unscrewing the nut with a spanner. Then, lifting it up, remove it from the pins;
- Now you need to remove all the wires, marking them with a marker as you go so that you don’t get confused when reinstalling them;
- It became possible to replace the lining and carry out noise insulation work.
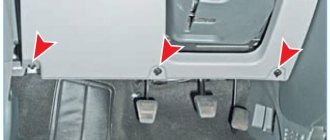
Unscrew the two self-tapping screws securing the right flap of the floor tunnel liningRemove the shield (Left is similar)
Using a screwdriver, remove the plug from the floor tunnel lining cover
Use a Phillips screwdriver to unscrew the screws securing the lining cover: two in the middle part of the tunnel
and two in the back
Raising the cover of the floor tunnel lining
Disconnect the cigarette lighter wire connectors
Using a screwdriver, remove the gearshift lever cover holder from the floor tunnel lining cover
Using a 10mm wrench, unscrew the nut securing the interior heating air duct
and remove the air duct
Using a 10mm socket, unscrew: two nuts in the middle part of the front fastening of the floor tunnel lining housing
and two rear mounting nuts
Removing the floor tunnel lining body
Using a Phillips screwdriver, unscrew the two self-tapping screws securing the glove box hinge brackets
Holding the glove box
disconnect the wires from the lampshade and remove the box
Using a Phillips screwdriver, unscrew the two screws securing the instrument panel, located: on the left - under the cover of the mounting block and on the right - under the glove box
Using a Phillips screwdriver, unscrew two screws (one on each side) of the lower side mounting of the instrument panel
Using a Phillips screwdriver and an “8” wrench, unscrew the two screws securing the instrument panel to the controller bracket
Prying it up with a screwdriver
remove the side ventilation and heating nozzles
Using a 10mm socket, unscrew the two nuts for the upper fastening of the instrument panel.
Lifting up, remove the instrument panel from the studs and move it back
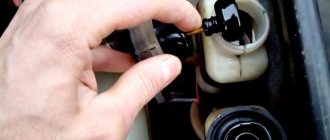
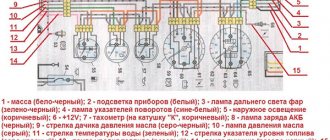
To completely remove the instrument panel, disconnect the connectors of the wiring harnesses (having previously marked them) and remove the headlight hydraulic corrector
Removing the instrument panel
Use a screwdriver to pry off the foot heating duct
and disconnect it from the air distributor housing