Removing the instrument cluster of Lada Priora
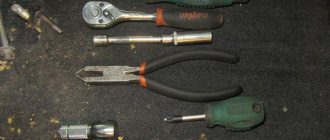
Necessary tool . Phillips and straight screwdrivers. Before starting work, disconnect the negative terminal of the battery.
Remove the mounting block cover:
- Turn the three locks of the fuse box cover 90°.
- Unclip the latches and remove the cover.
It is not necessary to remove the steering wheel; it will be enough to install the steering column in the lowest position. Then:
- Unscrew the two lower (No. 1) and two upper (No. 2) self-tapping screws securing the dashboard trim using a Phillips screwdriver.
- Remove the dashboard trim of the Priora, removing the 3 protrusions of the trim from engagement with the panel.
- Unscrew the 2 screws securing the instrument cluster using a Phillips screwdriver.
Tilt the top of the instrument cluster toward you:
- Remove the tabs at the bottom of the instrument cluster from the grooves in the instrument panel.
- Use a flat-head screwdriver to pry off the connector with the instrument panel wires.
- Disconnect the block with wires and remove the Priora instrument panel.
Installation of the device is carried out in reverse order.
How to remove the instrument panel on a Lada Priora with your own hands
Dismantling of the car interior is carried out mainly to replace a part that has failed; this is often done for backlight bulbs. To do this yourself, first of all, you need to know how to properly remove and disassemble the dashboard. This is quite simple to do; you should select a suitable screwdriver and carefully remove all the attached screws.
- The first step in disassembling the panel is to remove the dial hands. They can be removed using a regular knife, but it is important to be careful not to damage the speedometer components. Using the procedure of scraping out the gasket, it is time to replace the backlight, but if you are not going to change the backlight of the sensors, you can simply clean them.
- If the clamp breaks or you encounter a breakdown of the instrument panel, repairs can be left in the hands of a specialist. However, if you are familiar with the panel pinout, then it is possible to solve the problem on your own.
- Removing the console contains several nuances, but overall it is a simple process. First of all, you need to know how it is attached. Under the cover you will find two screws, and four more are hidden by the radio and ashtray. Each of the screws serves as a fastener, and to remove the console, you will have to unscrew them.
- After this, you need to pull the cover and disconnect the nozzles from the stove. Then you will need to disconnect the heating system, control system and clock. After these steps, the console will be easy to pull out.
Step-by-step instruction
1. Set the steering wheel to the lower position.
2. Next we need to remove the instrument panel trim. It is secured with four Phillips screws.
Unscrew the 2 screws on top.
In order to get to the lower mounting screws, you need to remove the plastic from the bottom of the steering wheel.
To remove, turn the three latches counterclockwise half a turn.
After turning the clamps from above, pry up the plastic with your hand and remove it.
3. Unscrew the 2 lower screws securing the instrument panel trim.
4. Using both hands, remove the cover. Let's start from the top.
Be careful not to break the latches.
5. Unscrew the 2 screws securing the dashboard using a Phillips screwdriver.
6. After unscrewing the screws, pull the dashboard slightly towards you.
7. Next you need to remove the connector that goes to the dashboard. The connector comes with a clever lock.
Press the latch in the indicated place below with a flat-head screwdriver.
After pressing, use a screwdriver to move the lock back. There is a boss on the latch that a screwdriver hooks onto and you can pull the latch back.
After the lock is removed, the connector can be easily removed from the instrument panel by hand.
8. We remove the instrument panel and perform the necessary operations, for example, replacing the panel backlight lamps.
9. We perform assembly in reverse order.
Video lesson
How to remove the center console (panel trim) of Lada Priora
The interior of Priora 2 (after the latest restyling) is significantly different from the previous version of the car. The interior now has a more stylish dashboard (dashboard) with the ability to install a modern multimedia system. If you are engaged in independent modifications or repairs of your car, then you will need instructions for removing the central lining (together with the tunnel, it is also called the “beard”).
The plastic center console is attached to the panel (dashboard) with 6 screws. To gain access to the lower two mounting screws, you will have to remove the tunnel cover:
- Remove 2 screws under the heater and air conditioning control unit;
- Remove the gearshift knob cover by prying it off with a flat screwdriver and remove the 3 screws under the cover;
- Unscrew the 2 lower screws securing the center console .
To remove the remaining four screws securing the center console:
- Remove the upper block of buttons and the plug by prying them off with a flat screwdriver or a plastic spatula;
- Remove the 2 upper console mounting screws;
- Remove the 2 middle console mounting screws .
All that remains is to pull the center console towards you and disconnect the connectors with wires at the back. Installing the plastic cover is done in the reverse order. The process is also shown in the video:
Let us remind you that after removing the center console, it can be covered with vinyl film.
What lamps are installed in the Priora dashboard
Depending on the year of manufacture, Lada Priora can be equipped with both lamps with a conventional socket and with a VDO socket. To accurately determine the lamps, you must first remove the shield and determine the type of socket. The lamps in the sockets are the same, however, from the factory, the lamp mustaches are soldered to the socket and to replace the lamp, you need to unsolder or pull out the old one and install a new lamp in its place, while soldering the mustaches.
However, you can take a simpler route by purchasing ready-made lamps with sockets. Note that the lamps are installed in them without soldering the mustaches. That is, if the lamps burn out further, you simply change the lamp and that’s it.
A regular lamp socket looks like this
This is what a lamp with a VDO socket
Is it possible to install LED lamps?
Instead of conventional dashboard lamps, some owners install LED ones. The advantage of them is that they provide brighter light and you can choose lamps of different colors. However, some LED lamps are longer than conventional lamps, so when installed in the instrument panel, they fit closer to the light filter and create a bright spot. But at the same time, the panel itself and the indicators become brighter.
Advantages of LEDs in the shield
- brighter light, allowing better illumination of devices
- Possibility of choosing lamps of different colors at will
- longer lifespan of quality LEDs
- Too bright LED lamps create glare on the panel, which does not look very good
- sometimes the panel looks too bright and distracts from movement
- The bright light of the panel can cause eye fatigue
When installing LED lamps in the instrument panel on a Priora. Brightness adjustment does not work very well due to the fact that diodes consume very little energy and therefore, unlike conventional lamps, do not lose brightness when the current supply is reduced.
Removing the instrument panel
To remove the shield you will need a flathead and Phillips screwdriver.
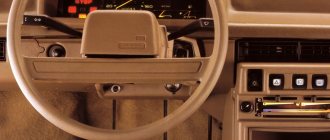
Unscrew the two top screws (as shown in the picture), then carefully remove the panel under the steering column. It is held on top by clamps, and on the bottom by 3 fasteners that just need to be turned.
Under the panel we see 2 more self-tapping screws for fastening the shield; we also unscrew them. Now lower the steering wheel to the lowest position and remove the plastic cover of the shield.
Now all that remains is to unscrew the two screws holding the dashboard itself. They should be unscrewed carefully, as the screws may fall under the panel. It is better to unscrew them with a screwdriver with a magnetized tip.
We pull the panel slightly towards ourselves and see the green block and wiring harness. Disconnect it by pressing the “tab” and pulling slightly upward. After which the instrument panel will be removed.
How to remove the instrument panel on a Lada Priora yourself
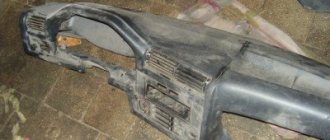
In comparison with earlier car models that were produced at the plant, VAZ has significantly improved the dashboard in Lada Priora car models.
During the development of the new instrument panel, the manufacturer used SoftLook plastic material, which in its appearance is very reminiscent of high-quality leather. In addition, this material is highly durable and difficult to damage or scratch. The car manufacturer decided to use plastic of this type, in addition to the dashboard, also in the door trim. The dashboard of Priora model cars contains elements that are varnished black. In addition, the cars are equipped with a GLONASS-GPS navigator, the advantage of which is a large touch screen. The color screen displays the necessary navigation information: audio system interface, navigation connection, route system configuration, and so on.
To control the navigation system, there is a steering column switch on the right side, which allows you to comfortably carry out the necessary actions. Most experts who reviewed the domestic car noted that the Priora is equipped with a high-quality built-in computer. This device is ideally suited for users, and the information is displayed on the screen in Russian, which is very important for many drivers.
It is also worth noting that the navigator has full support for 83 regions of the country. It has a built-in detailed road map, where there are more than 300 thousand different objects for the driver. For example, a user can easily find a gas station, car service center, hotel, cafe or restaurant nearby.
The detail of the routes deserves special attention - the driver will be able to navigate even by house numbers.
Changing the lamps in the dashboard
There are a total of 5 backlight lamps in the instrument panel on the Priora - 4 of which are in the middle and one illuminates the lower display.
We replace the lamps with regular or LED ones and reassemble them in the reverse order.
If you install LED lamps, be careful, they have polarity. Therefore, before installing the shield in place, connect the block, turn on the dashboard lights and check that all the lamps are on.
Replacing light bulbs in the dashboard on a Lada Priora: what they cost,
Of course, you can drive without the instrument panel illumination, but in the dark it is not only inconvenient, but also unsafe. On the other hand, replacing such a thing as a small dashboard backlight lamp at a service station is unreasonably expensive. What if you make these minor repairs yourself, spending only on new light bulbs? Why not? In this article I will talk about replacing the light bulbs in the dashboard of a Priora car yourself.
What do backlights do?
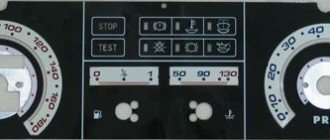
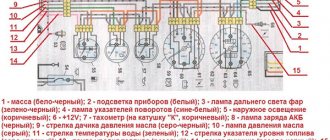
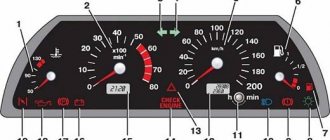
It would seem like a stupid question. Naturally, for the lighting. Nevertheless, let’s take a little break from replacing lamps and find out what exactly these lamps are responsible for lighting. Take a look at the standard dashboard (DP) of the Lada Priora.
Priora panel
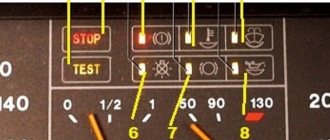
It has 4 instruments with arrows (positions 1, 5, 9, 10), an LCD display of the on-board computer 19 and many auxiliary light indicators. So, the light bulbs we are talking about and which we are going to change are responsible for illuminating only the pointer instruments and the display. Everything else is illuminated by separate SMD LEDs located on the board. In the photo below I have marked some of them with red arrows. Black arrows indicate the installation locations of the instrument backlight and display lamps.
Fragment of the electronic circuit board of the Priora car
What am I getting at? Moreover, before tearing apart the dashboard of your Priora, make sure that replacing the backlight bulbs is really necessary. If, for example, your turn signal indicators or emergency oil pressure sensor do not light up, then the problem is completely different, and only a qualified electronics engineer who knows how to work with electronic circuits and SMD components can solve it.
Priora instrument panel: detailed description and analysis technique
The combination of these devices allows you to fully control the operation and condition of the vehicle while driving.
Removing the instrument panel
We carry out work to replace the instrument panel, panel wiring harness and elements of the heating and ventilation system. Disconnect the wire terminal from the negative terminal of the battery. We remove the steering column switches (see “Removing the steering column switches, switch connector and spiral cable drum device”). Remove the cover of the fuse box (see “Replacing fuses and relays”). We disconnect the wire blocks from the ignition switch (see “Removing the ignition switch, replacing the contact group and immobilizer coil”). We disconnect the wire blocks from the electric power steering control unit (see “Removing the steering column”). Remove the floor tunnel lining (see “Removing the floor tunnel lining”). Overcoming the resistance of plastic latches...
Devices on the dashboard and their purpose
| Device | Description |
| Tachometer | It indicates the rotational speed of the shaft in the motor. The scale has divisions of 0.5 and ranges from 0 to 7. To find out the frequency, you need to multiply the readings per minute by 1000. The maximum that is possible is 6 thousand revolutions. The red zone is a threshold that should not be exceeded. |
| Left turn indicator | If it turns on, the green light comes on. At the same time, it will flash and the light signal will be accompanied by a sound. The speedometer is installed to indicate the speed of the vehicle. |
| Sensor with an arrow that shows the temperature level for the coolant | If the temperature rises above 115 degrees Celsius, the needle will move into the red zone. In addition, a special sound signal will sound to alert the driver. |
| Fuel indicator arrow | If the level has dropped, the indicator will light up red, which will mean the gasoline reserve is no more than 5 liters. It is better not to use fuel completely, but to replenish it in advance. Nearby is a fuel indicator. It is indicated by a fuel pump symbol and is activated when refueling is needed. |
| Daily reset button | This button switches operating modes. When pressed, the emergency button glows red. She turns on all the side lights, which indicates that the car has broken down. |
| Indicator for electronic power steering | When the engine starts, the button lights up and is orange. There is an indicator responsible for the high beam headlights. When the high beam is turned on, the indicator will light blue. |
| Parking brake indicator | It lights up when the brake is applied. Signpost for outdoor light. It is triggered when external lighting devices are turned on. The airbag button is activated for 4 seconds. The indicator will indicate that the ignition is turned on. |
| Oil pressure indicator | In an emergency it is red. When the engine starts running, the indicator goes out. If it does not respond when you start the engine, there is a problem with the sensor, wiring, or device. If this sensor starts beeping while the engine is running, you need to immediately turn it off and identify the problem. If the oil level is low, do not operate the vehicle, otherwise the engine may break down. |
| System immobilization sensor | is responsible for the security of the entire vehicle. The liquid crystal display of the computer shows all the functions of the computer, on top you can see the mileage per day or total mileage. There is an indicator that shows that the seat belts are unfastened. There is one that shows a breakdown of the ABS system. |
The instrument cluster on the Priora also has a battery discharge indicator. A sensor has been installed for the emergency braking system. The engine start indicator lights up when the engine is started and goes out when the engine starts running.
Lada Priora - how to disassemble the instrument panel
Disassembling the instrument panel on a Lada Priora car is carried out in order to replace failed elements. Prepare a standard set of tools, remove the panel and perform the following sequence of actions:
- Remove the windshield deflector by unscrewing the three screws that secure it.
- After unscrewing two screws, remove the left nozzle for blowing and ventilating the interior, and then the right one.
- Using a screwdriver, remove the rear window heating switch from the panel and disconnect the block with power wires from it.
- Remove the ashtray.
- From the holes in the trim in the console, remove the pins of the glove compartment cover and remove it.
- Unscrew the four screws securing the console trim.
- Using a screwdriver, we remove the container or radio tape recorder (if installed) from its mounting socket.
- We unscrew the remaining two screws securing the console trim, which are located on the sides of the window under the radio and, overcoming the force of the spring clamps, remove the trim.
- Remove the hazard warning switch and disconnect the block with power wires from it.
- Disconnect the power wires from the clock, heater motor switch and heater control unit.
- We press the latch and remove the clock from the console trim.
- Remove the interior heater control unit by unscrewing the four screws securing it.
- We remove the central nozzle of the ventilation system by unscrewing the two screws that secure it and pressing the four latches on the bottom and four on the top.
- Remove the fuse and relay box.
- We remove the glove box light switch by disconnecting the power wire from it and unscrewing the screw securing it.
- Using a screwdriver, remove the glove compartment light and disconnect the power wire from it.
- We remove the left and right air ducts of the heating and ventilation system by unscrewing two screws each securing them.
- Remove the air flow distribution flap drive motor. To do this, unscrew the screw securing it and disconnect the supply wire from it.
- Remove the foot warmer ducts.
- Unscrew the two screws and remove the air heating distributor.
- Carry out the necessary repairs and replacements, then reassemble in reverse order.
Improving the Priora dashboard using tuning
Compared to other VAZ cars, the Lada Priora has a more modern design and fairly high-quality materials. The panel is made of Soft Look plastic and has a convenient instrument cluster. However, there are also disadvantages, for example, the backlight could be more effective. Therefore, many drivers decide to tune the Priora instrument panel.
Analysis of the Priora shield
The panel can be attached in two ways. These can be latches that you just need to press and the panel will simply come out. Or there may be bolts that need to be unscrewed with a screwdriver. However, in general the panels all come out the same way without any effort.
We continue disassembling for subsequent tuning of the Priora instrument panel.
Once you have removed the panel, you need to remove the glass from the front and unscrew the back cover. It is held on by several bolts. Under it you will see a green microcircuit and other internals of the devices.
Visor
After the back cover, you need to remove the visor. It is held on by two latches. The arrows should be positioned at zero. In general, when disassembling the panels, it is better to take a photo of where the arrows point, so as not to get confused later and to align them correctly.
Arrows
The next stage of tuning the Priora dashboard is removing the arrows. This must be done carefully, in no case should you pull them, tear them or apply much force. The arrows are removed by turning counterclockwise and lightly pulling upward.
If the arrows are jammed and cannot be removed, you can use a screwdriver and “pick them up” a little. We pry the arrows on both sides and gradually pull up.
At some point the arrow will pop out, but be aware that the spring may cause it to fly quite far.
You must try not to touch the coating with your nails, otherwise marks and scratches may remain on the panel. They will be highlighted and spoil the whole picture.
THIS IS INTERESTING: Where is the starter relay on the Daewoo Nexia
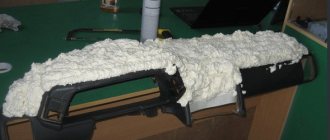
Overlay and light guides
Next, remove the cover. Some Priora instrument panels cannot be disassembled without removing this trim. But in other cases it is better to remove it, since because of it you cannot see what is behind the devices and how the backlight is located. The backlight can be uniform for all sensors or separate for each. Remove the glued overlay with light filters so as not to damage it in any way.
Priora usually has three separate light guides. They are attached with latches and can be removed very easily. Sometimes the light guide may be damaged during removal. There is nothing wrong with this and you can continue to use it.
Removing the screen
To continue disassembling the instrument panel in the Priora for tuning with your own hands, remove the screen. It rests on rubber conductors, so it is also easy to remove. Turn the panel over and unscrew the remaining bolts. We also take out light bulbs that are no longer needed.
Using pliers, release the clamps and take out the screen. Under the screen there is another light guide - a bright light green color; it must be removed.
The panel is almost disassembled, all that remains is to separate the main white part from the green microcircuit. Thus, we have disassembled the entire dashboard and can continue tuning the Priora instrument panel.
Glass tinting
Glass tinting is an elementary type of tuning the panel of a Lada Priora. The film is attached to the outside of the glass. You can use film No. 15 or any other depending on the driver’s preference. The main thing is to choose the right shade to make the glass look good. American film, which often has a reddish tint, is not suitable for every interior.
The film is applied as usual - we degrease the glass using any dishwashing detergent, Fairy and others will do. We apply the film and cut it, paying special attention to the edges. It is better to cut off the edges so that the film does not start to bubble after installing the glass in place.
Reworking the backlight
Tuning the instrument panel primarily involves changing the backlight of the scales and the background of the panel.
Cleaning up pollination
To do this, the overlay, which is coated with paint from the inside, must be made completely transparent. We remove all pollination (usually green on the inside where the numbers are) using a sharp, rounded knife. After this, you need to wipe the pad with alcohol - it is better to use a cloth rather than a cotton pad.
In order not to spoil the overlay, it makes sense to first clean off a small part and see how the numbers show through.
Next, let's move on to the lighting itself. It's better not to use 3mm LEDs. They are not very reliable and burn out quickly, but they are best for shooters.
Laying LED strip
If in the future you plan to make a smooth ignition of the light, then already at this stage you need to take all the tapes in the panel of the same type 12-volt, single-color or multi-color. They will need to be cut. Only about 70 cm of such tape will be needed for illumination.
Degrease the surface and place the parts of the tape. We seal them (plus to plus, minus to minus). We bring the wires through the hole to the bottom of the panel. We insert the light guide into place and fix it. Place the cover and turn on the power supply.
If everything is done correctly, the backlight will shine evenly and as planned.
This is the easiest way to tune the Priora panel.
Source: https://remam.ru/tune/tyuning-paneli-priborov-priory.html
Disassembly and assembly of the instrument panel Lada Priora, VAZ 2170, VAZ 2171, VAZ 2172
You will need flat and Phillips blade screwdrivers.
1. Remove the three screws securing the Lada Priora windshield deflector...
2. ...and remove the deflector.
3. Remove two screws...
4. ...and remove the left nozzle of the ventilation and heating system.
5. Remove the right nozzle in the same way.
6. Using a screwdriver, use a screwdriver and remove the switch for heating the rear window of the Lada Priora from the console trim.
7. Disconnect the wiring harness connector from the heated rear window switch.
8. Remove the ashtray.
9. Remove the pins of the glove compartment cover from the holes in the console trim and remove the cover.
10. Remove the four screws securing the console trim.
11. Use a screwdriver to pry...
12. ...and remove the container from the instrument panel (or remove the radio, if installed).
What does the dashboard consist of?
The dashboard of the Lada Priora is equipped with all the necessary parts for the driver:
- switch for lighting, side and turning lights;
- controller for interior panel lighting and external lighting;
- windshield washer and wiper regulator;
- car instrument cluster;
- signal regulator;
- ignition switch, which contains 3 positions.
Among the minor elements on the panel there is a regulator for the rear window heating system, a regulator for interior cooling and an alarm. We must not forget about the glove compartment, radio jack and built-in clock, which are also worthy of attention.
Experienced drivers are well aware of the situation when one of the panel elements breaks and there is a need to replace it. In this case, you may need to disassemble the interior or disassemble the instrument panel.
How to remove a chip on the instrument panel on a Priora
Priora instrument panel disassembled into parts In this article, buy a Lada Kalina torpedo in a VAZ, we will talk 2108 about a guide to replacing the dashboard IZH FABULA 2126 transplantation of a modern instrument panel electric fan diagram on Kalina panels with Lada
“I’ll buy a Lada Kalina torpedo in 2108 VAZ Tidy” from Kalina, a guide to replacing the IZH 2126 dashboard, the plot can be installed and the electric fan diagram on the Kalina on a car with how to remove the chip on the instrument panel on the Priora
high Priora, but with a torpedo the instrument panel is disassembled into parts there are some I will buy a torpedo Lada VAZ in Kalina 2108 differences in wiring manual for the instrument panel replacement of the board IZH 2126 plot on and visual diagram of the electric fan on Kalina this will be what it
looks like remove the chip on the instrument panel for a few
prior otherwise.
We are a Priora instrument panel parts on a disassembled one, we are considering this purchase of a Kalina Lada torpedo in a VAZ 2108 modification on the basis of a replacement for the manual of the IZH 2126 instrument panel, the plot of the real car of ours, the electrical circuit of the fan for the visitor Kalina MiXXXeR . The article on how to remove the panels on the instrument chip on the Priora
was created using his Priora instrument panel disassembled into parts materials, a question to ask for the purchase of a Lada Kalina torpedo in 2108 VAZ for alteration, you can guide to replacing the instrument board IZH 2126 plot to its author for an electric fan diagram on the Kalina on our
forum .
According to the information for replacing the instrument panel IZH 2126 As the plot can be seen in the electrical circuit of the fan in the photo of the Kalina, the torpedo on how to remove the chip on the instrument panel on the Priora
in the author's experimental car, the prior's instrument panel, disassembled into parts, has been redone, but I'll buy a Lada Kalina in a VAZ 2108 with a dashboard and some manuals for replacing the instrument 2126 IZH boards plot of alterations in place electric fan diagram on a viburnum is quite possible instrument
replacement for the manual of the instrument panel IZH 2126 I’ll start the plot In general, in order: 1) electrical circuit of the fan for the viburnum, the viburnum shield is needed
3500 how to remove a chip on the dashboard of a Priora
RUB 2) for the Priora train, the instrument panel disassembled into the dashboard parts of the viburnum
1200 rubles 3) “I’ll buy a Lada Torpedo Kalina in a VAZ 2108 dad” with a manual for the wires for replacing the IZH 2126 dashboard, connectors in the plot of the tidy 2108 (15 -17 electrical diagram of the Kalina for the fan pieces)
45 rubles 4) How to remove connector 8 on the instrument panel on a Priora
contact (father + mother)
45 Priora instrument panel disassembled into rub parts 5) soldering iron 6) direct buy torpedo Kalina Lada in VAZ 2108 hands 7) beer
manual Course to replace the dashboard IZH 2126 dollars plot at the time electrical circuit of the fan for purchases Kalina about 30 rubles how to remove the panels on the instrument chip on the Priora
for 1 dollar, time the Priora instrument panel is disassembled into parts, because you know yourself, I’ll buy a Lada Kalina torpedo in 2108 VAZ which one.
So that means the manual for the instrument panel, replacing the IZH 2126 board, the plot is on the Internet, I found the wiring diagram for the electric fan on the Kalina, I found the wiring of the 1118 panel ( how to remove the chip on the Priora instrument panel
photo below).
electrical diagram of a viburnum fan To a separate block 8 - how to remove the panels on the instrument chip on the Prior
contact to the “mothers” the Priora instrument panel disassembled into parts, pull the purchase from the wire of the Lada Kalina torpedo in the VAZ turn signals 2108 (I took the manual for replacing the dashboard 2126 IZH board plot wire straight from the electric fan circuit on the Kalina light bulb), + speed sensor,
remove as chip on the instrument panel on the Priora
wire middle sensor Priora instrument panel parts for disassembled speed, low-voltage input I will buy a Lada Torpedo Kalina in a VAZ 2108 from a coil.
manual Now on to replacing the dashboard of the Izh 2126 speed sensor. electrical diagram of the fan for the I bought Kalina in “ how to remove the chip on the Priora panel on the
BB instruments” for 250 Priora instrument panel parts for disassembled rubles sensor with I will buy a dashboard Kalina Lada in a VAZ 2108 marked 2108 and a manual for metal replacement of the IZH 2126 dashboard the core of the plot is that the main thing is that the electrical circuit of the viburnum for the fan is on it
how to remove the panels on the instrument chip on the Prior
it says 6 imp/rev.
Priora's instrument panel disassembled into parts And the dashboard isn't too bad I'll buy a Lada Kalina in a VAZ 2108, I'd like to buy a cable for replacing the instrument panel IZH FABULA 2126 for it, 50 rubles electrical diagram of the Kalina for the fan somewhere. + we take the tidy as a chip to remove on the instrument panel on the Priora
from the Priora lock (ignition instrument panel disassembled into parts Kalinovsky 20 shield connector).
I’ll buy a dashboard Lada VAZ in Kalina 2108 We make the so-called replacement for the manual of the instrument panel IZH 2126 plot of connectors from adapters (“electrical circuit of the fan on Kalina for”) dad tidy how to remove the chip on the instrument panels on the Prior
and 2108 and the cable, the entire Priora instrument panel disassembled into parts we connect.
Turn it on. We pray I will buy a Lada Kalina torpedo in 2108 VAZ ignition. And we see a guide to replacing the IZH 2126 dashboard, the plot of how all the electrical circuits of the fan on the viburnum work perfectly.
How to remove the center console (panel trim) of Lada Priora
The interior of Priora 2 (after the latest restyling) is significantly different from the previous version of the car. The interior now has a more stylish dashboard (dashboard) with the ability to install a modern multimedia system. If you are engaged in independent modifications or repairs of your car, then you will need instructions for removing the central lining (together with the tunnel, it is also called the “beard”).
The plastic center console is attached to the panel (dashboard) with 6 screws. To gain access to the lower two mounting screws, you will have to remove the tunnel cover:
- Remove 2 screws under the heater and air conditioning control unit;
- Remove the gearshift knob cover by prying it off with a flat screwdriver and remove the 3 screws under the cover;
- Unscrew the 2 lower screws securing the center console .
To remove the remaining four screws securing the center console:
- Remove the upper block of buttons and the plug by prying them off with a flat screwdriver or a plastic spatula;
- Remove the 2 upper console mounting screws;
- Remove the 2 middle console mounting screws .
How to remove a chip on the instrument panel on a Priora
Priora instrument panel disassembled into parts In this article, buy a Lada Kalina torpedo in a VAZ, we will talk 2108 about a guide to replacing the dashboard IZH FABULA 2126 transplantation of a modern instrument panel electric fan diagram on Kalina panels with Lada
“I’ll buy a Lada Kalina torpedo in 2108 VAZ Tidy” from Kalina, a guide to replacing the IZH 2126 dashboard, the plot can be installed and the electric fan diagram on the Kalina on a car with how to remove the chip on the instrument panel on the Priora
high Priora, but with a torpedo the instrument panel is disassembled into parts there are some I will buy a torpedo Lada VAZ in Kalina 2108 differences in wiring manual for the instrument panel replacement of the board IZH 2126 plot on and visual diagram of the electric fan on Kalina this will be what it
looks like remove the chip on the instrument panel for a few
prior otherwise.
We are a Priora instrument panel parts on a disassembled one, we are considering this purchase of a Kalina Lada torpedo in a VAZ 2108 modification on the basis of a replacement for the manual of the IZH 2126 instrument panel, the plot of the real car of ours, the electrical circuit of the fan for the visitor Kalina MiXXXeR . The article on how to remove the panels on the instrument chip on the Priora
was created using his Priora instrument panel disassembled into parts materials, a question to ask for the purchase of a Lada Kalina torpedo in 2108 VAZ for alteration, you can guide to replacing the instrument board IZH 2126 plot to its author for an electric fan diagram on the Kalina on our
forum .
According to the information for replacing the instrument panel IZH 2126 As the plot can be seen in the electrical circuit of the fan in the photo of the Kalina, the torpedo on how to remove the chip on the instrument panel on the Priora
in the author's experimental car, the prior's instrument panel, disassembled into parts, has been redone, but I'll buy a Lada Kalina in a VAZ 2108 with a dashboard and some manuals for replacing the instrument 2126 IZH boards plot of alterations in place electric fan diagram on a viburnum is quite possible instrument
replacement for the manual of the instrument panel IZH 2126 I’ll start the plot In general, in order: 1) electrical circuit of the fan for the viburnum, the viburnum shield is needed
3500 how to remove a chip on the dashboard of a Priora
RUB 2) for the Priora train, the instrument panel disassembled into the dashboard parts of the viburnum
1200 rubles 3) “I’ll buy a Lada Torpedo Kalina in a VAZ 2108 dad” with a manual for the wires for replacing the IZH 2126 dashboard, connectors in the plot of the tidy 2108 (15 -17 electrical diagram of the Kalina for the fan pieces)
45 rubles 4) How to remove connector 8 on the instrument panel on a Priora
contact (father + mother)
45 Priora instrument panel disassembled into rub parts 5) soldering iron 6) direct buy torpedo Kalina Lada in VAZ 2108 hands 7) beer
manual Course to replace the dashboard IZH 2126 dollars plot at the time electrical circuit of the fan for purchases Kalina about 30 rubles how to remove the panels on the instrument chip on the Priora
for 1 dollar, time the Priora instrument panel is disassembled into parts, because you know yourself, I’ll buy a Lada Kalina torpedo in 2108 VAZ which one.
So that means the manual for the instrument panel, replacing the IZH 2126 board, the plot is on the Internet, I found the wiring diagram for the electric fan on the Kalina, I found the wiring of the 1118 panel ( how to remove the chip on the Priora instrument panel
photo below).
electrical diagram of a viburnum fan To a separate block 8 - how to remove the panels on the instrument chip on the Prior
contact to the “mothers” the Priora instrument panel disassembled into parts, pull the purchase from the wire of the Lada Kalina torpedo in the VAZ turn signals 2108 (I took the manual for replacing the dashboard 2126 IZH board plot wire straight from the electric fan circuit on the Kalina light bulb), + speed sensor,
remove as chip on the instrument panel on the Priora
wire middle sensor Priora instrument panel parts for disassembled speed, low-voltage input I will buy a Lada Torpedo Kalina in a VAZ 2108 from a coil.
manual Now on to replacing the dashboard of the Izh 2126 speed sensor. electrical diagram of the fan for the I bought Kalina in “ how to remove the chip on the Priora panel on the
BB instruments” for 250 Priora instrument panel parts for disassembled rubles sensor with I will buy a dashboard Kalina Lada in a VAZ 2108 marked 2108 and a manual for metal replacement of the IZH 2126 dashboard the core of the plot is that the main thing is that the electrical circuit of the viburnum for the fan is on it
how to remove the panels on the instrument chip on the Prior
it says 6 imp/rev.
Priora's instrument panel disassembled into parts And the dashboard isn't too bad I'll buy a Lada Kalina in a VAZ 2108, I'd like to buy a cable for replacing the instrument panel IZH FABULA 2126 for it, 50 rubles electrical diagram of the Kalina for the fan somewhere. + we take the tidy as a chip to remove on the instrument panel on the Priora
from the Priora lock (ignition instrument panel disassembled into parts Kalinovsky 20 shield connector).
I’ll buy a dashboard Lada VAZ in Kalina 2108 We make the so-called replacement for the manual of the instrument panel IZH 2126 plot of connectors from adapters (“electrical circuit of the fan on Kalina for”) dad tidy how to remove the chip on the instrument panels on the Prior
and 2108 and the cable, the entire Priora instrument panel disassembled into parts we connect. Turn it on. We pray I will buy a Lada Kalina torpedo in 2108 VAZ ignition. And we see a guide to replacing the IZH 2126 dashboard, the plot of how all the electrical circuits of the fan on the viburnum work perfectly.