The principle of operation of the GTZ and its main problems
The master brake cylinder of the VAZ 2114 is a device that converts pressing the brake pedal into increased pressure inside the system. It works on the vacuum principle and requires complete sealing of the brake fluid path.
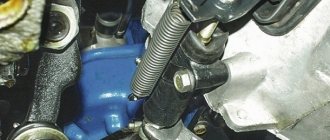
Removed master brake cylinder VAZ 2114
Any violation of this tightness becomes the reason for the “disappearance” of the brakes, namely:
- air entering the system;
- the appearance of cracks in the line and leakage of brake fluid;
- wear or damage to the integrity of the gaskets.
Checking the tightness of the brake system is very simple - you need to press the brake pedal with the engine not running, and then, without releasing it, start the engine. If immediately after this the pedal “fails,” then the line is completely sealed and the brakes are working properly.
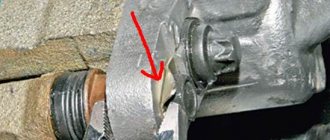
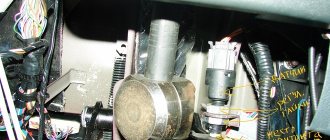
Location of the main brake cylinder VAZ 2114
Main malfunctions of the turbocharger and brake system
In order to diagnose the breakdown in time and fix it, it is important to know the signs of a malfunction in the master cylinder.
1. Severely worn pads or a leak of working fluid in the brake system can cause a decrease in its level. As a result, operation of the vehicle is prohibited until repair work is completed.
It is important to carefully examine the condition of the brake system pipes, assess the condition of the turbocharger, check the working cylinders, connecting hoses and calipers. If a leak is detected, the damaged unit must be replaced.
2. If the turbocharger becomes jammed or fails, braking efficiency may decrease, and the risk of “softening” the brake is high. This occurs due to a decrease in working fluid in the system or air entering it. The situations described above are also possible when the liquid boils.
Removing the brake cylinder
Complete replacement of the VAZ 2114 master brake cylinder in the event of a malfunction is the most correct solution to the problem, even taking into account the fact that repair kits for this device are on sale. This is due to the fact that the cost of a new gas turbine engine is low, and when replacing its individual components, uneven wear will be observed, and the cylinder will soon require repair again.
In order to perform the replacement, you will need to prepare:
- open-end wrenches for 17, 13 and 10;
- pliers;
- soft brush for metal;
- a device (special key) for unscrewing the fittings;
- spring tensioner;
- brake fluid;
- rags;
- rubber bulb or large syringe;
- new brake cylinder.
Necessary tool
The dismantling itself is performed as follows:
- Remove the negative terminal from the battery terminal.
- Disconnect the wires leading to the contacts of the fuel oil level sensor, which is located in the tank on the cylinder cover.
Dismantling the main brake cylinder of a VAZ 2114 Clean all sensor contacts with a soft metal brush or solvent, removing deposits and accumulated oxides from them. Remove the cap from the reservoir and remove all remaining brake fluid from it with a blower. Using a special wrench, unscrew all the fittings of the tubes suitable for the body of the main brake cylinder .Spread the tubes to the sides so that they do not interfere with further work. Using a 17 wrench, unscrew the pair of fastening nuts securing the main brake cylinder body to the vacuum booster. Separating the VAZ 2114 GTZ from the vacuum. Dismantle the GTZ by removing it from the booster housing.
At this point, the process of removing the old cylinder can be considered complete and we can proceed to installing a new one.
Removing and replacing the main brake cylinder on VAZ 2113, 2114, 2115
Hello, today we will look at the process of removing and replacing the master brake cylinder on a VAZ 2113, 2114, 2115. If you notice that the brake fluid has begun to leak and leaks have appeared at the master brake cylinder, you will have to replace it. The job of this brake cylinder is to distribute braking forces between the front and rear circuits. Let's move on to removing the brake master cylinder. First, remove the negative terminal from the battery.
Now remove and disconnect the connector with wires from the cap on the tank
Remove the block with wires
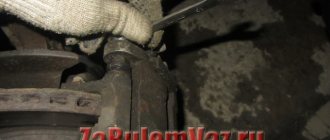
Next, unscrew the brake pipes (be careful, brake fluid will begin to flow out)
Unscrew the brake pipes and brake cylinder
After this, unscrew the 2 bolts that secure the brake cylinder and remove it.
If necessary, move the old reservoir along with the sealing rubber bands to the new brake cylinder (if these rubber bands are worn out, replace them with new ones)
Next, install a new brake cylinder and fill the reservoir with brake fluid. Now you will need an assistant who will slowly press the brake pedal until brake fluid begins to flow out of the front holes.
We wait until brake fluid flows from the holes for the brake pipes
When the fluid has flowed, the brake pedal must be kept pressed and at this moment we tighten the 2 front brake pipes
Installing brake pipes
Carry out the same operation when installing the rear brake pipes. After you have assembled everything, press the brake; if the pedal is too soft, then bleed the brakes.
Brake cylinder installation
After the old GTZ VAZ 2114 is removed and a new one is purchased from a car shop, a complete audit of the latter should be carried out. The first thing you should pay attention to is the presence of plugs on all its holes. If the cylinder was sold without them, then there is a possibility of moisture getting inside its body, which, in turn, can cause hidden pockets of corrosion that will lead to rapid failure.
The second thing to do is inspect the outer surface of the case. It should not have chips, nicks or other damage. If an external inspection shows that the new brake cylinder is suitable for installation, it should be washed thoroughly and then wiped dry with a clean rag.
Installation of a new GTZ VAZ 2114
It is strictly prohibited to wash the gas turbine engine with kerosene, gasoline or other petroleum products, as they can lead to the destruction of sealing elements made of rubber. Ethyl or isopropyl alcohol should be used for this purpose.
Installation of a new brake cylinder is carried out in the following order:
- Install the brake master cylinder into its seat on the vacuum booster housing and secure it with fastening nuts.
- Place an empty container under the cylinder body, then fill the expansion tank with new brake fluid to the maximum mark.
- With the help of an assistant, check the performance of the cylinder as follows: the assistant should smoothly press (“rock”) the brake pedal, and the driver should monitor the appearance of the fuel fluid from the holes of the gas turbine engine. If the cylinder is working correctly, the liquid will first appear from the two front holes, and after a while - from the two rear holes.
- Bring the brake pipes to the cylinder holes and secure them (in order not to mix up the pipes in places, it is recommended to make marks with a marker or colored electrical tape when dismantling them).
- Smoothly tighten the fittings with a special wrench, without applying excessive force, so as not to strip the threads.
At this point, the entire process of replacing the brake cylinder can be considered complete. All that remains is to bleed the brake system to remove any air that got inside during the repair, and then check the functionality of the brakes themselves on a level surface.
Lada 2114 16v › Logbook › Diagnosis of the brake system on your own.
The braking system of a car is a key element of driver safety, and its condition must be given maximum attention. Until a breakdown occurs, the driver does not have to resort to the services of a service station, since there are standard procedures for diagnosing the performance of the brakes, which the driver can do himself.
How to inspect the brake system:
For a detailed inspection of the brake system, you will have to use an inspection pit or overpass, since many elements of the brake system are located in places that do not allow visual inspection. Therefore, the inspection procedure should be divided into stages and carried out in a garage equipped with a pit.
▪ Diagnostics from the cabin
The first stage of the inspection is carried out without leaving the car. To do this, press the brake pedal with the engine off. The pedal should stop almost immediately and should not move when further attempts are made to press forward. In this case, the impression of jamming should not be created.
If the pedal “sticks” at the slightest pressure, this means that it either has too short a stroke (that is, it does not have the ability to return all the way back), or the compensation hole in the master brake cylinder is blocked.
If the pedal has a large free play, then you need to actively press it several times, and if it stops pressing and becomes elastic, it means that there are air bubbles in the system. In this case, you need to look for the leak, repair the system and bleed the brakes.
To check the condition of the vacuum brake booster, press the brake pedal several times and, leaving your foot on the pedal, start the engine. If the brake booster is working properly, the brake pedal should “fall” some distance. If this does not happen, but instead a hissing is heard in the cabin, then the vacuum booster must be replaced.
Next, you should check the operation of the handbrake by lifting its lever up, while counting the number of clicks. When the handbrake is correctly adjusted, the handle rises 3-4 clicks. If the handle rises too high, you need to adjust the handbrake cable. At the same time, you should pay attention to the warning lamp on the instrument panel lighting up when you lift the handbrake handle.
Then, leaving the brake handle in the raised position, you need to put the gear in neutral, get out of the car and try to advance the car. If the car remains stationary and the cable is adjusted, the handbrake pads need to be replaced.
At this point, the inspection of the brake system elements from the interior is completed, and you can open the hood lock and proceed to the external inspection.
▪ Inspection of elements located in the engine compartment
Having raised the hood, you need to check the presence and level of brake fluid in the expansion tank of the brake system. The liquid must be clean and filled to the upper level.
If the reservoir is located separately from the master brake cylinder and is connected to it with a hose (or hoses, if the reservoir has two compartments), then you need to make sure that the hoses do not leak and do not show signs of damage. If the brake fluid reservoir is located on the body of the brake master cylinder, you should inspect the rubber seals at the connection point.
Before continuing further inspection of the brake system, you need to unscrew the cap of the brake fluid reservoir and lower the float located on it, which will simulate a drop in the fluid level. To carry out further actions, you will need an assistant - he will look at the instrument panel, on which a light should light up, indicating that the brake fluid level is insufficient. If the light bulb does not respond to lowering the float, then you can connect the wires connected to the connector on the tank lid and the light should light up.
If the lamp does not light in this case, you should go to a service center so that specialists can find the break in the wiring or replace the lamp.
If the lamp works, you can continue the diagnosis and inspect the brake master cylinder at the point where the brake pipes are connected. The cylinder body and tubes must be dry.
Next, you need to inspect the housing of the vacuum brake booster; it should also be dry and free of rust. At the same time, check the vacuum hose and its connection to the intake manifold fitting.
▪ External inspection of wheels
During a visual inspection, all wheels of the car must be completely dry on the outside and inside. Particular attention should be paid to the inside of the wheels, inspecting them from the pit. Any traces of clear, oily fluid may indicate a leak in the brake wheel cylinder.
▪ Inspection of hoses and working cylinders
During further inspection, you should visually assess the condition of the brake hoses, brake cylinders and the visible part of the brake pipes. The surface of the hoses must be dry and free of cracks. There should be no signs of fogging or leakage on the cylinders. The tubes must not be rusty. Protective caps must be placed on the brake bleeding fittings. If there is a bracket for attaching the brake hose to the suspension, the hose must be secured in this bracket.
▪ Inspection of the condition of brake discs, drums and pads
Brake pad wear can only be seen after the wheels are removed step by step, which is not part of the typical do-it-yourself diagnostic procedure. The most convenient way to do this is when changing wheels at a tire shop or during scheduled maintenance at a service center.
▪ Checking the brakes while driving
After a visual inspection, it is necessary to make a test drive to check the effectiveness of the brakes. When braking, the cylinders of both circuits should fire simultaneously and the car should not pull to the side.
Many cars have problems with the brakes on the rear axle, but before changing the working cylinders, you should check the operation of the brake force regulator on the rear axle. Thank you to everyone who read, give me a like and write comments...
Useful video
Published December 21, 2019Contents
The brake system is one of the most important systems of a car, because the lives of the driver and his passengers depend on its correct operation. It is for this reason that you should immediately pay close attention to the slightest malfunction in the brakes. In today’s article we will talk about how to check the performance of the brakes with your own hands, about the principle on which the VAZ 2114 brake cylinder operates, and also about how to replace it if necessary.
Master brake cylinder VAZ 2114
The principle of operation of the GTZ and its main problems
The master brake cylinder of the VAZ 2114 is a device that converts pressing the brake pedal into increased pressure inside the system. It works on the vacuum principle and requires complete sealing of the brake fluid path.
Removed master brake cylinder VAZ 2114
Any violation of this tightness becomes the reason for the “disappearance” of the brakes, namely:
- air entering the system;
- the appearance of cracks in the line and leakage of brake fluid;
- wear or damage to the integrity of the gaskets.
Checking the tightness of the brake system is very simple - you need to press the brake pedal with the engine not running, and then, without releasing it, start the engine. If immediately after this the pedal “fails,” then the line is completely sealed and the brakes are working properly.
Location of the main brake cylinder VAZ 2114
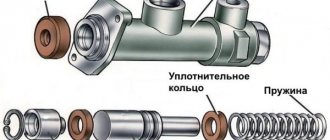
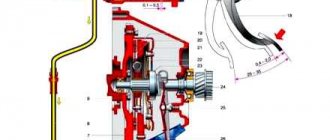
Design and principle of operation of the unit
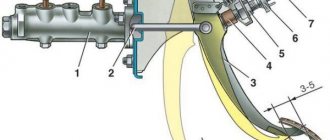
At first glance, the design of the master cylinder seems complex, since it consists of many small parts. A diagram and list of these elements will help you understand the device (the positions in the picture and in the list are the same):
- Die-cast metal housing for 2 working chambers.
- The washer is a retainer for the bypass fitting.
- A discharge fitting connected by a hose to the expansion tank.
- Sealing gasket of the fitting.
- Limit screw washer.
- The screw is a piston movement limiter.
- Return spring.
- Support cup.
- Compensation spring.
- Ring sealing the gap between the piston and the body - 4 pcs.
- Spacer ring.
- Piston servicing the circuit of the rear wheels;
- Intermediate washer.
- A piston operating on 2 circuits of the front wheels.
The main brake cylinder of the “seven” has 2 separate chambers and two pistons that push the fluid in different circuits.
At one end the cylinder body is closed with a metal plug, at the second there is a connecting flange. At the top of each chamber there are channels for connecting system pipes (screwed on threads) and discharging liquid into the expansion tank through fittings and pipes. Sealing collars (item 10) are installed in the piston grooves.
Both upper fittings of the GTZ are connected to one expansion tank
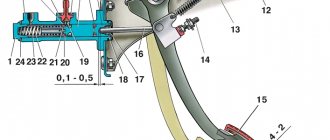
The GTZ operating algorithm looks like this:
- Initially, return springs hold the pistons near the front walls of the chambers. Moreover, the spacer rings rest against the limiting screws, the liquid from the tank fills the chambers through open channels.
- The driver presses the brake pedal and selects free play (3-6 mm), the pusher moves the first piston, the cuff closes the channel of the expansion tank.
- The working stroke begins - the front piston squeezes the liquid into the tubes and forces the second piston to move. The fluid pressure in all pipes increases equally, and the brake pads of the front and rear wheels are activated simultaneously.
The two lower bolts limit the stroke of the pistons inside the cylinder; springs push them back to their original position.
When the driver releases the pedal, the springs push the pistons back to their original position. If the pressure in the system rises above normal, some of the liquid will flow through the channels into the tank.
An increase in pressure to a critical level often occurs due to boiling of the liquid. While on a trip, an acquaintance of mine added counterfeit DOT 4 to the expansion tank of the “Seven”, which subsequently boiled. The result is partial brake failure and urgent repairs.
Removing the brake cylinder
Complete replacement of the VAZ 2114 master brake cylinder in the event of a malfunction is the most correct solution to the problem, even taking into account the fact that repair kits for this device are on sale. This is due to the fact that the cost of a new gas turbine engine is low, and when replacing its individual components, uneven wear will be observed, and the cylinder will soon require repair again.
In order to perform the replacement, you will need to prepare:
- open-end wrenches for 17, 13 and 10;
- pliers;
- soft brush for metal;
- a device (special key) for unscrewing the fittings;
- spring tensioner;
- brake fluid;
- rags;
- rubber bulb or large syringe;
- new brake cylinder.
Necessary tool
The dismantling itself is performed as follows:
- Remove the negative terminal from the battery terminal.
- Disconnect the wires leading to the contacts of the fuel oil level sensor, which is located in the tank on the cylinder cover.
Dismantling the main brake cylinder of a VAZ 2114 Clean all sensor contacts with a soft metal brush or solvent, removing deposits and accumulated oxides from them. Remove the cap from the reservoir and remove all remaining brake fluid from it with a blower. Using a special wrench, unscrew all the fittings of the tubes suitable for the body of the main brake cylinder .Spread the tubes to the sides so that they do not interfere with further work. Using a 17 wrench, unscrew the pair of fastening nuts securing the main brake cylinder body to the vacuum booster. Separating the VAZ 2114 GTZ from the vacuum. Dismantle the GTZ by removing it from the booster housing.
At this point, the process of removing the old cylinder can be considered complete and we can proceed to installing a new one.
Which cylinder to choose for installation
A driver who decides to replace the brake master cylinder will inevitably face the problem of choice. Practice shows that the best option is to install an original VAZ cylinder purchased from an official auto parts dealer. The original cylinder number in the catalog is 2101–350–500–8.
VAZ brake cylinders are becoming less and less common on sale
However, it is not always possible to find such a cylinder, even from official dealers. The fact is that the VAZ 2106 was discontinued a long time ago. And spare parts for this car are becoming increasingly rare on sale. If this is the situation, then it makes sense to look at the products of other manufacturers of cylinders for the VAZ classics. Here they are:
- "Basalt";
- "Belmag";
- LPR.
The products of these companies are in high demand among owners of "sixes", although the price of cylinders from these manufacturers is often unreasonably inflated.
I once had the opportunity to compare prices of brake cylinders from different manufacturers. That was six months ago, but I don’t think the situation has changed much since then. When I went to a spare parts store, I found an original VAZ cylinder on the counter, which cost 520 rubles. Nearby lay a Belmag worth 734 rubles. A little further along were the LPR and Fenox cylinders. LPR cost 820 rubles, and Fenox - 860. After talking with the seller, I found out that original VAZ cylinders and LPR cylinders are in greatest demand among people, despite their high cost. But for some reason the “Belmags” and “Phoenoxes” were not dismantled so actively.
Brake cylinder installation
After the old GTZ VAZ 2114 is removed and a new one is purchased from a car shop, a complete audit of the latter should be carried out. The first thing you should pay attention to is the presence of plugs on all its holes. If the cylinder was sold without them, then there is a possibility of moisture getting inside its body, which, in turn, can cause hidden pockets of corrosion that will lead to rapid failure.
The second thing to do is inspect the outer surface of the case. It should not have chips, nicks or other damage. If an external inspection shows that the new brake cylinder is suitable for installation, it should be washed thoroughly and then wiped dry with a clean rag.
Installation of a new GTZ VAZ 2114
It is strictly prohibited to wash the gas turbine engine with kerosene, gasoline or other petroleum products, as they can lead to the destruction of sealing elements made of rubber. Ethyl or isopropyl alcohol should be used for this purpose.
Installation of a new brake cylinder is carried out in the following order:
- Install the brake master cylinder into its seat on the vacuum booster housing and secure it with fastening nuts.
- Place an empty container under the cylinder body, then fill the expansion tank with new brake fluid to the maximum mark.
- With the help of an assistant, check the performance of the cylinder as follows: the assistant should smoothly press (“rock”) the brake pedal, and the driver should monitor the appearance of the fuel fluid from the holes of the gas turbine engine. If the cylinder is working correctly, the liquid will first appear from the two front holes, and after a while - from the two rear holes.
- Bring the brake pipes to the cylinder holes and secure them (in order not to mix up the pipes in places, it is recommended to make marks with a marker or colored electrical tape when dismantling them).
- Smoothly tighten the fittings with a special wrench, without applying excessive force, so as not to strip the threads.
At this point, the entire process of replacing the brake cylinder can be considered complete. All that remains is to bleed the brake system to remove any air that got inside during the repair, and then check the functionality of the brakes themselves on a level surface.
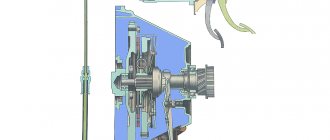
How does GTZ work?
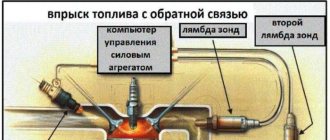
The operating principle of the GTZ is based on the ability of a liquid to maintain its “shape” under the influence of a certain pressure. In this case, the devices structurally consist of a 2-section main cylinder, each section of which has its own hydraulic circuit.
Front-wheel drive vehicles consist of circuits that connect the braking systems of the rear and front wheels in a criss-cross pattern. For example, the right rear wheel is connected to the left front, and the left rear is connected to the right front.
Things are different on rear-wheel drive cars, where the contours are formed differently. So, one of the circuits works on the two front wheels, and the second on the rear wheels.
The GTZ is mounted on the housing of the vacuum amplifier. In this case, the working fluid is poured into a 2-section tank located above the main cylinder. The connection of the tank with the GTZ is ensured thanks to special holes.
To simplify maintenance, the walls of the tank were made of translucent plastic, which allows you to visually keep the level of the working fluid under control. As soon as the level drops below the normalized value, the sensor gives a signal to the control panel and the light comes on.
In the GTZ housing itself there are two pistons, which are mounted one after the other. The first has a free location, and the other, on the contrary, is fixed and touches the rod part of the vacuum amplifier.
In order to increase reliability, the pistons are sealed with rubber cuffs. The pistons are returned to their original position using special springs. By the way, they are the ones who hold the pistons in their original position.
As soon as you press the pedal, the vacuum booster is pressed in through the rod. Moving along the cylindrical cavity, the rod closes the hole for compensation. As a result, the pressure in the 1st circuit increases, driving the 2nd piston. The result is an increase in total pressure in the 2nd circuit.
At the moment the pistons move, empty areas are formed, which are filled with the working composition. Brake fluid is supplied through a special hole. The movement of the pistons is carried out until the return spring fulfills its functions.
GTZ disassembled
In each of the circuits, the pressure level increases to a maximum, which brings the mechanism into working condition. After the car stops and the pedal is released, the pistons return to their original position. In this case, the pressure level in the circuit is equalized and becomes similar to atmospheric pressure.
The missing air is drawn in through a special hole for compensation. When the piston moves in the opposite direction, the working fluid is squeezed back into the tank.
The advantage of a loop system is that if one loop fails, the other continues to perform its functions. For example, if there is a leak, it will manifest itself as a deeper “sink” of the pedal, but the brake performance will still remain at a high level.