The seat belt is a mandatory element of the car interior. It is designed to reduce the likelihood of injury during an accident. Traffic regulations indicate that the use of this device is mandatory. Therefore, if the seat belt breaks for some reason, it must be repaired urgently. This can be done with your own hands.
If your seat belt won't pull out, there are a number of things you can do to quickly resolve the problem. Experienced auto mechanics are ready to give some advice on how to properly fix the breakdown. In this case, you will be able to avoid visiting a car service center and additional costs.
Seat belt device
If the belt does not come out of its slot, it is most likely jammed. To fix the problem, you need to understand the principle of this element of the car. With such a breakdown, there is a high probability that it is the locking mechanism that is not working correctly. Sometimes the belt may not stretch after an accident. There is a special technology for eliminating such breakdowns.
The first step is to understand the seat belt design. There is a special element inside the locking mechanism that is responsible for fixation. It looks like a ball that moves through levers. At the same time, it clings to the gears of the coils.
The seat belt latch reacts when it is pulled out too quickly, blocking the ball. It is in this system that problems may appear over time. In this case, the belt may not stretch or, conversely, may remain locked in the fastened position.
What does a jammed belt mean?
If the seat belt does not pull out of the installation socket, it is most likely jammed. To understand what this means, you first need to understand how it works. When the belt does not extend, this indicates a failure of the locking mechanism or that the belts were jammed as a result of an accident. But first, let's look at the principle of operation.
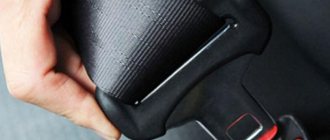
Vehicle seat belt
Inside the blocking device there is a sensitive element responsible directly for blocking, which is made in the form of a ball. This ball, moving through a system of levers, clings to the body of the coil gear. If the belt is retracted too quickly, the spool disc puts more force on the screw surface, thus blocking the ball.
In such cases, the strap does not retract and cannot be turned off in any way. In such cases, even an attempt to slowly latch the element may not help - it simply jams and no longer retracts, does not work.
Causes of the problem
There are several main reasons why a seat belt does not extend. First of all, it should be noted the banal wear and tear of the system. Moreover, this may only apply to one of its elements; for example, seat belt pretensioners or a locking device may fail due to wear. The roller mechanism may also wear out.
Adverse weather conditions also provoke such malfunctions. Severe frost can cause this phenomenon.
Sometimes seat belt pretensioners fail after an accident. This may cause the coil lock or the entire main mechanism to break. After an accident, in many vehicles the belt may not retract back into its intended location at all. This is due to the activation of the system's squibs.
If the car is involved in an accident, even with smooth pulling, the mechanism may jam. Then you will have to look for the cause of the breakdown and eliminate it.
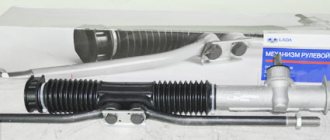
How to repair seat belts of a VAZ-2110 car
All vehicles must be equipped with seat belts. And although in the VAZ-2110 the manufacturer made them as functional and wear-resistant as possible, this part is also not protected from breakdowns.
Possible problems:
- the belt jams and does not want to come out of the groove, both when pulled out sharply and when trying to pull it out slowly;
- the reel feeds the strap slowly, does not release it at all, or cannot place it in the technological space allocated for this;
- problems arise with the belt coming out from its seat, especially at sub-zero air temperatures;
- The lock does not hold the straps.
Most often, the causes of breakdown are mechanical defects that can be easily fixed on your own. However, it is worth considering that the manufacturer categorically does not recommend repairing elements of the driver/passenger protection system outside of service centers. Amateurish repairs can cause deterioration in the functionality of the belt and its failure to fulfill its tasks in a critical situation on the road.
Belt diagnostics
If, while using a seat belt in a VAZ car, the driver feels something is wrong, you need to check the quality of the device. What does that require?
- Make sure the belt feeds correctly. You need to check whether it is initially twisted. If the belt runs unevenly, it may well jam.
- Pull the belt out completely, straighten it and release it, checking that it is completely assembled. If this does not happen, you need to check the condition of the belt, blocker, and perhaps you need to clean out any debris or foreign bodies that are preventing the belt from working properly.
- Look at the fasteners. The belt must be tightly secured. A common problem in VAZ-2110 cars is rusting of the belt attachment points to the body. If there are already traces of corrosion, you need to thoroughly clean them or replace the rust-affected segments.
A dirty belt can be washed with soapy water. If you cannot clean it with this product, you can try more aggressive cleaning agents or completely replace this component, because Excessive contamination will not have the best effect on the functionality and safety of the belt.
When is it necessary to change the seat belt on a VAZ-2110
It is recommended to replace the safety element:
- If the threads are broken, there are problems with the tape, the loops on the edge of the belt are deformed, or there are cuts/holes in the tape.
- In case of weak fixation or, conversely, strong blocking of the belt buckle, if the unlock button fails, if noticeable defects or cracks appear on the buckle, and also when it is not possible to get the belt out without extreme efforts.
In order not to miss the moment when the belt loses its functionality, you need to periodically check its integrity and proper operation.
Belt removal and repair
Removing the seat belt completely may cause it to fail. It is advisable that this work be carried out in special service centers. The order of work will be approximately as follows:
- The safety coil is removed. To do this, the seats are moved forward all the way and the backs are lowered.
- If disassembly starts from the spring side, it must be done very carefully, because This part can seriously cut your hands.
- The cover can only be removed in a horizontal position. It is necessary to remove 4 pistons (carefully so that the contents of the box do not fall out).
- To get to the ratchet, you need to disassemble the coil. Here, too, you need to be careful not to accidentally deform it. The ratchet will have a rectangular design with a tab. The technological ball is the main component of the belt locking, which is produced when the angle of inclination of the reel block is changed.
- Then you should check the parts that rub against each other. A lump of lubricant most often forms between them, which it is advisable to remove. Often it is this clot that interferes with the proper operation of the structure.
- When the system is disassembled, all mechanisms need to be treated with fresh lubricants. It is advisable to choose products that can withstand low temperatures.
- To make the belts stretch and gather better, you can adjust the copper tab that interacts with the metal ball. As a rule, in these products the ball unbends the leg after some time, reducing the effectiveness of the safety system. By slightly bending it back, you can increase the productivity of the structure. After this, you need to make sure that the coil does not stop working when tilted.
If the main part of the parts shows signs of scuffs and severe wear, it is better not to replace each part, but to replace the entire module assembly.
What will be required for repairs?
For the reasons mentioned above, sometimes the seat belt does not extend. What to do? Advice from experienced auto mechanics will help. First of all, you will have to disassemble the casing and remove the coil. In some models, you will have to dismantle the seats in the place where the breakdown occurred.
To do this, you need to prepare screwdrivers (flat and Phillips), as well as spanners. Their diameter should be different. You should also purchase a multi-purpose lubricant. The seats must be protected from accidental contact with oil. You will also need napkins and wire.
Repairs can be simple or more complex. In some cases, you have to completely change the coil. For some machine models, you will need to prepare special tools. But repairing a seat belt yourself will help save quite a lot of money in the family budget.
Is it possible to restore seat belts after an accident?
Almost all car owners, after being involved in a traffic accident, are faced with the problem of unlocking their seat belts. Note that the device can also jam during sudden braking (perceiving this as an accident). In some cars, once the seat belts are stuck, there is no other way out than to cut the belt and free it (that is, they cannot be repaired, but only replaced). But these are extremely rare cases. In most vehicles, such products are subject to repair, or restoration. Note that in a collision with other vehicles, as a rule, two squibs are fired at once (that is, the belts of both the driver and the passenger are blocked). If you were alone in the car during an accident and your belt got stuck, we recommend that you also check the belt that should protect your passenger in the front seat.
Coil repair
Do-it-yourself seat belt repairs are most often performed in the reel area. To get to it, you need to remove the side panel trim. It can be fixed with clips or bolts.
To comply with safety regulations, it is necessary to remove the terminal for the negative conductor from the battery. The contacts that lead to the airbags are also disconnected (if possible). The colors of the corresponding wires are specified in the operating instructions.
These simple steps will prevent the squib from accidentally firing. Otherwise, you may be injured during the repair process.
The coil housing needs to be opened. Most likely, the spring of the tape return mechanism has failed. This element can be replaced. It will be easier to get it out than to install it in its original place.
Repair process
Now that we have dealt with the signals and reasons for blocking a fastened and unfastened seat belt, let’s move on to the repair process. Cleaning seat belts is one of the main tasks in this process, so we will consider this procedure separately. So, what should you do if you receive a signal that the lock is jammed? How can I clean it or turn it off? You will learn more about this below.
Tools
To disable the lock if a corresponding signal appears, the entire mechanism will need to be cleaned. To do this, you need to thoroughly prepare in advance and collect all the necessary tools. so what to prepare:
- a Phillips screwdriver, preferably a short one;
- flat head screwdriver;
- a wrench set to “17”, it will be more convenient to use a socket wrench;
- stationery pin;
- syringe with tube;
- some gasoline (lighter fuel is ideal).
Phillips head screwdriver.
Slotted screwdriver
Wrench 17
Stationery clothespin for fixing
Syringe with tube
Gasoline for lighters
Step by step instructions
When the entire list of tools is ready, you can begin repairing and cleaning.
- Using a Phillips screwdriver, unscrew the screws that secure the strap protection.
- If the lock is not working, pull the strap out to its full length and secure it with a clothespin.
- Take a wrench and remove the screw that secures the element coil. The screw must be removed from its installation location. To prevent the element from starting to unwind, you can attach it directly to the same spool using the same clothespin. In any case, in order to disable and clean the lock, it must be locked to make further actions easier.
- Put the reel aside and sit in the next seat. To disable and clean the lock, you will need to find the lid behind which the inertial device is hidden. As a rule, it is slightly thicker in design. Shake the coil - under which cover you hear the noise - under that one it is located.
- Now to dismantle the protective cover you will need to remove four plastic pistons. This can be done using a slotted screwdriver or a thin knitting needle. The pistons should be supported by hand so that they do not fly out and you do not have to look for them and collect them throughout the cabin. Then pry up the cover with a screwdriver and remove it. Set the lid aside.
- Your view will now be presented with the first mechanism of the component. It is a kind of box with a cylinder and thus a locking ball and a so-called rocker inside, which jams the lock. This mechanism can be dismantled freely from the installation site.
- Check the functionality of this rocker - ideally it should move freely along the axis of rotation. This device should be positioned vertically with the top angled toward the locking ball. One way or another, the rocker arm must be positioned vertically so that it does not jam. If you feel that the so-called rocker arm does not move freely, then you need to clean its rotation axis. Pour some gasoline and rinse the device until it rotates freely on the axis, without the slightest jamming.
- Now let's move on to the second, inertial device. It is located under the gear, which is made of plastic and in most cases is made of steel. The gear comes off freely, so remove it.
- Note the center of the serrated hole. It contains an eccentric with teeth. It is these teeth that jam the strap when it is suddenly pulled out. The space under this very eccentric needs to be cleaned. Pour a little prepared gasoline around the entire perimeter of the hole, add a little fuel to the center. At the same time, hold the strap, preventing it from winding up, for which you can temporarily remove the clothespin. Make sure that the liquid gets into all parts of the element, otherwise cleaning it will be useless.
- Take the dismantled spool with one hand so that the plastic guide along with the spring can be supported with one finger. Using your other hand, pull and wrap the safety element several times. Also pull it a few times until the device itself engages. Next, hook it on the reel one more time. These steps should be repeated several times.
1. First, unscrew the screws that secure the rack trim
2. After this, secure the belt with a clothespin
3. Pry off the inertia mechanism cover with a screwdriver
4. In front of you is a box with a cylinder and a so-called rocker arm
5. This is what the inertial mechanism looks like, which should be filled with gasoline
We recommend: The windshield washer does not work: we look for the cause and eliminate it
At this point, the cleaning process of the mechanism can be considered complete. You should carry out all further assembly in reverse order. Do everything correctly, because an incorrectly assembled mechanism will cause breakdowns in the near future with regular use of the straps.
Also check in advance whether all elements of this node work correctly and move freely. If this is not the case, then the cleaning should be repeated, because what is the point if everything is not cleaned. Only with the right approach to such repair work will you be able to avoid major mistakes and carry out all actions correctly.
If you are not sure that you can do all the steps described in this article correctly, then we recommend that you contact a service station with this question. After all, if the seat belts are locked, you need to do everything correctly, and incorrect actions will only cause further breakdowns, which you are unlikely to want to encounter. In any case, washing the components is not the most radical measure, because you will always have time to change the mechanism.
How to disassemble the system?
If the seat belt does not extend, you need to properly disassemble the system. On the lower trim of the door pillar (middle), 4 bolts are unscrewed. Next, the cover is carefully removed.
You need to prepare a paper clip. Now you can remove the belt. It is fixed to a special eyelet using a paper clip. After this, you can unscrew the bolt that holds the coil. To prevent the belt from twisting, it is secured with the same paper clip.
The coil can be easily removed. The locking mechanism is located on the side where the ball will ring. You can shake the device and easily determine the correct direction. The 4 pistons are unscrewed and the cover is removed in a horizontal position. This way you can get to the ratchet.
How to repair
After finding out the reasons for the malfunction of the seat belt reel, we will figure out how to repair it and what is needed for this. In this procedure, the main thing is to thoroughly clean the belts.
Required Tools
To resolve a malfunction of the seat belt buckle, the device will need to be cleaned. This will require certain tools and accessories.
- Short shaped screwdriver.
- A 17 mm wrench is better than a socket type.
- Flathead screwdriver.
- Clothes pin for office work.
- A syringe with a thin tube.
- Gasoline for lighters.
- A piece of polyethylene to protect the seats from dirt.
- A piece of steel wire.
Step-by-step instruction
After preparing the instrument, you can begin repairs and cleaning in the following order:
- Using a curved screwdriver, unscrew the screws that secure the decorative trim of the belt.
- If the lock is faulty, pull the belt all the way out and secure it with a clothespin.
- Using a wrench, unscrew the coil mounting bolt and pull it out. To prevent the device from winding up, secure it with the same clothespin. This will make the lock easier to clean and repair.
- Put the device down and sit somewhere else. To clean and disable the lock, you need to find the inertia coil cover. It can be detected by thicker metal. Shake the coil - the cap will be located where the noise is heard.
- To remove the protective cover, you need to pull out the 4 plastic clips. This can be conveniently done with a flat screwdriver or thin wire. The clips must be held with your hand so that they do not jump out and get lost in the cabin. Next, hook the trim with a screwdriver and remove it, setting it aside.
- After this, the locking device becomes available. It is made in the form of a box containing a cylinder and a ball, as well as a rocker arm that locks the lock. The device can be easily removed.
- Check the operation of the locking rocker - ideally, it should move easily along the axis of rotation. The mechanism must be placed vertically so that the upper part is inclined towards the blocking ball. If the vertical position is not maintained, the rocker arm will jam. It should move easily, otherwise the rotation axis needs to be cleaned. To do this, use prepared lighter gasoline. Rinse the mechanism with it so that the rocker rotates easily on the axis without delay.
- Now you need to get to the inertial mechanism. It is located under the plastic gear, and itself is made of steel. Remove the gear and set it aside.
- Look at the middle of the gear hole - there is an eccentric in it. When the seat belt is pulled out suddenly, the teeth block it. The place under the eccentric needs to be cleaned; to do this, pour gasoline into the hole. Hold the belt with your hand to prevent it from unwinding. To do this, temporarily remove the clothespin. Make sure that gasoline seeps into all parts to ensure proper cleaning.
- Take the removed inertial coil so that the plastic guide with the spring can be held with your finger. Try wrapping and rewinding the safety tape several times with your other hand. Pull it sharply and the lock should be activated.
The device is assembled in the reverse order. Be careful when assembling, as an incorrectly assembled mechanism can cause malfunctions. Check in advance that all parts work correctly and move easily. If it is difficult for you to make repairs yourself, then it is better to contact a car repair shop. After all, erroneous actions will only lead to further malfunctions that will cause trouble on the road.
Effect of frost
Sometimes the seat belt latch may not work due to extreme cold. This will not require changing any parts. In some older vehicles, the insulation of the mechanism may not be sufficient. This causes the belt to jam.
In this case, the oil that lubricates the system becomes thicker in the cold. You will have to disassemble the coil and lubricate its elements with a special substance. It must be frost resistant. This, for example, could be silicone grease or lithol.
In some cases, the situation can be corrected by bending the metal “claw” of the ball mechanism at a smaller angle. When the coil is positioned vertically, the retainer should not come into contact with the gear teeth. This should only happen when the bobbin is tilted.
How to pull a seat belt out of a reel
When all the bolts are unscrewed, you need to correctly pull the belt.
To do this, you need to pull it while holding the coil with your finger. To pull out the end with the stopper, you need to pull harder. Now you need to carefully pull the strap out of the reel, holding it.
Pulling the seat belt from the reel
In this case, you need to make sure that the spring does not unwind. To do this, place a screwdriver inside the mechanism instead of a stopper.
This is very important, since an unwound spring is difficult to put back in place manually.
Reel stopper
How to remove a jammed belt
If during disassembly you cannot pull out the strap, then the reason is that the mechanism is jammed. In this case, it is impossible to pull it out; the belt gets stuck and does not move. To solve the problem, it is enough to use the tools that most car enthusiasts have in their garage.
First, you will need to unscrew the screws on the lower trim of the middle door pillar (if there are no screws on the trim, it may simply be held on by brackets/clips). After this you need to remove the cover. To do this, just lift it and pull it towards you. Next, you need to pull out the belt and lock the mechanism.
Similar articles
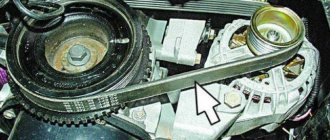
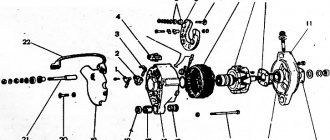
Replacing the VAZ-2112 16 valve alternator belt: tensioning
Removing the center pillar trim
The next step is to unscrew the bolt that holds the coil in place. Once unscrewed, it can be easily removed.
To prevent accidental winding, the strap is secured with a paper clip. The coil must be shaken, the mechanism must shake
It is important to remember where it is. Using a thin wire, it is important to squeeze out the plastic caps
When removing, the pistons must be held, as they may fall and get lost.
Now you can use a slotted screwdriver to pry and remove the cover located on the mechanism side. Under the lid there should be a plastic box with a cylinder, in the middle of which there is a metal ball. The rocker arm of the locking mechanism will also be attached here. The box needs to be hooked with wire and pulled out.
Similar articles
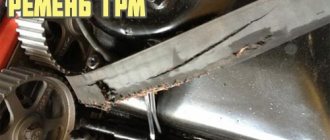
Timing belt: when and how to change, what to do if it breaks
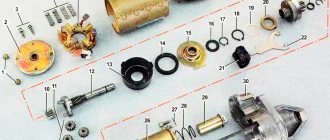
Disassembled seat belt reel
Next comes the check
It is important to check the rocker arm, which should rotate freely on the axle. If this unit jams, then the axle needs to be washed and the clogged dust removed
After checking the primary mechanism, you need to inspect the main one. It is also under the cover. This unit, made of metal, is located under the plastic gear. You can remove the gear from its recess without using tools. In the middle of the connector there should be a toothed ex class=”aligncenter” width=”640″ height=”480″[/img]
Then remove the paper clip from the belt, while holding it to prevent it from unwinding. The connector of the main mechanism must be cleaned of contaminants, which often cause jamming. To do this, first carefully pour gasoline over it. You need to take the reel while holding the guide. At this time, wind the belt with your right hand, while trying to tighten it.
It is necessary to make several sharp jerks for the mechanism to lock. After the manipulations have been completed, the belt is again installed on the reel. And again you need to wind it several times, while simultaneously tightening it. The performed operations should solve the jamming problem.
More details and more clearly about this process in the video:
Possible problems when removing the belt and after it
It happens that the driver pulls out the belt, but it does not tighten at all. Most likely, the reason is not at all due to incorrect installation of the node. Most often, this problem is caused by a breakage of the spring inside the drum. It is a consumable item and can be easily replaced.
Similar articles
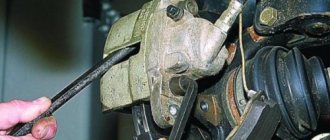
Timing tension roller
The opposite situation also occurs when the strap jams and does not extend. This means that the internal mechanism lock has broken. Such cases often occur after an accident. Then you need to follow the instructions above, which indicate what to do if it jams.
If the spring unwinds during removal, it will be difficult to wind it back. But it is not necessary to immediately change it to a new one. The coiled spring must be wound in the direction in which its short part is directed.
Spring in coil
Replacing the coil
In some cases, do-it-yourself seat belt repair requires completely replacing the reel. If after these steps the tape still does not come out of the reel, this action most likely cannot be avoided.
Typical signs when the coil should be replaced are the absence of changes after cleaning this system. If, after taking it out and lubricating it with a new substance, as well as bending the metal tab, the belt still does not come out, you need to purchase a new mechanism.
For each brand of car it is necessary to select its own special type of device. Therefore, it is necessary to show the old reel in the store. This will allow you to choose the right mechanism.
When is it time to change seat belts?
The seat belt needs to be replaced if:
- Mechanical damage to the belt occurred - abrasion, cutting as a result of exposure to various external factors,
- due to old age there was mechanical damage to the belt - abrasion, snagging, changes in the structure of the belt,
- the belt does not unwind smoothly, jamming occurs,
- the belt does not wind smoothly, jamming occurs,
- the belt does not twist at all, it dangles,
- the seat belt does not fasten (gets stuck),
- we bought a used car after an accident - the pyrotechnic pretensioners in the belts worked, the belts are blocked or they do not roll smoothly,
- we bought a used car after an accident - belts with mechanical tensioners can be damaged due to heavy load,
- our own car was involved in an accident - the pyrotechnic pretensioners were activated,
- our own car was in an accident - the mechanical tensioners were damaged,
- our own car was involved in an accident or collision - the winding mechanism was damaged,
- The car is over 15 years old and the seat belts have not yet been replaced.
Most manufacturers put the date of manufacture on belts. It usually consists of six digits, two of which stand for the day, two for the month and two for the year. Depending on the belt manufacturer, the numbers may be located differently and rather unusually, for example - month / day / year.
Diagnostic device
If the seat belt does not extend, a high-quality auto scanner can show the cause of the breakdown. Experts recommend purchasing high-quality devices from trusted manufacturers. This will allow you to accurately determine the cause of the presented breakdown.
In addition, the auto scanner will be able to detect many other faults. Moreover, the program can be installed on a smartphone. The use of such devices will save money. There is no need to visit specialized services and perform expensive maintenance.
Having examined why the seat belt does not extend, you can replace or repair the mechanism yourself. In this case, you will not need to visit a service center and pay for expensive repairs of the presented system.
How to unlock
Naturally, if the belt is stuck, it is best to turn to professionals. But, if you don’t have enough money, but have a lot of free time, and also if you want to learn something new, you can perform this operation yourself. There are several options that we will now share with you.
Squib with bushing
First, you need to remove the entire seat belt mechanism. In most cases this does not cause problems. Although in certain cars, to dismantle this device you will have to remove the front wheels. Now we are looking for access to the squib (it is the one that blocks the entire system). With the mechanism in hand, look for the spring. Carefully unscrew all the bolts to remove it (sometimes it may fly out). Next, remove the belt and, without twisting it, set it aside. Afterwards you will see the squib shell, which needs to be removed from the belt (use an asterisk key for this purpose). The next step: you need to remove the cover of the device (it can be fixed not only with bolts, but also with sealant). In this case, we recommend using a stationery knife. In front of you will be a nylon bushing with six copper scraps (they are the ones that block the belt). These pieces need to be removed. Do not touch the bushing while doing this. Reinstall the squib and screw this device into the mechanism body
It is important that before installing it in place, tighten the belt with your own hands - a few circles will be enough. Why do this? After such manipulations, the spring will weaken slightly. Place the spring in its place and secure it. Work completed
If the strap still does not work, it will have to be replaced.
Rack
Using a ribbed strip, it will be possible to unlock the belts if they are jammed after a traffic accident.
- Remove the mechanism, and then disassemble the tensioning device.
- Disassemble the squib.
- Next you will see a gear rack (they are already broken, remove it and replace it with a new one).
- Your next steps: after dismantling the gear, you will notice a lot of debris and dirt - they need to be removed.
- Reassemble in the reverse order of disassembly.