The standard Chevrolet Niva speed sensor is a separate module designed to transmit a signal from the gearbox output shaft to the speedometer. The device is simple - the functionality of the system is limited to only one option. The main advantage of the electronic system is increased accuracy. Such a speedometer has a minimal error, which increases traffic safety and eliminates the appearance of controversial fines for speeding.
This performance means that over a range of 1000 meters, the sensor generates more than 6000 pulses, which allows it to maintain extreme accuracy.
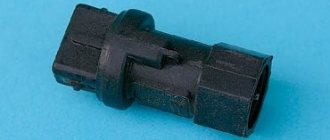
On the Chevy Niva, the sensitive sensor is made entirely of plastic; the contact chip is also quite sensitive. Therefore, care will need to be taken during repairs.
Where is the speed sensor located on a Chevrolet Niva
The DS sits directly on the gearbox housing. It is noteworthy that the location of the device on machines of 2008 and 2021 has not changed. The stability of the structure indicates the correct placement of the device. The module is covered by body panels and the gearbox housing, which makes it inaccessible to obstacles and sharp elements that could damage the sensor.
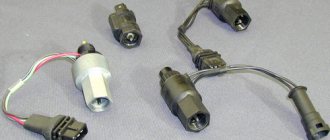
You can see what the module looks like in the photo.
Purpose of the device
Each car has a speedometer in its design, which displays the speed of movement of the vehicle. But the speedometer is only a display of useful information; the main function of indicating the speed of movement is performed by the sensor. If it malfunctions, further travel becomes a pain, especially on city highways, where it is necessary to maintain the speed of movement.
Therefore, the main function of the device is to read information about the movement of the vehicle. Indirect functions of the device include:
It is possible to drive a car without this part, but it is quite difficult.
There are two types of speed sensors:
It is imperative to purchase the product only for your car model.
Operating principle of the sensor
An electronic device for reading vehicle speed is installed on a Chevrolet Niva SUV. The sensor works on the principle that was founded by the American physicist Edwin Hall.
The essence of the effect (and operating principle) is the reading of electromagnetic pulses by a sensor, which are sent to the controller for subsequent processing. One kilometer of the vehicle's travel distance is equal to 6004 electronic pulses from the sensor. When the car moves faster, the frequency of pulse transmission increases. The controller, in turn, measures the intervals between each pulse and displays them on the speedometer in a form understandable to humans.
Device placement and design
On a Niva Chevrolet car, the sensor is installed on the gearbox. Due to the rotation of the box shaft, electromagnetic pulses are generated inside the device.
Photos for product placement
Structurally, the sensor consists of a steel or plastic housing, internal elements and conductors. It is attached to the gearbox directly to the shaft. Inside there is a ferromagnetic core that rotates when the car moves and creates electrical impulses. Pulses are sent through a conductor to the controller, which is located on the speedometer. A photo of the speed sensor is presented below.
READ How to connect ieee 1394 board to motherboard
The product is a fragile material, so you should be careful when carrying out repair work.
Device malfunctions
During the operation of a Niva Chevrolet, interruptions or breakdowns of the speed sensor often occur. There is no need to rush to purchase a new sensor and replace it. First of all, you need to find the cause of the problem and then make a decision. So, the causes of malfunctions can be:
To determine the malfunction, it is necessary to carry out testing actions!
Checking the speed sensor for faults
There are two ways to check the sensor for faults, which we will consider separately.
First way. To carry out the test you will need a multimeter.
If such a process is observed, then the speed sensor is serviceable, and the cause should be looked for elsewhere.
Second way. Does not require dismantling.
Operating principle and design features
The standard Shnivy speedometer sensor is a hall sensor enclosed in a plastic housing. The element has a specific design that allows it to read the number of shaft revolutions.
The next stage of the device's operation is signal processing. The computer counts the revolutions of the box for a certain period of time and transmits the data to the speedometer display.
Connection diagram
The Shnivy sensor connector itself is a three-pin connector, where:
- red – plus;
- black – minus;
- blue – signal.
The electrical diagram of the element will tell you how the wiring is connected to the speedometer.
Skipping the details and complexity of the speedometer drive pinout, you should focus on connecting the sensor itself. There are three wires here.
- Cable number 1 is a plus, goes to the brake fluid sensor. To maintain constant nutrition.
- The second wire is connected to the speedometer and is responsible for transmitting the signal.
- The third one is black. The cable is responsible for the minus and is connected to another similar wire, or screwed onto the car body, directly at the installation site.
Device location.
Each vehicle is equipped with only the appropriate equipment, designed for a certain number of shaft rotations and installed in the appropriate seat. The Chevrolet Niva speed sensor is installed on the gearbox.
The sensor itself is a small steel or, more often than not, plastic device that is mounted in the shaft area. Inside the case there is a core that transmits impulses to a special controller responsible for displaying information on the instrument panel.
When carrying out work, it should be taken into account that the device can be quite fragile, so installation should be carried out with care.
And also interesting: Phase sensor NIVA 21214; 2123 Euro-3; 4; 141.3855 (camshaft positions) 2111-3706040-02 Autoelectronics 2859 - Engine elements
Fuse
They are located directly in the mounting block.
According to the pinout of the fuse links, there is no separate element for the sensor. The on-board circuit only has a fuse responsible for part of the wiring. This is argued by the fact that the element does not have a separate power supply system - the positive conductor is connected directly to the DVTZh. The fault should be looked for directly from fuse F19.
Causes of breakdowns
There are a number of possible reasons for module failure. The most popular of them are described below.
- Mechanical damage. A similar problem occurs among users who operate the vehicle in off-road conditions. Protruding road surface elements, branches and stones can damage the plastic housing or break wires.
- Moisture ingress. Over time, the insulation of wires and blocks can dry out. The winding cracks and allows water to enter the system, which can cause a short circuit.
- System failure. During power surges, the on-board computer may malfunction. Errors within the module prevent data from being read from the device correctly.
Symptoms of a problem
Simply observing the car's behavior will help you understand that the speedometer sensor is not working. Typically the symptoms of a breakdown are factors.
- The speedometer needle jumps, jerks or does not respond. This is due to the complete failure of the device and the need for its immediate replacement.
- Increased fuel consumption. Part of the system is interfaced with the ECU, therefore, the remaining sensors will also act up.
- The speedometer is reporting incorrect data. If a motorist sees that the actual speed of the car differs significantly from the measured one, this is a sign of a device failure.
- 4. Separately, instability of idle speed should be considered. The device is also responsible for the operation of the motor at idle.
How to check the sensor
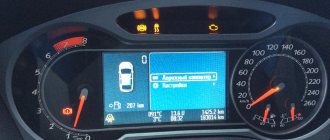
Usually, if the speedometer needle readings are incorrect, an error from the 0500 level is displayed on the dashboard. Such a code indicates the presence of problems in the module network and indicates the need for diagnostics. There are also possible ways to check the device.
- Check with a multimeter. Connect the positive terminal of the device to the sensor, and the negative terminal to the car body. If nothing happens when the sensor shaft rotates, it is faulty. In the working position, if you spin the wheel faster, the voltage also increases.
- Using a voltmeter. Raise the car on a jack, connect a voltmeter to the DC and spin the free wheel. In this case, changes should occur on the device proportional to the shaft rotation speed.
- A similar technique using control involves attaching a light indicator.
Reasons for a non-working speedometer: from simple to complex
In the Niva Chevrolet, the speedometer needle is driven not by a cable and a magnetic device, as in classic VAZs, but by electronics. The speedometer itself, like the rest of the instruments on the panel, are nothing more than voltmeters or ammeters with different scales.
The speedometer receives an electrical impulse, and the needle is driven by a simple stepper electric motor.
This is for information, because it is useless to poke into the speedometer itself, it is not repairable and if at least one element fails, you have to buy the entire instrument panel on the circuit board.
The speedometer receives an impulse from the speed sensor, and it is installed on the transfer case housing. These impulses are also monitored by the electronic engine control unit and, receiving them, draws its conclusions about the operating mode of the motor.
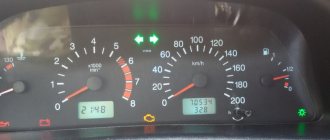
The signs of a non-working speedometer are quite clear - the needle either lies shamelessly, showing 160 at a speed of 20 km/h, or twitches, or falls dead to the zero mark.
Since there are not many elements in the electrical circuit of the Chevrolet Niva speedometer, there are only a few reasons for the device not working:
- Mechanical damage to the speedometer itself.
- No contact in any of the terminal connections.
- Broken or shorted wire.
- Failure of the speed sensor.
- ECU malfunction.
Dashboard test and speedometer check
If the speedometer starts to work incorrectly and the Check Engine light comes on, then you should check the electronic control unit for errors.
If the ECU memory contains information about error 0500 , this indicates that something is wrong with the pulse coming from the speed sensor.
We’ll return to the sensor later, but for now we’ll check the entire dashboard for the functionality of each of the devices.
To do this, there is a panel self-diagnosis procedure. The verification process goes as follows:
- Turn off the ignition and press the daily mileage reset button.
- Do not release the button and turn on the ignition.
- Let's release the button.
- In this case, the arrows on working instruments should move three times from zero to the maximum division.
Everything is clear here - if the speedometer refuses to fulfill the test conditions, the problem is either in the device itself or in the tidy board. Most likely, you will have to change the board assembly.
Video about self-diagnosis
The video shows a VAZ-2112, but the principle is the same, and the panel is the same.
Checking the contacts of the speedometer and speed sensor
There are not many contact blocks in the speedometer circuit. It often happens that vibration causes the block moving from the common bundle of wires to the dashboard to move. To eliminate the possibility of losing contact in this place, you will have to move the device away and remove and insert the chip on the back of the panel board several times.
Pin No. 9 is the speedometer pin. Sometimes the block may simply be installed skewed , then the contact may be inconsistent or absent altogether.
If this does not help, you will have to look for the contact connector on the speed sensor. As we said, it is located on the transfer case housing and its connectors often suffer from water and reagents that are sprinkled on the roads.
The contact needs to be disconnected and its condition assessed . In addition, the wires themselves that go to the speed sensor often come under attack. On a Chevrolet Niva with high mileage, the wire can easily fray, and if at least one of the three wires is damaged or shorted to ground, the speedometer will not work.
And the location of the sensor is not entirely successful; the wires can simply be torn out by a snag.
Checking the speed sensor
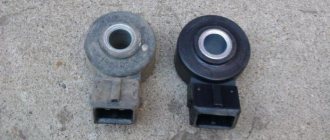
The design of the speed sensor is simple - it is a metal or plastic case, a ferromagnetic core and a winding in which the rotor rotates, generating an electrical impulse - the faster the sensor roller rotates, the greater the impulse, the further the speedometer needle deviates from zero.
Replacing the speed sensor
Installation does not require deep knowledge of mechanics or specialized, expensive tools. To change the sensor, just follow a simple sequence of steps.
- Drive the car onto an overpass or inspection hole. If such equipment is not available, you can use a jack.
- Disconnect the wiring from the battery and securely secure the machine. In this case, it is recommended to put the gearbox in neutral position.
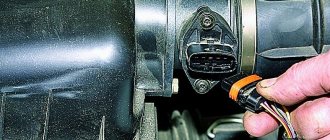
- Climb under the car and find the DS on the front flange of the transfer case - this is a plastic part connected directly to the device body.
- Using a rag or brush, remove dirt, dust and possible debris from adjacent surfaces that could harm the operation of the new sensor.
- Using a screwdriver, loosen the clamp of the wiring plug and pull it off. In this case, extreme caution should be exercised - the part is quite fragile.
- Use key No. 22 to unscrew the sensor.
- Install the new part in the seat in reverse order.
The replacement process can be seen in more detail in the video.
Chevrolet Niva › Logbook › Speed sensor connector.
Good afternoon All drivers probably know where the speed sensor is located on their car and how it is installed. Personally, one thing makes me happy, it’s good that it is not installed perpendicular to the body, vertically down, and that’s it. Of course, the length of the sensor and its installation location amaze the imagination; what is even more surprising is that it does not come off every time you drive off the asphalt. Well, okay, you can’t understand the engineers’ plan; perhaps, in their opinion, everything is even very harmonious. So, one of the three wires going to the sensor connector rotted and fell off. Contact began to periodically disappear. The speed meter began to show nonsense, then the needle did not rise above 40 km/h, then suddenly it sharply went to a maximum of 200 km/h and again fell to 0. By the way, after the needle goes to the maximum and then the speed drops, the ECU perceives this like a sudden stop and release of gas, cutting off the fuel supply, respectively, the car suddenly bites (engine brakes). This is especially nice when overtaking. So, if such a situation occurs, I think the right solution would be to completely turn off the sensor, for safety reasons.
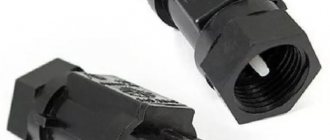
When I got to work, I went to the nearest store and bought a speed sensor connector and some heat shrink. Connector article number AX-312.
The connector is of course of poor quality; during its production, savings were made on everything. So it needs to be improved a little. I put heat shrink on the connector wires, coated the block and wiring harness with sealant and added more heat shrink on top.
We go to the pit and solder the connector to the sensor wiring harness, the main thing here is not to confuse the wires.
We hide the soldering point and the wiring harness itself in heat shrink, in several layers.
The result was three layers of heat shrink on the harness going to the sensor. Everything is quite strong and reliable, in the places where the heat shrink fits the wires, I additionally applied sealant. Now everything is sealed and durable, there is peace of mind.
READ How to properly connect a color digital television receiver
Source