Waxing the body or pouring magic additives into the oil or fuel tank does not mean taking care of the condition of your car. Wax and additives can be not only not useful, but also harmful, and in the case of domestic front-wheel drive VAZs, it is much more useful to check the condition of the brakes and engine before each trip. However, there is one thing that is often forgotten and then regretted. This is the drive belt of the VAZ-2114 generator. Let's take a closer look at it.
The importance of tension level and checking it
Let's consider what unpleasant consequences an incorrect level of tension will lead to. If it is weakened, then there is a high probability of slippage . That is, the generator drive will not operate at rated speed, which in turn will lead to the level of voltage generated by it being below normal. The result is an insufficient level of battery charging, insufficient electricity to power the vehicle systems, and operation of the electrical system under increased load. In addition, when slipping, the temperature of the belt itself increases significantly, that is, it overheats, which is why it loses its service life and may fail prematurely .
If the belt is too tight, this can also lead to excessive wear on the belt itself . And in the worst case, even to its breakage. Also, excessive tension has a detrimental effect on the bearings of the crankshaft and generator shaft, because they have to work under conditions of increased mechanical load. This leads to excessive wear and speeds up their failure.
This is interesting: Why does the belt whistle when starting the engine?
LAYOUT
On this car, however, as on the VAZ 2113 and VAZ 2115 models, the power unit is located across the body. With this engine arrangement, if you open the engine compartment hood, the generator set will be located on the left side of the engine.
On this side of the engine, the timing gear drive pulleys, water and oil pumps are also installed. This drive is covered with a plastic cover, and the generator drive passes over it. The belt installation diagram is shown in the figure.
Alternator belt installation diagram
The figure shows the generator drive parts:
- Bracket for attaching to the engine block;
- Connection of the generator with the bracket;
- Tension screw;
- Generator set pulley;
- Axial screw;
- Drive belt;
- Generator pulley on the crankshaft.
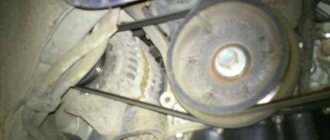
The red arrow indicates the place to check the deflection of the belt drive, and the letter “A” shows its value. If the tension of the generator belt is done correctly, then the bending at the point being checked should not be more than 10 mm, under a load of 10 kg.
Does it whistle and skid? Diagnosing the alternator belt
As long as the belt works normally and adequately, we do not notice it. The generator operates in normal mode and provides reliable power to the on-board electrical network and recharges the battery.
This is evidenced by stable ammeter readings and quiet engine operation. However, one fine day the belt makes itself known with a high-pitched squeal or lack of charging current to the battery. This will be indicated by the ammeter on the instrument panel and the battery charging indicator lamp.
Alternator drive belt
Open the hood and see if the belt is in place at all. Some unfortunate drivers' belts break while on the road, and it is quite difficult to find a replacement.
Not a tricky lever!
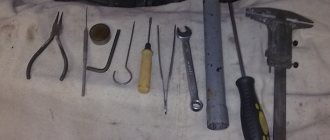
To do this, you will need only two keys from the standard set of tools - 10 and 13, but it is more convenient to use heads with a ratchet. And preferably a lever! Everything is ready, you can start working.
How to tighten the alternator belt on a VAZ-2114
Observe the “polarity” of the alternator belt installation
The procedure for tightening and adjusting the belt will take about five minutes, but it is important to know a few subtleties that will save you from problems on the road in the future. The procedure for tightening a belt is simple and even a child can handle it if you follow a simple algorithm and do not violate a certain sequence:
The procedure for tightening a belt is simple and even a child can handle it if you follow a simple algorithm and do not violate a certain sequence:
Generator drive diagram: 1 - mounting bracket to the engine block; 2 — connection of the generator with the bracket; 3 — tension screw; 4 — generator set pulley; 5 - axial screw; 5 - drive belt; 6 — generator pulley on the crankshaft.
- It is better and easier to tighten the VAZ-2114 generator belt either in a pit, or simply on a flat and dry area, since you will have to dive under the car, several times.
- We install the car on the site and put it on the handbrake or in first gear.
- If crankcase protection is installed, you can try to loosen the generator mounting bolt from under the hood. To do this, you will need a 13mm socket, but if there is no protection, then it is easier to loosen the bolt from under the car with an open-end wrench. Just take off the nut and unscrew it a few turns.
- Before tightening the alternator belt on the VAZ-2114, loosen the upper fastening nut, which presses the alternator housing to the adjusting bracket. We use the same key for 13.
- To tighten the belt, you need to find the tension bolt; it is installed directly perpendicular to the axis of rotation of the generator. By rotating the tensioner bolt clockwise, we will tighten the belt, and counterclockwise, we will loosen it. When the belt is tensioned, the generator housing will move away from the cylinder block. More details about tensioning the timing belt on the VAZ-2114 here.
- We control the belt tension after tightening. It is quite problematic to do this from above, since the engine mount is in the way. It is easier to do this from below, where the entire belt branch is accessible for inspection. To visually check the tension, some experience is required, but according to VAZ instructions, the belt deflection should not exceed 10-15 mm with an applied force of 10 kg and after several revolutions of the crankshaft for the belt to sit in place.
- If the belt is tensioned correctly, tighten the lower nut securing the generator, then the upper one, which secures the generator housing to the adjusting bracket.
When is it necessary to tighten?
Actually, the reasons why the belt needs to be tightened are simple - the generator does not produce enough current to operate all consumers on board and cannot charge the battery. The primary sign of weak belt tension will be a whistling sound from under the hood. Nevertheless, the belt can whistle when water gets in, sometimes when the pulleys become oily, and even less often when the generator bearings fail. If the belt cannot be tensioned or the adjustment rail does not allow the generator to be moved further, the belt must be replaced.
The most common mistake is storing a spare belt under the hood, in one of the niches. Due to constant high temperature, even the best and new belt can become unusable in just a couple of months if it lies as a dead weight under the hood. New or spare belts should be stored either in the garage or in the trunk.
Tightening the alternator belt on a VAZ-2114 is quite simple, the main thing is to do it in moderation and adhering to simple rules and manufacturer’s standards. Then the generator (see “choosing the right generator”) will last longer and there will be fewer troubles on the road. Strong belts and good roads to everyone!
Tension with adjuster bar
Securing the generator using a strip
This method is used for older cars (for example, “classic” VAZs). It is based on the fact that the generator is attached to the engine using a special arc-shaped strip , as well as a bolt and nut. By loosening the fastening, you can move the bar with the generator relative to the engine to the required distance, thereby adjusting the tension level.
Actions are performed according to the following algorithm:
- unscrew the fastening nut on the arc-shaped bar;
- Using a pry bar, we adjust the position (move) of the generator relative to the engine;
- tighten the nut, fixing the new position of the generator.
The procedure is simple, it can be repeated if you were unable to achieve the required level of tension the first time.
Tension using adjusting bolt
Adjustment with a bolt on a VAZ-2110
This method is more progressive and is used in most modern machines. It is based on the use of a special adjusting bolt , by turning which you can adjust the position of the generator relative to the engine. The algorithm of actions in this case will be as follows:
- loosen the generator, its upper and lower fastenings;
- Using the adjusting bolt, we change the position of the generator;
- fix and tighten the generator mount.
The belt tension level in this case can be determined during the adjustment process.
Tension adjustment using a roller
Adjusting roller and key for it
Some modern machines use special adjustment rollers . They allow you to quickly and easily tension the belt. As an example of using this method, consider adjusting the belt on a Lada Priora car with air conditioning and power steering, as one of the most popular cars in our country.
How to tighten the alternator belt on a Priora
Work on tensioning the alternator belt on a Lada Priora car is carried out using a special tension roller, which is part of the structure. To work, you will need a 17 mm wrench to unscrew and lock the mentioned roller again, as well as a special key to turn the adjusting roller (it is a structure of two rods with a diameter of 4 mm, welded to the base, the distance between the rods is 18 mm). Such a key can be purchased at any auto store for a nominal price. Some car owners use curved pliers or “duckbills” in their work. However, we advise you to still buy an adjustment wrench, given its low price and ease of further work.
Voltage regulation process
To adjust with a 17 key, you need to slightly unscrew the fixing bolt that holds the adjusting roller, then use a special key to turn the roller a little in order to increase (most often) or decrease the belt tension. After this, use the 17 key to fix the adjusting roller again. The procedure is simple and even an inexperienced car owner can handle it. It is only important to choose the right force.
After you have completed the tension, you need to perform a check . To do this, start the engine and turn on the maximum consumers of electricity - high beams, heated rear window, air conditioning. If they work properly and the belt does not whistle, it means you have tensioned correctly.
The automaker recommends tightening the belt every 15 thousand kilometers, and replacing it every 60 thousand. Also, do not forget to periodically check the tension, as the belt tends to stretch.
Alternator belt tension on Priora
Another method for tightening the alternator belt on a Priora
You will find detailed information about the process of replacing the alternator belt on a Lada Priora in the corresponding material.
How to tension the Ford Focus alternator belt
On different modifications of Ford Focus cars, one of two systems for adjusting belt tension is used - using an automatic or using a mechanical roller. In the first case, operation is much simpler for the owner, since the belt is tensioned using built-in springs. Therefore, the driver only needs to periodically replace the belt (either on his own or at a service station).
In the case of a mechanical roller, tension must be done manually using bench tools - a pry bar and wrenches. The design of the roller mechanism may also differ. However, the essence of the procedure comes down to the fact that it is necessary to slightly loosen the fastening of the roller, tighten it and fix it again. Also, in some modifications of the Ford Focus (for example, Ford Focus 3), there is no tension adjustment . That is, if the belt slips, it must be replaced.
Note! Buy original belts, as often non-original ones are slightly larger, which is why it will whistle and get hot after installation.
We invite you to familiarize yourself with the material, which presents the procedure for replacing the alternator belt on a Ford Focus 2 car - article.
This is interesting: How to replace the support bearing on a VAZ 2110
ABOUT REPLACING THE GENERATOR SET ON A CAR
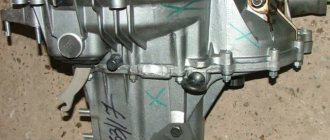
It so happened that replacing the VAZ generator is necessary. The necessary spare part has been purchased. By the way, some car enthusiasts replace serviceable components with more powerful units. The reasons for this can be very different. Basically, this is the installation of new, additional electricity consumers. Powerful audio systems, good headlights, illumination of body kits and other similar “things” require an increase in the power of the generator set.
In such cases, a generator from Priora or Kalina is usually purchased and installed. Its generated current is approximately 115 A, while the standard device produces 80 A. Its mounting is similar to the standard one, only the drive belt pulley needs to be replaced. The matter is not very difficult; even inexperienced drivers can cope with it.
Required tools for replacing generators:
- Wrenches for “10”, “13”;
- Open-end wrench 17x19;
- Screwdriver Set;
- Mount.
If the work is carried out in a garage with an inspection hole, then the following procedure can be recommended:
- Disconnect the engine protection. You can release it only in the area of the generator set and leave it hanging;
- Using a “10” wrench, tighten the nut on the protruding contact bolt of the generator and remove the wires from it. Also disconnect the connector from the brush assembly;
- Unscrew the tensioner bolt, the bolt securing it to the cylinder block and remove it from the engine;
- Now the nut of the bracket axle is unscrewed to mount the generator. This action is performed with a key set to “19”, remove the nut with the spacer washer and knock the axle out of the bracket.
The generator can be removed from the engine compartment and a new one installed in its place. Installation is carried out in reverse order. Connect the previously disconnected wires and connectors, and replace the drive belt. After this, you can try it out at work. Before starting the engine for testing, a few words about how to properly tension the alternator belt. This process is slightly different for different engine displacements. With a volume of 1.5 liters, the belt is tensioned by moving the generator housing away from the engine block with a pry bar. With a volume of 1.6 liters, tighten the belt using the tensioner screw.
- Description
- Har-ki
- Reviews
- Delivery
- Payment
Shield (casing, screen) for dirt protection of the alternator belt of a Priora car 1 pc. weight:0.25kg. dimensions:32x9x2 cm
The manufacturer reserves the right to change the characteristics of the product, its appearance and completeness without prior notice to the seller.
| Automobile model | Lada Priora, Lada Priora 2 |
| Automobile model | VAZ 2170 Priora, VAZ 2171 Priora, VAZ 2172 Priora |
Finally
Regardless of which method you used to adjust the position of the generator, after the procedure you need to turn the crankshaft 2-3 times using a wrench, and then make sure that the tension level of the hanging belt has not changed. We also recommend driving a short distance (1…2 km), and then checking again .
If you have not found information about the tension level of the alternator belt or cannot perform this procedure yourself, contact a service station for help. If the adjusting mechanisms are set to the extreme position and the belt tension is insufficient, this indicates that it needs to be replaced. As a rule, a car's mileage between belt replacements is 50...80 thousand kilometers, depending on the model and brand of the car.
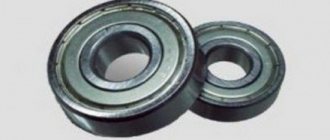
VARIETIES OF GENERATOR BELTS, WHICH ONE IS BETTER TO CHOOSE
Today there are only 3 varieties of the part in question:
- Polycline;
- Just wedge ones;
- Serrated.
It’s probably better to start the story with wedges. When cut, they look like a trapezoid, it tolerates heavy loads very well, is capable of transmitting enormous forces, but its disadvantage is that it cannot bend in the opposite direction, so it is not used to transmit rotation to several devices.
Now about the poly-wedge ones - they are much wider than the previous ones and it seems that they are just several wedge products glued together. The inner side is dissected by a longitudinal groove.
Alternator serpentine belt
Toothed – have grooves on the inside, therefore they can accurately transmit rotation to several parts at once.
In the question - which alternator belt to choose, it is difficult to say something specifically, it all depends on the requirements that you place on it, if you don’t know how to decide, talk to specialists, look on forums, people often ask similar questions, so it won’t be too difficult to find the answer. Most importantly, don't go wrong with the size.
FAULTS IN THE GENERATOR SET DRIVE
The drive, which at first glance seems simple in design and low maintenance, nevertheless plays an important role in ensuring the energy independence of the vehicle. During operation, it is not only subjected to mechanical tension, it must also withstand possible chemical and thermal effects.
The VAZ 2114 generator belt, which is installed in the drive, has a length of 698 mm. Such products are subject to increased requirements. The car plant installs products from a Russian manufacturer, but products from GATES have proven themselves well.
There may be several signs of malfunction, but the most common are:
- Clearly audible noise and whistling of the VAZ 2114 generator belt;
- Belt drive slippage. This problem can arise not only from weak tension, but also from the ingress of coolant or oil. The latter leads to the destruction of the belts;
- The tension is too strong, which at best ends in a gust, and in the worst case – failure of the generator bearing.
This rubber product does not take up much space, so find a “secret” place for it in the car, and carry a spare belt with you.
Also a sign that you need to tighten the alternator belt will be dim headlights, a blinking warning light on the instrument panel, or failure of other electrical appliances. The whistling sound of the generator set can be easily eliminated if you simply tighten the VAZ 2114 generator belt, which has become stretched.
Motorists Council
As practice shows, many experienced VAZ 2110 drivers, who have been driving this particular model for many years now, carry an additional alternator belt with them in the trunk.
This is due to the fact that its breakdown can occur at the most inopportune moment. This node cannot be called the weakest point of the “ten”, but problems may arise with it. And it is better for you to be prepared for such a situation.
Otherwise, you will have to call a tow truck, go to the nearest service station, and pay a lot of money for the services of specialists. Although, if you have a spare alternator belt and a standard set of tools, if it breaks, you would spend literally a couple of tens of minutes and calmly continue driving with a new belt. Because the choice is always yours!
Why does the whistle occur?
There are several reasons why the characteristic whistle-like sound occurs.
- Weak tension. The element slips, and this happens most actively at night. The increased intensity of the whistle at night is explained by the fact that the generator additionally works for lighting.
- Gradually the component is destroyed. The belt can dry out, causing its structure to be disrupted and it literally crumbles into pieces. The first signs are cracks, and then whole pieces break off. When moving, the pulley hits and slipping begins. Only replacement is required here.
- Although moisture gets on the belt very rarely and evaporates almost immediately, the connection can still whistle. In this situation, tension is required.
- The generator itself jams.
ABOUT GENERATOR SET DRIVE BELT TENSION
Even novice drivers perform this operation independently. Just keep in mind that for power units with a volume of 1.5 and 1.6 liters, it is produced differently, this is due to the fact that devices of different designs can be installed. First, let's look at how the alternator belt should be tensioned for a one and a half liter engine.
To perform this work you need to prepare the following tools:
- Key to "10";
- Key to "13";
- Rags and gloves.
The procedure for performing the operation in which you will do the tensioning yourself will be as follows:
- Place the car on level ground and tighten the handbrake;
- Next you need to open the hood of the engine compartment;
- At the bottom of the engine, on the right side of the car in the direction of travel, they find a generator;
- Loosen the nut on the bracket bar with a wrench to “13”;
- Use the key to “10” to set the desired degree of belt tension. To tension the drive belt, the screw must be turned clockwise, and if it is removed for replacement, then it must be turned counterclockwise to loosen it.
- Check the belt tension, which should be no more than 10 mm, with a load at the test site of 10 kg;
- Tighten the nut on the bracket bar with a wrench to “13”.
Now let us remind you how to properly tension the alternator belt of a VAZ 2114 with a 1.6-liter engine. You need to prepare the following tools:
- Wrench set to “17”;
- Key to "19";
- A small pry bar or a powerful screwdriver;
- Work gloves and rags for wiping generator components.
The VAZ 2114 generator belt is tensioned in the following order:
- The machine is installed on level ground and secured with a hand brake;
- The hood of the car's engine compartment opens;
- Find the mounting location for the generator set;
- Use a key set to “19” to loosen the nut of the lower axis of the generator;
- Using the key at “17”, release the upper nut on the tension bar; Loosen nuts number 4
- Having installed the “mounting” between the cylinder block and the generator, move the device to the front of the machine to tension the drive belt;
- Check the tension, and if it corresponds to the norm, tighten the lower nut on the axle with a wrench to “19”, and then tighten the upper nut with a wrench to “13” - on the tension bar.
In this case, the main condition is not to overtighten the belt, in order to avoid failure of the generator bearings.
As can be seen from the above text, there are no difficulties in servicing the drive belts of generator sets. For this type of service there is no special need to contact auto centers. The cost of repairs at a car service can range from 200 to 300 rubles. We can say with great confidence that for such “pennies” they will not contact you, but they will definitely impose some other operation.
Read this article several times, prepare the necessary tools, and feel free to get to work.
Questions about selecting, replacing and adjusting the drive belt tensioner
The tension roller of the drive belt, like the belt itself, has a limited resource, after which it must be replaced. Different types of tensioners have different service life - some of them (the simplest eccentric ones) must be changed regularly and along with belt replacement, while devices based on springs and with dampers can last almost the entire life of the power unit. The timing and procedure for replacing tensioning devices are indicated by the manufacturer of a specific power unit - these recommendations should be strictly followed, otherwise various negative consequences for the power unit are possible, including its jamming (due to overheating due to the pump stopping).
You should replace only those types and models of tensioners that are recommended by the power unit manufacturer, this especially applies to cars under warranty. “Non-native” devices may not have the same characteristics as the “native” ones, so their installation leads to a change in the belt tension force and a deterioration in the operating conditions of the drive of mounted units. Therefore, such a replacement should be resorted to only in extreme cases.
When purchasing a tensioner, you should also purchase all the components necessary for it (if they are not included in the kit) - fasteners, brackets, springs, etc. In some cases, you can take not complete tensioners, but repair kits - only rollers with installed bearings, brackets, dampers assembled with springs, etc.
Replacing the drive belt tensioner should be carried out in accordance with the vehicle repair and maintenance instructions. This work can be performed both with the belt installed and with the belt removed - it all depends on the design of the drive and the location of the tensioner. Regardless of this, the installation of spring tensioners is always carried out in the same way: the device and the belt are first installed in their place, and then the pin is removed - this leads to the release of the spring and tension of the belt. If for some reason the installation of such a tensioner is carried out incorrectly, then re-installation will be very difficult.
If the tensioning device is correctly selected and installed on the engine, the drive units will function normally, ensuring reliable operation of the entire power unit.
More in this section
Hello, dear motorists! Those of you who really take care of your car try to tirelessly monitor its technical condition.
Considering that a modern car is a rather complex complex of all kinds of mechanisms and parts, keeping all its elements under control is not so easy, but you still don’t want to cause the car to break down.
It is for this reason that before each departure a special ritual is performed - a technical inspection of the most important components. Checking the level and condition of the oil in the engine crankcase, determining the condition of the coolant, and diagnosing chassis parts have become commonplace.
You should not neglect checking one more parameter - the tension of the alternator belt.
The generator must always be in good working order and produce enough current to power the vehicle's electrical system. However, the efficiency of work does not always depend on its technical condition.
Considering that the operation of the generator is dependent on the rotation of the crankshaft, the belt drive must also be in good working order. The mere fact of having an alternator belt is not enough to ensure the functionality of the electrical system. The alternator belt must be tensioned to the required level. Only in this state can you be confident about your energy supply.
How important is it to adjust the alternator belt?
How to properly tension the alternator belt on a VAZ 2114
The only way to transmit the rotational motion of the crankshaft to the generator shaft is a belt drive. The belt, made of special reinforced elastic rubber, connects two pulleys that rotate at speeds of up to several thousand revolutions per minute.
At this speed, the belt must fit very tightly into the pulley groove in order to prevent slipping. Insufficient tension in the alternator belt can be heard from the engine compartment with a characteristic whistle.
There can be three options regarding the degree of tension, but only the last one can be acceptable:
- insufficient tension;
- excessive tension;
- normal tension.
In the first case, when the belt is loose, the crankshaft pulley performs a large number of idle revolutions, and the generator operates inefficiently. In addition, slipping of the pulley leads to heating of the belt and its damage.
An over-tensioned belt leads to another negative result - premature failure of the generator bearings. To check that the tension of the generator belt is adjusted correctly, you need to press on its middle between the two pulleys. Each brand of car has its own limit for the permissible deviation of the belt from its natural position.
How to tension the alternator belt using the adjusting bar
Some cars, especially VAZ classics, have a very simple mechanism for adjusting the alternator belt. The generator itself is attached to the engine crankcase with a long bolt that allows it to be moved up and down.
In the upper part there is an arc-shaped bar with a slot and a nut that fixes the position of the generator. In order to set the required tension of the alternator belt, perform the following steps:
- unscrew the nut on the bar;
- using a mounting spatula or other long tool, press the generator away from the engine;
- tighten the nut on the bar;
- Check the tension of the generator belt and repeat the procedure if necessary.
How to tighten the alternator belt with an adjusting bolt
Bolt adjustment of the generator belt tension is more progressive and easier to maintain. In order to perform this procedure, you must follow the following algorithm of actions:
- loosen the nuts of the upper and lower fastenings of the generator;
- by turning the adjusting bolt clockwise, we move the generator away from the block, simultaneously checking the degree of belt tension;
- tighten the generator mounting nuts.
Regardless of which system is used to adjust the generator belt, after the procedure you should use a wrench to make 2-3 revolutions of the crankshaft and check the tension again. A control measurement should also be carried out after a short trip.
Possible malfunctions in the electric generator drive and ways to eliminate them
Malfunctions in the belt drive of an electric generator during operation can manifest themselves in different ways:
- it may be a whistle from the drive location;
- This is a weak generator voltage, due to weak tension and periodic slippage of the belt drive. Slippage can also occur with normal, standard belt tension due to water, coolant or oil getting into the working elements of the drive;
- No less dangerous for the engine is too much tension in the drive. Due to excessively large loads, bearings may be destroyed (how to change a bearing on a VAZ 2114 generator?), gears or shafts damaged, and the belt may also break. In this case, further movement will be impossible until it is replaced with a new, working one. The worst situation is when a gust occurs on the highway, in a deserted place. Driver practice suggests that this does not happen very rarely.
Attention! Experts and experienced car owners recommend having a new belt in a spare set in the trunk, despite the fact that the driver can learn how to properly tension the alternator belt on a VAZ 2114 within 10 minutes. They also advise you to read an article about how to remove the alternator belt in order to be “savvy” for all occasions.
Since the condition of the generator belt drive is a vital issue, monitoring it is the responsibility of the driver. Checking the belt is quite simple - you just need to simply press it with a force of 10 kg to check the deflection. For an electric generator of brand 9402.3701 it should be within 0.6 - 0.9 cm, for brand 37.3701 - 1.0 - 1.5 cm. In addition, it is necessary to check the cleanliness of all drive elements.
If the driver hears that the generator belt is whistling, then it is imperative to immediately check the condition of the belt drive. The fact is that if the belt is really loose, it can twist and break at high speeds.
If during inspection it is determined that there is a weakening, then you need to tighten the generator belt. To do this, you need to perform a number of simple steps and keys to “10” and “13”.
- Place the car on a level surface and put it on speed and handbrake.
- Open the hood and before tightening the alternator belt on the VAZ 2114, use a key set to “13” to loosen the nut securing the alternator housing to the adjusting rail.
Loosening the lower bolt of the VAZ 2114 generator
- Using a “10” key, tighten the adjusting screw of the tensioner mechanism, while the body of the electric generator should move along the rail towards the front of the machine.
Alternator belt tension
- As the tensioner screw rotates, it is necessary to control the belt deflection. After it is within the normal range for the type of electric generator installed on the machine, you need to use a “13” key to firmly tighten the nut on the adjusting rail.
- As soon as the fastening nut is tightened, you need to turn the crankshaft twice by hand and check the deflection again. If it is within the normal range, then, after starting the engine, you need to check the operation of the belt drive in operating mode. During this check there should be no extraneous noise, the belt should rotate without bending or moving to the side.
Replacement instructions
How to tighten the generator belt on a viburnum with your own hands
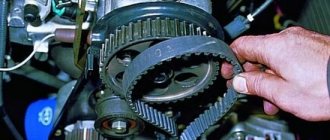
Timing belt and pulley VAZ 2114 8 valves
So, you have personally encountered this problem, and the part has fallen into disrepair or is completely torn. In order for the replacement to be successful, it is not at all necessary to contact a car service, since although this is a labor-intensive task, it is quite doable with your own hands. Replacing the timing belt in a VAZ model 2114 should be done following the instructions given below. 1.
We park the car on level ground, put it in gear and put the handbrake on.
2.
Using a 10mm wrench, unscrew the bolts securing the timing case.
3.
Loosen the generator belt tensioner using a 13mm wrench. Remove the belt.
4.
We check the marks on the camshaft gear and the protrusion on the rear cover of the belt housing.
5.
If they do not match, you need to turn the crankshaft until they match.
This can be done by rotating the front wheel, jacking it up first, or turning the crankshaft with a 17mm wrench using the crankshaft pulley bolt (the gear must be engaged). 6.
Behind the 4th cylinder on the clutch housing there is a rubber plug.
We open it by prying it off with a screwdriver. Below it you can see the flywheel crown, which also has a mark. It should coincide with the triangular cut located on the crankcase to the left of the flywheel. 7.
If they do not match, you need to loosen the tension roller, turn it to the left, thus loosening the belt, and remove it from the camshaft gear.
8.
Using a 17mm wrench, turn the crankshaft as described above until all the marks match.
9.
We immobilize the flywheel by locking it with a screwdriver in the hole where the plug was located.
10.
Using a 17mm wrench, unscrew the bolt securing the generator pulley.
11.
Behind it is the crankshaft pulley, onto which the belt to be replaced is placed.
12.
Remove the old one and put on a new timing belt, starting with the crankshaft gear.
13.
We fasten the generator pulley by putting a belt on it.
Let's pull it on. 14.
Remove the old tension roller and install a new one, lubricating it with oil on both sides.
15.
We tension the timing belt by turning the tensioner roller to the right (if there is no special key, you can insert two suitable pins into the holes and secure with a screwdriver or other similar object). The tension should be 1.5-2 kgf. If you don’t have a tool to measure the tension, we do it the old proven way. The optimal tension is when one plane of the belt can be rotated horizontally by 90 degrees by holding your fingers in the middle between the crankshaft and camshaft gears.
16.
In this position, tighten the tension roller bolt.
17.
Remove the screwdriver from the hole in the clutch housing and replace the plug.
We do not install the timing belt protective cover until we check the operation of the entire drive. Conclusion
After completing the repair work, start the engine. Evaluate the sound of the engine. If everything is done correctly, there should be no extraneous noise. If the timing belt is too tightly tensioned, the tensioner roller may hum. In this case, its fastening must be loosened and the roller rotated 10-15 degrees to the left, after which it must be securely fixed again.
How to tension the VAZ 2115 alternator belt?
It is not difficult to adjust the VAZ 2115 alternator belt; it is only important to understand how it is done correctly. To adjust the alternator belt on VAZ cars, you will need only two keys, “17” and “19”, and the procedure itself will take from 10 to 20 minutes. It should be noted that VAZs 2114, 2113, 2115 can have different power units installed; for each modification, the process of tensioning the alternator belt may differ.
Tensioning the alternator belt on a 1.5 liter VAZ 2110 engine.
- First you need to loosen the fastenings of the upper and lower ones.
- Adjust the belt tension using the adjusting screw - clockwise to tighten the belt, counterclockwise to loosen it.
- Having established the required tension, tighten the generator mounts and check the degree of tension.
On 1.6-liter engines, in addition to the keys, you will need a small assembly or pry bar. The principle is the same, loosen the alternator mounting bolts, then use a pry bar to move the alternator away from or toward the engine, depending on whether you need to tighten or loosen the alternator belt. When finished, secure the mounting screws and check the belt tension.
VAZ 2114 generator bearing numbers
Once we were convinced that bearing replacement was inevitable, all that was left was to simply select the bearing and replace it. In general, everything is simple, but with the huge number of fakes that flood the market, it would not hurt to know the dimensions of the bearing so as not to get into trouble. Since there are only two ways to find out the dimensions of the bearing - remove the generator and measure it with a caliper, or ask knowledgeable people. Knowledgeable people say that: the front bearing of the generator has an internal diameter of 17 mm and an external one of 47 mm; the rear bearing has an inner race with a diameter of 15 mm, and its seat is 35 mm; The width of the bearing race of the VAZ 2114 generator is 11 mm at the rear and 14 mm at the front.
The front bearing should be marked 6302, and the rear bearing - 6202. The price of a generator bearing for a VAZ 2114 should not be higher than 220 rubles. Although, depending on your luck. And also, if you are too lazy to play with pressing the bearing out of the cover, as an alternative, you can buy a cover assembled with a bearing. It will cost no more than 400 rubles, and the replacement will be much more pleasant.
Performing tension
If there is no wear on the V-belt drive, but there is a whistle, first of all, check the tension level. We will not use complex terminology, but will simply advise you to press with some force on the belt in the middle.
If the tension is done correctly, then the belt will bend no more than 8 millimeters. If the deflection is greater, then the element will have to be tensioned, and if it practically does not deflect, the tension will have to be loosened.
The problem is not the whistling. Due to weak tension, the battery does not charge effectively, and the drive itself begins to wear out faster. Excessive tension can lead to damage to the alternator bearings and stretching of the belt.
Correct tension of the VAZ 2110 generator belt is performed as follows:
- Loosen the generator from the bottom and top. A nut is used for this;
- Turn the adjusting bolt and adjust the belt;
- If you want to increase the tension, the bolt is turned to the right. Thus, you move the generator away from the cylinder block;
- To loosen the tension, move in the opposite direction - to the left;
- Use a wrench to grab the fastening bolt and turn the crankshaft a couple of turns, then check the tension;
- If all is well, the tension is correct, the nut can be tightened back.
Dimensions
It is quite possible that you have selected the wrong alternator belt size for your 16 valve VAZ 2110. This often causes whistling. The correct size of the alternator belt for the 8 valve VAZ 2110 should be determined in advance, even before going to the auto parts store.
The sizes are different, and they are individual for each VAZ model.
If we talk specifically about the “ten”, then adhere to the following rules for choosing a belt size:
- In the absence of air conditioning and power steering, 742 millimeters is suitable;
- If the car is equipped with a hydraulic booster, then the size will be 1115 millimeters;
- If an air conditioner is also present, then the optimal size is 1125 millimeters.
Some craftsmen regularly use original belts from other AvtoVAZ models - Priora and Kalina - to replace them when repairing their "ten".
Replacement
We have already figured out how to tighten the alternator belt. But such measures are not always relevant. If the element is cracked, overstretched and no longer tensioned, then there is nothing left to do but replace it with a new one.
In fact, replacement cannot be called a complex procedure. Follow the instructions and everything will work out.
- Slightly loosen the bolt nut from the lower mounting of the car generator, as well as the tension nut.
- Loosen the tension of your belt further. You already know how to do this from the previous section, where we talked about tensioning the alternator belt.
- Move the generator towards the power unit, which will allow you to remove the belt from the crankshaft and generator pulleys.
- The next step is to install a new element. To do this, you will need a high-quality belt purchased from a trusted store. What exactly this part will be and what size it will be is not difficult to determine. But quality comes first.
- First, the belt is put on the crankshaft pulley.
- Now it goes to the generator pulley.
- At the last stage, you have to repeat the tension adjustment procedure. You already know very well how this procedure is carried out, so there should be no problems.