Replacing any of the lamps in the headlight unit of a Lada Priora is not at all difficult. Our step-by-step illustrated instructions will help you cope with this task. There are differences in the procedure for replacing lamps in the headlights of cars manufactured before and after 2013, which we will show.
LADA > Priora
Attention! High and low beam lamps are halogen. You should not touch their glass flasks, as fingerprints will darken when the flask is heated. You can remove dirt from the flask with a clean rag soaked in alcohol.
Replacing headlight bulbs on a car manufactured after 2013
Snapshot1
We demonstrate the work on the left headlight unit (for clarity, the work is shown on a removed headlight unit), and change the lamps in the right headlight unit in the same way.
It is more convenient to perform operations to replace lamps in the left headlight unit with the battery removed. To replace the turn signal lamp...
During the operation of the car, drivers may encounter minor troubles. For example, at night they notice that the headlights do not light up. If the check does not reveal faulty fuses, then the cause may be a burnt out light bulb.
Before replacing lamps, make sure the optics are turned off. To replace the lamps in the left headlight of the Priora, there may not be enough free space; to do this, remove the battery. Do not touch the lamp bulb with bare hands; use cotton gloves. If there is dirt on the bulb, it is recommended to wipe the lamp with a swab moistened with a 70% ethyl alcohol solution.
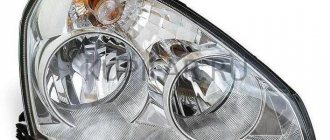
Lada Priora headlights can be of two types:
- High beam and DRL (daytime running lights) are combined. Option A – with two protective plugs.
- high beam without DRL. Option B - with one large plug.
Replacement
Now you know which light bulbs are suitable for the Lada Priora car. Prepare clean gloves, a brush for cleaning optics, and a standard set of tools, which includes wrenches and screwdrivers. If you will be working with the left headlight, it is recommended to remove the battery in advance. Replacement can be done without this step, but it will be difficult for you to reach some of the light bulb mounts. Before you change the lights, you need to determine what type of headlights are installed in your car.
- Option A shows headlights with high beams and DRLs. In this version they are combined and equipped with plugs.
- On option B, the main beam does not have daytime running lights; there is one large plug.
Novice motorists may confuse the lamps with each other. To prevent this from happening, compare the light bulbs of your car with this image, H1 - high beam, near H7 - low beam:
The Priora uses halogen lamps. When installing new components, try not to touch the bulbs with your fingers. Upon contact, grease stains may remain, which will lead to darkening of the lamp glasses. Work must be carried out with clean cotton gloves. If you do touch the flask, immediately wipe the area with a clean rag. It is advisable that the cloth be soaked in alcohol.
What kind of lamps are in the headlights of the Lada Priora?
| Lampatip | Lamp type |
| low beam lamp | H7 |
| high beam lamp | AKG12–55–2 (H1) |
| high beam lamp and DRL | H15 |
| turn signal lamp | А12–21–4 (PY21W) |
| side light lamp | А12–5–2 (W5W) |
Also, the process of replacing low and high beam lamps is shown in the video:
Have you ever had to change the bulbs in the headlights of a Priora yourself? What were the challenges during this process? Let us remind you that it is possible to install DRLs yourself.
Found an error? Select it and press Ctrl+Enter..
Automotive low and high beam lamps used on the Lada Priora in the restyled and pre-restyling versions are almost the same. The difference is in the layout of the headlight itself on the Priora. The lamp used in the dimensions of early cars has disappeared. The rear lights are distinguished by a diode insert in the brake lights; now there is a circuit with diodes, but before there was a light bulb.
Turn indicators, daytime running lights, low and high beam headlights, side lights, fog lights and reversing lights are very helpful to both the driver and other road users.
For example, the switched-on low beam lamp in a Lada Priora will indicate, for pedestrians and other drivers, the dimensions of the car and help to approximately determine the speed of movement. Lamps for a Lada Priora car should be selected with special meticulousness, with a long service life and moderately bright light.
For example, in the headlights of a Lada Priora you can find from 4 to 5 different lamps at the front. Their markings are indicated by the factory, and it is not difficult to find light bulbs - they are manufactured by several manufacturers, from which you can choose. The power of a good headlight with mirror-clear illumination should exceed 58 W, otherwise visibility at night will remain the same, but I would like to give Priora the kind of lighting with which it would be pleasant to drive.
What kind of light bulbs are there in Priora?
Operating any car involves constant minor repairs and replacement of consumables, and Priora is no exception. Below are instructions for replacing low and high beam bulbs in the headlights, as well as changing bulbs in the rear lights
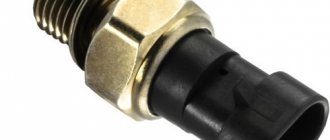
The Lada Priora car uses H7 lamps for low beam and H1 for high beam. (pictured below).
It is also necessary to take into account some precautions during repairs: it is advisable to disconnect the battery, and the glass should not be touched with hands, since fingerprints on halogen bulbs lead to darkening when heated.
What standard lamps are used in Priora headlights?
The Priora headlight unit is equipped with:
- low beam lamp;
- high beam/running light lamp;
- turn signal lamp;
- side light lamp.
Designations
- Low beam, for example, is marked 55H7, where 55 is the power in Watts, and H7 is the designation of the base;
- The main beam is designated 55N15;
- turn signal – 21PY21W;
- side light – 5W5W.
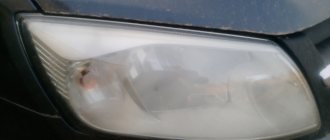
The lamps are in the headlights in a single unit, and the headlight unit is not always replaced - only the bulbs are changed. And not in vain - the factory headlight produces a cloudy light. Prior owners try to install the best lamps so that the headlights shine longer.
Removing and installing the side turn signal Priora and replacing lamps
- Move the side turn signal towards the front of the vehicle.
- Remove the pointer from the hole.
- Turn the cartridge counterclockwise and remove it from the indicator body.
- Remove the W5W turn signal lamp.
Installing a new lamp is carried out in the reverse order. We install the side turn signal housing in the reverse order.
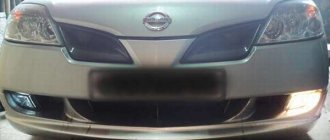
Layout of the restyled version
In the Priora, little has changed after restyling - small details invisible to the eye, the center console, the dashboard. The headlights have also changed - they have become quite a bit larger. The principle of their design has remained virtually unchanged, except that there is now one plug at the back to isolate the contacts.
Read more: Connecting the Lada Kalina alarm system
The design of the headlamp unit has become more complex: now in place of the usual high beam lamp there is a light consumable, combined with daytime running lights, which switches between operating modes. PTF fog light bulb, everything is also mounted depending on the configuration.
We buy replacement light bulbs
The headlight unit contains four lamps: dimensions, turn signal, low beam and high beam. We are interested in the last two components:
- Low beam is equipped with H7.
- For “high beam” the lamp AKG12-55-2 (H1) is used.
The VAZ 2170 (as well as more modern models) uses halogen optics for high and low beam. Some motorists prefer to modernize the Priora by installing alternative headlights. We recommend following factory recommendations. A halogen lamp for low beam will cost you 250-500 rubles, for high beam - 100-400 rubles.
If you decide to change the standard “light” of the Priora to alternative optics, then you should pay attention to the products of Philips, Koito and Osram. On automobile forums, owners recommend using products from these manufacturers, as they have a long service life. When choosing light bulbs, you need to start from their types. For example, you want to buy a Koito component for low beam - find the H7 bulb in the list.
How to change the low beam light bulb on a Priora
First of all, it is necessary to remove the battery, otherwise access to the headlight will be limited. And even if you stick your hand inside, working under the hood will be uncomfortable. The process of replacing a light bulb is described in several steps:
- Remove the rubber cover, the outermost one (it is located closest to the front fender of the car). At the same time, try to be careful with fastening the headlight housing;
- Disconnect the block with contacts from the lamp itself;
- We press the latch and remove it from engagement with the hooks carefully and without sudden movements;
- We take out a 55H7 light bulb;
- We do everything in reverse order with the new lamp.
It is recommended to do the entire mechanism according to the clockwise principle - first remove the old light bulbs from both sides, and then install new ones. Lamps used at the factory do not perform very well, even in terms of durability, and may require repairs a couple of months after purchase.
How to replace the running light bulb on a Lada Granta
The standard equipment of the Lada Granta involves the installation of the most primitive running light lamps. And their only advantage is their modest price.
replacements on the 16-valve engine below.
Is it worth replacing a working running light bulb?
But such lamps have more than enough disadvantages!
- Including dim light with a yellow tint, which does not have the best effect on visibility in front of the car.
- And, of course, it is important to remember about the service life of such lamps, which will turn out to be very short.
All this forces people to change the running light bulbs in their cars almost immediately after purchase.
LED DRL lamp is more practical and brighter
In principle, replacement may also apply to new incandescent lamps if the old ones fail. But, nothing prevents you from using LED lamps. Pay attention only to the base, which must correspond to the connector that is supposed to be in the car.
But, in this case, you also need to remember that simply replacing an incandescent or halogen lamp will not be enough, since you need to tear off the base from the diode in order to redirect the antennae to the desired connectors. Naturally, before the procedure you will need to check the correct polarity.
Review of the standard DRL lamp
This is what a standard lamp looks like
The standard lamp is called W21/5W.
When it is turned on, a 21 W filament starts up, and when the headlights are turned on, these lights go out and the side light based on a 5 W filament starts working.
DRL lamp replacement process
It is necessary to remove (move aside) the air filter housing
- To gain the necessary access to the left headlight unit , you need to move to the side the housing, inside of which the engine air filter is located. For this purpose, we dismantle all housing fastenings, wiring harnesses and sensor. After this, you can slide the filter housing up.
- But to gain access to the right headlight unit , you will need to remove the power unit cover. To do this, you need to unscrew the oil filler cap, and then carefully snap off the cap. This is done with a confident upward movement. The main thing is not to forget to screw the lid back into place in order to prevent the possibility of solid objects falling into the neck, including dirt, which can be quite a lot under the hood.
As for the headlight lamp connector, it is located closer to the lower corner of the headlight. So, you will need to remove the cartridge. This is done by turning the cartridge counterclockwise. Now you will have access to a lamp, which is very easy to replace.
Installing a new lamp occurs in the reverse order. The main thing is to get the cartridge into the corresponding groove on the headlight, but turn it clockwise.
Disadvantages of LED lamps
Another example of a diode fluorescent lamp
Replacing Priora high beam lamps
It all starts again with removing the battery - you can’t do without it now. The high beam lamp is located a little deeper and is not easy to get to. The sequence of actions when replacing a high beam lamp is as follows:
- We disconnect the rubber cover (it is larger than the one designed to protect the low beam lamp);
- Disconnect the block with wires;
- Unclench the spring clamp and disengage it from the reflector hooks. We release the light bulb.
- We remove the lamp socket from the headlight unit.
In fact, everything is simple: they opened the lid and took out one lamp. However, such minor operations will put a lot of strain on your wrist and palm - don’t forget to warm up, otherwise the new part may treacherously slip out of your hand when you don’t expect it.
Removal and installation of Priora side lamps
To replace the side light bulb you need:
- Remove the lamp socket.
- Remove the W5W size lamp from the socket.
We install a new lamp in the reverse order.
Replacing lamps in Priora taillights
Replacing the rear light bulbs is complicated by the fact that the combination unit inside supports the operation of the parking lights and brake signal. But it all starts just as simply, when replacing the bulbs in the rear headlights of the Priors, as well as the front ones:
- Remove part of the upholstery opposite the headlights;
- Unscrew the screws that support the protective housing of the rear light. In Kalina, there were nuts in place of the screws, and unscrewing them was even more fun - they fell into a huge gap and were lost in the car body forever;
- Turn the brake light and clearance holders counterclockwise. Do not remove the socket, take it out together with the light bulb;
- It is easy to press down the lamp, turn it clockwise and remove it from the socket with a slight movement (it will almost fall out on its own);
- Carry out the operation in reverse order.
Read more: Mutlu 60 amp reviews
All you have to do is remember about the combination headlight - remember where each lamp was located, so that you don’t confuse anything during installation. With the rest of the light bulbs, everything is different - in addition to the ground (black wire), wires from the ECU are connected to them. Thus, the “foglights” correspond to the red wire color, the turn signal indicator – blue, the green light is assigned to the reverse lamp.
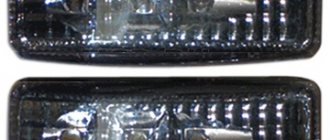
Replacing dimensions of Lada Priora (VAZ Priora)
With the release of the restyling of Priora 2, a large number of details have changed in it.
The rear lights are especially noticeable; they have become LED. Now the dimensions have become lower, which gives the car a wider appearance in the dark. To achieve this effect, it is not at all necessary to buy and install LED lights. To do this, just swap the backlight from the top position to the bottom. We don’t touch reverse and turns!
After such a replacement, when you press the brake pedal, the brakes will light up where the side lights and fog lights were previously illuminated. And the dimensions and rear PTFs will glow from the bottom of the lamp.
- remove cover No. 1 (option A) or cover No. 2 (option B) by tilting spring latch No. 1 to the left and releasing it from hooks No. 4 (Fig. 87).
- remove the socket together with lamp No. 9;
- remove lamp No. 9 from the socket.
- Unscrew the screws securing the headlight casing (decorative trim) and remove the casing.
- remove the lampshade together with lamp No. 3 by turning it counterclockwise.
- remove the lamp from the socket, also turning it counterclockwise.
Dorestyling
The life of the owners of pre-restyling cars was darkened by the fact that, in addition to the reduced service life, even then it was darkened by the fact that when replacing some light bulbs it was necessary to remove the socket along with the bulb - this, for example, happened when the owner wanted to replace a side light bulb. Owning a Priora became increasingly expensive; rarely did anyone think about buying another headlight - developed by other companies. Installing light bulbs from foreign manufacturers solved the problem of poor lighting well and for a long time.
Turn
The turn signal signal is located the highest (in relation to the hood), and to remove it you don’t even have to wrap your hand under the hood.
- Remove three screws and a self-tapping screw from the plastic cover, pry it up with a flat-head screwdriver and remove it;
- Turn the cartridge strictly counterclockwise;
- Remove the cartridge;
- It is easy to press down on the lamp and rotate it counterclockwise until it begins to fall out of the socket.
When choosing a turn signal PY21W (Voltage 21 W), you should be careful - a lamp with a similar marking - P21W - will not have orange, but colorless glass, and will not be suitable as a turn signal.
Interior lighting lamp Priora, differences between blocks, lamps and replacement rules
Priora interior lighting: differences between blocks, lamps and replacement rules
Interior light is very important when driving in the evening or at night. Bright lamps help the driver to easily see everything inside and minimize distractions when changing gears or changing the handbrake position.
The domestic Priora interior lighting, which differs for different trim levels, does not always satisfy owners with the quality of the lamps' glow. That is why many AvtoVAZ fans will be interested to learn about these differences and the features of replacing burnt out lamps or installing a new ceiling.
Interior lighting of Priora: what lamps are installed in “Norma” and “Lux”?
In its simplest configuration, the Lada Priora includes a single lighting unit located on the roof above the front panel. Conventional lamps marked C10W are installed in it. True, in most cases they give a soft but weak yellowish light.
That is why for Priora the ceiling lamp does not seem to be of such high quality and many owners of domestic cars want to modernize and install a unit from the improved model of the “Lux” version.
In the most expensive configuration of the Priora, two units are installed. The first is located as standard near the driver, and the second is located in the ceiling above the rear row seats. This equipment allows not only the driver, but also passengers to feel truly comfortable in the car when driving or boarding in the evening.
The Priora's LED interior lighting for rear-row passengers is in no way inferior in quality to the lighting elements installed in the front part of the cabin.
How to install new lampshades in Priora?
High-quality replacement of a Priora interior lighting lamp is quite simple and does not require special skills from the owner. In particular, the diffuser is attached to the base only with a pair of clips, which are quite easily pressed out with a flat screwdriver.
To carry out the work, you will need to pry the scattering cover near the mount and lightly press the clip. Next, the cover easily comes out of the gaps, and the suitable power cord is easily removed from the socket. Afterwards, the old lamp is unscrewed and a new one is installed; the lampshade is assembled in the reverse order.
Full installation of the lamp in the rear will take much more time and greater care. Since the installation is carried out in the ceiling of the car, you should carefully carry out each stage.
But first of all, the driver needs to buy a Priora Lux interior lamp for the rear row. You can purchase the product at any car dealership. The installation procedure is as follows:
1. Markings are made on the ceiling of the cabin in the place where the ceiling lamp will be installed.
2. The covering is cut out according to the outlined measurements.
3. A wire is pulled from the front lamp (under the covering, of course).
4. The rear seat illuminator is connected.
5. If necessary, a thin frame is cut out of rubber or other sealant to ensure a tight fit of the lampshade to the ceiling.
Experts also recommend replacing the front lamp on the Priora “Norma”. The procedure is quite easy to perform, since the parameters of the elements are identical.
A complete replacement of the lampshade is carried out according to a similar scheme for replacing a lamp, only instead of the old light fixture a new one will be installed (the wire is simply switched). The only thing you need to remember is that the LED elements may differ from each other. It is recommended to purchase lamps with medium brightness for the front seats, and high brightness for the rear seats.
The high-quality and bright lighting of the Priora Lux allows you to conveniently equip the Norma configuration model. The cost of the components is minimal, and the benefits obtained are quite high.
Considering the short installation time, ease of replacement and installation of the rear lamp, even a beginner can do the job. And the result obtained will be positively assessed by both the driver himself and the passengers being transported.
Difficulties with replacement
The most convenient thing is to replace the turn indicators. In other cases, you have to twist very tightly and stand in this uncomfortable position for a couple of minutes until the job is done. This is not very convenient, because the light bulb is a consumable, but the engineers could make sure that replacing it was as easy as the plastic steering wheel insert on the “ten”.
Another inconvenience is that you have to remove the battery. Nobody argues that it is better to turn off everything before starting work. But the battery is removed for reasons of rationality - the battery takes up a lot of space and interferes with working with your hands while you stand in an awkward position.
Adjusting Priora headlights using a corrector
Adjusting the light beam is extremely important for safe, comfortable driving. If you have a suitable place and desire, you can carry out the procedure yourself at home. You will need to place the car on a flat horizontal surface at a distance of five meters from the wall to the car. Check the operation of the manual corrector located directly on the back of the block (small movable wheel). At the level of the middle of the headlights, draw a horizontal line on the wall (L. 1), approximately 65-75mm. Below we draw a line (l. 2). Two vertical lines in the middle of each headlight (l. A) (l. B), another vertical line strictly in the middle between them. There should be 1 person in the car, the tire pressure should be within normal limits and be the same everywhere. The low beam turns on, we try to adjust the light. Close one headlight tightly. We turn the corrector wheel until the horizontal and oblique beams of light intersect at the point of intersection of lines A. and B. with line L. 2. Electronic adjustment in the car interior should be zero.
Why the headlights don't light up - reasons
The most common reason for headlights not working is a burnt out light bulb. Its service life is indicated in hours on the packaging. For a low beam bulb, this limit can be 400 hours of operation. The second extremely possible reason could be a wiring malfunction due to water leakage, or the wire simply frayed. This problem is already more serious, because you will have to fuss with it much longer than with a regular replacement of consumables.
Often, car enthusiasts are too lazy to change light bulbs, driving out onto the road in “one-eyed” cars. This is very unsafe - it is recommended that immediately after a malfunction is noticed, you go for a spare part to replace a new lamp.
How to replace a light bulb
As mentioned above, xenon and LED bulbs must be installed by specialists. Therefore, below we will consider how to change the low beam lamp on a halogen Priora.
So, the work is done in this order:
- First of all, you need to open the hood and disconnect one terminal from the battery;
- Next, from the back side of the headlight unit, you need to remove the rubber casing covering the low beam compartment, which is located closer to the car’s fender;
- Then you need to disconnect the connector with the machine wires from the contacts;
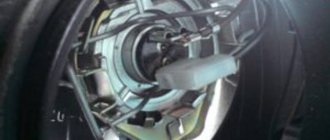
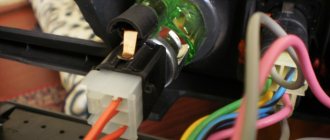
- After this, you need to unclench the ends of the latch with your hands and move them away from the hooks. Then the latch should be moved away from the base;
In the photo there is a spring clamp
- Now that the base is not fixed in anything, you can remove the socket from the headlamp, and then remove the lamp from the socket;
- Then a new lamp is inserted into the socket. This operation should be performed carefully, without touching the glass flask with your fingers. Grease stains remaining on the glass can lead to overheating of the lighting element and its premature failure;
Base with light bulb
- Next, the structure is assembled in the reverse order - the socket with the lamp is inserted into the headlight unit and fixed with a spring, after which the block is connected to the contacts. Next you need to reinstall the rubber casing;
- To complete the work, you need to connect the terminal to the battery and check the operation of the low beam. In this case, the ignition must be turned off.
Note! The battery terminal must not be disconnected while the engine is running, as this may damage the electronic equipment. Here, in fact, are all the instructions for replacing a light bulb on a Lada Priora
The work is performed equally on both the right and left sides
Here, in fact, are all the instructions for replacing a light bulb on a Lada Priora. The work is performed the same way on both the right and left sides.
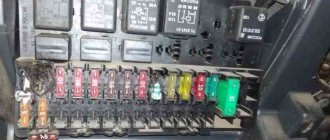
Advice! If replacing the low beam lamp on a Lada Priora did not give positive results, i.e. The light still doesn't come on, you need to check the fuses. They are located in the instrument panel to the left of the steering column.