Anton-FatTony › Blog › LED door lighting
Door lighting is not only a beautiful, but also a functional addition to any car, regardless of whether you are into tuning or not, everyone wants to see exactly where you place your foot when leaving the car... Door lighting is extremely useful, because no matter where you stop, You will always know where exactly you are going, because everyone is familiar with the situation when, having stopped at night in an unlit area, getting out of the car, your foot falls into a puddle, mud or something similar, you will agree, not a pleasant surprise...
And of course, we must not forget about the aesthetic component of door edge lighting: even if you choose white lighting, you will always be the center of attention. But why limit yourself to just white? Your choice of backlight in any color: blue, red, green, yellow, orange, purple, etc.
Now a few words about the technology: To make door lights, we use a fully sealed LED strip of IP65 standard with increased brightness, which gives rich, even light and at the same time lasts much longer than its cheaper counterparts.
All connections and wires are reliably soldered and sealed, which makes the entire structure as reliable and durable as possible.
The connection is made to the standard wiring using Smart Connection; if the car is equipped with its own diagnostic system, adjustments are made using standard dealer equipment to ensure correct and error-free operation of the entire system.
In addition to illuminating the edges of the doors, we also suggest illuminating the trunk space, which is also quite functional, since now you can see everything that is in it not in the dim light of the standard lamp. The trunk lighting, by the way, looks quite beautiful not only in the evening, but also during the day, giving the car a certain charm.
You can find out the cost of work on lighting the interior of your car by phone or on our website:
And I remind you again:
On the eve of Valentine's Day, we, the team at Tuning Atelier Fat-Tony, want to congratulate you on this wonderful holiday and inform you that on February 14, everyone who signed up with us for any work, be it installing acoustics, illuminating the underbody or interior of a car, reupholstering vinyl of the body or interior, in general, for all all work, we give a 14% discount
Please your loved ones with an extraordinary gift: give them the embodiment of their dream associated with a personal car, let there be something special in it that will remind them of you every day they spend with their car.
February 14th 14% discount on all work at Tuning Atelier Fat-Tony! Don't miss your chance to please your loved ones!
Source
Tips for choosing LED strip for different rooms
Depending on where the ceiling lighting is planned to be installed, the type of product and its placement are selected. The brightness changes due to variations in the number of diodes within one meter of tape. The more lighting elements, the brighter and more expensive it is.
One meter of tape may have a different number of diodes
Number of LEDs on strip
In the corridor
Since this area does not require stable bright lighting, purchasing a strip with SDM 5050 or higher diodes will be impractical. Mostly corridors and walk-through areas need additional light at night. Using incandescent lamps will lead to high energy costs, and darkness is not a good solution. The best option would be to install low power LED strips. Their light will not irritate the eyes at night, and using a dimmer you can change the brightness, which will also have a positive effect on the family budget.
LED lighting in the corridor
Dimmer for LED strip
In the bathroom
Since this is a room with high humidity, it is necessary to use a sealed structure. This will prevent electrical problems if water gets in. The brightness of the lighting is selected according to the wishes of the home owners, because for a small space the tape is suitable both as additional lighting and as the main light source.
LED ceiling lighting in the bathroom
In the bedroom
Most people who want to purchase LED strips install them in the bedroom to add comfort and a more relaxing environment. In this case, options with RGB crystals are suitable, giving more room for imagination, working in certain parts of the spectrum and providing finer tuning when using a dimmer.
LED strip
Amazing bedroom design using LED strip
In the nursery
It will be a great joy for your child to select interesting color combinations with their parents and adjust the lighting to suit their mood.
For this reason, it is worth paying attention to diode strips with advanced capabilities. These are models with RGB + W diodes
The advanced functionality mode allows you to configure both pure white light for main time and different shades of the spectrum for games. In this option, it would also be appropriate to use dimmers. Then a low voltage will allow you to minimize the glow of the diodes and use the backlight as a night light.
An example of using LEDs to illuminate a plasterboard ceiling in a children's room
In the living room
This place performs key functions in almost any home. All relatives gather here, holidays are held and guests are received
Therefore, it is important to choose not only the optimal interior design, but also to take a responsible approach to the installation of lighting. Massive chandeliers with incandescent lamps have long given way to diode systems
The latter allow you to implement a larger number of design ideas. For example, creating a multi-level ceiling with internal lighting.
Drywall prices
drywall
LED strip to illuminate the ceiling in the living room
This idea will appeal not only to guests, but also to members of the household. For supporters of natural white lighting, monochrome strips are suitable, and for creating a festive atmosphere, the best solution would be RGB strips, the variety of colors and customization options of which will be an excellent addition to the fun.
In the kitchen
Here, in most cases, tapes are used not only for decorative, but also for practical purposes. In addition to the ceiling, they can be glued to the top edges of wall cabinets, which will add something unusual to the kitchen interior. You can increase functionality using sensors - they are convenient to use when you need to turn on the light, but your hands are full. When using the tape over the work surface, this solution is especially convenient if your hands get dirty while cooking.
LED strip in the kitchen
OSRAM › Blog › Interior lighting tuning: functionality and beauty
Until recently, car interior lighting was limited to a single ceiling lamp. But the level of comfort gradually increased. And now automakers are adding navigational directional lamps, lights in the glove compartment, illuminated vanity mirrors, lighting for thresholds, interior door handles, and even footwell lighting.
But this was not enough for tuning fans. They began to highlight niches, chairs, controls and interior elements. Car interiors began to flicker, pulsate and change colors at the owner's request.
Today we’ll talk about how to modify your interior lighting yourself.
Traffic regulations very strictly regulate the color, brightness, type and location of external lighting devices. But you won’t be fined for interior lighting tuning. But it is worth considering that turning on the interior lights at night reduces visual acuity. Even an ordinary lamp above the driver worsens the sensitivity of the retina, the eyes are less able to distinguish dark objects.
We recommend turning off the interior lighting while driving.
The pioneers of domestic lighting tuning simply replaced ordinary lamps in the ceiling lamps of their “nines” with blue or green ones. It looked impressive, but had to sacrifice functionality. It became impossible to see anything in the dim blue light.
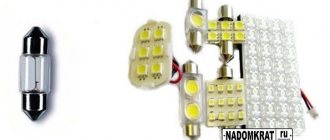
Today, the best functional tuning of a ceiling lamp is the installation of LED white light lamps. They burn brightly and consume much less electricity than regular ones. This will be appreciated by absent-minded drivers who forget the light in the cabin at night. With LED lamps, the battery, of course, will not discharge so quickly.
You can also modify the instrument panel. For example, change the color of the backlight or make it brighter. To do this, you will have to tinker with dismantling the panel and replacing the lamps with diodes. But you can choose the lamps so that the shield becomes multi-colored, the main thing is to buy diodes with the right base and not to overdo it with the brightness.
Legroom
The designers of expensive luxury cars were the first to come up with the idea of illuminating the legs of passengers. It looks beautiful, creates a cozy atmosphere in the cabin and makes it easier to navigate in the dark. Gradually, this option appeared on cheaper cars.
You can mount the footlights yourself. Special LED strips will help you, which are attached with double-sided tape in an inconspicuous place and connected to the cigarette lighter. The main thing is to hide the wires properly so as not to spoil the whole look.
Flexible LED neon for car interior SEAMETAL (3-5 m, 4 colors)
Customer reviews:
Review #1: Sent in a couple of days. It took 18 days to reach Nizhny Novgorod. The packaging is soft, but there is no damage. They delivered it free of charge to your home via SDEK; first, via VK and/or SMS, they asked you to specify the date and time of delivery. The tape works perfectly, I didn’t notice any sounds (maybe I need to check it in complete silence), there are no unpleasant odors. It doesn't shine brightly, so I think it will look great in the car, it won't hurt. The connector is in the cigarette lighter, but I will connect directly to the car wiring through a fuse. The tape itself is connected to the ignition unit through a convenient, high-quality connector with a latch. The ignition unit is lightweight and can be attached with double-sided tape. I recommend.
Review #2: Installed it on the edges of the dashboard, awesome! Everything works great, delivery is fast!
Review #3: It arrived quite quickly, the product is of good quality, the light is not bright and does not dazzle the eyes. The unit is not loud; if you hide it under the car panel, you won’t hear it at all. Packed well, the post office did not break anything during delivery. I was pleased with the product.
AlexxxGray › Blog › Lighting in the car door. Let there be light!
“Should I or should I not illuminate my car door?” — If such a question is relevant for someone, then my advice is yes, definitely do it (if you haven’t installed it yet). There are quite a few reasons for this - such as simple modding - the desire to highlight the individuality of your car or pretentious pampering,
and for practical reasons - illumination of the boarding area
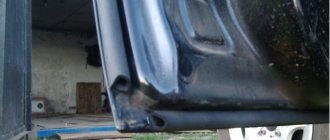
and door end lighting to warn passing vehicles. And this means the safety of passengers getting out of the car.
To be honest, the first installation of lighting for the landing zone in the door was inspired by pathos. This idea is not expensive and it is not very difficult to implement. I purchased sets of lights with my car's logos and an electrician installed everything within 1 hour. It looked very impressive in the dark. But time passed and the door lighting itself became something familiar and ordinary. Then the not-so-pleasant moments began: 1) over time, the logo began to fade 2) within a year, the backlights in two doors burned out 3) the battery charge dropped catastrophically quickly (within 2 weeks of the car being idle in the garage, you could end up with a pile of iron with locked doors and not responding to alarm). At that time, I did not associate current leaks with the lighting until a global rework of the electrical system began. As it turned out later, the diodes in the backlight not only shine well, but also do not heat up so much. Over the course of a year of operation, the diodes managed to melt the plastic lenses, which is why the logo turned out to be “insane”, and the design on the lens simply began to fade. Perhaps this is a problem with the manufacturer of my backlight, and not with everyone, but as they say, “a residue remains...” In addition, it turned out that the cable (thin two-core in transparent silicone protection), which was routed for backlighting, had become frayed and punished over the course of a year. Lights with the logo and wires took their rightful place in the trash. But since I was already deeply hooked on this topic (damn, it’s convenient to see where you’re stepping :))) and there were still holes in the plastic, I decided that I’d still make some lighting in the doors. I didn’t want to bother with the logo anymore, so the choice was towards more light and moisture protection. We bought these things that are used mainly for running lights.
Source
Reflectors in car doors (5 colors)
Dashboard lighting: how to do it yourself
Customer reviews:
Review #1: Excellent reflectors, made with high quality. I'll glue it as soon as it's warm. Then I’ll add a review. Delivery to Moscow region about two weeks. Thanks to the seller for the efficiency and quality product. +5
Review No. 2: Delivery almost 2 months to the Moscow region. The track is tracked only within the country. The product was in an envelope and delivered to the mailbox.
Review #3: I waited a little over a month. I'm happy with the quality. The size is large, cut it, enough for two cars (4 doors each). The stickers reflect light perfectly. Thank you.
How to make car interior lighting with your own hands?
Internal car tuning is very popular.
And this is understandable, because any driver wants his car to impress not only pedestrians and other drivers, but also those who ride in the same cabin with him. And sometimes, you just want to please yourself with individual car interior lighting. Installing lighting in the car interior with your own hands is not a difficult procedure. To do this, you need to purchase high-quality material and prepare tools, as well as think in advance about what exactly you want to emphasize with the help of light.
How and in what places is LED lighting most often installed? What is the effect, from an aesthetic and functional point of view, of additional LED lighting? You will get answers to all these questions in this article.
Door lights for cars JURUS (2 pcs, 11 options)
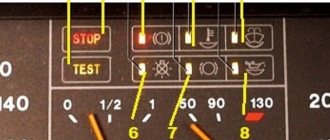
Why the instrument lighting on the Priora does not work auto-help
Customer reviews:
Review #1: Super! The essence arrived in less than 2 months. The quality is good, the seller is sociable. The only downside is that now the flashlights do not come in a box, as before, but in a regular package. It’s good that it didn’t affect the quality in any way; I’ll keep an eye on the operation)).
Review #2: Great logos on the door. I liked it very much, I will order more. The packaging is simple, but everything is intact.
Review #3: Everything works, my husband tinkered with it for an hour and made such a beauty :)))))) Thank you!!)
How to choose lighting for a car interior?
Before starting work, you need to choose a place to place the interior lighting, its type, and also take care of the activation mechanism. For example, appliances and/or door opening mechanisms can be controlled by remote control. The best option is a combination of devices.
Today the market offers us two modernization options:
There is a clear advantage to first lighting a car's interior. This is the ease of installation of the tape. There is no need to purchase additional mounting hardware for installation. The LED strip included in the kit is simply attached to double-sided tape. A standard size lamp can be powered by a cigarette lighter and illuminate other small parts of the interior.
The positive properties of diodes include shock/strength and high tightness, as well as long-term operation in comparison with other interior lighting devices. It is important that the car's LED lighting turns on instantly. This allows you to create different lighting effects.
You can also create neon lighting for the car interior yourself. This will be a bright light, with the help of which a large space will be illuminated. Unfortunately, neon-based lamps are technically complex devices, and also very capricious in their operation. Neon lighting often burns out when constantly turned on/off, and is highly fragile.
Installing neon lights on a car
In principle, there is any place for installing neon tubes, but you need to remember that they are quite easily damaged. Therefore, if you decide to install it outside the car, look for a place as far from the road as possible. When choosing a meta setting, remember: you cannot fix the lighting elements:
- near the pipes where gasoline passes;
- brake pads;
- electrical wiring;
- any moving parts;
- near the location where the lever jack is installed.
To install car lighting you will need corners. Some use L-shaped profiles for drywall, others use aluminum corners, or, as an option, use plastic boxes for electrical wiring. To secure them you will need self-tapping screws. The lamps are secured to the corners with clamps.
Neon lighting of the car interior using a flexible cord
If you will be installing neon lights on the bottom of the car, drive it onto an overpass and make sure that it is standing securely. Next, the actions are standard:
Disconnect the negative cable from the battery - you will be working with electrical wiring and this is a necessary safety measure. Place the corners in the selected places. During installation you will need to drill through holes. In order for the corners to be securely fastened, at least three fixation points are required. When choosing a location for the holes, make sure that you do not damage the wiring, gas line or other system while working. When installing corners, do not forget about the direction of the light. After securing the corners, we attach the tubes to them with clamps. Some versions of neon emitters have a connector at the end of the wires for connection to the cigarette lighter. This option is inconvenient: there is only one cigarette lighter in the car, but there are enough devices that receive power through it. Therefore, if there are such connectors, we simply cut them off. We fix the wires from the tubes in hard-to-reach places; if the neon lighting is installed inside the car, the wires can be laid under the floor mats, carefully attaching them
Particular attention should be paid to fixing the wires if underbody lighting is installed. Where possible, it is advisable to hide them under corners, etc. It is advisable to insulate the junction of the wires, not with electrical tape, but with heat-shrinkable tubing. You can connect neon lighting in different ways. The choice depends on the type of kit you purchased
Usually recommendations for connection are in the instructions. It is often necessary to install a transformer under the hood to provide power. In this case, the best place is close to the battery. The backlight is rarely connected directly to the power source. Typically a switch is inserted into the circuit. You can power it from the door opening sensor, then the backlight will turn on only when the doors are open.
The choice depends on the type of kit you purchased. Usually recommendations for connection are in the instructions. It is often necessary to install a transformer under the hood to provide power. In this case, the best place is close to the battery. The backlight is rarely connected directly to the power source. Typically a switch is inserted into the circuit. You can power it from the door opening sensor, then the backlight will turn on only when the doors are open.
But you don't have to mess with the tubes. Recently, a glowing neon cord has appeared on the auto goods market. For illumination of the bottom, it is, of course, rather weak - there is no necessary intensity of glow, but with its help it can be used to organize LED lighting of the car interior, dashboard, glove compartment, trunk, etc. it can be done very simply. The thing is that such a cord is powered by ordinary AA batteries, it is simply attached and easily connected through a connector to a power supply, which has an on/off key and a mode switch (in the simplest version, a constant light mode and a blinking mode). The video shows a flexible yellow neon cord (supply voltage - 12 volts, length - 3 meters).
https://youtube.com/watch?v=ONYbDxxSwtc
Neon cord can be cut into pieces of any length anywhere. Inside the silicone tube or PVC tube there is a central luminous core, along which two thin flexible electrodes run. If necessary, they are connected in parallel or in series, maintaining polarity. Connection to the power source is required through the controller, and directly to the controller from tubes or through a wire - it makes no difference.
How to properly install an LED strip for car interior LED lighting?
Installation of a car with LED strip is carried out according to the standard scheme. First of all, you need to purchase a set of wires, heat shrink tubing, and tape.
It, like individual diodes, is purchased at automobile markets and/or in specialized automobile stores. You should not skimp on the quality and length of the tape; experts advise stocking up on good LEDs. It’s better to buy more diode strip than to realize at the last moment that you don’t have enough.
In addition to interior design, diode strips are actively used to illuminate car wheels.
Step-by-step instructions for diode connection of car interior lighting
Arrangement of lighting in the car, with your own hands, should begin with the instrument panel of the vehicle. To do this, standard equipment is removed: instruments, panel lighting, and diodes are installed. The installation process is very simple, since the diodes have bases similar to factory equipment.
Then you need to determine the installation locations. Many people prefer to mount diodes along the entire perimeter of the ceiling, parallel to the car body pillars. The summer is laid gradually, and the remains can be cut off.
The cut points are clearly visible: they are marked with special membranes. After the procedure, do not forget to clean the ends of the cut and solder them together. We close the connections with bushings and heat them with a hairdryer. In this case, it is better not to use an industrial hair dryer, since there is a high risk of overheating; an alternative is a regular household appliance.
Switching on is carried out similarly to the circuit of neon lamps. You need to be especially careful at this moment and not confuse the polarity points that are indicated on the tapes at the cut points.
Essentially, this is where the workflow ends. There is nothing complicated. Only the installation must be carried out sequentially and be careful about small elements when connecting them.
An important aspect when working is the combination of lighting aesthetics and its functionality, which will be discussed below.
LED strips for car interior SAARMAT (4 pcs, RGB, remote control)
Customer reviews:
Review #1: The order arrived in Novokuznetsk in 20 days! Fully corresponds to the description! Good quality! Everything is intact and everything works! Satisfied with the seller and the product! The track was tracked all the way! I recommend!!!
Review No. 2: Everything is super, the wires are intact and the diode strip is intact! Everything works), the quality of the product is 5 out of 5, delivery to the Republic of Yakutia is quite fast, the seller sent it exactly the same day, the wires, by the way, are long, they shine very brightly, in general, a great product, everything is super, I recommend!)
Review #3: The second time I ordered 2 sets. And this seller did not disappoint for the second time. The first order arrived in 11 days. The second order arrived in 13 days. Everything is whole and corresponds to the description. I'm very pleased. The seller is excellent. Fast. Communicative. I recommend. Unlike other sellers whose orders take a long time, this seller is super fast. I received from him for the second time what I ordered, but others still haven’t received it. In general, guys, order from this seller. You will not regret. Great seller. 5 stars from the heart. Well done.
Aesthetic and functional components of lighting in the car interior
Vehicle interior lighting, which is done on your own, simultaneously solves a number of problems:
Determining the functionality of lighting in a car interior is often somewhat more difficult. For many cars, installing additional lighting (tuning) is an opportunity to create comfortable conditions for passengers and the driver at night, which include:
It is also worth mentioning that the interior lighting can be synchronized with the subwoofer installed in the car's interior. This gives many interesting moments, in particular the pulsation of light to the beat of music, changing the color of the backlight, etc.
We can talk for a long time about useful functions, but we will focus on the above combinations.
Let there be light
If you are wondering how to make the wheels illuminated, then our instructions will answer it for you. Let's do this job using LEDs, as they are best suited for this purpose. We will not describe installation on all four wheels. Let's look at the whole process using one wheel as an example, and the rest are performed in a similar way:
- To begin, we will need several LED strips, four current stabilizers, corrugated tubes, wires, sealant, glue and wire.
- Then we lift one side of the car and. If desired, the car can be placed on safety stands, since working with a car mounted on a jack is extremely dangerous due to poor stability.
- After removing the wheel, you must thoroughly wash the brake disc casing with gasoline and dry thoroughly.
- After everything has dried, you need to measure the length of the LED strip. This is quite easy to do - just wrap the tape around the casing and cut off the excess. Remember that the tape should only be cut in places specially marked for this purpose. Every three diodes there is a white mark, cut along it (if you cut it in the wrong place, you will simply ruin the tape, since it will no longer work).
- We coat the finished diode strip with glue on the side that will be adjacent to the casing.
- Carefully glue the tape to the casing and let the glue set. After the glue has dried sufficiently, we additionally attach the tape with wire to the brake disc casing.
- The tape is fastened quite tightly. Carefully seal the cut end of the tape using sealant. This is necessary so that moisture does not get into the silicone tape with lamps and ruin all our beauty.
- Wires (plus and minus) are released from the untouched end of our ribbon. We solder the wires to them that will connect to the stabilizer.
- We carefully insulate the soldered wires and place them in a corrugated tube, after which we bring them into the cabin.
- Next, the wires are connected to the stabilizer and lead from it to the headlight wires. If you connect it not to the headlights, but directly to it, then you will have to install an additional switch in the cabin for our lighting. In our case, the illumination of the car wheels will work only when the headlights are on.
Do-it-yourself wheel lighting requires a lot of care and precision on your part. The main components of the backlight are very fragile and can easily fail if mishandled.
Do not forget that when connecting LED strips it is very important to observe the polarity (plus and minus), since if you connect the poles incorrectly, the diodes will not work
If you lower your financial priorities, you can purchase a ready-made kit. Ready-made car wheel lighting has many unique features. For example, sound sensors that respond to musical compositions. As a result, “light music” is produced on wheels. If the lighting kit is multi-colored, then the wheels will play with different colors of the light spectrum. The kits, as a rule, always contain detailed instructions for installing and operating a specific device.
Keep up with auto fashion and let your “steel friend” be the most beautiful, bright and memorable!
One of the easiest and most exciting ways to give your car an unusual look is light tuning. This is a fairly common art that allows you to add zest to any car and make the underbody, radiator grilles and even wheels shine with neon colors. Wheel illumination, as a method of light tuning, always looks very unusual and attracts attention; the contrasting glowing wheels of the car are mesmerizing.
In fact, this effect can be obtained from the primitive installation of LED light equipment in the wheels of a car. For this, an LED strip is used, which should be installed and connected. Next we will look at these processes in more detail.
Design aspect of lighting in the car interior
It is important to choose niches for car interior lighting and decide how to illuminate them. You can place and make lighting in the car interior in any place you like. But do not forget about the practical side of the issue. The most successful is the installation of lighting in the glove compartment, in the foot area and in the rear of the car, where passengers are located.
Interestingly, the rear seat lighting is the most productive. This applies to accessories and individual parts, including door handles. Car interior lighting as decor will look effective on air duct grilles and/or around the entire perimeter of the doors. You can combine directional light, or its individual elements, using a cigarette lighter or other electrical on-board network.
You can limit yourself to one-time activation and/or connect on an ongoing basis after dark. There are no clear recommendations on the use of one color scheme or another. However, the lighting in the car interior should be “polite”, that is, not irritate passengers, not be in the eyes, etc.
The main thing is that the chosen color does not distract the driver from driving, and corresponds to the general concept of the car’s interior.
Turn off the backlight in the switch
If there are no other ways to get rid of the flickering lamp lamp, you will need to completely turn off the LED or neon lighting on the switch. Let's look at how to do it yourself and what are the main stages of this procedure.
Preparatory stage
For those who have never installed switches or done electrical work, it is recommended that you carefully consider your actions. Pre-requisite:
- Disconnect the general power supply in the apartment/house from the switchboard switch (by checking its absence with an electrical probe or an indicator screwdriver).
- Prepare a set of necessary tools (mostly a flat-tip screwdriver).
Operating principle of the lighting device
To create illumination, an LED or neon bulb is introduced into the switch circuit parallel to the main contacts. The disconnected chandelier base circuit allows electrical current to reach the switch lighting system. Turned on, on the contrary, leads to disconnection of its power supply. The mechanism of action is based on the difference in resistance between the lamp and the additional light source.
The current passing through the switch LED is clearly not enough to heat the filament of the incandescent light bulb. However, if the chandelier contains an energy-saving lamp or an ice element, then a driver system is used that can operate on low current. Due to the latter, the semiconductor crystal may begin to blink due to the gradual accumulation of potential in the resistor and its periodic release.
What turns on the light
All LEDs and fluorescent lamps operate on direct current. Therefore, at the beginning of their case, a special driver is installed, which includes two required elements:
- Diode bridge – AC to DC converter.
- An electrolytic capacitor is a smoother for voltage pulse dips.
The latter is the main culprit for spontaneous turning on of the light. The fact is that, although weak, current passes through the backlight system - it is impossible to turn it off (only if you completely remove this parallel circuit) - and this is quite enough for the capacitor to accumulate charge. When its potential reaches a predetermined value, a discharge occurs - the light bulb flashes. Although such an event occurs fragmentarily, it nevertheless worsens the life of the lamp, especially gas-discharge ones. In addition, this reduces the comfort of a person’s stay in such a room.
Step-by-step instructions for disabling
Instructions on how to turn off the LED in a household switch consist of the following steps:
- Dismantle the switch or remove the top panel with keys.
- Having understood the circuit, find the LED and conductors connected to the contacts.
- Disconnect the indicator from the terminals, using wire cutters if necessary.
- After making sure that the main conductors and contact points are in good condition, reassemble the switch in the reverse order.
What tools and materials are needed for additional interior lighting?
Using one or another version of car interior lighting, you will need the most common tools and consumables. Including:
From consumables:
In operation, individual lighting components must be connected to each other using a multi-core cable. In this case, the useful area of the cores should be 1–2 mm. Those places where soldering occurred, as well as connecting contacts, must be covered with insulating material. In the process of checking and monitoring the correct installation of car interior lighting with your own hands, you must use a multimeter.
Installation on small parts
For tuning small parts, it is more convenient to use single diodes.
We prepare the diode for installation and connection. We take a diode, solder a resistor to one of its legs, then solder the wires and insulate the exposed wires with regular electrical tape. Somewhere at a distance of about 20 cm you need to make a terminal connection. So, the LEDs are ready for installation. Next, prepare the installation site. Let's consider, for example, how the lighting of the interior handles is installed. To do this, make holes near the handle in the place where you want to install the diode. They must be small so that the diode fits tightly into it. You can additionally secure it with glue. Next, stretch the wiring under the trim into the interior so that it can be connected later. In the same way, single diodes are installed anywhere in the cabin.
What do you need to know about car interior lighting with cold neon?
You can add individuality to your car and make it stand out from the general flow of traffic using cold neon, which looks original and is very effective. Today, neon lighting is one of the most common methods of interior tuning. This option has the following advantages:
Do-it-yourself car interior lighting using cold neon is not only beautiful, but also practical. Such tuning allows you to protect you and your passengers, and provides a huge field for imagination. By making lighting in the car interior with your own hands, you can get a single-color light, or in different colors, using different patterns, colors and combining their quantities. Installation with neon material is a minimum cost and minor interference in the electrical system of the car, which does not affect the stable operation of other (standard) vehicle systems.
DIY installation of neon lamps
First, specialized radiation equipment is installed, for the installation of which you must acquire everything necessary, namely:
- nylon clamps;
- aluminum corners;
- neon emitters - the connector must be removed and the wires must be stripped by 1 cm;
- self-tapping screws.
The further process of installing neon is as follows:
- We saw off the corner to the size of the radiation device.
- Screw it over the dashboard using self-tapping screws.
- Using clamps, we fix the radiation device in such a way that the space under our feet is illuminated.
- We do the same in all passenger seats. At the back, we screw the corner up with the edge to avoid mechanical damage to the radiation device.
- We pull all the switching under the floor to the dashboard on the driver's side. If the length is not enough, you need to increase it.
- We connect the wires to the sensor, which will be triggered when the doors are opened, and to the standard light switch in the car interior.
Tuning interior lighting when opening the car doors
Every motorist wants to improve the operating conditions of his vehicle. In this article we will talk about how to illuminate car thresholds and doors when opening them with your own hands. In fact, this function is not the most important when using a car, however, it adds aesthetics to the car and practicality for the driver and passengers at night.
Backlighting is one of the most popular types of tuning; it makes your car more practical and doesn’t break your pocket.
Many drivers believe that taking on such work without experience is an impossible task, and yet it is possible to install interior lighting in a vehicle without the help of specialists, although this is a very labor-intensive process.
Neon lights
With neon lighting, things are a little more complicated. Here is a short list of characteristics of neon lamps:
- Brightness and saturation of lighting.
- Complexity of installation, which makes it difficult to install it yourself.
- Flashlights are quite demanding in terms of operating conditions.
- Poor response to rhythmic on-off cycle.
- Lack of resistance to mechanical damage.
Let's look at how you can install neon lights at the bottom of the car interior with your own hands, and lay an LED strip along the ceiling so that the backlight with the car brand logo in the door is triggered when the car doors are opened.
Popular articles Beautiful poems for Forgiveness Sunday
Neon illumination of the front car door
Technology and features of installing lighting in a vehicle interior with your own hands
Interior lighting is not only a practical solution for illuminating a car at night, but also a modern type of tuning and decoration of a vehicle. Initially, you need to set the right tasks for yourself so that the result meets your expectations. The set of tools and the specifics of the work depend on exactly which areas of the interior you want to tune - these could be the car's sills, handles, dashboard, driver's foot lighting, and how the lighting should work - when you open the door, when you turn on the ignition, or on a special button. .
And also decide which lighting devices you want to use to illuminate the car interior. Most often, LEDs or neon glow elements are used for these purposes.
Car door illumination using LEDs
You can decorate the interior of a vehicle using LED strip. The tape is easier to install with your own hands, as it has a special self-adhesive coating and therefore does not require additional fasteners. It is also shock-resistant and can withstand different weather conditions well.
Purchasing special LED strips for car lighting can greatly facilitate the work of installing them, but their price category is much higher than LEDs per meter. It is necessary to improve and adapt the meter tape to the vehicle using a soldering iron.
To work, you will need to purchase heat-shrinkable pipe, LED strip and electrical wires. First, we try on the LED strip to the threshold of the car and cut off the required piece, it is better to take it with a small gap. To one end of the LED strip you need to solder two wires, minus and plus. For convenience, you can install female terminals on their ends. Separately, it is necessary to prepare four electrical wires with male terminals.
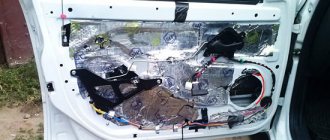
We insulate the soldering areas using heat-shrinkable tubing. The modules are ready to use. Next, you need to remove the trim from the doors and sills of the vehicle and install the developed blanks.
Two wires with male terminals on each door must be routed through the hinge, so they will stick out from it. We tighten the negative wires to the ends of the right and left doors, respectively. This will ensure that the threshold is illuminated exactly from the side where the car opens.
We connect the negative electrical wires to the diode modules, and connect the positive wires to any permanent positive in the vehicle. This could be a car's standard light source, a cigarette lighter, or a battery plus. It is important here not to confuse the polarity of the electrical wires. We check the operation of the installed LEDs. If everything is done correctly, they will light up every time the car is opened. We put the casing in place and enjoy the result.
Similarly, you can illuminate the dashboard of a vehicle, the driver’s feet or door handles. And also the negative ends of the wires can be brought out to a separate button. In this case, the backlight will only work when you turn it on yourself.
Installing neon lighting in the car interior
Neon lighting fixtures have a diffused glow, which greatly attracts the attention of car enthusiasts. Although, on the other hand, if we compare LED and neon devices in terms of service life, the former are distinguished by a long period of operation.
If you want neon lighting for the car interior, then the easiest way to work is with a neon cord. It is sold similarly to LED strips by the meter and is installed according to the same principle. For installation, it is necessary to remove the threshold covers and lay out neon cords of the required length along the outer edge. Ideally, when installing the casing in its place, it should be flush with the neon cable. Similarly to the previous method, we bring out the electrical wires to the ends of the doors and to the power supply.
Neon lamps are a more difficult lighting material to install, as they are prone to mechanical damage and are demanding in terms of operating conditions. To install neon lamps, you will need clamps, screws and aluminum corners. The aluminum corner is cut to the size of the neon light sources and attached in places above the dashboard using self-tapping screws. The same is done in the rear passenger seats. Neon light sources are attached to the installed corners with clamps. Wires are supplied to the door opening sensor and power supply to ensure that the lighting devices are turned on when the door is opened.
DIY installation of LEDs and logo lighting
So, it has already been said above that it is quite possible to install door lighting in a car with your own hands - be it laser with an attractive logo or a simpler one. Let us consider in this paragraph what is necessary for this, and, of course, what the sequence of actions should be. Let's start by selecting the right tools and materials. We will need four LED bulbs, a special lamp used to illuminate license plates (also 4 pieces), electrical wires, corrugation and a utility knife. Having prepared all the tools, you can get down to business.
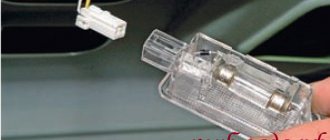
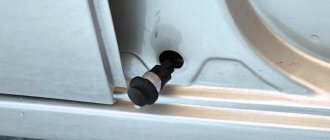
First, it’s worth taking care of the wires, because they are entrusted with a very important mission - supplying power to lighting devices. In order to avoid incidents that may arise with electricians, all wires should be laid to the door in a special corrugation. In general, if you want simple lighting, then connect one cable with the plus to the car’s lighting system, and the minus to the door limit switch. It is a button, when pressed, some signal action occurs. So, for example, it is thanks to this element that a symbol lights up on the instrument panel, notifying us that the doors are not closed well enough or are completely open.
Popular articles Quantum Nuka Cola from Fallout 3
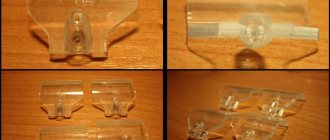
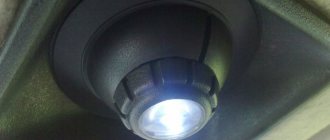
The simplest lighting method was presented above; now let’s look at a more interesting option for organizing lighting in the form of a logo for car doors. To do this, you need a special laser lamp, which is also very easy to buy. Next, you should dismantle the door trim and choose the most suitable place where it will be installed. Then we drill a hole with a special drill; it should have the same diameter as the lens, and install the above-mentioned laser illumination with the logo in a strictly vertical position.
The laser comes with instructions that describe in detail how to connect this item to the car wiring with your own hands. Having fixed all the elements that the laser illumination kit contains, we return the door trim to its original place. The new option will not only add comfort to the owner’s life, but will also emphasize the style and individuality of your car.
Home →
Device → Body →