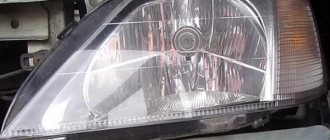
Foggy headlight on Grant During sudden temperature changes, during rain, after driving through puddles, after a car wash, condensation appears in the car headlights or water collects. And even the ventilation holes don't help. There are several different reasons for this problem. You can solve it yourself in several ways, but if you are not confident in your abilities, then it is better to turn to specialists.
Why do my headlights fog up?
The causes of fogging may be the following:
- violation of the integrity of the headlight housing;
- destruction of the sealant layer connecting the glazing to the body;
- violation of the tightness in the places where the wiring is supplied to the light bulbs;
- microcracks in headlight glazing;
- clogging of ventilation ducts and holes that provide air circulation in the headlight;
One way or another, all of the above malfunctions lead to a violation of the headlight seal. Depending on the specific source of condensation inside the optics, there are various ways to eliminate fogging from the headlight.
But it’s just splashing there! How so?
YouTube channel of Sergei Morozov
But this is already bad! If the moisture inside the optics does not evaporate, but flows down the glass and accumulates into entire puddles, turning the headlights into an aquarium, urgently look for the cause of the ventilation problem. There are three possible options.
- Valve clogged. With prolonged use, they become clogged with dirt and dust, clogging the headlights. The air exchange of the internal cavity is disrupted. The moisture does not evaporate and condensation occurs.
- Cracks in glass or case. Even through minor damage to the headlight units, water can get inside and accumulate there.
- Destruction of seals. Glass, housing covers and wiring harness connectors have hermetically sealed seals that protect the headlights from dust and moisture. Over time or after an accident, the material partially collapses and does not perform its functions.
Why should it be eliminated?
It's simple, and there are several reasons for this:
- The efficiency of lighting drops significantly; if you like, it can be compared to a dirty headlight. Which is already dangerous, because you simply may not see the crossing pedestrian.
- Fogging is often accompanied by the accumulation of water inside the headlight, which leads to corrosion and destruction of all metal parts of the headlight. Although now many manufacturers are made of plastic, the lamp itself is made of glass and metal.
- If moisture gets on a heated lamp, it may simply burst.
- Water is a good conductor; it can short-circuit the lamp contacts. At a minimum, it will burn out, at a maximum, the fuses will blow out, and if this happens on the road, you risk being left without road lighting.
- The lamps will burn out more often, again due to moisture getting on the contacts.
In general, problems are guaranteed, so something needs to be done. Often the reasons are trivial.
What is the danger of fogging up the optics on a car?
If the front headlight and rear signals are sweating on Grant, then problems may soon appear:
- The quality of lighting decreases. The appearance of condensation can significantly distort the light flow and lighting efficiency.
- Contacts oxidize and corrosion appears on metal parts. The metal begins to rust, other parts with a reflective coating oxidize, it loses its properties, the functioning of electronics is disrupted, and blocks often flood.
It is very important to fix these problems quickly so that the devices work properly. Otherwise, headlight repair or replacement of individual elements may be required.
Cloudy headlight glasses
During operation, car headlight windows can not only fog up, but also become cloudy; because of this, the optics do not shine so brightly, which also affects traffic safety. Plastic glasses can lose their appearance for various reasons:
- the outer surface of the headlight is wiped with a dry cloth (this cannot be done);
- Dust and sand flies onto the glass from the road, as a result, small scratches form on the glass surface and yellowness appears;
- The glass becomes dull over time, natural aging occurs, and the glass also burns out under the sun's rays.
To return the glass to its normal appearance, they are polished. After polishing, the headlight will not look like new, but its light transmittance will increase. If the glass is inexpensive and sold separately, it is easier to replace it than to polish it. The optics are polished using special polishing pastes, first processed with a coarse-grained compound, then with a fine-grained paste.
The headlight is sweating - what to do? Common causes of fogging of car optics
During the cold season, car headlights often fog up. Drivers of a wide variety of cars face this. On the one hand, there is nothing bad about this, but on the other hand, there is a problem with the illumination of the road and I can get out before the light bulb expires. What is this feature associated with? Why does the headlight sweat? What to do and when to deal with it?
Why troubleshooting is necessary
Is the headlight foggy? What does this mean:
- It spoils the appearance of the car.
- Poor and insufficient illumination of the road at night. Often falls several times.
- Regular fogging can cause water to accumulate inside.
- Due to the presence of moisture inside the headlights, the bulbs may burn out more often than usual.
- Moisture can cause oxidation of contacts.
- The plastic becomes cloudy from the inside.
- The worst thing is that the presence of moisture and water can cause a short circuit.
When the car's optics fog up, the light does not pass through the glass, but is refracted by the condensation.
If the fogging is insignificant, then it will quickly go away on its own; just briefly turning on the low beam headlights is enough. This type of fogging is normal.
Unpleasant situations can happen in any case, so the problem needs to be solved. The main thing is to know the cause and solutions.
Natural process
Not all car owners are aware that car headlights figuratively “ breathe ”. In other words, the air in the headlight is exchanged with the environment. The exchange occurs through the breather. These vents are a must.
When the headlights are turned on, the temperature inside the headlight begins to rise. As a result, the air expands and needs to find a way out. cold air enters the headlight through the breather .
For example, when entering a warm and damp parking lot (garage), especially if the headlights were not turned off before, the air inside the headlight will certainly pick up some moisture . The same effect can be observed when leaving a warm garage into the cold. The temperature difference will ensure air movement inside the headlight.
Previously, headlights were made in a square or rectangular shape, but now it is completely different. Large, deep and pointed headlights are increasingly common. And, as usual, the lower pointed part will fog up.
Modern lamps (LED, xenon) spend very little energy producing light, and accordingly the headlight no longer heats up so much. Thus, air exchange is carried out in very small volumes.
How to remove moisture?
The headlights need to be dried. The easiest way is to remove the covers from the optics and turn on the low beam for a few minutes. In a heated garage and in warm weather, you can simply open the headlight housing and leave the car for a couple of days. You should not drive without covers, otherwise dust will get inside and you will also have to deal with dirt on the reflectors.
YouTube channel “1000 plus 1”
Another option is to direct a stream of air with a compressor or hair dryer inside the headlight. In 15–20 minutes, all moisture should evaporate. The main thing is not to overdo it with the air temperature, so as not to melt the body and overheat the reflector or glass.
If the headlight is attached with two or three bolts or even with latches, then the easiest way is to remove it, take it home and dry it on a radiator or just in the room.
Causes of headlights fogging on the Lada Priora and methods for eliminating the problem
Car owners often encounter headlights on their Lada Priora sweating. Electric lights are a component not only of the appearance of the vehicle, but also of the safety of the driver and passengers. To prevent unpleasant consequences, you need to immediately eliminate the fogging problem.
Reasons for fogging of standard lights
Light fogging of headlights on Lada Priora is a natural phenomenon. The appearance of condensation on these parts is due to the laws of physics. The process is related to relative humidity and ambient temperature.
When operating a vehicle, the spotlight heats up, and as a result of its cooling, condensation forms on the surface of the lens.
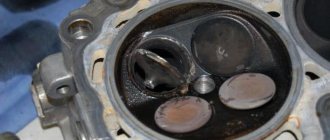
The design of electric car lights includes an emitter, a reflector, a housing and a diffuser. the function of the latter is to protect the lamp from dirt and water. It is made of glass or plastic. The latter is more durable and lightweight.
It is easier to make various types of headlights from it. However, glass does not become cloudy over time. A car spotlight has ventilation holes (aeration channels), in which there are special valves with flaps. Their main function is to ensure air circulation.
During the cooling process of the lanterns, moist air gets inside, causing condensation to form. Most often it appears in the area of high beam lamps. When you turn on the lights, after some time the condensation completely evaporates. If the humidity does not disappear for a long time, it is necessary to urgently determine the cause of fogging.
The following sources of this problem are known:
- a crack in the glass or body;
- depressurization of joints and seams;
- flow of liquid through aeration channels.
If the Lada Priora is under warranty, you should not fix the cause yourself. It is better to contact an official dealer.
Possible consequences
Fogging of headlights is a common problem, the solution of which car owners, not considering it critical, put off until later. However, the consequences can be quite serious:
- Bad visibility. The spectrum of light rays passing through the condensate is refracted and scattered. This leads to insufficient and incorrect illumination of the path. And drivers experience a feeling of discomfort and get tired quickly. Poor visibility is one of the common causes of road accidents.
- Partial or complete failure of electrical wiring. Foggy windows cause a decrease in the performance of electrical contacts. The process of constantly exposing electrical connections to moisture leads to oxidation reactions.
- Damage to the reflector. Condensation, in contact with metal parts, causes corrosion.
Reduced service life of lamps installed in car spotlights. Excessive humidity that occurs when headlights fog up reduces the lifespan of even the highest quality lamps.
According to traffic rules, foggy headlights are a serious malfunction in which the operation of the vehicle is prohibited.
Methods for solving the problem
If the Lada Priora headlight sweats from time to time, you can try the following universal method. First, remove the lampshade of the light unit. Next, loosen the lamp and slightly remove it from the socket. After turning on the optics, you should let the lamp work for a while.
After turning off the low beam, you need to return the lamp cap to its place. If you carry out the manipulation in the evening, this will ensure that there is no condensation on the inner surface of the lampshades by the morning.
If the procedure does not help, or the headlight constantly sweats, you should use another method:
- First you need to remove the spotlight.
- Then carefully clean the structure from any existing dirt. It is recommended to carry out the work with gloves. When removing the glass from the headlight unit, do not touch the reflector, as fingerprints are very difficult to remove.
- Next, carefully inspect the surface of the headlight. Microcracks can be easily eliminated by making repairs by applying a special sealant to a previously degreased and blow-dried surface. If you have free money, it is better to replace the headlight dome with a new one.
- Condensation forms when the seal of the seams is broken. To check this, you will need to remove the lamps and inspect all the joints. If you find damaged seams, remove the old sealant using a technical hair dryer or activators. Before applying the substance, it is necessary to treat the area with a degreaser. Silicone sealant is easy to apply, dries quickly, and has high moisture resistance.
- After treating the seams with this product, you should wait 22-24 hours until the composition completely hardens and only then put the headlight in place. Otherwise it will fog up again.
You can also check the presence of special caps for the check valve of the canopy and the serviceability of the valve itself. Inspect the ventilation system. If necessary, you need to clean it from dirt. It is recommended to completely wash the headlight - remember not to wet elements that interact with electricity. Installation of the lantern is carried out only after drying.
There are not many reasons for foggy headlights. To eliminate the defect, sometimes it is enough to turn on the low beam. In some cases, to get rid of the problem, you will need to repair or even replace the standard lights.
Eliminating the causes of water appearance
Removing fogging of taillights or headlights:
- The cables are disconnected and the corrector hose is disconnected.
- Remove the headlight, thoroughly clean the surfaces, check the technical holes and breathers.
- Be sure to check the O-rings that are located in the connectors and sockets of the lamps - any rings that are even slightly damaged must be replaced immediately.
- Carefully examine the surface for the formation of cracks. Small ones can be sealed with sealant.
- Check the seam for tightness. It is necessary to replace the seal, it is advisable to go around the sealant in a circle.
- If a lot of water collects in the housing or the headlight on the Granta Liftback constantly sweats heavily, some car owners drill a small hole in the glass at the bottom. This often helps, but it is not the best solution to the problem.
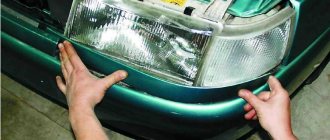
How to disassemble a headlight
The process of removing the headlight is as follows:
- You need to remove the terminal from the battery.
- Remove the bumper.
- One by one, release the clamps and disconnect the pads from the lamp sockets.
- Turn the headlight unit cover on the engine side counterclockwise.
- Disconnect the block.
- Rotate and pull out the corrector cylinder.
- Unscrew the bolts (3 pcs.) from the mounting loops that hold the headlight unit.
After this you can remove the headlight. Assembly is carried out in reverse order.
How to disassemble a Granta headlight
Separating the glass and the body is much more difficult; you will need a hair dryer, a utility knife and a flat-head screwdriver:
- If the headlight on the Grant is sweating and you need to disassemble the entire body, you will first need to carefully remove 4 brackets.
- Next, the edge is removed, under it there is a joint, which is glued with sealant. To soften it, use a household hair dryer; do not bring it too close or heat it too much, so as not to melt the plastic.
To remove the taillight you need to take an 8 mm wrench. The process looks like this:
- Open the trunk, remove the trim.
- Unscrew the nuts (3 pcs.).
- There is a plastic fastener on the wing, you need to carefully press it out.
- Remove the power connector.
- Pry the headlight from the outside and bend it a little.
The headlight can now be completely removed. The sockets are unscrewed counterclockwise, they are removed along with the lamps. Installation is carried out in reverse order.
Separating the housing from the glass on the taillights is much more difficult. The fact is that they are glued together without sealant and represent a continuous, non-separable structure. In this case, you will need to use an engraver or flat soldering iron. You need to go around the circle, but don’t forget about the fixing protrusions. After cleaning and drying, connect the two parts using sealant or solder.
What to do?
You know, many people save money, and in case of accidents, they put non-original spare parts on their car. Lighting devices are no exception here, because often the price of the original is simply off the charts. If you start to sweat, but there is no external damage. This means a low-quality “Chinese” craft, either look for a place where moisture and air are drawn in, or replace it with a new original one (or better quality).
What to do when it looks normal, there seem to be no chips or cracks, but moisture appears from the inside?
There are several recommendations here:
- It is necessary to dry the headlight - this is mandatory, otherwise the moisture inside will provoke evaporation. If you don’t remove it from the body, you can try drying it with a hairdryer, the hot air will evaporate the moisture.
- After drying, it is worth sealing all the joints of the glass and the body - this is done with a sealant, preferably colorless. This way you can remove all small cracks.
- We look at the fit of the light bulb to the body. It must have a gasket, sometimes rubber, sometimes plastic. If it is not there, it is through this place that moist air can be drawn in.
- For an accurate determination, it is advisable to remove the headlight. There is a 100% method for determining a “fistula”. We pour water into the bathtub - then simply lower the headlight into the water - observe. If bubbles appear, then this is our place for air leaks. We mark it, then seal it. Again we apply sealant. After it has dried, you need to repeat the procedure.
- If the glass is cracked. This is more problematic - ideally, you need to replace the glass, but it is not always sold separately, and buying the entire headlight is also not an option. What to do then? If there is a small crack, you can stick a tint film on top - just take a transparent one, not a dark one. It has an adhesive base that will seal all the “holes”, and the glass will not spread further.
- If the crack is large, then replacement is advisable. By the way, many people are looking for originals in the analysis, this is the way out, just take one that is not too worn out, otherwise you will need to polish the glass . You can, of course, seal it, just remember it must be airtight. A short video to help.
That’s actually all the main causes and consequences, I think the information was useful to you. Read our AUTOBLOG.
(
16 votes, average: 4.06 out of 5)
Proper cleaning and assembly
The dried headlight must be cleaned thoroughly. It is strictly forbidden to use hot water, scratching sponges or aggressive agents. The best option is dissolved laundry soap and a soft cloth. Don't rub too hard, just swipe very lightly over the surface. Thoroughly pour the cleaned elements with distilled water and leave to dry.
It is advisable to use soft gloves when assembling the headlight so as not to leave marks. Apply sealant to the seams to avoid tears. After connecting the body to the glass, leave it to dry for 24 hours. Then you can check the structure for leaks.
What to do if the headlight on a Lada Granta sweats? If you are not confident in your strengths, knowledge and capabilities, contact a specialist. The most dangerous moments in disassembling the headlight structure are removing the sealant, as well as heating the product. But if you have the skills to do this kind of work and do everything carefully, then you can solve the problem of headlights fogging on your own. Be sure to use only a special sealant that is designed for headlights.
Well, I dried it, and then what?
Now you need to eliminate the cause of the fogging so that it doesn’t happen again. Check the drain valves on the housing. On different optics models, they can be in the form of simple plastic caps, curved tubes with foam inserts, or membranes with several holes. If necessary, clean the valves and replace the foam with new ones.
drive.ru
Inspect the seals on the lid and make sure there are no cracks in the body or glass. It is worth fixing these problems yourself only if you are confident in your abilities. Often, removing headlights involves disassembling the bumper, and to restore the tightness of the joints, you need a special sealant and sealing tape.
How to eliminate fogging at home
You can begin to solve the problem yourself after the exact cause has been established. It is impossible to detect microcracks in plastic with the naked eye. In this case, the headlight will sweat over its entire surface, and not in any specific place.
To check the device you need to:
- Remove the terminals from the battery;
- Unscrew the light bulbs;
- Clean the body;
- Check for cracks in the seams.
If the headlight fogs up due to cracks in the seams, it is necessary to clean the surface of the old glue. Next, dry the headlight and degrease the surface. We seal the headlights with sealants. A silicone-based mixture is best.
To check the plastic for microcracks, it is immersed in water. The presence of cracks reveals air bubbles. A colorless sealant will help correct the situation. Another way to repair a crack is to seal it with instant glue.
Silicone sealants that can be used to seal headlights
If the above-described process of drying the headlights turned out to be ineffective, then you will still need to spend time on a thorough inspection and identifying gaps, cracks or chips.
If they are found, you can use silicone sealant. It goes on sale in cylinders and is available in any auto store.
Applying the product is a fairly simple process and will be easy for any car enthusiast to handle. If you have problems identifying gaps or chips, it is better to immediately turn to professionals - specialists can easily identify them using optical or laser special devices.
It should also be taken into account that the lifespan of sealants is not always long enough, i.e. problems can arise precisely because the sealant has lost its original qualities.
In this case, gaps can form either visible to the human eye or almost invisible. Most often, middle-class cars assembled in the Middle Kingdom or on assembly lines of domestic car factories suffer from such problems.