Let's start with the fact that a diode bridge is an electrical circuit, a chain of diodes designed to convert alternating current into direct current. A faulty diode bridge is one of the main causes of generator malfunction, and is also a powerful consumer that can drain the battery to zero overnight.
A faulty diode bridge can both discharge and recharge the battery, which can result in major electrical problems. The principle of diodes, in addition to converting current from alternating to direct, is the unipolarity of current transmission from the generator to the battery. In other words, a working diode transmits current only in one direction (generator - battery), a faulty diode transmits current in both directions (battery - generator) or does not transmit anything at all. Diodes burn out due to poor contacts or moisture.
Before you start blaming the diode bridge for all your problems, be sure to check the generator brushes and voltage regulator.
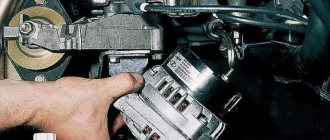
To start checking the diode bridge, you need to remove it, fortunately the process is simple. You can also do without removing the rectifier block (diode bridge), but this is very, very inconvenient.
One way to check the diode bridge is to check the on-board system for current leakage (How to check for current leakage?)! If the current consumption in a stopped engine with electrical appliances turned off is 1A per hour or higher, then most likely the problem lies in the diode bridge. The bridge can only be checked more thoroughly when removed.
Diagnostic methods
As practice shows, diode bridges periodically fail on any vehicle, regardless of the make and model. It is
also not fundamentally important whether you use diode bridges from Valeo, Bosch or any other manufacturer
Most often, one or several diodes burn out in a DM. As for the reasons, here we can highlight:
- dust ingress;
- negative impact of dirt;
- contact of diodes with oil;
- accumulation of moisture in the generator;
- polarity error when lighting;
- incorrect battery connection;
- overload in the electrical network;
- errors in the installation of electrical equipment;
- factory defects, etc.
If you set a goal, the bridge can be checked in normal garage conditions. For such tasks, use a light bulb or a multimeter.
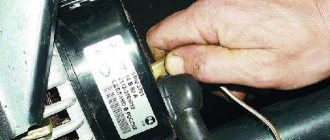
Before starting work, remove the protective casing from the DM, and also do not forget to disconnect the terminals on the regulator. Remember that all bridges are positive, that is, positive diodes are equipped with red wires, and negative ones are black. Don't get confused.
Now in more detail about each of the methods.
Multimeter
If you decide to use a multimeter to check the bridge, you will need to perform several sequential procedures.
The whole process looks like this:
Checking the functionality of the generator on VAZ cars
- the bridge is dismantled from the generator (no other way);
- each diode will need to be checked separately;
- the beeper mode is selected on the measuring device;
- This setting will allow you to hear a signal when the probe is shorted;
- if this mode is not available, select the 1kOhm position;
- the probes are brought to the edges of the diode;
- a measurement is made;
- the probes are swapped.
Now regarding the measurement results. Everything is fine with the diode, if in one position you see an infinity sign on the screen, in the second it gives a value in the range from 500 to 700 Ohms.
If the device shows a lower resistance value, or there is an infinity sign in two positions, you have found a faulty diode.
Bulb
Now let's see how the procedure is carried out using a regular light bulb. This is a good alternative for those cases when you don’t have a multimeter.
The most ordinary 12 V lamp will do the job.
- The DM housing is connected to the negative of your battery;
- the plate must fit tightly to the car generator;
- one end of the lamp is connected to the minus of the generator;
- the second to the positive terminal 30 through the battery;
- if the lamp is on, then one or several diodes have failed;
- check negative diodes;
- the minus of the lamp goes to the body of the autogenerator;
- plus to the axle mounting bolt;
- if the lamp lights up or starts blinking, the problem is with the negative diodes;
- Next, the positive diodes are checked;
- the plus goes to terminal 30, and the minus also goes to the mounting bolt;
- when the lamp is on, we conclude that the problem is with this group of diodes;
- additional bridge diodes also need to be tested;
- the minus remains in its place, and the plus goes to terminal 61;
- if the lamp is on, the problem is diagnosed again.
To solve the identified problem, you will need to remove the problematic diode. A new one is installed in its place.
Nobody forbids you to simply buy a completely new DM and install it in place of the old one, then the question is a more substantial amount of money.
- How to increase onboard voltage - very simple
In total, checking and repairing the bridge will take no more than 2-3 hours for a technician without much experience. If you are an experienced auto mechanic, then you definitely won’t spend more than an hour of your time on such events.
Have you had any experience in repairing or simply checking diode bridges on your car? If yes, write about it, tell us what difficulties you encountered or what tricks you know.
That's all
Thank you for attention! Subscribe, leave comments, ask questions and expect a lot of new, useful and interesting materials! (1 ratings, average: 5.00 out of 5)
(1 ratings, average: 5.00 out of 5)
SIGNS OF GENERATOR SET PROBLEMS
- The charging indicator lamp lights up constantly or flashes while the engine is running;
The battery is not charging - Undercharging or overcharging of the battery;
- Poor headlights when the engine is running, unsatisfactory performance of wipers and other consumers of electricity;
- A strong increase in the brightness of the headlights, boiling of the electrolyte in the battery;
- Presence of extraneous noise from the generator set.
MALFUNCTIONS OF THE BRUSH UNIT
This unit may have problems with the electronic regulator and brushes. Replacing the brushes of the VAZ 2115 generator can be done without removing it from the engine. It is impossible to check this unit without removing it from the generator, so if there is such an opportunity, you can simply change the brushes. You can check its operation; there is an adjustable power supply and a control light. Connect the power to the “+” and “-” of the regulator, and the light bulb to the brush. It should glow, and when the input voltage increases to 15-16 volts, the light goes out. If this does not happen, then the tablet needs to be replaced. Let's look at the signs of brush wear. This will be indicated by:
- Low on-board voltage;
- Lack of battery charging;
- Charging voltage surges.
Brushes in a free state must have a length of at least 0.5 cm. If the length is shorter, they must be completely replaced. Check the condition of the brushes and their free movement in the grooves. If there is a hang, it can be eliminated by dropping a drop of oil into the grooves. Check the slip rings and their surface for wear. If present, you need to sand the surface of the rings with fine sandpaper. When the brushes of the VAZ 2114 generator are replaced, performance will be restored in a few minutes, after grinding in the brushes and slip rings.
Brush unit
DIODE BRIDGE AND ITS PROBLEMS
Signs of a faulty generator diode bridge may be as follows:
We independently change the diode bridge on a VAZ 2107
- Complete lack of charging;
- The charging voltage is significantly higher than normal.
All this can cause great negative consequences for the entire electrical system of the car. Repairing a generator with your own hands is possible, but only if you have experience and equipment for working with electrical equipment. For example, signs of a broken diode bridge have been identified and require repair.
Most often, in this case, a breakdown of the “horseshoe” power diodes occurs. Replacing them is not very difficult, the problem is that they are not available in spare parts. You can look for repairmen who repair electrical equipment of cars. It will be easier and cheaper to purchase a new unit with a diode bridge and install it to replace the failed one. The diode bridge is replaced in the following order:
- Mount a contact bolt with insulating bushings and nuts in the block and tighten it;
- Correct and reinstall the leads of the stator windings and screw in the nuts at their connection points;
- Replace the bolts securing the rectifier unit and tighten them;
- I install the brush assembly with the regulator in its place, and secure it with screws on the back cover body;
- Install a protective plastic casing and secure it with three clips.
After this, the device can be mounted at the installation site, the wires can be connected, the drive belt can be put on and tensioned, and its operation can be checked.
Diode bridge (rectifier)
VESKO-TRANS.RU
AutoNews / Reviews / Tests
How to Check the Generator Diode Bridge with a VAZ Multimeter
The diode bridge of the generator on the fourteenth is a whole electronic system, a diode chain that converts alternating current into constant current. If your bridge (or rectifier unit) fails, then you risk the life of your own generator and battery, because the rectifier unit sucks electricity in huge quantities. When problems with this unit can affect the life of the battery in different ways - drop it to a minimum or, on the contrary, recharge it. Not bad is not enough anyway.
Diode bridge of the VAZ 2114 generator
The danger of a faulty unit is also that the diodes are designed to transmit current in a one-sided order: from the generator to the battery, if they are broken, then the current flows to both countries, thus, of course, screwing up the entire electrical system in the fourteenth.
Diagnostics
To check, the generator does not need to be removed. The test is carried out using a tester. You can use a cheap Chinese tester. The two probes of the measuring device need to be connected to the battery terminals and the voltage checked.
Analysis of voltage values makes it possible to judge the health of the generator set. What voltage the generator device produces can be found in the manual.
Unit location
Signs of device malfunction:
- The charging indicator light is constantly on or flashes when the engine is running;
- the battery either does not discharge completely or receives an increased charge;
- The headlights do not shine well enough when the engine is running, poor performance of other electricity consumers;
- the headlights are too bright, the electrolyte in the battery boils;
- heats up at high voltage;
- increased noise during engine operation from the generator side.
There may be problems in the brush assembly, which may be due to a malfunction of the brushes, their size, or problems with the three-level regulator. It is impossible to check the size and serviceability of the brushes without removing the generator. But you can change the brushes.
Signs of worn brushes:
- no battery charging;
- Voltage jumps when charging;
- The on-board voltage in the network is below normal.
If the brushes are less than 0.5 cm long, that is, they do not correspond to the required size, they need to be replaced. The condition of the brushes is checked to see how the brushes move in the grooves. After replacing the brushes, the generator restores its operation after a few minutes when the slip rings and brushes grind in.
Three-level voltage regulator
The three-level regulator should be checked along with the brush holders. If the regulator is working properly, the voltage should be 14.7 V. If the voltage is less than 13 V, the regulator must be replaced with a new one, since it maintains the required voltage for devices in the on-board network. If the regulator is faulty, the installation heats up. The procedure for replacing the three-level regulator is similar to replacing the brushes, since the devices are removed together.
Problems are possible not only with the cheeks, but also with the diode bridge.
Signs of a diode bridge malfunction:
- There is no charging at all;
- charging significantly exceeds the permissible values.
Repairing a diode bridge by replacing its spare parts is problematic. Therefore, the problem can be solved by replacing the diode bridge with a new one. When replacing the diode bridge, install the contact bolt, install the leads of the stator windings, and install the brush assembly. After installing the protective casing, the diode bridge is mounted, the power supply is connected and the drive belt is put on the pulley. After installing the belt on the pulley, check the tension of the drive belt.
Signs of a faulty generator diode bridge
The bridge is an electrical circuit of diodes that process signals from alternating current flows into direct current. Problems with the generator directly depend on problems in the diode bridge.
Problems that can completely leave the battery without a charge or charge the battery more than normal ultimately have huge negative consequences with the internal electrical system of the car.
The function of the diode system is not only in the process of converting current pulses, but also in its unipolar transmission from the generator to the battery. Accordingly, if the diode is faulty, the current is directed in both directions, or the current supply is completely stopped. The cause of damage and malfunction of the diode bridge is poor-quality contacts, or as a result of moisture penetration.
To check the diodes, the bridge must be dismantled using fairly light manipulations.
We dismantle the diode bridge of the generator:
- Disconnect the “-” terminal from the surface of the battery and detach the wiring system from the casing.
- Unscrew the wires.
- We remove the rubber cap from the wires + terminal, disconnect the nut securing these wires and remove them from the generator block.
- We remove the plastic casing, having previously unfastened the fastening system.
- Disconnect the mount for the regulator.
- When removing the voltage regulator with brushes, do not forget to unfasten the wire block.
- Use a wrench to remove the bolts securing the bridge.
- Having bent the leads directed to the stator winding, we unscrew the capacitor mount.
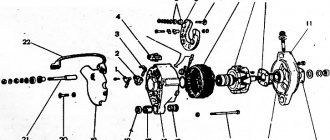
- We take out the diode bridge. We unscrew the 2 nuts of the contact bolt, remove the bushings from it, and also remove the bolt from the bridge. That's all, now you can change or check the diode bridge.
- We repeat the installation process in reverse order.
Removing the diode bridge
FUNCTIONAL PURPOSE AND FEATURES OF THE RECTIFIER
The diode bridge of the generator, depending on the type, can consist of either 4 or 6 diodes that perform the function of converting alternating current into direct current with a given pulsation frequency. The operating principle of the device is based on the bipolar rectification method, which is also widely used in a variety of electronic systems.
In addition to the conversion, the unit acts as a valve, the purpose of which is to pass current exclusively in one direction. With a properly functioning device, the current from the generator enters the fourteenth power network, but does not pass back to the stator. If the node fails, current leaks and flows in both directions. This will cause a constant lack of power, and the vehicle's systems that consume electricity will not be able to operate.
The VAZ 2114 is equipped with a three-phase rectifier, which has the following advantages:
- Converts alternating current into direct current with the lowest pulsation frequency: the lower the frequency, the more stable the vehicle’s electronic systems will function;
- Can be equipped with diodes of both bridge and half-bridge types;
- Makes it possible to install a current filter - a capacitor.
The cost of a diode bridge ranges from 500 to 1100 rubles, depending on the manufacturer. The market offers rectifiers both from Chinese companies, which have a low cost and questionable quality, and from well-known brands, the reliability of their products has been tested by many car owners.
Problems with the brush assembly
The performance of the brush assembly directly depends on the electronic controller and the brushes themselves. By the way, it is possible to replace the brushes without dismantling the generator, however, this is quite inconvenient.
In order to check whether the brush assembly is working, you need to take a 12-volt light bulb and an regulated power source. Connect the light bulb to the brush, and the power regulators “+” and “-”. Thanks to this action, the light bulb should light up immediately. If the input voltage is increased to 15 Volts, the light should go out. But if it continues to burn at 16 Volts, the electronic regulator should be replaced.
The wear of the brushes themselves can be determined by the following parameters:
- complete lack of battery charge;
- The charging voltage constantly fluctuates;
- The on-board network voltage is lower than specified.
Generator bulkhead VAZ 8,9,10,11,12,13,14,15 Priora, Gazelle Volga, Sable
Check Features
When checking the generator of a VAZ 2110, 2107 and others for serviceability, the following conditions must be met:
- An accurate multimeter should be used for diagnosis.
- The normal voltage is 12 V.
- If it is necessary to replace the wiring, you must use wires with the same cross-section as the original.
- Before checking, you should check that all fasteners are connected correctly and the belt tension is correct. If necessary, the connections should be adjusted to normal, the belt should be loosened or tightened.
During the verification process it is prohibited:
- short circuit the wires;
- connect terminals that differ in purpose and parameters, connect terminal 30 or B+ to ground;
- diagnose a generator without connected consumers.
How to check the diode bridge of a VAZ 2114 generator
In order to see whether the diode bridge is broken or not, it is better to remove it. Although, you don’t have to take it off, but then you’ll have to strain. If you still decide on the second option, immediately see below the method on how to do this.
We check the generator rectifier unit without actually removing it:
To do this, simply remove the protective casing from the generator itself, then disconnect the control wire “B” from the terminal on the generator, and also remove contact “B” from the voltage regulator. Now we take a twelve-volt paw (control).
There are three positive diodes on the case with red marks; they are responsible for the positive voltage. So they are connected to the output from the generator, and the diodes themselves are mounted in the plate of the rectifier block. There are also diodes (there are also three of them) marked black, they are negative and create a negative voltage. They are located on the other side of the plate connected to the engine mass.
Now we connect the terminals through the light bulb and look at its behavior (a more detailed connection diagram is described below), blinking - the diode bridge needs repair or replacement.
The rectifier unit includes four or six diodes, which control the operation of the current; They are a kind of gateways and are located on the generator body itself.
Here are the most common causes of diode failure in a bridge:
- When washing engines, you can soak the generator rectifier block
- Diodes can become dusty, they can be dripped with oil, dirt gets in while the car is moving
- You can light the car incorrectly, mix up the plus and minus terminals
The most obvious fact of a non-working bridge will be a current leak in the on-board system, which manifests itself as follows: if the current is drawn above 1A per hour with the engine turned off but the electronics turned on.
In your garage, you can check the rectifier unit using very simple tools - a multimeter or a tester (a small 12 V light bulb).
Checking with a light bulb
- We attach a plate (diode bridge housing) to the battery at the negative terminal; the plate should fit very tightly to the generator (to its ground).
- We take a twelve-volt light bulb, connect it to the positive of the battery, throw its other end to the terminal at the output of the additional diodes of the system, then to the positive of the output bolt and to the starter winding.
- If the light blinks on any connection, the bridge is faulty.
Checking for broken contacts
- Connect the minus contact of the light bulb plate to the plus of the battery.
- The positive contact of the light bulb is to the negative of the battery.
- Now we go to all the points described above and check whether the light is blinking or not. And if it blinks again at a certain point, the bridge needs to be replaced.
Checking with a multimeter
- We need to remove the block to measure it with a tester; we will measure all the bridge diodes separately.
- We will test the diodes with a multimeter: we close the electrodes on the diode, it should beep.
- The multimeter reading should be from 400 to 700 ohms at one end of the contact, and an infinite number at the other; if the resulting number does not fit into the specified regulations or the number is infinite at both ends of the contacts, the diode is faulty.
Replacing the diode bridge of a VAZ 2114 generator is not a very difficult task than replacing an ordinary breakdown of its part. Buying a new diode and working magic on the connection with a soldering iron is, in fact, not difficult. And this action, in principle, will constitute the entire repair of the generator diode bridge. It is simply not possible to repair anything else, and replacing diodes is a cheap thing, the entire unit will cost more, the average price for a VAZ 2114 diode bridge is 400 - 700 rubles.
Checking the car battery and generator
The generator is quite stable in operation. Its failure, as a rule, occurs due to environmental factors, for example, in the form of condensing moisture on contacts and metal, causing corrosion and breakdowns, as well as as a result of mechanical wear of rotating parts.
To know how to check the charging of a generator, you need certain basic knowledge about the structure of the unit, its components and the principle diagram of the operation of some of its parts.
To measure electrical resistance, you will need a special testing and measuring device: the so-called multimeter or ohmmeter.
Before checking the generator winding with a tester, it is necessary, first of all, to inspect it for the presence of external damage to the insulation, burns in the winding resulting from short circuits. If visible damage is detected, the stator must be replaced. If no external damage is found, then we proceed to a step-by-step check of the integrity of the stator winding using an ohmmeter.
The stator must be disconnected, the winding terminals must not contact each other.
Need to check:
- no winding circuit break
- absence of short circuit of the windings with the housing.
We set the ohmmeter to test and measure the resistance.
In the first case, the ohmmeter tips are connected in turn to each of the three winding terminals. If the winding is faulty, the control device will show infinite resistance (i.e. one in the left digit of a digital multimeter and a maximum deviation to the right if the multimeter is analog).
In the second case, the ohmmeter tips are connected to the winding terminal and to the stator housing. If there is a short circuit, the test device should show low resistance.
A serviceable stator, therefore, in these two tests should show low resistance in the first case and infinitely high resistance in the second.
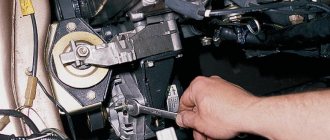
How to remove the generator
Removal
Genadiya in Samara through the top without straining.
- In order to remove the generator, you will need to drive the car into a pit or lift it on a lift. For ease of operation, it is necessary to remove the crankcase protection. The next step is to remove the terminal from the car battery.
- Moving the rubber boot to the side, you can see the nut that attaches the positive terminal to the generator. It should be unscrewed and the wire block disconnected. This may require some force.
- Using a socket wrench or wrench, unscrew the adjusting bolt.
- Find the nut of the bolt located on top. It is thanks to him that the generator is held on the bar. Both the nut and bolt should be removed while simultaneously removing the tension bar that holds the bolt.
- Finally, you need to unscrew the nut of the bolt located below. Directly behind this nut there is a spacer sleeve that will also need to be removed.
- Next, using milk, you should knock out the bolt from the generator, but at the same time the latter must be held suspended.
Note. Once the bottom nut of the alternator bolt is loosened a little, you will need to remove the alternator belt. To do this, move the generator closer to the engine itself, and with the other hand remove the belt from the generator roller.
It should remain hanging until the generator is put in place or a new one is installed.
Installation of a new generator occurs in exactly the same way, only in reverse order. After installing the generator in place and installing the belt roller, the voltage should be adjusted to the required level.
Important! It is best to replace the generator with a similar one. It often happens that, having purchased a slightly different generator, it is simply not possible to install it on a VAZ-2115. This is directly influenced by several reasons.
For example, the mounting may be arranged differently, or the dimensions of the generator may not correspond to those prescribed by the factory. In any case, before purchasing a new generator, it is best to consult a specialist
This is directly influenced by several reasons. For example, the mounting may be arranged differently, or the dimensions of the generator may not correspond to those prescribed by the factory. In any case, before purchasing a new generator, it is best to consult a specialist.
There is a special offer on our website. You can get a free consultation with our corporate lawyer by simply submitting your question in the form below.
Quick check of the GENERATOR without installing it on the car
How to increase the voltage of a VAZ generator: installing HUCO pH - 14.5V How to replace a diode bridge without errors. Useful advice from an auto electrician.
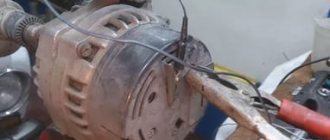
Checking power diodes
- We connect the negative (black) probe of the tester to the aluminum plate (to the body) of the diode bridge, into which the power diode is pressed. We connect the positive (red) probe to the diode terminal (see figure) and look at the tester readings. A working diode - the readings go to infinity.
- We swap the tester probes and look at the readings. A working diode - readings of approximately 300-700 Ohms.
- We check the remaining power diodes using the same method.
Result: The faulty diode bridge needs to be replaced. You can also give the diode bridge to an electrician and ask him to re-solder the diodes into working ones. If the cause is not found, then look at other possible causes of generator malfunction.
HomeCarsVAZ2111
The car's generator is used to recharge the battery while driving. If the generator breaks down or malfunctions, the battery will quickly discharge. You can check the performance of the device yourself using a multimeter. You can diagnose a VAZ generator in installed and dismantled form.
Diagnostic methods
There are two main methods that will allow you to determine the malfunction of the generator diode bridge. You need to choose based on what you have at hand. The first option requires the presence of a multimeter, and the most entry-level option, which is inexpensive, is suitable. The second is a regular 12V light bulb with three long wires so you can connect them to the right pins.
Diagnostics using a multimeter
Let's look at the option without removing the diode bridge, since it requires less time. The test is easy to carry out on an installed unit if you know the main features. The process is simple; you first need to provide access to the generator contacts. After this, carry out the following checks:
- When checking for a short circuit, press the positive contact of the multimeter to pin 30, and the negative contact to the body. If everything is in order with the diode bridge, the resistance readings will tend to infinity. Any other reading indicates a problem.
- To find out whether the positive diodes are broken, you should attach the positive terminal to pin 30 on the generator, and the negative terminal to the diode bridge mounting bolt. If everything is in order, the resistance will tend to infinity.
- To test the performance of negative diodes, you need to press the positive probe against the bolt that secures the diode bridge, and attach the negative probe to the housing. The readings should tend to infinity.
- To check additional diodes, the positive contact of the multimeter should be pressed to pin 61 on the generator, and the negative contact to the mounting bolt of the diode bridge. As in all cases above, the resistance should tend to infinity.
Important!
Do not forget to first switch the device to ohmmeter mode.
Using simple recommendations, you can literally check in a few minutes and find out whether the diode bridge has burned out or the reason lies in another unit. You can use not only a multimeter, but also any other device if it has an ohmmeter mode.
Checking the bridge with a light bulb
This option is especially good on the road, because it only requires a 12-volt light bulb and three long wires with bare ends. Or you can use a ready-made warning lamp, they are sold in car dealerships. In this case, proceed like this:
- To detect a short circuit, the plus must be pressed to pin 30 on the generator, and the minus must be shorted to the housing. If the light is on, you need to change the diode bridge, but if not, then everything is in order.
- To test positive diodes, you need to apply positive from the battery through the light bulb to pin 30 of the generator. Connect the negative from the battery to the bridge mounting bolt; if the lamp is on, one or more positive diodes are broken.
- From the battery through the light bulb, the plus is given to the diode bridge mounting bolt, and the minus goes to the housing (also from the battery). If the lamp is on, the negative diodes are faulty.
- If you connect the 61 terminals of the generator to the positive terminal of the battery through a light bulb, and apply the negative terminal to the diode bridge mounting bolt, you can check additional diodes. If they are faulty, the lamp will light up.
This option, due to its simplicity, allows for quick diagnosis. However, it will not require much time and will allow you to identify the problem within a few minutes. But it is better to work with an assistant to hold the wires.
Checking diodes. Three ways available to everyone.
Changing the diode bridge of a VAZ 2114 generator is not quite a difficult task than changing an ordinary breakdown of its part. It will essentially be easy to purchase a new diode and work some magic on the connection with a soldering iron. And such a situation will, by and large, equal the entire repair of the diode bridge of the generator. Repairing anything else is simply not possible, and changing diodes is an affordable thing, the entire unit will cost more, the average cost for a VAZ 2114 diode bridge is 400 - 700 rubles.
How to remove the diode bridge on the fourteenth?
- We remove the negative terminal from the battery, then remove the contacts that connect to the generator housing.
- Next, we remove the wire system.
- It is necessary to remove the protection from the ends of the contacts on the positive side. Later, unscrew the nut securing these contacts, remove what remains for our client to do from the generator ground.
- We remove the protection from the generator; simply disconnect the springs that secure this protection (there are three of them around the perimeter of the bridge).
- Unscrew the fasteners of the voltage regulator, remove it and its brushes at the same time.
- Use a figure eight to unscrew the fasteners of the rectifier unit.
- Now remove the ends of the winding and unscrew the capacitor fasteners.
- Remove the block freed from excess: unscrew the bolts with the tenth wrench, then remove the bushings from the bridge contact bolt with the engine.
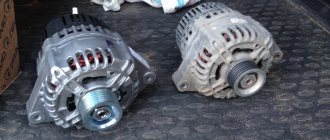
What, the question of what, how to change the diode bridge on a VAZ 2114, is solved in the reverse order of all the above steps, with a difference in the assortment of the new unit. When, the diode bridge of the VAZ 2115 is completely suitable for the fourteenth.
Our client needs to understand that Samaras stopped production in 2013, and spare parts, including the rectifier unit, are not always available. VAZ car enthusiasts with generators of the old standard (the old standard is the presence of negative diodes on the body of the unit itself) often complain that in order to find a bridge to their professionalism the car. There is a way out. The standard diode bridge on a VAZ is a single-plate monoblock, and on the fifteenth they install a double-plate one. It is more reliable, and its properties are ideal for fastenings for a standard single-plate bridge.