How to save money?
If a car owner wants to save money, he needs to do a preliminary inspection of the bottom himself. For this you will need:
- Lift, inspection hole, overpass.
- Good lighting: a flashlight or a carrier with a powerful lamp.
- Hammer.
Using a hammer, it is necessary to tap all suspicious areas of the bottom and determine the extent of their damage in order to approximately know the volume of materials needed.
If all of the above is not at hand or there is simply not enough time for a thorough inspection, then a special mirror for inspecting the underbody of the car will come to the rescue. It will allow you to generally assess the condition of the metal and get an approximate idea of the amount of work. But the situation will become completely clear only after a thorough examination.
The welding process itself is simple; anyone can master it in the shortest possible time. Sometimes it takes longer to connect and set up equipment. The easiest way to overweld the underbody of a car is to use a semi-automatic welding machine. But often such repairs are simply impossible without the use of gas welding. Best of all, when both of these devices are used, they complement each other and improve the quality of underbody repairs.
Quality
It is quite possible to learn the processing scheme on your own. The main thing is to treat the body with high quality, the service life of the coating in the future depends on this. A good result cannot be achieved without using appropriate high-quality equipment. Especially if you need to go through hidden cavities. Lada 2114 is no exception.
Factory anti-corrosion protection can also last a long time, but it needs to be updated from time to time.
Such treatment is especially necessary for cars aged 3 years and older. Especially if the vehicle is already purchased with mileage, and no one plans to change it in the near future. Protection also makes sense in situations where damage is local in nature.
Source
Cost of the kit and work with it in the service
The service station carries out the full range of work to restore the body. You can weld the bottom of a VAZ 2115, the price of work without the cost of dismantling, materials and components starts from 15,000 rubles. It is also permissible to change rotten jacks, sills and replace part of the bottom, the cost of work is up to 10,000 rubles.
Repairing the underbody, like any other part of the body, is classified as labor-intensive and complex. The cost of the repair kit must be added to the cost of the work.
- original floor from AvtoVAZ - from 3,000 rubles;
- bottom with thresholds ─ from 5,000 rubles;
- sound insulation ─ from 500 rubles per 1 sq. meter;
- anticorrosive ─ from 600 rubles per 1 kg.
Simple calculations show that self-repair will cost three to four times less, but only if the driver understands the complexity of the work and has minimal skills in using electric welding and working with metal.
Sources
- infokuzov.ru/remont/dnishhe-vaz-2114
- studwood.ru/2119815/tehnika/tehnicheskoe_obsluzhivanie_remont_kuzova_avtomobilya_2115
- zen.yandex.ru/media/id/5b18432b57906a01b991210f/kak-sekonomit-na-remonte-kuzova-vaz-2108099-211315-5b3a363c64a96200a9028313
- drive2.ru/l/463139037704618688/
Device for applying liquid anticorrosive
The problem faced by car enthusiasts who decide to process hidden cavities on their own is the lack of necessary equipment. They can use a relatively simple device that operates on the principle of air spraying of drugs under a pressure of 4-6 kg/cm2.
The simplest design of such a device is as follows: a nozzle for it can be made from a cologne spray bottle by drilling out the nozzle in its tip to a diameter of 1.2 mm. A brass tube must be soldered to the inner wall, through which the anti-corrosion agent will be supplied.
The pump is connected with a hose to the spray tube going to the container with Movil. To supply the drug to the tube, you can use a polyvinyl chloride tube lowered into the vessel. For greater clarity, a diagram of such a device is shown below.
With the constant creation of air pressure by the pump, the torch emerging from the Movil nozzle is ensured within 14-20 cm, which is enough to apply it inside hidden cavities.
Before applying Movil to hidden surfaces of cavities, it is necessary to ensure that the sprayer has access to the required areas. For this:
- remove the seals of the front wings, headlights and their rims (VAZ - 03, -02);
- remove the spare tire, tools and floor covering (VAZ - 013), upholstery (VAZ - 03, -07 and -06) from the trunk;
- open the rear door (VAZ - 02) and remove the carpet, trim, spare tire and its cover;
- remove the door signal lamps (VAZ - 03, -06) and the reverse signal lamp (VAZ - 03).
Then you should perform a somewhat unpleasant, but technically necessary operation - drilling holes (9 mm) in the sills, and for VAZ-013, -21 and -05 - also in the end surfaces of the rear doors.
If possible, accessible treatment areas should be washed with water, blown with air and dried. In garage conditions, where it is impossible to carry out effective drying, it is enough to limit yourself to wiping them with a damp cloth, followed by natural drying. Considering that the largest number of points requiring treatment are located in the bottom area, it is advisable to carry out all work on a lift or overpass.
To process the sills, the place of the spare tire and the cross member of the front part, you need to pull out the plugs. Two plugs are installed on both sides under the front fenders, a plug on both sides in the rear arches, in the center in the spare tire niche, and one on both sides in the cross member under the front seats. The drainage holes also need to be cleaned.
Before anti-corrosion treatment of thresholds, arches, and bottoms is carried out, they should first be washed with ordinary water and blown with a compressor (this will dry them out faster). It is advisable to dismantle the wheels so as not to complicate the process, and place the car on reliable supports. Cover wheel rims, brake mechanisms, and transmission elements with something to prevent anticorrosion. After this, open all doors, lids and begin application.
Preparing a car for anticorrosion
Before treating the underbody of the car from internal corrosion, the interior must be prepared. In addition, it is important to purchase materials and find tools for work. To perform the manipulations you will need:
- overalls that cover exposed skin;
- protective glasses;
- White Spirit;
- rust converter;
- anticorrosive;
- metal brush;
- industrial dryer;
- sandpaper.
Having collected the necessary accessories, you can begin processing the car. First of all, you need to dismantle the plastic parts that interfere with work. The previous layer of anticorrosive must be cleaned off. Next, thoroughly rinse the surface with hot water and dry. If this is done poorly, the bitumen coating will peel off, compromising the integrity of the anti-corrosion layer.
It is also worth degreasing the surface by wiping it with white spirit. Before treating the car's sills inside, you should first use an anti-corrosion primer, although you can do without it, the main thing is that the metal is clean.
Before treating a car with pushsal, the substance is heated (it is important to control the temperature, the oil should not change color and the consistency should resemble thick sour cream), dilute with a solvent or anti-corrosion agent in a ratio of 1:4. A number of substances are suitable for this: gasoline, used oil, melt-stop. A solution with the latter is most effective, except when the thresholding process is carried out internally. In summer, the composition heats up and, due to the capillary effect, spreads over a large area, filling the cracks, increasing the quality of the coating. It is also recommended to apply the mixture to the car quickly before it thickens.
How to save on body repairs for VAZ 2108-099, 2113-15
To repair rusty or broken car parts, AVTOVAZ produces various spare parts, but often a small part of the entire part requires replacement, which can be very expensive. In this article we will tell you how you can save money when repairing the body of VAZ Samara family cars.
A common problem with these cars is that the corner of the windshield window frame is rotting.
AVTOVAZ stamps the entire frame, but third-party manufacturers make a repair insert - a corner of the wind window frame.
Spare part for repair from AVTOVAZ
Third party solution
The savings in this case are about one and a half thousand rubles.
If the lower part of the frame is rotten, then there is a repair for this too. insert. In this case, the savings are about seven hundred rubles.
Another common problem is rotten rear arches and sills.
For 2108-09 and 2113-14 AVTOVAZ stamps the entire sidewalls. They are also made for 21099 and 2115, but they consist of two parts.
Option from AVTOVAZ - sidewall 2109
For 21099
That is, to replace, for example, only a threshold you need to buy this spare part.
Third-party manufacturers offer their own options for repairing various parts. There are different repair parts for the rear fenders. Savings can range from approximately three to seven thousand rubles.
And for rapids from three and a half to six and a half thousand.
From top to bottom: External Threshold, Amplifier, Internal Threshold, and Threshold Connector
If the floors are rotten, then AVTOVAZ makes an entire floor panel for repair.
Factory floor
But third-party manufacturers also make different repair inserts for floors. You can change only the front floors, you can change the jacks - there are enough options.
Front right floor 2108
Savings of about four and a half thousand. Various fastenings, etc., are sold separately for floor repairs.
Front jack
Seat bracket
We hope this article will help you save money!
Principles of inverter welding
Inverter is a welding machine with a high frequency of current conversion (30–40 kHz instead of the usual network 50 Hz). This is a compact but powerful unit of small size and light weight, working with which has a number of advantages:
- the light weight of the device makes it easier to work with;
- welding with an inverter occurs quickly, the metal heats up to a high temperature instantly;
- the welding current remains stable during voltage fluctuations and does not create unnecessary loads on the network;
- the device is economical - consumes 15–20% less electricity compared to other units;
- the spattering of molten metal is not intense;
- the basics of welding with an inverter are simple; every car enthusiast can master the process.
Learning to work with an inverter is not difficult, practice on some iron scraps
Processing of models 2105, 2107
Before applying anti-corrosion material to the VAZ-05 and -07 you need to:
- dismantle all parts that interfere with access to the cavities being processed, that is, shields under the front fenders, spare tire, trunk cover, sidewall linings;
- cover the oval openings of the sills at the base of the pillars with something so that when washing, water does not penetrate into the interior;
- Rinse all areas where anticorrosive is applied with water. But before that: pull out the plugs in the rear wheel arches, in the beam of these arches, in the cross member under the front seats, in the niche for the spare tire, and clean the drainage holes. After washing, blow everything with air and dry it.
The following cavities are treated with anticorrosive agents first:
- Between the rear fender and the wheel arch
- Rear side members
- Rear floor cross members
- Recess under the fuel tank
- Rear lower cross member
- Recess for spare wheel
- Mudguard strut
- At the connection of the front flap with the side of the wing
- In the hood pockets
- At the connection of the front panel with the side of the wing
- Front upper cross member
- Front lower cross member
- To the front suspension buffer bracket
- In the front fender pockets
- Doors
- Thresholds
- In the jack bracket
- Cross members between rear wheel arches
- Rear side members
- Front side members and their reinforcements
For more affordable shown in the picture
Places where anti-corrosion material is applied to the surfaces of parts and hidden sections of the body of VAZ-2105 and 2107 cars
After the anti-corrosion treatment of the car with your own hands is completed, you need to remove traces of mastic using a swab moistened with white spirit or kerosene, then replace the previously removed parts, including plugs, plugs, covers, etc.
This article indicates only the key points in the anti-corrosion treatment of VAZ bodies. In the process, each of the models may have its own specific nuances. But in general, any car enthusiast can perform such body treatment.
Anti-corrosion compounds and sound-proofing mastics applied at manufacturing plants protect wheel arches, trunk, engine compartment and other surfaces of the car, primarily from mechanical damage. To preserve the attractive appearance of the car and increase the resistance of its individual elements to rust, they carry out independent anti-corrosion treatment.
What to process?
Modern manufacturers offer a huge variety of materials that differ in composition, purpose and application features:
• special compounds for the bottom; • mastics; • anti-gravel coatings; • varnishes; • enamel; • preservatives for hidden cavities; • soils.
Important: no treatment can restore a completely rotten metal frame! Make sure that the car is at least in satisfactory condition before purchasing the necessary materials
We treat the bottom with anticorrosive
This category of materials includes mastics, as well as special compounds for the underbody of a car, containing aluminum (crushed to a powder) and corrosion inhibitors. Another useful function of underbody mastics is the ability to improve the vibration-acoustic parameters of the body. In this regard, of great interest are inexpensive domestic bitumen mastics filled with crumb rubber, which makes the “lower armor” of the vehicle much thicker.
Before you begin, make sure the bottom is 100% illuminated and has easy access. After this, use neat, even layers to treat the entire surface, including bolted joints, ball joints, technical seams, and suspension parts.
We treat wheel arches with anticorrosive
A peculiarity of the arches is that their surface, much larger than the bottom, suffers from abrasive wear due to snow, ice, small stones, sand, and dirt, which continuously fall from the spinning wheels directly onto the arches. The problem can be effectively solved by using a liquid locker - a durable material applied to the surface in two or three layers.
Bottom painting process
Painting or anti-corrosion treatment of the underbody of a vehicle is carried out using the material selected for protection. Before applying it, you should completely and completely clean it of dust, only then can you paint this element.
If materials such as mastic and primer have been selected, it is recommended to apply them with a brush or a special device - a spray gun. The primer usually contains some amount of zinc, which greatly increases its resistance to destructive corrosion processes. These materials must be mixed very thoroughly before use. Zinc powder is added independently, but this operation is not allowed for all types and varieties of soil.
When treating the surface, zinc powder can be added independently, but this process is not permissible for all types of soil. First of all, this is necessary to completely remove any rust that has formed from the surface of the bottom.
The process of applying mastic is carried out strictly on top of the primer. Initially, it is recommended to completely degrease the surface and also thoroughly sand it.
For this purpose, white spirit is used, as well as a special abrasive no finer than grade P280. Before applying mastic, all hard-to-reach cracks present are carefully filled with a special composition, which is intended for automotive preservation. This can be cannon fat or Movil, which can effectively prevent water from penetrating into them. To continue working, you need to wait until the Movil used is completely dry. This usually takes at least 4 hours.
As for the drying process of the mastic, this process is carried out within two days. It is not recommended to allow these compositions to dry completely. It is enough to withstand 5-6 hours at room temperature for two layers.
For the highest quality application of mastic, experts recommend using two spatulas - narrow and wide. The solution must be rubbed in very carefully, not leaving any holes or irregularities unattended. Painting is carried out in stages, the composition is applied layer by layer with sufficiently strong pressure, which is required to squeeze air and moisture out of the cracks.
To achieve the maximum effect, it is necessary to apply at least 3 layers of mastic, and the thickness of each should be from 0.2 to 0.4 mm, no more and no less. Painting over mastic is done quite rarely, since the anti-gravel composition is sprayed after the last layer has completely dried.
To treat the underbody of a vehicle with your own hands, the principle of impregnating corrosion with a special composition, which is made on the basis of varnish, is used. In this case, rust binds in a special way and turns into a special composition that is a little like paint. In addition, there is a coating that is designed specifically to effectively protect various chrome parts of the vehicle. To treat the bottom, a special anticorrosive varnish is usually used, which forms a protective, shiny film on the surface of the parts. It is advisable to clean them very well before painting and treating them with a special varnish.
To treat the bottom with your own hands and paint it, experts recommend choosing a brand of one color and giving preference to it, since it is almost impossible to remove the old bottom coating.
Anti-corrosion treatment of VAZ 2110. Theory
Any car needs anti-corrosion treatment and it doesn’t matter what year, model or class it is. But in what places does corrosion eat metal most often and how can you stop it? Rust is the body's biggest enemy. That is why the car owner carefully examines the car body in order to identify the source of damage in time.
It is impossible to completely stop the corrosion process; such is the nature of things, they age and collapse. But this does not mean that nothing can be done in this case
That is why the car owner carefully examines the car body in order to identify the source of damage in time. It is impossible to completely stop the corrosion process; such is the nature of things, they age and collapse. But this does not mean that nothing can be done in this case.
Our goal is not to stop corrosion forever, we just need to delay its onset. Electrochemical rust begins to develop during rain, snowfall or temperature changes. The body does not immediately become covered with the familiar brown rust. First, a thin film of water forms on the surface of the VAZ 2110 body, and as soon as acids and alkalis enter this environment, a classic electrolyte is formed, which begins to corrode the metal. You may ask, where do alkalis and acids come from? Everything is very simple, all these elements are contained in sufficient quantities in the reagents that cover roads in winter and even in the air we breathe. Although the root causes arise not only during the operation of the VAZ 2110, but also at the production stage. After the parts have been stamped and welded, inhomogeneous areas are formed on the surface
It is important to know that corrosion progresses especially actively in a humid climate, which includes the entire central zone of Russia, where humidity remains at 60% almost all year round. So, how to deal with this scourge? There are two options: galvanic coating and anti-corrosion metal treatment. In the first case, the process can be called body galvanization
But what to do if the bottom has fallen out, and you are standing 150 km from the nearest populated area? We need to call friends or call a tow truck, which means we will need mobile communications. It is very important that at such moments there is a positive balance.
In the first case, the process can be called galvanizing the body. But what to do if the bottom has fallen out, and you are standing 150 km from the nearest populated area? We need to call friends or call a tow truck, that is, we will need mobile communications
It is very important that at such moments there is a positive balance.
It is known that machines that have undergone such treatment at the production stage last many times longer. But this is not a panacea; sooner or later the surface will begin to rust, especially for various edges or joints where small stones and sand get caught during driving. It would not hurt to additionally treat these areas with an anti-corrosion compound. The manufacturing plant performs this during assembly by applying various chemicals to all surfaces of the body. The bottom is usually treated with a special mastic, and hidden cavities are treated with a protective compound. In this case, the car manufacturer provides a guarantee during which no damage to the body will occur due to natural causes. However, even this is not enough; preventive procedures must be carried out periodically and this should happen approximately once a year. It is not so easy to treat a car with anti-corrosion agent on your own, because you need to provide sufficient access to all elements of the bottom and apply the product in a thick layer
Now everything depends on the quality of the product you purchased, so you need to pay a lot of attention to this too. It’s never too late to treat the body, so even if the car is already well-corroded, apply the product anyway and this will stop its further harmful effects
Requirements for materials for anti-corrosion treatment
Anticorrosives for the bottom are divided into two types.
The first type is necessary to cover the outer surface of the bottom of the car, which is constantly exposed to the mechanical action of sand, gravel, and stones. Anti-gravel mastics made on the basis of polymer, bitumen and rubber, which have the property of elasticity, are applied to defective areas.
To use these mastics you need a sprayer or a brush to cover them with a thick layer. For the quality of spraying treatment, a good device is required because this type of mastic is sold in a jelly-like consistency.
The second type is necessary to cover hidden cavities in the bottom of the car. Oil or wax based mastics are applied to these problem areas. They may contain rust inhibitors. This type of product has the property of penetrating into gaps, cracks, tears and chips.
Due to the fact that their consistency is not as thick as that of anti-gravel compounds, they have useful water-repellent and moisture-displacing qualities, as well as the ability to neutralize corrosion by impregnating the site of occurrence.
VAZ 2115 | Preparation and anti-corrosion treatment of hidden cavities
Due to the use of complex technological equipment and the need for high-quality work, it is recommended that the treatment of hidden cavities be performed only at car service stations.
Before starting work, place the car on a lift, remove parts and upholstery that prevent access to hidden cavities. Rinse the hidden cavities (Table 8.2) and the bottom of the body with water heated to a temperature of 0–50 °C through the technological and drainage holes until clean water flows out. In this case, the sliding door windows must be raised. Remove moisture that has entered the passenger compartment and luggage compartment, blow with compressed air all areas where anti-corrosion compounds are applied.
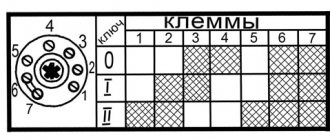
| Cavity name | Injection point | Injection direction | Additional instructions |
| Hood pockets | In the openings of the internal panel | Over the entire inner surface | Open the hood |
| Door pockets | In the panel openings under the upholstery | Along the inner surface of the bottom | Remove the upholstery |
| Cavities between wheel arches and rear fenders | From the trunk | Over the entire inner surface | Open the trunk |
| Rear floor rails | Below the body, in the trunk and under the rear seat | Forward and backward | Open the trunk, lift the seat cushion |
| Middle floor cross member | Below the body and under the rear seat | Right and left | Raise the seat cushion |
| Front floor cross member | From the interior and from below the body | Right and left | Remove the floor mats |
| Door thresholds | From the interior, from the front and rear ends of the sills | Forward and backward | Remove the floor mats |
| Front floor members | From the interior and from below the body | Forward and backward | Hang up the car |
| Bulkhead reinforcement cavities | From the interior and engine compartment | Right and left | Open the hood, remove the floor mats |
| Floor thresholds | From below the body, from the interior, rear and front | Forward and backward | Hang up the car |
| Front side members Rear floor cross member | Under the front fenders From below and from the interior | Forward and backward Right and left | Jack up the car Remove the rear bumper |
| Rice. 8.8. Hidden body cavities (front view): 1 – middle floor cross member; 2 – rear floor cross member; 3 – rear floor spars; 4 – sidewall and front connectors; 5 – hood pockets; 6 – upper amplifiers of mudguards; 7 – lower cross member of the radiator frame; 8 – front mudguard amplifiers; 9 – front side members; 10 – floor thresholds |
| Rice. 8.9. Hidden body cavities (rear view): 1 – lower surfaces of door pockets; 2 – floor thresholds; 3 – front floor sill connectors; 4 – cavity between the front panel and the floor; 5 – cavities of the front floor spars; 6 – cavities between the mudguards and the front strut reinforcements; 7 – cavities between the outer and inner panels of the sidewalls; 8 – rear side members |
| Rice. 8.10. Hidden body cavities (bottom front view): 1 – lower cross member of the radiator frame; 2 – cavity between the front panel and the floor; 3 – front floor spars; 4 – cavity of the front connector of the floor threshold; 5 – floor thresholds; 6 – rear floor cross member |
Drive the car into the chamber and place it on a lift. Spray anti-corrosion compound to the areas shown in Fig. 8.8,8.9, 8.10. Lower the car from the lift, clean the front surfaces of the body from dirt with a rag soaked in white spirit.
Table 8.2 Hidden cavities treated with anti-corrosion compounds
| Cavity name | Injection point | Injection direction | Additional instructions |
| Hood pockets | In the openings of the internal panel | Over the entire inner surface | Open the hood |
| Door pockets | In the panel openings under the upholstery | Along the inner surface of the bottom | Remove the upholstery |
| Cavities between wheel arches and rear fenders | From the trunk | Over the entire inner surface | Open the trunk |
| Rear floor rails | Below the body, in the trunk and under the rear seat | Forward and backward | Open the trunk, lift the seat cushion |
| Middle floor cross member | Below the body and under the rear seat | Right and left | Raise the seat cushion |
| Front floor cross member | From the interior and from below the body | Right and left | Remove the floor mats |
| Door thresholds | From the interior, from the front and rear ends of the sills | Forward and backward | Remove the floor mats |
| Front floor members | From the interior and from below the body | Forward and backward | Hang up the car |
| Bulkhead reinforcement cavities | From the interior and engine compartment | Right and left | Open the hood, remove the floor mats |
| Floor thresholds | From below the body, from the interior, rear and front | Forward and backward | Hang up the car |
| Front side members Rear floor cross member | Under the front fenders From below and from the interior | Forward and backward Right and left | Jack up the car Remove the rear bumper |
automn.ru
Do-it-yourself anti-corrosion treatment of a VAZ 2114 car
Anticorrosive treatment for VAZ 2114
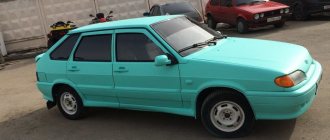
Corrosion can destroy any car after some time. That’s why such a question as treating a VAZ 2114 with anticorrosive agent yourself continues to be relevant.
VAZ 2114 car in winter
General information
When anticorrosive is applied, weak parts of the car body are covered with a sealed coating with additional protective functions. The need for this arises for such details as:
In addition, anti-corrosion treatment is also needed for the outside of the sills and the exhaust system.
Procedure diagram for used cars
Most often they try to do only anti-corrosion on doors; advice suggests that with full processing you will have to find a way to the most hidden parts of the car. This means that the treatment is carried out even from the inside.
1 – middle floor crossbar; 2 – rear floor cross member; 3 – rear floor spars; 4 – sidewall and front connectors; 5 – hood pockets; 6 – upper amplifiers of mudguards; 7 – lower cross member of the radiator frame; 8 – front mudguard amplifiers; 9 – front side members; 10 thresholds">
Metal thickness
To repair the underbody of a car with your own hands without any problems, you need to choose metal of optimal thickness. Its recommended thickness varies from 1 to 2 mm. But here you should take into account the qualifications of the person who will carry out the welding work. When working with thinner metal, you must strictly observe the temperature requirements during welding. Which, in turn, depends on the debugging of equipment and the quality of consumables.
Thicker metal is more difficult to process, but it is also more difficult to damage or spoil. Therefore, before purchasing consumables, you need to realistically assess your qualifications as a welder.
Features of material selection
To effectively protect the underbody of a car, a large number of different materials are used, more than half of which are paints. Among the various primers with an anti-corrosion effect, the following compositions can be distinguished:
- Epoxy primer, which is able to set sufficiently high adhesion parameters, and also has durability indicators;
- Lead plumbate or special red lead, which provides optimal protection against moisture and various mechanical damages;
- Special liquid, cold zinc is used, which can replace factory galvanization;
- Liquid plastic, as well as special corrosion-resistant mastics. In terms of their level of protection, they are a little like soil, but with sufficiently strong vibration they can peel off;
- Anti-gravel compounds, which in their properties are a little similar to rubber. In addition, they effectively correct the special shock-absorbing properties inherent in metal;
- Special gun oil can provide optimal protection. It is recommended to use it only in certain areas, since it wears off with constant mechanical impact;
- Over relatively mild corrosion, you can use a special one.
The choice of one material or another directly depends on the characteristics and general condition of the underbody of the car.
Replacing the bottom of a VAZ 2114
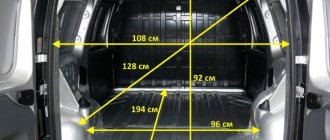
Today we will talk about replacing the bottom of the Samara and Samara-2. Here's everything that will change in the near future:
Packed for 16 pieces
So, let's get straight to the topic. Before starting car repair work, I would like to remind you about safety precautions, because I think everyone will agree that you want to see the finished result with two eyes, and not one... Part 1: Drilling and cutting out the bottom
. To cut out the bottom, we need to disassemble the interior. We completely disassemble the interior, remove everything, including the steering wheel and pedals. We take the Bulgarian wife (Bulgarian) in our hands and CAREFULLY cut off parts of the bottom along the lines (indicated in the photo in blue), so as not to touch the elements that will be useful to us in the near future.
After that, take a drill and put an attachment on it to remove rust from the metal.
We begin to process with a drill the places where we will drill out the points (indicated in the photo in red). Then we take a “7” drill, sharpened for drilling out points, and drill it out. For those who don’t know what it is, look here When all the work is completed, we dismantle the remains of the bottom using a hammer and chisel. Final result.
Part 2. Preparing the new bottom for installation.1.
We take a new bottom trough and begin to clean the transport soil with a brush using a drill.
(Sometimes you don’t need to remove the shipping primer. It’s easy to check. We take a rag, wet it with 646 solvent and throw it on the area of the shipping primer. After 10 minutes, we carry out a test with another rag (clean): take it and lightly rub the shipping primer. If the primer is cleaned off or the rag turns dark , then we remove such primer. If the rag remains clean and the primer does not come off, then we leave it, having previously filled it with sandpaper R120, so that the anticorrosive will adhere better)
in the process
The process is quite hectic, but I managed it in 3.5 hours of continuous work.
Afterwards, we take sandpaper with a p80 mark and matte the metal so that the soil lays down normally and does not fly off in the future.
When the metal is matted, we dilute primers (acid and epoxy) and prime the bottom. First, prime with acid primer in one layer. Leave it for an hour to dry (you don’t have to do this step)
The best friend will not leave you in trouble)))
Then we prime with epoxy primer (I used novol protect 360 primer) in 2 layers. interlayer drying 15 minutes
The bottom is reliably protected
2.
When the bottom is primed, we leave it in the garage overnight and come back only the next day.
Why did I recommend not touching the lower elements of the bottom (all sorts of hooks, brackets) when cutting? Because we will weld them immediately in place, measuring all the dimensions as they were. I strongly recommend not to repeat my mistake, but to first weld the trough into the car and only then weld everything else to it.
, although if you have a flat floor, you can do it like I did. Only if the bottom moves a little with the propeller, it’s not my fault))) We weld all the studs, brackets, hooks and other elements, measuring everything from the old bottom.
We weld all the upper elements of the bottom, measuring all the old dimensions and marking everything with a marker.
All we need: a middle floor reinforcement, seat reinforcements, seat brackets, and those two little crap on which the outer slides are placed (the rightmost ones in the photo).
tried it on and circled it with a marker.
cleaned with R80 sandpaper
Covered with epoxy primer.
3.
We clean the side members from rust.
Do-it-yourself replacement of VAZ-2112 valves
So, after removing the cylinder head cover, you can visually inspect the block and identify surface defects, such as soot in the pistons or carbon deposits in the combustion chambers. In this case, the valve stem seals must be replaced, and the rest of the carbon deposits can be removed using a screwdriver. It is also recommended to use special felt for sanding. All components are cleaned and wiped to a characteristic shine. The presence of gaps, which occurs when valves are bent or burned out, is not always noticeable: a control measurement is made to determine them. The presence of cracks and chips on the valves is a reason to replace them with new ones. The kit will cost about two and a half thousand rubles.
To dismantle damaged valves you will need a special tool - a “depressurizer”. It allows you to fix the restraining springs and remove the valve
(tweezers are suitable for this). You can also remove the springs - this is necessary if you need to replace the oil seals.
After this, if you want to make repairs
existing valve, rather than installing a new one to replace it, apply a special paste with sealing diamond chips to its edges and “grind in” using a rubber pipe. For greater efficiency, it is recommended to grind not only with circular movements, but also by pulling the part down.
Do-it-yourself VAZ 2103 engine repair video.
Having completed the “grinding in” and removing excess paste, the valve is tried on in its original place. Remember that there should not be even a millimeter gap between it and the cylinder. If the procedure does not help, then you will need to install a new part. However, before installation you will also need to “grind it in” slightly to fit your VAZ-2112.
After processing and installing all the valves, the cylinder head assembly is performed in the reverse order. It is recommended to immediately check the engine to ensure the functionality of the updated valves and avoid repeating repair work in the near future.
The following two tabs change content below.
Square pipe instead of thresholds on a VAZ
To change the thresholds on a VAZ 2114 with your own hands, in half of the cases profile pipes are used. This method has proven itself well when replacing similar parts on classic VAZs. The profile has suitable dimensions of width and height, and the metal thickness reaches 2 mm, which ensures the reliability of the body for at least 7 years. In addition, profile pipes in 40% of cases have an additional zinc coating, which ensures the metal’s resistance to corrosion.
To work you will need:
- profile pipe 60x60x2 mm: 180 cm for one threshold, 70 cm for the cross member that will connect the spar to the part;
- profile with dimensions 40x20x2 mm: 70 cm for an additional cross member, 25 cm for jacks, if you have to reinstall the old ones;
- metal plate 15x5 cm to strengthen the part to the bottom;
- anticorrosive for the bottom - bitumen mastic 500 g;
- Bulgarian;
- electric or gas welding, 3 mm electrodes.
- Remove moldings and panels.
- Using a grinder, cut off the outer part along the top seam and bend the metal.
- Cut off the inside, remove the amplifier.
- Attach the pipe, cut off the excess part, weld plugs at the ends of the profile.
- Tack the profile to the bottom by welding at two points, front and back.
- Boil the outer part of the profile to the body, moving from the central pillar. If the body has a bend in this area, tap the pipe during welding to align the profile.
- Weld the cross members that will connect the threshold and the spar.
- Weld fasteners under the jack, weld plates to the bottom to strengthen the structure.
- Clean the weld seams with a grinder and treat with mastic.
- Paint and install decorative panels.
Power profile thresholds have maximum resistance to mechanical damage. If the original body elements bend under a strong impact, for example when driving incorrectly on a difficult section, on potholes, etc., then with installed profiles only the paintwork and plastic linings will suffer.
Preparatory work
Anti-corrosion treatment of the bottom, as well as the inner sides of the wings, begins with the removal of used damaged coating, pockets of rust and corrosion, dirt and grease deposits. Proper adhesion of anti-corrosion mastic to body elements is only possible on a well-cleaned and degreased surface.
Old peeling treatment can be removed with a metal brush and scraper. They also remove loose layers of rust. After this rough treatment, the body elements should be cleaned with sandpaper and degreased with white spirit.
Next, the cleaned and degreased surface is processed...
a rust converter that turns the top layer of metal into a chemically inactive compound. It is advisable to use a high-speed converter.
Now you can treat with anti-corrosion mastic or paste; the possibility of using one or another tool - a brush or just a mitten worn on the hand - depends on its viscosity. The treatment should be carried out so that the anticorrosion layer has approximately the same thickness, without large sagging or missing areas of treatment.
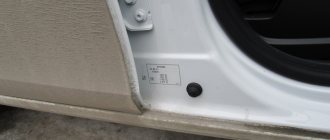
When repairs are required
For all VAZ models, the body was made of black or low-carbon steel of class 08Yu, 08KP. The parts were not galvanized, but were coated with a polymer anti-corrosion composition; the film protected the bottom from moisture for up to 6 months, then natural oxidation processes began. After the purchase, drivers had to carry out thorough anti-corrosion treatment of the metal.
Repair or complete over-welding of the bottom of the VAZ 2114 will be required in the following cases:
- It is impossible to jack up the car; the jacks fall through.
- The floor in the car became uneven, the metal sagged from corrosion.
- The driver's seat cannot be adjusted; when the doors are closed, increased gaps appear.
- Noticeable areas of corrosion on the sills and wheel arches. If you lift the car onto an overpass and check it with an awl, the anti-corrosion layer from the bottom will fall off, and traces of rust will be clearly visible.
Anti-corrosion treatment of car thresholds using mastic
This method of treating car thresholds with your own hands is less popular. This is explained by the complexity of the process and the large amount of time spent.
To protect thresholds, you can purchase “Anticor bitumen”. It is a cold applied mastic. Produced by mixing rubber and resins. It is affordable and can be easily found on sale.
The preparatory stage of the car is the same as in the case of using anti-gravel. The bottom of the car must be thoroughly washed, dried and free of rust. After this, you can begin applying anti-corrosion mastic.
Before using “Anticor bitumen” it is better to warm it up a little. This will increase its fluidity and adhesion level. The mastic is applied with an ordinary paint brush. No need to skimp on mastic. The thickness of the layer directly affects the effectiveness and durability of threshold protection against corrosion.
After applying the mastic, you need to wait for the anti-corrosion material to dry naturally. Using a hair dryer to dry your hair will have the opposite effect. On average, 2 hours is enough. After this time, you can put the protection in place and use the car.
Preparing for replacement
For the entire VAZ family, thresholds are non-removable body elements; in 80% of cases, repairing an element involves completely cutting or cutting out the part. Overcooking requires preparation
- The car is installed on a flat surface.
- The negative terminal is removed from the battery. In some cases, the battery is removed.
- The wiring from the inside of the doors from the electric windows is dismantled, all sensors are removed.
- The seats are removed from the interior, the inner trim of the pillars and the floor covering are removed.
- Doors are dismantled.
When planning to repair only the threshold, drivers have to partially change the bottom, install new jacks, and strengthen the central pillar. The metal for the body of the VAZ 2114, as well as for other models in the Lada Samara line, did not undergo anti-corrosion galvanizing.
Rolled steel was puttied, primed and painted. The inner part of the bottom and the box were not treated with anticorrosive; the first layers of rust appear on the internal parts of the body in the second year of operation. If the threshold is being repaired for the first time, and the “youngest” VAZ 2114 model is 6 years old, we can confidently say that the owner will find completely rotten metal under the bottom trim.
Types of corrosion
As you know, two types of corrosion most often occur:
- chemical;
- electrochemical.
In the first case, the metal is destroyed due to exposure to exhaust gases. This primarily concerns the system for discharging fuel combustion products into the atmosphere. In the second, corrosion is caused by the contact of electrolytes on metal surfaces.
Also, the destructive process occurs in different conditions. Which allows us to divide it into the following categories:
- gas corrosion (damages the exhaust pipe, muffler, exhaust valves);
- non-electrolytic (fuel and oil supply systems);
- electrolytic – destroying those parts of the machine that are in direct contact with water;
- electrical (terminals and other live elements are oxidized);
- contact (occurs when different metals come into contact);
- crevice (appears in gaps and cracks);
- atmospheric (damages the body during storage, use, transportation, etc.).
And this is not a complete list.
How often should a car be treated with anti-corrosion agents?
Even when buying a new car, you must first make sure that its bottom is protected from corrosion by the manufacturer. Often foreign companies supply cars to the Russian market without any coating in order to save money. Domestic ones almost never do anything to increase the durability of the vehicle.
Thus, immediately after purchase, it would be best to come in for an inspection and, if necessary, treat the bottom with special compounds.
Having bought a used car, it must be treated against corrosion - after all, it is unknown how intensively it was used, how careful its previous owner was.
The ideal frequency of inspection of the bottom is once every 12 months. It is better to do this in early autumn. Correctly applied protection retains its properties for 4 or 5 years.
In addition, it is necessary to restore the coverage if the machine is being repaired after an accident or when replacing components that have become unusable.
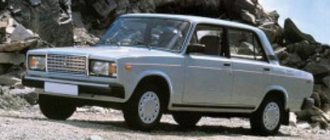
VAZ 2199 2003
VAZ 2199 2003
Body repair painting polishing Auto service +7 ;
Stavropol; Mikhailovsk;
- Examples of work Video
. Shop . About us Who and Where are we? News Sitemap
A client contacted us
Good evening..
Available 99th 2003 Guards
Tired of the body.
The years take their toll. There are shoals on the body, rust has appeared here and there...
What will be the total cost of body treatment, complete repainting, Movil?
I can post a photo as soon as I can, I’m not in the city
Design Features
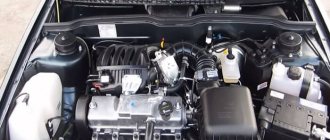
Model 2114 was built on the basis of the VAZ 2109, it is a restyled version. The hatchback received a new steering column, a modernized dashboard, an updated one and a half liter engine, redesigned for Euro 2 protocol. The VAZ 2114 shares the same wheelbase with the Nine, 2460 mm. The configuration of the bottom panel is the same for the models.
Are there any differences between 2114 and 2115
The VAZ 2115 model is considered a related model. The hatchback is built on the basis of the VAZ 21099 with various transport sizes and shares one wheelbase with the entire Lada Samara family. The standard dimensions of the bottom and sills for VAZ 2108, 2109, 21099, 2113, 2114, 2115 models are the same and interchangeable.
The bottom of the VAZ 2114 structurally consists of the following parts:
- central reinforced panel;
- driver's side panel;
- side passenger;
The factory stock bottom is a one-piece stamped part, primed and painted black. The polyethylene coating acts as protection.
Preparation for repair
Repairing the underbody of a VAZ involves a set of measures:
- preparation of the necessary material and tools;
- interior dismantling;
- installing the car on a lift or repair plane;
- cutting out rotten elements of the bottom during partial or complete replacement of a part, if it is necessary to completely digest the body;
- patch welding or bottom welding;
- anti-corrosion treatment;
- installation of interior, replacement of sound insulation, additional work.
To repair the body yourself, you will need to prepare the following materials and tools:
- A new bottom or part of it for a complete replacement, metal patches for a partial repair. It is recommended to take industrial steel with a thickness of up to 1-1.2 mm. The standard metal on the body of the VAZ 2114 has a thickness of 0.9 mm for the bottom, 0.8 for the sills.
- Angle grinder, grinder with a set of replaceable discs from metal, for processing a weld seam, stripping metal from corrosion, to a soft attachment for grinding soil.
- Welding machine. For self-repair, it is recommended to use a semi-automatic machine using wire in a carbon dioxide environment.
- Electric drill, set of drills.
- Sound insulation sheets.
- Metal brushes, coarse and fine sandpaper, chisel, set of screwdrivers.
- Zinc-based primer, putty, set of spatulas, anti-corrosive agent for final processing.
The first stage of work is dismantling the interior and lifting the car onto the overpass.
Dismantling the interior
The bottom 2114 is a stamped part that is welded to the reinforcements of the side members and hinged panels along factory lines. Original replicas require no trimming and are ready for installation. Description of replacement in stages:
- The fuel is drained from the car and the battery is removed.
- The electrics are turned off, the front and rear doors are dismantled.
- The chairs and flooring are pulled out, and the sound insulation is removed.
- All plastic lining of the pillars is dismantled, the dashboard must be covered with a thick piece of rags.
- The glass is sealed on both sides with thick paper.
- An inspection is carried out from the inside, rusty areas are tapped with a hammer, and the scale of work is determined.
Instructions for repairing and replacing the windshield on KIA RIO 3
The cost of repairs at a service station for a VAZ 2114 starts from 15,000 rubles. When replacing them themselves, owners can save at least 10,000 rubles. Repair kit price for independent work:
- replica – 3500 rub.
- anti-corrosion kit – 1000 RUR:
- rental of electric welding ─ 1000 rubles;
- sound insulation sheet ─ 300 rub.
Metal cutting process step by step:
- Use an angle grinder to clean the bottom from dirt and used anti-corrosion.
- Check the general condition of the metal and jacks.
- In case of partial replacement, cut out the rusty places with a grinder or chisel, and prepare patches.
- Sand the metal until white.
- Drill out spot welding points if the entire part is being replaced.
It is recommended to cut the metal for patches using metal scissors. Welding cutting is used if the driver has experience in welding. Otherwise, you may end up with a patch with convex edges, and the metal will be inconvenient to weld to the body.
Replacing parts or the entire bottom
Repairs begin with inspection and repair of thresholds. Rotting of the central part of the body begins with corrosion of the sills and wheel arches, so if rust has destroyed parts of the bottom by 30%, then we can confidently say that the sill is rotten by 60% and requires complete replacement. The bottom of the VAZ 2114 consists of the following elements:
- underbody panels under the seats;
- threshold extension;
- crossbars;
- side member amplifier;
- space for a jack or jacks;
- central support platform;
After cleaning the underbody from anticorrosion, the jacks, side members and panels under the feet of the driver and passenger are inspected. These are the most vulnerable parts. If the general condition is satisfactory, then it is recommended to cut out the problem areas and install the original floor parts from the repair kit. The process of partial overcooking of the bottom in steps:
- Drill out the spot welding points and cut out the rusted metal with a chisel.
- Clean the edge of the future weld with a grinder and treat with a degreaser.
- Attach the original part or the cut out patch. The metal patch should protrude 1 cm beyond the edges of the trim; welding will be carried out overlapping.
- Spot weld the edge of the metal. Weld the patch in increments of 2 cm welding, 4 cm skip.
It is not recommended to weld a one-piece sealed seam; when the engine vibrates, the body experiences torsional loads, and the solid seam may crack.
- Clean the weld seam.
- Treat with primer, apply a layer of oil anticorrosive or bitumen mastic under the sound insulation layer.
- After complete cleaning, treat the outer part of the bottom with bitumen mastic.