- The importance of proper headlight installation
- How does a hydraulic corrector work?
- Headlight device for VAZ 2114
- Operating principle
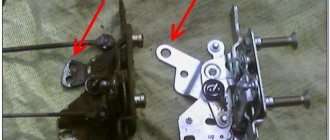
- Repair or replacement of hydraulic corrector VAZ 2114 on your own
- Causes of hydraulic corrector malfunction
- Installation of a new device
- Useful video
Any modern car needs diagnostics and repairs. The condition of the suspension, vehicle load and some other factors have a significant impact on the direction and inclination of the light flux. The VAZ 2114 headlight hydrocorrector will help correct the negative consequences associated with headlight illumination.
Hydrocorrector of headlights VAZ 2114
This is especially important on the highway, because incorrectly adjusted headlights can shine not on the road, but directly into the eyes of oncoming drivers, which can lead to an accident. In order to prevent such a scenario from happening, you should monitor the technical condition of the lighting devices and carry out all the necessary preventive procedures in a timely manner.
The importance of proper headlight installation
Proper installation and adjustment of lighting devices is no less important. For example, it is better to lower the headlights of a loaded car slightly lower than usual. In a similar way, you can direct the light flux not to the sky, but to the road. This method will avoid dazzling oncoming vehicles and ensure proper illumination of the road.
If the car is not loaded with anything, then the headlights should be raised slightly. Lighting equipment is quite sensitive and difficult to adjust, so this work is best entrusted to qualified specialists who have extensive experience in adjusting headlights.
Correct headlight settings
Purpose
The headlight hydraulic corrector is used not only in VAZ models, but also in foreign cars of older years of production. Therefore, this material will be useful not only to owners of “classic” Zhiguli cars, but also to foreign-made cars. It's a shame that it breaks down most often on domestic cars; its service life is no more than 3-5 years maximum.
What is it for? It adjusts the angle of incidence of the light beam on the road surface depending on the vehicle load. If you are driving alone in the car and your trunk is empty, then the headlights will shine at one angle, relative to the road; if you load the car completely, its front part will rise up. Accordingly, the position of the headlights will change relative to the horizon, and the light beam will rise upward.
Consequences:
- The light spot on the road will become more blurred, since the light will not concentrate at a certain distance from the car, the level of illumination of the road will drop significantly
- Dazzle oncoming drivers
In a word - shine into the sky with all the ensuing consequences. Therefore, the hydraulic corrector allows the driver, without leaving the car, to adjust the position of the headlights , depending on the degree of load of the vehicle.
Has several provisions:
- “0”—the headlights are raised as high as possible. From this point you need to start adjusting the angle of incidence of the light using the adjusting bolts on the headlamp under the hood. This position corresponds to one person in the cabin and an empty trunk.
- "I" - Four people in the car
- “II” - Full cabin of people and up to 75 kg of luggage
- “III” - Maximum vehicle load, five people in the cabin and maximum loaded trunk
Knowing this, the driver can use the hydraulic corrector adjustment knob to control the position of the headlights while driving. It is convenient and safe on an overnight trip.
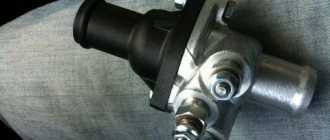
How does a hydraulic corrector work?
What is this device, what is it for and what is its operating principle?
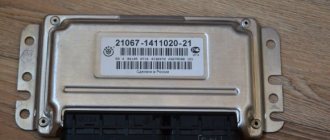
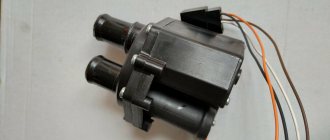
The headlight hydraulic corrector is a one-piece device designed to change the position of the light beam by reducing or increasing the pressure of the liquid located inside the pipes. The headlight range control of the VAZ 2114 has a special design. In this VAZ model, the corrector has a one-piece design, which means that it is almost impossible to repair it. If it breaks, you will have to purchase new elements and adjust the lighting devices to the standard as accurately as possible.
How to check functionality
Body position sensors may be different. For example, the service life of potentiometric sensors is 10-15 years. The electromechanical drive may also fail. If there is automatic adjustment, you can hear the characteristic buzzing of the adjustment drive when you turn on the ignition and low beam. If you cannot hear it, then this is a malfunction signal.
The performance of the system can also be checked by mechanically changing the position of the car body. If the luminous flux changes, then the system works. The cause of the breakdown may be electrical wiring. In this case, service diagnostics are necessary.
Headlight range control is an important safety element. Many drivers do not attach much importance to this. But you need to understand that the wrong or blinding light can lead to dire consequences. This is especially true for cars with xenon headlights. You shouldn't put others in danger.
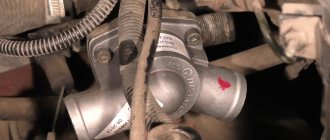
Headlight device for VAZ 2114
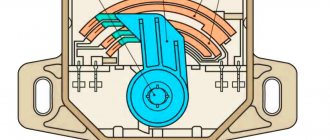
The design of the hydraulic corrector on this model is as follows:
- The master cylinder is located under the instrument panel.
- Small working cylinders are mounted directly under the headlights. It is these devices that are used to raise the headlights on the VAZ 2114.
- The working fluid used in a car is resistant to both high and low temperatures.
- Another element of the hydraulic corrector design is the pipelines. They contain working fluid and are secured with special clamps.
Headlight hydraulic corrector device
Interesting to know . In its normal state, the corrector operates at high pressure. In order to direct the headlights downward, the pressure decreases. After this, the optics are lowered. This operating principle of the device means that during operation it is under extremely high pressure. If temperature changes occur, the working fluid may leak. After this, the headlight range control will also fail.
Price for headlight correctors: large selection
Headlight correctors can be a standard system, or they can be installed independently. Also, the driver, if desired, can replace the corrector on his car with a more advanced one. Today, trading enterprises offer their customers these devices from various manufacturers of various classes. Prices for headlight correctors vary, depending on their type, over a very wide range. Thus, a VAZ driver can purchase a hydraulic corrector at a very reasonable price - from 280 rubles. up to 450 rub. And an electromechanical corrector will cost 1,700 - 1,900 rubles.
As for the universal Hella headlight auto-corrector, which can be installed on almost any car, you will have to pay 13,900 - 14,200 rubles for it. Devices of the same class differ in cost from other manufacturers, both downward and upward. A headlight range control for GEELY CK can be purchased, for example, for an average of 1 thousand rubles; prices for this device for Lanos fluctuate in the same range. The main thing is that when purchasing, we must not forget that for xenon headlights, regardless of the car model, the installation of an automatic leveler is mandatory. Video: Video - installation of electric headlight corrector for an Opel Omega A with xenon:
Automatic headlight leveler Hella
Among the many companies that produce this module, the German company Hella is currently leading. You will receive a quality product that is thought out to the smallest detail, with it you will forever forget about such a problem as the dissatisfaction of oncoming drivers. In addition, you will know that your car will always pass a technical inspection. Hella headlight leveler can be installed on any make and model of car. It can be used as a stand-alone device or to complement a manual corrector. The kit comes with instructions so you can install it yourself. The calibration process is very simple. The built-in indicator displays all information about angles and projections of change, both automatically and manually. Modes are switched independently as needed.
Features of the Hella autocorrector
- Automatic headlight angle correction;
- The programmable angle of the optics depends on the machine load;
- An ultrasonic sensor calculates the position of the car body relative to the road surface;
- Powered by 12 V car, there are kits designed for 24 V;
- If you have standard xenon, autocorrectors are required for maintenance.
Autocorrector SmartEye
This model of autocorrector (additional option) is intended mainly for re-equipment of factory machine systems that are equipped with an electromechanical device. The kit includes:
- Electronic unit with position sensor;
- The monitor with which the adjustment is made;
- Wiring;
- Two types of plugs for connecting to a device monitor.
The module is not equipped with its own activators for changing the headlight angle. The operating principle of this device is to determine the position of the car body in relation to the plane of the road. The sensor reads information and is installed on the housing. Then a command is sent to change the angle of the headlights in relation to the vehicle load.
Repair or replacement of hydraulic corrector VAZ 2114 on your own
If the headlight hydraulic corrector fails, it is necessary to establish the cause of the malfunction as soon as possible. It may be possible to repair the device yourself.
In order to check the functionality of the headlight hydraulic corrector, you should:
- Inspect the condition of the tubes and rubber bands. There shouldn't be even small leaks.
- If no leaks were found, then you should pay attention to the condition of the working cylinders. To do this, you need to measure the stroke of each rod. Under normal conditions, it ranges from 6.5 to 7.5 mm.
- If such diagnostic measures do not help restore the functionality of the headlight hydraulic corrector, then the entire mechanism will have to be replaced. The fact is that the repair of the VAZ 2114 headlight is not provided by the manufacturer, so the easiest way to replace a broken device is with a new one.
Malfunctions and why it breaks
- Loss of tightness in tubes, places where they are attached to the cylinders, leaks in the cuffs of the main or working cylinders;
- Jamming of working pistons
The main problem in the system of hydraulic adjustment of the reflector position is depressurization. Since it uses liquid as a working medium, its leaks lead to the fact that pressure is not transmitted from the master cylinder in the car interior to the workers on the headlights. No matter how much you turn the regulator, the position of the light beam will not change.
The second reason is souring of the pistons of the hydraulic corrector cylinders in certain positions. For example, if the piston is “stuck” in the maximally extended position, then the light will shine upward, while in a recessed position it will shine downward. When rotating the handle of the regulator, a lot of tension will be felt and when it is released, it will return to its original position and will not be fixed as necessary.
This happens because the pressure changes as the regulator rotates and the pistons cannot move. When you release the handle, the system tries to return to its initial state, equalize the pressure, the handle returns to the position from which you started turning it.
The listed types of breakdowns are prone only to the hydraulic drive of the corrector. Let the manufacturer claim that it is not repairable, but this is not so. There are examples of self-repair of a hydraulic corrector, which we will discuss in the following articles. In order not to bother with restoring it or replacing it with a new one, it is recommended to install alternative types of headlight range control units.
Video about the device and main breakdowns of the VAZ headlight hydraulic corrector:
Causes of hydraulic corrector malfunction
One of the most likely causes of failure lies in the ingress of liquid, which flows out of the cylinder when a crack appears in the rubber seal. In such a situation, the pistons often jam, and the angle of the headlights changes and it becomes impossible to adjust it using levers. In some cases, the whole point is a malfunction of the adjustment lever itself. In order to get rid of these problems, you will have to replace all broken parts.
Important note! If an electronic corrector is installed on the car, a possible breakdown may be associated with the contact connection. It also happens that a malfunction is associated with the fastening of the device bracket.
Types and types of headlights in a car
There are three types of car light sources:
- fog lights;
- high beam headlights;
- dipped headlights and dipped lighting sources.
The purpose of fog lights can be understood based on their name. This type of lighting is used to create visibility in poor weather conditions such as rain or fog. Another type of lighting will not help in this case, so the presence of fog lights provides a full view of the route in bad weather.
In order to improve visibility of objects located at a distance of 120-150 meters, high-beam headlights are used. They are necessary to see road markings or signs from afar. This type of lighting is prohibited from being used in populated areas, as the light from it is too bright.
Low beam headlights are designed to illuminate the path in front of the car at a distance of 20-40 meters. They must be adjusted so as not to blind drivers who are moving towards you. This type of lighting is used most often, since in some populated areas the use of high-beam headlights is prohibited.
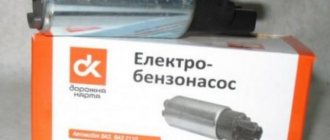
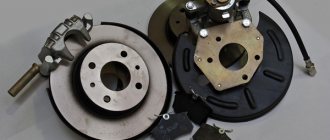
Installation of a new device
In order to install a new headlight hydrocorrector, there is no need to go to a service station. This is quite simple to do, so you can save time and money if you do the installation yourself. To get started, you will need a flathead screwdriver and an extension cord with a socket head.
Replacing headlight hydraulic corrector
Once these tools have been found, you should proceed to choosing a hydraulic corrector.
Today you can find a wide variety of models on the market:
- hydraulic, operating due to the pressure of the pistons and fluid;
- electrical;
- automatic, capable of independently adjusting the level of headlights.
The cheapest of them are hydrocorrectors. Their only drawback is frequent breakdowns.
So, in order to install a new hydraulic corrector, you need to remove the old one. Anyone can do this if you follow the simplest instructions, which are presented below in the text.
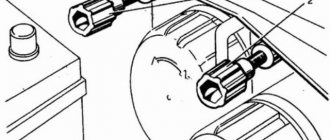
Instructions:
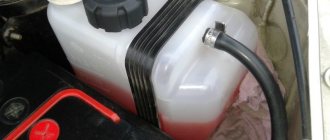
- First you need to find all the clamps securing the pipelines with liquid. They will need to be removed. To do this, you need to unscrew all the bolts.
- After this, you should return to the cabin and carefully remove the rotating handle from its seat. In this case, the rotating handle is located on the main cylinder.
- Now it's time to remove the main cylinder. This can be done using bolts. All bolts (which secure the cylinder) must be unscrewed and removed.
- When there are no more bolts left, you can start removing the cylinders from the headlights. The easiest way to pull them out is directly through the inside of the car. That's all!
Installing a new hydraulic corrector is as easy as removing the old one. To do this, all of the above steps should be carried out in reverse order, but before doing this, the O-ring must be replaced. Once the new device has been successfully installed, the entire system should be checked.
Warning! If the system is not checked for functionality in time, then while driving, light rays may be directed into the eyes of drivers of oncoming cars, and not onto the roadway. This may lead to an accident. In order to prevent such a scenario, you should check the operation of the lighting devices in advance.
Corrector installation
If your car does not have such a system, you can install it yourself. There are various sets available on the market (from electromechanical to automatic) at very different prices. The main thing is that the device matches the lighting system of your car. If you have special skills and tools, you can install the system yourself.
After installation, you need to make adjustments and adjust the luminous flux. To do this, you need to draw a special diagram on the wall or shield, which indicates the points of deflection of the beam. Each headlight is individually adjustable.
Headlight adjustment
Why do you need to adjust headlights?
While driving, the car cannot avoid hitting various road defects. Because of this, after a certain period of time, the factory settings of the optics are disrupted and require troubleshooting.
It is also necessary that the angle of the headlights be able to be adjusted when any of the following situations occur:
- Mounting fog lights;
- Changing tires or wheels;
- Adding new suspension parts or performing repair work;
- Updating a lamp, headlight or its reflector;
- Damage to the headlight range control;
- Replacing lamp types - from an incandescent lamp to an LED or xenon headlight;
- In the event of an accident, if the front half of the car body is damaged as a result.
Where are the headlight adjustment screws located?
Even before starting work, you need to clearly know where the adjusting screws are located. They are found on all types of headlights, but the location may vary, as will the design. It is important to remember the following:
- The easiest way is to study the information in the car’s operating instructions or find data on thematic forums dedicated to a specific car model. You can often find videos where everything is shown clearly, which greatly simplifies the process.
- There are two screws on each headlight. The first regulates the luminous flux in the vertical plane, the second - in the horizontal . Therefore, you can adjust not only the height of the light, but also, if necessary, shift it relative to the road surface.
- The adjustment system may also differ. You can rotate the screws manually, using a flat-head or Phillips screwdriver, a hex or even an asterisk. It is worth clarifying this point in advance so that the necessary tool is at hand. Do not rotate plastic parts with an inappropriate tool; they are very easily damaged.
In some models, auto adjustment is carried out through special holes in the front trim. In this case, the main thing is to choose a screwdriver or other wrench of suitable length.