Downloading a book
After successfully completing the payment (by any method) and returning to the KrutilVertel store from the payment system website, you will be taken to the successful payment page:
The book you purchased will be in your personal account, from where you can always download it.
Please note that after making the payment, you need to return back from the payment system website to the KrutilVertel website. If for some reason you did not return back to the site and closed the payment system tab with a message about the successful completion of the payment, please let us know - we will send you a letter indicating access to download the book
If for some reason you did not return back to the site and closed the payment system tab with a message about the successful completion of the payment, please let us know - we will send you a letter indicating access to download the book.
Necessary tool
The process will require the following:
- brake fluid and a pump to remove its excess (if you don’t have a special pump at hand, you can use an ordinary enema or syringe);
- socket wrench 13;
- open-end wrench 17;
- powerful slotted screwdriver;
- a brush with sufficiently stiff bristles to remove dirt from the places where the pads are fixed;
- pliers.
- preferably a clamp (for pressing the brake cylinder)
Before starting work, the machine must be firmly fixed. Ideally, special shoes are used for this, supporting the wheels. If you don’t have any at hand, you can use improvised supports, for example, bricks.
Several ways to bleed the brake system
Let us remind you that bleeding the brakes is very important for accident-free situations on the roads; keep an eye on the ABS brake bleeding system. Bleeding ABS brakes is possible in several ways, and their implementation depends on the design of the entire complex. There are two ways to remove air from the brake system, but in any case, you will need an assistant. The process of bleeding a brake system with ABS cannot be considered labor-intensive or complicated.
Method No. 1
After completely disabling the ABS system, you need to do the following:
- First, you need to bleed the unit farthest from the master cylinder - the rear wheel on the right side. You need to put one end of the hose on the fitting, and lower the other end into a bottle of brake fluid. You need to have an assistant behind the wheel who will press the brake with your foot. And press until the air is completely removed.
- While the assistant holds down the gas pedal, you need to unscrew the fitting. After the liquid or air stops flowing, you must immediately tighten the fitting. This operation must be repeated several times if bubbles still come out of the working cylinder.
- Then you can move to the rear left wheel and do the same actions.
- After this, we move to the right front caliper, and finish pumping the brakes on the left front caliper.
- When each slave cylinder has been bled, it's time to look at how much fluid is in the expansion tank. The main thing is not to allow the brake fluid to completely drain from the reservoir, because then air will enter the system.
Method number 2. Using a special pump, bleed the brakes
If it is possible to connect a pump, then you can use this method to pump the brakes, but you will also need a partner for this. It is imperative that after the brake bleeding process is completed, before leaving, you need to check the tightness of the system and the absence of leaks. Check the brake fluid level.
- To bleed the right rear cylinder, you need to put a hose on the fitting on one side, and on the other side, also put the hose in a bottle with brake fluid. Then you need to unscrew the fitting about 1.5 turns.
- The assistant will also press the brake pedal and turn on the engine. The attached pump will create pressure in the brake line and expel all the air. After the bubbles stop flowing into the bottle, you just need to turn off the engine.
- The rear left wheel is pumped a little differently. The hose is attached to the fitting and lowered into the liquid, and the drain must be unscrewed 1 turn.
- Turn on the engine and when the bubbles enter the bottle of liquid, you will need to press the brake pedal about halfway, after which you need to quickly tighten the fitting.
- Then you can release the pedal and turn off the engine.
- The main thing is to add brake fluid to the reservoir on time.
- When bleeding of the brakes has come to an end, you need to tighten all the fittings, screw on the cap on the reservoir and reconnect all previously disconnected connectors. Look under the bottom and check how tight the pipelines, fittings and cylinders are. And if nothing leaks anywhere, then everything is fine with the car and you can drive safely. Good luck in completing the solution to the problem of bleeding brakes with ABS.
When bleeding ABS brakes, during work, care must be taken to ensure that the pump does not run without fluid. Remember that the braking system is an extremely important component, and timely bleeding of the brakes ensures the safety of the car and may not only save your life.
Video tip - Quickly pumping brakes with ABS on BMW 75o:
The sequence of removing air from the vehicle
We start pumping the brakes from the front right, and then the left. The procedure takes place with the ignition turned off (position at “0”) and the terminal on the TJ tank removed.
- We put the hose, with the bottle, on the fitting and open it (with an open-end wrench). It is necessary to push the transparent hose so that air bubbles can be seen, and the other end of the hose must be completely placed in the liquid.
- We fully depress the pedal and hold it until all the air comes out.
- Tighten the fitting and release the pedal until liquid flows out without air.
New Lada: Technical characteristics of Lada Largus van - AutoHERMES auto showroom
The rear wheels are pumped with the ignition on in key position “2”.
- As when bleeding the front wheels, we put a hose on the bleeding fitting on the caliper.
- Having fully depressed the pedal, turn the ignition key (to start the hydraulic pump). We observe the air coming out and control the level of brake fluid in the reservoir (top up periodically).
To properly bleed the ABS brakes on the rear left wheel, the sequence of actions needs to be slightly changed.
- As in previous cases, we first put the hose on the fitting and do not unscrew it completely, but only 1 turn, and the pedal does not need to be depressed.
- Turn the ignition key to start the hydraulic pump.
- As soon as the air comes out, depress the brake pedal halfway and tighten the bleeder fitting.
- Then we release the brake and wait for the pump to stop.
- Turn off the ignition and connect the removed connector from the tank.
If you need to pump the brakes together with the ABS modulator, then information on this procedure can be found here.
It is imperative that after bleeding the brakes, before driving off, you need to check the tightness of the system and the absence of leaks. Check the brake fluid level.
Which brake fluid is better
Brake fluid has a significant impact not only on the condition of the braking system, but also on its effectiveness. The most important criterion when choosing a suitable TZ will be compliance with the necessary properties and requirements. But as a rule, everything is very beautifully written on the packaging of different manufacturers, but does the liquid meet the stated four basic requirements, such as: high boiling point, minimal corrosiveness, lubricating properties and stable viscosity. This can only be learned through experience and user reviews.
According to the rating carried out by the staff of the expertcen website, the best foreign-made brake fluids are: Castrol React DOT4 (price 450 rubles), Motul DOT 5.1 - will cost at least 600 rubles, Liqui Moly Bremsenflussigkeit DOT4 - 300 rubles. The list of worthy brake fluids from domestic manufacturers includes: Ros DOT-4 - 180 rubles, Sintec Super DOT-4 - 100 rubles.
But in order not to endanger yourself and other road users, you should also pay attention to those brands whose quality is not at the highest level. Among such dubious TZ there are: Luxe DOT-4 (“Delfin Industry”), “Sintec DOT-4” (TOV “TSKh-Khimreaktiv”) and “Alaska DOT-4” (LLC “Tektro”), they are the ones that do not meet the requirements class DOT-4 according to boiling point
In addition, the Alaska DOT-4 liquid also has a deviation in viscosity at -40°C. In turn, such liquids as: “Oilright DOT-4” (Tektron LLC) and Lux DOT-4 (Delfin Industry JSC) have a fairly low boiling point in a liquid that contains moisture; such parameters do not even correspond to the class DOT 3. There are also deviations to the requirements of DOT 4 for viscosity at -40°C, in liquids: PP “Lumo” (Ukraine) and Belhim DOT 4 (“BelKhimGroup”, Belarus), which is 15-25% higher than the norm.
When choosing brake fluid, you can draw analogies for a long time, read reviews, consider the list of characteristics, but at the same time you need to remember that even the brake fluid that has the best performance among others has its own service life and it must be replaced strictly according to stated regulations from the manufacturer, because your safety depends on the condition of your car.
To summarize, let's say that you only need to use the brake fluid that the car manufacturer recommends.
When buying brake fluid for your car, be vigilant and be sure to pay attention to the specifications that are required for the car. If we talk about the required amount for replacing brake fluid, then, as a rule, in domestic cars it is required from 0.5 to 1 liters, while the volume of fluid in the brake system of foreign cars is from 1-1.5 liters
Therefore, when replacing and bleeding brakes, take this fact into account and always monitor the level in the expansion tank.
Motor oil is a key component in any car. Without it, he will not be able to fully work. There is a wide range of lubricants on the market. They differ in brand, composition, viscosity and other characteristics that provide them with special chemical properties. When choosing consumables for LADA Granta, you must take into account the manufacturer's technical instructions. The functionality of the power unit depends on how correctly the fluid is selected.
The role of lubrication for parts is great. It forms a special film inside the unit that protects it in adverse operating conditions. Oil helps reduce friction during operation. As a result, the service life of the components is increased.
The frequency of the procedure is provided by the manufacturer and is indicated in the relevant documentation. He recommends changing the engine fluid for the first time after two thousand kilometers. Subsequent replacement is carried out after 15 thousand km. The engine block will hold 3.5 liters of oil.
The lubricant consumption rate is 1 liter per thousand kilometers. In reality this value is not respected. Oil consumption is slightly lower and depends on the technical condition of the machine, its operating conditions, viscosity and quality of the fluid. Fast driving and frequent acceleration lead to increased oil consumption.
Filling volumes and oil names for different power units of the Lada Granta are shown in the table.
How much oil to pour into the Kalina gearbox
The factory's recommendation for the filling volume for a gearbox says that 3.1 liters of transmission oil is needed for the gearbox. But according to many manuals from official publications, you can read that it is best to exceed this volume by a certain value.
https://youtube.com/watch?v=kDsZ23eUKGc
Fuel tank volume - experiment
What is the actual volume of the fuel tank
your car. I tried to find out this personally.
Lada Kalina Sedan 2011. Car review
Channel about various equipment: https://bit.ly/2dwkJGH Subscribe to the channel: https://bit.ly/1U4tlDE Review of the Lada Kalina
.
Here, on the contrary, it is better for the level on the dipstick to be slightly higher than the maximum, approximately 5 mm. This is necessary so that the fifth gear gears are better lubricated. Accordingly, this advice will extend the life of the box, or the fifth speed specifically.
Types and properties of fuel fluid
Any brake fluid has 93-98% of the main composition and from 2 to 7% of additives, which, in fact, are the key component for imparting the declared characteristics. In general, if you look at it this way, the properties of brake fluid depend on the combination of its components. Depending on the composition of the base, TJ is divided into 3 groups.
Types of brake fluids:
- Mineral (mineral oil LHM). They consist of alcohol and castor oil.
- Glycolic. Developed on the basis of polyglycols and their esters.
- Silicone. Manufactured from silicon-organic polymer products.
Regardless of the type and composition, all brake fluids are divided into two classifications.
TJ classification:
- By viscosity.
- By boiling point:
- for “dry” liquid (without water);
- “wet”, which contains 3.5% water.
If the boiling point exceeds the permissible norm, then there is a risk of a vapor lock forming in the system (as a result of moisture evaporation), which can lead to breakdown and failure of the brake pedal.
Types and types of abs anti-lock braking systems
Based on the number of control circuits, there are three types of anti-lock braking systems:
- single-channel - when one wheel is blocked, all four are released;
- two-channel - triggering occurs based on data from the best (high-threshold) or worst (low-threshold) wheel;
- four-channel - each wheel is adjusted separately, which ensures maximum braking efficiency.
Important! Modern cars are equipped with four-channel systems.
Depending on the location of components and maintenance features, there are three types of ABS:
- with components (hydraulic module, valves, accumulator and pump) located in a single unit;
- with components spaced in the form of different units;
- with optional SBC and ESP systems.
Despite the complicated design, it is quite possible to replace ABS brake fluid yourself.
Summary
You can replace the fluid yourself only on cars with a hydraulic accumulator and valves combined into one unit. List of required equipment:
- syringe with extension tube or bulb;
- transparent containers;
- transparent tube 20-30 cm long;
- open-end wrenches at “8” or “10”.
Briefly about the procedure for replacing brake fluid in a car with ABS on your own:
- replace the composition in the tank with a new one;
- bleed the left and right front brake cylinders;
- bleed the rear right cylinder with the brake pedal depressed and the pump turned on;
- bleed the rear left cylinder with the brake pedal released and the hydraulic pump turned on;
- check the system for leaks.
If there is a drain fitting on the ABS module, you should use the classical method according to the scheme specified by the factory to bleed all 4 brake cylinders, and then “drive” the ABS installation with excess pressure supplied from outside.
The serviceability and reliability of the brakes largely depends on the condition of the fluid in the system circuits. The mentioned consumables are far from eternal and during the operation of the machine they lose their working properties. Replacing brake fluid with your own hands is a completely common operation for experienced car enthusiasts who prefer to personally service the vehicle and thus save on car service costs. The procedure is really simple and accessible to every owner of a budget car.
Braking system design Grants
Brake linings
Before you start adjusting and checking, you should find out what the Lada brake system is like and what its features are. The design includes the following parts:
- brake regulator;
- pipelines;
- brake pads and cylinders;
- amplifier.
To ensure efficient and safe braking, Grant has a double-circuit (diagonal) pipeline system. The tasks of the first circuit include blocking the left rear and right front wheels. The second circuit is designed to block the left front and right rear wheels. The front wheels have disc brakes, and the rear wheels have drum brakes.
The process of controlling the master cylinder on the Lada Granta is carried out using a vacuum amplifier. This device is designed to improve controllability of the brake system. To do this, you need to press the appropriate pedal. It is necessary to take into account that an anti-lock braking system may be included in the Lada Granta, or ABS will be absent. The Lada Granta system under consideration is equipped with a hand brake that blocks the rear wheels by spreading the corresponding pads in the drums. These parts are moved through levers and by moving a steel cable located inside the vehicle.
Bleeding the hydraulic brakes of Lada Granta
Tool:
- 8mm curved box spanner
- Technological capacity
- Hose
- Large flat screwdriver
- Ditch lift
Parts and consumables:
Notes:
It is necessary to bleed the brake system to remove air from the hydraulic drive after it has become depressurized when replacing the master cylinder, brake cylinders, hoses, tubes, as well as when replacing the working fluid or when the brake pedal becomes “soft”. It is more convenient to carry out the work on an inspection ditch or overpass. Remove air from the system with the engine not running, first from one circuit and then from the other in the following sequence: - the brake mechanism of the right rear wheel; — brake mechanism of the left front wheel; — brake mechanism of the left rear wheel; — brake mechanism of the right front wheel. If air gets into one of the circuits, it is enough to bleed only this circuit, and not the entire hydraulic drive.
1. Raise the rear wheels of the vehicle using a trench lift.
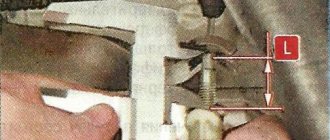
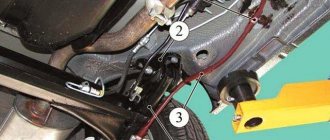
2. Insert a screwdriver between the lever and the push lever of the pressure regulator 3 in the hydraulic drive of the rear wheel brakes (pictured below), fixing the regulator piston in the recessed position.
3. Check the fluid level in the brake hydraulic reservoir and, if necessary, add fluid as described in this article.
4. Clean the brake bleeder fitting of the right rear wheel from dirt with a rag and remove the protective cap from it.
5. Using an 8 mm spanner, loosen the bleeder fitting.
6. Place the hose on the fitting and immerse its free end in a container partially filled with working fluid.
7. An assistant must vigorously press the brake pedal all the way 4-5 times and keep it pressed.
8. Using an 8 mm wrench (pictured above), unscrew the bleeder fitting 1/2–3/4 turn. In this case, liquid with air bubbles will flow out of the hose, and the brake pedal will move forward.
9. As soon as the liquid stops flowing out of the hose (the pedal should be pressed all the way), tighten the fitting, and only then can the assistant release the pedal.
10. Repeat pumping until air bubbles no longer appear in the liquid coming out of the hose.
11. Remove the hose, wipe the bleeder fitting dry and put the protective cap on it.
12. Bleed the brake mechanism of the left front wheel as described above.
13. Bleed the brakes of the other circuit in the same way.
Note:
When pumping, you need to monitor the fluid level in the tank and add fluid if necessary.
If, when you press the brake pedal, you feel its “softness” and increased travel, it means there is air left in the system. In this case, repeat pumping until the pedal becomes “hard”, i.e., when pressed, go no more than half the distance to the floor. If air cannot be removed, check the tightness of connections, pipelines, hoses, master and working cylinders. Tighten leaking connections, replace faulty master and working cylinders.
Sequence of actions when replacing fluid yourself
Necessary tools, materials:
- key to “10”, “14”, cylinder to “17”;
- rags;
- additional lighting;
- Pillbox for filling;
- new brake pads as needed.
Algorithm of actions:
- We hang the car with an electric lift.
- Open the hood.
- Unscrew the cap of the brake fluid expansion tank.
- We remove the wheel.
- In the cabin, a partner pumps the brake pedal and fixes it in the lower position. Waiting for commands.
- Clean the surface of the back of the brake caliper, remove dirt, and wipe dry.
- Using a key set to “10”, unscrew the grease fitting and bleed out the air along with the liquid.
- We tighten it and give a command to our partner to repeat the pumping procedure.
- We repeat the step again.
- We replenish the missing amount of DOT in the expansion tank.
After completing bleeding of one wheel, we immediately proceed to the next one according to the scheme:
- Front left – rear right;
- Front right – rear left.
The algorithm outlined above does not allow the complete replacement of bunkers in the contours. The design of the car is such that it is impossible to “flush” the system without major dismantling.
Many service station mechanics use a channel in the hydraulic drive to replace brake fluid:
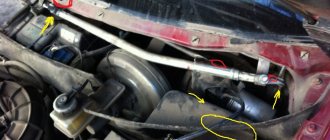
- From the front of the engine we find the hydraulic drive fitting.
- Remove the plastic cap from it.
- We put on a hose, one end of which is lowered into a container with liquid.
- We recess the bracket.
- Pull out the plastic tube.
- The system has been depressurized and the bunker leaks out of the hose under pressure.
- As soon as the level in the expansion tank drops below the minimum, we replenish the missing amount.
- We repeat the cleansing procedure until the color of the DOT becomes transparent.
The volume of bunker that is filled into Lada Vesta is 1.5 liters.
Bleeding brakes on Lada Priora
After servicing or repairing the brake system of a Lada Priora, it is necessary to bleed the hydraulic brakes to remove excess air. I don’t think it’s worth talking about what the consequences may be if you ignore this procedure.
– when you press the pedal once – increased pedal travel, its “softness”;
– with repeated pressing of the pedal - a gradual decrease in the pedal stroke with a simultaneous increase in its “hardness”.
Before bleeding the hydraulic drive, it is necessary to identify and eliminate the cause of depressurization.
Helpful advice. If pumping a hydraulic drive is associated with the repair of one circuit and the serviceability of another circuit is known, then pumping only the circuit being repaired is permissible.
Sequence of bleeding the brakes:
– rear right;
– front left;
– rear left;
- front right.
You will need: an “8” wrench, a rubber hose, a container for collecting brake fluid.
Self-bleeding brakes on Lada Priora
1. Check the level and, if necessary, add brake fluid to the master cylinder reservoir to the “MAX” mark.
Attention. Only add brake fluid of the same brand as that poured into the system.
Please note that on our website there is already a publication about bleeding the brake system of a VAZ 21099 with your own hands. 2
Place the vehicle on an inspection pit or lift
2. Place the vehicle on an inspection pit or lift.
3. If the rear wheels are suspended, first unlock the rear brake pressure regulator by inserting a screwdriver between the plate and the piston. Don't forget to remove it when finished.
4. Clean the air release valve on the brake mechanism from which air is supposed to be removed from dirt and dust.
5. Remove the protective cap from the air release valve.
6. Place the rubber hose over the valve head and immerse the end in a clean, transparent container partially filled with brake fluid (the end of the hose should be immersed in the fluid).
7. An assistant must sharply press the brake pedal 4–5 times (with an interval of 1–2 s between presses). After the last swing, you need to keep the pedal pressed.
8. Unscrew the air release valve 1/2 to 3/4 turn. Air bubbles will be visible in the liquid flowing from the hose. When the fluid stops flowing from the hose, close the air release valve completely, after which the assistant should release the brake pedal.
9. Repeat steps 7 and 8 until there are no air bubbles in the flowing liquid. At the same time, monitor the brake fluid level in the reservoir and, if necessary, add fluid, not allowing the level to drop below the “MIN” mark.
10. Remove the hose, wipe the air release valve fitting dry and put the protective cap on it. Bleed the brakes of the remaining wheels if necessary.
Notes. Do not reuse brake fluid that was drained when bleeding. If the brake system hydraulic drive is not pumped thoroughly enough, then when you press the pedal at the end of its stroke, you will feel an increased “softness” of the pedal.
Recommendation: There are two ways to bleed the hydraulic brake system without an assistant. The first is the most reliable: order a turner an aluminum or bronze cover for the main brake cylinder, screw the valve from the camera into it and connect it to the spare wheel with an additional hose; air pressure should not exceed 0.05–0.07 MPa (0.5–0.7 kgf/cm2). The second is not very reliable, but acceptable: connect the rubber bulb to the wheel cylinder fitting - the connection should be very tight. Squeeze the bulb, unscrew the fitting; When the bulb is half full, tighten the fitting. Repeat the procedure three to four times. During test braking, check the operation of the brakes.
Do-it-yourself brake bleeding on the Lada Priora has been successfully completed. Let us remember that the previous article was about replacing the wheel bearing on a Lada Priora.
Is it possible to mix dot-3, dot-4, dot-5 or dot-5.1
Differences between brake fluid classes:
- DOT 3 (glycol base) – for relatively low-speed vehicles with drum brakes or front disc brakes;
- DOT 4 (glycol base) – on modern high-speed cars with predominantly disc brakes on all wheels;
- DOT 5.1 (glycol base) - on road sports cars, where the thermal load on the brakes is significantly higher.
- DOT 5 (silicone) is practically not used on conventional vehicles.
Brake fluids DOT 3, 4, 5.1 (color from light yellow to light brown) are interchangeable, but mixing them is not recommended (it is better to completely replace them), the properties may deteriorate. DOT-5 (dark red) cannot be mixed, it only mixes with itself. In other words, brake fluids can only be mixed by color.
What brake fluid can you recommend? Is it worth changing the usual DOT-4 class for Lada to others, for example, DOT-5.1? Let us remind you that you can easily find any information about your car by its content (Niva, Priora, Kalina, Granta, Largus, Vesta, XRAY).
Keywords: lada xray brakes | Lada Vesta brakes | Lada Largus brakes | Lada Granta brakes | Lada Kalina brakes | Lada Priora brakes | Niva brakes | universal article
Brake fluid Rosdot-4 was developed specifically for cars with disc brakes, taking into account the recommendations of AvtoVAZ specialists. Rosdot-4 is currently one of the best in its class among world analogues. It is recommended to replace the brake fluid after 1.5-2 years.
Brake fluid specifications
| Parameter | Meaning |
| GOST, TU | TU 2451-004-36732629-99 |
| Appearance | transparent homogeneous liquid from light yellow to light brown without mechanical impurities |
| Kinematic viscosity, mm²/sec, at -40°С, no more | 1450 |
| Kinematic viscosity, mm²/sec, at -50°С, not less | 5,0 |
| Kinematic viscosity, mm²/sec, at -100°С, not less | 2,0 |
| Boiling point of dry liquid, °C, not less | 260 |
| Boiling temperature of the moistened liquid, °C, not less | 165 |
| Stability at high temperatures, change in boiling point, °C, no more | 3,0 |
| Hydrogen ion activity indicators (pH), units. pH, within | 9,5-9,0 |
USEFUL TIPS In order to avoid exposing yourself in the future to unforeseen expenses for repairing the brake system, or even the entire Lada Granta car as a whole, promptly replace the brake fluid with fresh one. It is very hygroscopic and absorbs moisture from the air, which, in addition to causing corrosion of brake system parts, lowers the boiling point of the fluid itself, and this can lead to brake failure during frequent heavy braking.
Do not reuse brake fluid that has been drained from the brake system: it is contaminated, saturated with air and moisture. If brake fluid comes into contact with wires, plastic or painted body parts, it can cause damage, so always use a clean wiping cloth when pouring. If liquid gets on these parts, wipe them immediately with a clean cloth.
1. Check the brake fluid level in the master cylinder reservoir. When the plug is removed, it should be located between the “MIN” and “MAX” marks marked on the tank body. With the plug installed, the brake fluid level should be at the lower edge of the filler neck, since the brake fluid is displaced by the level sensor float.
WARNING A gradual decrease in the brake fluid level in the absence of leaks most likely indicates the need to replace the brake pads. Check the condition of the brake pads on your Lada Granta car (see “Checking the degree of wear of brake pads, brake discs and brake drums”). Untimely replacement of brake pads leads to expensive repairs (replacement of brake pads, brake discs and brake drums)!
New Lada: Programs for diagnosing domestic cars
The automobile braking system can be called one of the most important in the operation of a car, because without it more than one vehicle cannot exist. Therefore, for the brakes to function flawlessly, it is necessary that the system elements be reliable. VAZ brake fluid is no exception.
, in this publication we will figure out what kind of fluid is needed and after what period of time it is necessary to replace the brake fluid.
Not every car enthusiast knows that the fluid in the brake system needs to be changed from time to time. Some people believe that it is only necessary to periodically top up the brake fluid so that air particles do not appear in the system, which will impair the performance of the brakes. However, this opinion is not entirely correct, although you should not refuse this operation.
. The presence of moisture in a liquid is no less dangerous than the presence of air in it, since work in this case becomes ineffective and is subject to corrosion. Based on this, it is recommended that the brake fluid be replaced not only according to the manufacturer’s recommendation, but also when moisture and air in it are independently detected.
Lada Granta Replacing brake fluid
Repair Grants → Brake system → Replacing brake fluid in the hydraulic brakes of Lada Granta VAZ 2190
To replace the brake fluid in the hydraulic brake system on a Lada Granta VAZ 2190, you will need: an “8” wrench for the brake pipe nuts, brake fluid, a rubber or transparent hose, and a transparent container.
NOTE
This is what a special wrench for brake pipe nuts looks like.
According to the manufacturer's recommendation, the brake fluid should be replaced after 3 years of operation or 45 thousand kilometers of the Lada Granta VAZ 2190 (whichever comes first).
The brake system on the Lada Granta VAZ 2190 is filled with special brake fluid DOT-4.
Helpful advice
Brake fluid is very hygroscopic (absorbs moisture from the air), which, in addition to causing corrosion of brake system parts, reduces the boiling point of the brake fluid itself, and this can lead to brake failure during frequent heavy braking. Therefore, it is recommended to replace the brake fluid on a Lada Granta VAZ 2190 car at least once every 2 years.
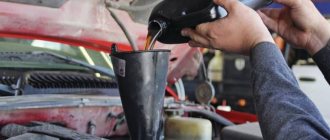
1. Unscrew the master cylinder reservoir cap and place it on a clean cloth. Be careful: brake fluid may drip from the float.
2. Pump out the old brake fluid from the brake reservoir with a syringe or rubber bulb and fill in new brake fluid to the lower edge of the brake reservoir filler neck.
3. If the rear wheels of the Lada Granta VAZ 2190 car are suspended, first unlock the brake pressure regulator of the rear brake mechanisms by inserting a screwdriver between the plate and the piston. Don't forget to remove it after repairing the brake system.
4. Clean the bleeder fitting of the right rear brake mechanism from dirt. Remove the rubber protective cap from the brake bleeder fitting. Place a rubber hose onto the brake bleeder fitting (it is recommended to use a transparent hose to see the condition of the leaking brake fluid) and lower its end into a clean transparent container.
5. An assistant must sharply press the brake pedal 4 or 5 times (with an interval of 1-2 seconds between presses), and then keep the brake pedal pressed.
6. Unscrew the brake bleeder fitting 1/2-3/4 turn. Old (dirty) brake fluid will begin to flow out of the hose. In this case, the brake pedal should smoothly reach the stop. As soon as the fluid stops leaking, tighten the brake bleeder nipple.
7. Constantly monitor the brake fluid level in the brake reservoir, not allowing it to drop below the “MIN” mark, and if necessary, add new brake fluid. Repeat bleeding the brakes according to paragraphs. 5 and 6 until new (clean) brake fluid begins to flow out of the hose.
8. In the same way, replace the brake fluid in the left front brake mechanism, and then in the second circuit (first in the left rear brake mechanism, then in the right front brake mechanism).
9. Press the brake pedal several times. The travel and resistance of the brake pedal should be constant each time you press it. If these conditions are not met, it means that air has entered the brake system and it needs to be bled (see below “Bleeding the brakes (hydraulic brake system)”).
10. After replacing the brake fluid, be sure to put the protective caps on the brake bleeder fittings.
11. Add brake fluid to the brake reservoir up to the “MAX” mark and tighten the cap.
Bleeding the brakes (hydraulic brake system) on a Lada Granta VAZ 2190
The brakes on a Lada Granta car are pumped to remove air from the brake system that got there when filled with brake fluid after replacing it or after repairing the hydraulic brake drive units associated with its depressurization.
Signs of air in the brake system:
— increase in pedal travel, its “softness” when pressing the brake pedal once;
— a gradual decrease in the brake pedal travel with a simultaneous increase in its “hardness” when the brake pedal is pressed repeatedly.
Before bleeding the brakes, it is necessary to identify and eliminate the cause of depressurization of the brake system.
Helpful advice
If bleeding the brakes is associated with the repair of one brake circuit and the serviceability of another brake circuit is known, then bleeding only the brake circuit being repaired is permissible.
Which brake fluid to choose for Priora
The manufacturer fills it with DOT 4. The most popular brake fluids among buyers are ROSDOT 4 and NEVA-M. The first option is more expensive, the second is cheaper. For cars with and without ABS, it is recommended to use different types of fluids.
- DOT-4 plus - for cars without ABS
- DOT-4 class 6 - designed for modern braking systems (ABS, ESP, VSA)
Depending on the capacity, the cost of the brake fluid indicated above is from 50 to 150 rubles.
You can also add DOT 5.1 fluid. It has a lower viscosity than the above samples, as well as a higher boiling point and, according to manufacturers, changes once every five years.
It is prohibited to mix liquids of different types with each other!
How to fill brake fluid correctly
The brake reagent on the Lada Granta should be replaced after every 45 thousand kilometers traveled or after 2-3 years of use. It should be said that the replacement can be done with your own hands.
It must be said right away that the reagent is replaced on Grant, which is initially installed on the overpass. First you need to unscrew the cap from the neck of the tank to fill the liquid. Then the spent working fluid is pumped out. This is best done with a syringe or rubber bulb. Only after this is the previously unused brake fluid poured into the container.
During the process of filling brake fluid, you need to be as careful as possible and take special care. If liquid gets on painted surfaces, it will need to be cleaned up quickly as it may damage the paintwork.
Then the hydraulic drive is pumped, through which the brake fluid flows.
Pumping is carried out until the moment when a liquid lighter than the used liquid comes out of the fittings on all pumped working cylinders. Bleeding is carried out with the engine turned off, first on one circuit, and then on the other.
The replacement procedure is as follows:
- The first to bleed is the brake system located on the right side of the rear wheel.
- Then the left front wheel mechanism is cleaned of the spent reagent.
- Next comes the turn of the left rear wheel system.
- The pumping mechanism ends with the right front wheel.
Before you begin the process of cleansing the system of old brake fluid, you need to check the volume of brake fluid that is in the brake hydraulic reservoir. If the fluid level is insufficient, it needs to be topped up. You will need one more person to bleed the brakes.
First, you should clear the fitting of the right rear wheel from debris and dirt. To clean, first unscrew the cap located on the fitting. Then it is equipped with a hose, and the other end is lowered into a container containing brake fluid. At this time, the partner presses the brake pedal all the way once or twice and leaves it held.
Then you need to unscrew the bleeder fitting halfway, but not completely. At this time, the used brake fluid will flow out.
The assistant must continue to press the brake pedal until the fluid disappears. All this must be repeated until new, clean brake fluid appears. Then the hose is removed, the fitting is thoroughly wiped and the cap protecting it is returned to it. Next, the entire procedure is repeated to free the left front wheel mechanism from the clogged working fluid. The same sequence of pumping the brake mechanism of the next circuit. The only thing you need to monitor is the presence of liquid in the container.
You can replace the brake fluid with another, simpler method. For this procedure, finding a partner is not required. However, the brake fluid supply must be at least a liter.
Replacing the used fluid can only be done on a Lada Granta, which is located on an overpass or has space to approach the tank. The brake fluid is first removed, then new fluid is added to the maximum level, and to make the pumping procedure faster, hoses are put on all branches of the cylinders being pumped.
The free ends of the tubes are in prepared containers. Usually the pumping process ends if 200-250 ml of the reagent used has spilled out. Then the fittings are wrapped well, the protective caps are returned to their place, and the amount of brake fluid in the master brake cylinder is recorded.
After this, the car owner pays attention to the level of brake fluid in the reservoir and understands how much brake fluid still needs to be filled
How to change the fluid the traditional way?
The replacement technique with bleeding the brake pedal has been practiced by experienced drivers for quite a long time. What is the essence: the assistant sits in the driver’s seat and, at the command of the main performer, presses the brake pedal repeatedly, causing the master cylinder piston to fire and the fluid to move outward through an open circuit.
The work technology is as follows:
- Place the car on a level surface and support the front left wheel with shoes on both sides. Using a jack and wheel wrench, remove the right rear wheel of the car.
- Open the hood, unscrew the cap of the expansion tank, disconnecting the sensor wires. In order not to drive the entire volume of old liquid through the tubes, suck it out of the tank with a syringe.
- Fill the container with new consumables up to the MAX mark and place an assistant behind the wheel.
- Remove the protective cap from the working cylinder fitting, put a spanner on the edge, and then a transparent tube. Place the other end of the hose into the bottle.
- Give the command to the assistant to make a few pumps and fix the pedal in the pressed position. Use a key to loosen the valve 0.5–1 turn, allowing the liquid to flow through the tube into the bottle. When the pressure weakens, lightly tighten the fitting and again command the assistant to continue pumping.
- Repeat the pumping operation until you see completely clean new fluid in the transparent hose. Finally tighten the valve, remove the tube and replace the boot. Then move on to the next wheel.
Pipelines with a liquid medium leading to the working brake cylinders can be connected in a diagonal or parallel pattern. In the first case, the replacement order looks like this: rear right wheel, front left, then rear left and front right. In a parallel pattern, move from the rear right wheel to the rear left wheel, then the front right wheel and then the left wheel.
If an automatic pressure regulator is installed on the circuit supplying the rear wheel cylinders, it must be forcibly opened before bleeding. Use a screwdriver or other pointed tool to secure the valve in the open position.
Why update the TZ?
Brake fluid is an incompressible medium with certain physical parameters. Initially, the consumable material has almost zero humidity and is able to operate normally at high temperatures (200–260 °C) without going into a boiling state.
The first step is to clarify why you need to change the fluid in the car’s brake system circuits. Over time, the properties of TF deteriorate due to hygroscopicity - the ability to absorb water vapor contained in the surrounding air. Contact of the working fluid with the air occurs in the expansion tank, into which excess flows during the operation of the brakes.
When the “brake fluid” receives 3% or more additional humidity, the minimum boiling threshold is significantly reduced - to 140–180 ° C. Please note: during normal city driving, the fluid in the car warms up to 150 °C, and during more dynamic driving - up to 180–200 °C. Then the following processes occur in the main circuit of the system:
- In the immediate vicinity of the wheel brake mechanisms, the incompressible medium begins to slowly boil.
- Small air bubbles form, which gradually combine. An air plug appears in the tube, displacing some of the liquid into the expansion tank.
- Since air is a compressible medium, the next time the brakes are applied, the force from the pedal is not transferred to the calipers, and the pads do not close on the disc. The result of a brake system failure is clear - an accident of varying severity.
Hence the conclusion: to the question of whether it is necessary to change the brake fluid, there is only one answer - it is definitely necessary. Otherwise, driving becomes unsafe for the driver, passengers and other road users.