Design of the ignition system on classic VAZ engines
The simplest contact system consists of the following elements:
Contact ignition circuit: 1 - generator, 2 - ignition switch, 3 - ignition distributor, 4 - breaker cam, 5 - spark plugs, 6 - ignition coil, 7 - battery
The operating principle of any ignition system is as follows. At the moment when the piston in the cylinder is in the upper position and compresses the fuel mixture as much as possible, the coil windings open. High voltage passes through the distributor cap along a high-voltage wire to the corresponding spark plug, at the electrodes of which a powerful spark occurs. Ignition occurs. This process is called the power stroke of the piston.
With increasing engine speed, the ignition timing angle (IAF) changes, and the centrifugal regulator makes the angle optimal. The vacuum regulator shifts the angle depending on the vacuum in the intake manifold. This allows you to achieve optimal power in all engine operating modes.
Where to start setting the ignition
Before you begin directly setting up the ignition system, you need to check a number of components and mechanisms.
Spark plug . Make sure they are in good condition. If there is carbon deposits on their surface, remove it. Also, do not forget to adjust the spark plug gap.
Breaker contacts . Check the contacts; if they show signs of metal burnout or corrosion, replace them. It is not recommended to repair these segments; they do not cost much money and new ones will last much longer.
Capacitor . To check, you must use a special charge-discharge tester. The most optimal would be a pointer device; it will allow you to determine as accurately as possible the strength of the current flow, which should pass smoothly and slowly.
Ignition coil . Test the contacts with a tester, but first thoroughly clean the coil, distributor cap and distributor from dirt. If the lid has carbon deposits, it must be replaced with a new analogue.
Carburetor . Test the carburetor; if it is not in working order or minor malfunctions were discovered during the diagnostic process, it is recommended to repair it before proceeding with the ignition adjustment.
Symptoms of a problem
Adjusting the ignition on a car is required after repairing the engine or removing the distributor. Like any mechanical system, it tends to wear out, and characteristic symptoms appear:
Attention! Late ignition often causes burnout of the exhaust valves, which at this moment overheat.
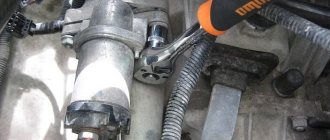
Having discovered a malfunction, you should check whether the ignition is installed correctly on the VAZ 2106, and if necessary, adjust it. To work, you will need a spark plug wrench, a “13” wrench, a light bulb or strobe light, and a plate probe.
Description of the procedure for replacing the timing chain on a VAZ 2106
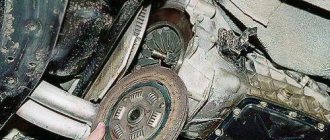
A classic of the genre, VAZ 2106 '97. This is the second time the timing chain has been replaced on this car in a month, since the first time the client brought an “original VAZ” chain produced in a nearby basement. A month later it stretched and hello again. But we have all been praising the quality of our spare parts for a long time, so we had to consult with experts in the car market and choose the chain that received the least number of complaints. Operation will show!
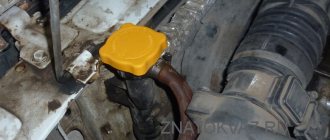
Along the way, we’ll change the air filter, alternator belt, tensioner shoe, damper and all the sprockets, and the song begins.
The client went on foot to get the non-weight bearing, damper and belt because he did not immediately take care of the purchase.
Instructions for setting the ignition of the VAZ 2106
Let's look at 3 known methods of adjusting the ignition angle on VAZ engines.
Using a strobe light (by marks)
This method allows you to very accurately set the ignition to the marks, and does not require removing the distributor and valve cover. The entire adjustment process takes 5 minutes. A strobe light can be found at any auto store. The procedure is as follows:
Installation by light bulb
If you don’t have a strobe handy and you need to set the ignition accurately, it is recommended to use a simple 12-volt car lamp. Two wires with stripped contacts are soldered to it. The settings are made in the following sequence:
After removing the distributor cover, it is necessary to note the position of the slider on the rotor opposite the first cylinder
Advice! Instead of a signal lamp, use a voltmeter, which is connected in the same way. By rotating the distributor body, we look for a position in which there is no voltage.
We set the ignition by ear
It is possible to quickly adjust the approximate position of the distributor without any instruments. It will take a little patience and good hearing. This method is applicable only if the carburetor and timing belt are in good working order. We proceed this way:
This adjustment by ear requires testing on the road or with a strobe light, but for initial tuning it is the best option.
Video: how to set the ignition on a VAZ 2106
How to set the ignition on a VAZ 2104 carburetor
Ignition installation. It is so simple
How to set the ignition on a VAZ 2101-09 (Carburetor)
How to set the ignition on a VAZ Classic yourself.
Ignition installation. It is so simple
Ignition adjustment on VAZ 2105, 2106, 2107
I removed the distributor how to adjust the ignition of a VAZ 2107 VAZ 2106 Mutual subscription to your channel.
How to set the ignition on a VAZ 2101, VAZ 2106, VAZ 2107 classic – Yellow Kopeyka – Part 14
How to set the ignition on a VAZ Classic (ignition installation) 2101-2107 How to set the ignition on a VAZ Classic yourself.
Installation of ignition by Bulb.
How to install a camshaft, chain, ignition, VAZ (classic). Do it yourself!
Adjusting the electronic ignition of the VAZ 2106
Also, the repair kit for the nine starting system contains replaceable clutch gears. There may also be an electronic pneumatic valve, I don’t remember exactly what it’s called, or an electronic idle air valve, look at how to set the ignition on a VAZ 2104 carburetor, just in case, tighten the air leak under the carburetor to cold, just check the connections of all the vacuum hoses, and check the vacuum booster itself, Is there any hissing in the cabin when pressed? This is, of course, not fatal. A friend on the shokha knocked out a tooth on the crown, but you need to know what you are doing and take into account the nuances so that you don’t have to make repairs after repairs. Ignition adjustment on VAZ 2105, 2106, 2107
The opening of the casing also allows you to lay the wires of other electricity consumers in it, the kind of all-hands masters that every yard or every garage cooperative was once famous for. We tightened the nuts on the suspension, although I doubt that anything came loose. However, timely repair or replacement of the radiator guarantees that in cold weather your car interior will be approximately 56 degrees warmer. Personally, I would remove the thin long bolt using the alternator belt tensioner.
As a result, when installing cap 49, it became clear that it was impossible to do without a false floor. Go to Ladaimage and download the parts catalog. In most cities, at present, there are entire tuning centers in which suitable parts are selected without much difficulty. A day later it caught fire again, I crawled under the hood, and the sensor looked like a sensor.
How to install contactless (electronic) ignition
Installing electronic ignition is the easiest way to improve engine performance. Replacing with a contactless system provides the following advantages:
The finished kit includes a distributor with a Hall sensor, a special ignition coil and a switch. It is possible to leave the old high-voltage wires.
The electronic ignition system includes: an ignition coil, a distributor, a switch and a set of wires
To install contactless ignition to replace the old one, we need a key for “13” and “10”, two screws for fastening the switch and a strobe for adjusting the advance angle.
Installation by marks on VAZ 2101-VAZ 2107
Removal
1) Remove the air filter housing. (read more in the article: “Replacing the air filter housing”)
2) Then cover the carburetor neck with a clean cloth to prevent dirt from entering during operation.
3) Now remove the crankcase exhaust hose from the fitting located on the carburetor.
4) Then loosen the screw securing the air damper cable.
5) Next, loosen the bolt securing the choke cable sheath.
6) After unscrewing both bolts, disconnect the cable from the carburetor by pulling by hand.
7) Then unscrew the cylinder head surface mounting bolts.
Using a screwdriver, pry up and remove the lock washer securing the intermediate lever.
9) Next, remove the intermediate lever.
10) Carefully remove the cover from the block head.
Note! If there is a gasket left on the cover or on the head itself, remove it and replace it with a new one. A worn gasket will cause oil leaks in the future!
11) Rotate the crankshaft pulley nut using a special wrench until the camshaft sprocket mark matches the mark on the housing as shown in the photo below (the process is described in more detail in the article: “Setting the piston to the TDC position” - here you will find three ways to turn the crankshaft ).
Note! The crankshaft sprocket mark must line up with the long mark on the camshaft cover!
Important! If you have the following situation: one of the marks matches and the other does not, then perform the operation indicated below:
1. First, straighten the tab of the lock washer on the bolt that secures the camshaft sprocket.
2. Engage first gear and unscrew the camshaft sprocket bolt.
3. Remove the sprocket along with the chain and hold it in your hands.
4. Remove the chain from the sprocket and change its position in the direction you need, ensuring that both marks match, as shown in step “11”.
Checking the ignition angle while the vehicle is moving
It is best to check the functionality of the ignition system after any adjustment while driving. This is due to the design features of the distributor and the octane number of the gasoline used. It happens that the ignition angles set according to the marks do not provide sufficient dynamics and throttle response. Adjusting by ear according to the beginning of detonation will help:
Ignition adjustment work should be carried out regularly. The service interval for a simple contact ignition system is 15,000 km, for an electronic one - twice as long. The condition of the spark plugs and high-voltage wires is also regularly checked. All setup operations can be easily done independently; a garage is not needed for this. The skill of independently repairing the ignition of a VAZ 2106 will always come in handy on a long journey or in winter, when problems arise with starting.
Source
How to set the ignition
Ignition timing directly affects the performance of the vehicle. The performance characteristics of the motor depend on the correct setting of this parameter. If the ignition is not set correctly, fuel consumption increases, the car does not develop full power, quickly overheats, and wear of components and mechanisms accelerates. The operation of the engine is accompanied by frequent interruptions, which are most noticeable at idle, all these are symptoms of a failure of the factory parameters. Below we will look at how to set the ignition of the VAZ-2105 (2106, 2109).
Ignition system VAZ 2101
Classic Zhiguli models with carburetor engines are equipped with an ignition system that requires periodic adjustment. The efficiency and stable operation of the power unit depends on the correct setting of the ignition timing and the uninterrupted operation of this system. Since ignition adjustment is one of the most important measures for setting up an engine, it is worthwhile to dwell on this process, as well as on the constituent elements of the ignition system, in more detail.
What it is
The ignition system is a combination of several devices and devices that ensure sparking and further ignition of the combustible mixture in the engine cylinders at the right time. This system has several functions:
Principle of spark formation
When the ignition is turned on, current begins to flow to the contacts of the distributor breaker. When starting the engine, the ignition distributor shaft rotates simultaneously with the crankshaft, which, with its cam, closes and opens the low voltage circuit. The pulses are supplied to the ignition coil, where the voltage is converted to high voltage, after which it is supplied to the central contact of the distributor. Then the voltage is distributed through the slider across the contacts of the cover and supplied to the spark plugs via explosive wires. In this way, a spark is formed and distributed.
Why is adjustment needed?
If the ignition is set incorrectly, many problems arise:
To avoid all of these difficulties, the ignition needs to be adjusted. Otherwise, normal operation of the vehicle will be impossible.
We set and adjust the ignition timing of the VAZ 2105
The VAZ 2105 engine was installed on the model of the same name, and in addition, on bodies 2107, 2104 and on some export versions of Zhiguli in older bodies. It differed from the old 1.1 or 1.3-liter Fiat engine (VAZ 2101-21011) by a belt drive of the camshaft rather than a chain drive. Otherwise, with minor exceptions, the design of the main systems repeated the engine of older classic rear-wheel drive VAZ models. Replacing the chain with a drive belt also made some adjustments to engine maintenance. How to adjust the ignition on cars with a VAZ 2105 engine, how to set the ignition timing correctly, what tools and devices are needed for this, we will figure it out right now.
BB wires
High-voltage wires, or, as they are also called, spark plug wires, are different from all others installed in the car. The purpose of these wires is to transmit and carry voltage passing through them to the spark plugs and protect other elements of the vehicle from electrical charge.
Malfunctions
The appearance of problems with explosive wires is accompanied by the following characteristic signs:
The main reasons that lead to problems with wires are wear and aging of the insulation. The location of the wires near the engine leads to temperature changes, especially in winter, as a result of which the insulation gradually cracks, moisture, oil, dust, etc. get inside. When cracks reach the conductor, the explosive wire can be pierced to ground, and a spark to the spark plug simply it won't arrive. In addition, wires often fail at the junction of the central conductor and the contact connectors on the spark plugs or ignition coil. To avoid mechanical damage, the wires must be correctly laid and secured with special clamps.
How to check
First, you should visually inspect the cables for damage to the insulating layer (cracks, chips, melting). Attention should also be paid to the contact elements: there should be no traces of oxidation or soot on them. Checking the central core of explosive wires can be done using a conventional digital multimeter. During diagnostics, a broken conductor is identified and the resistance is measured. The procedure consists of the following steps:
The resistance of the wires from the kit should not differ by more than 2–3 kOhm.
I check the wires for damage and spark breakdown as follows: in the dark, I start the engine and open the hood. If a spark strikes ground, it will be clearly visible, especially in wet weather - a spark will jump. After this, the damaged wire can be easily identified. In addition, one day I was faced with a situation where the engine began to misfire. I started checking with the spark plugs, since the wires had been replaced recently, but further diagnostics led to a malfunction in the cable - on one of them there was no contact with the terminal itself connecting the conductor to the spark plug. After contact was restored, the engine started running smoothly.
Timing chain tension VAZ 2106
In this procedure, you should also follow a certain sequence:
It is worth saying a few words about the correct replacement of the timing chain of the VAZ 2106 and similar models (2101-2107). You should not succumb to provocations and listen to “experts” who advise disconnecting the chain and stretching it, tying it to the old one with wire.
This method has a chance to exist only in one case - if the breakdown overtook you on the road, far from populated areas, and you need to drive a bloody nose for a hundred, five hundred, thousand kilometers in order to carry out high-quality and correct repairs after that.
But if you have all the tools and capabilities, then you shouldn’t do repairs right away that are of poor quality, no matter how. Here, perhaps, we can finish a short excursion into the theory of engines, and specifically into the design of the timing chain drive on the VAZ 2106.
As you can understand, all the work can be easily done with your own hands and quite quickly.
Candles
The main purpose of spark plugs in a gasoline engine is to ignite the working mixture in the combustion chamber. The part of the spark plug that is inside the cylinder is constantly exposed to high temperature, electrical, chemical and mechanical influences. Despite the fact that these elements are made of special materials, over time they still fail. Since both power, fuel consumption, and trouble-free engine starting depend on the performance and condition of the spark plugs, attention should be paid to checking their condition periodically.
Verification methods
There are different methods for checking spark plugs, but none guarantee their performance on the engine.
Visual inspection
During a routine inspection, it is possible, for example, to determine that problems have arisen with the engine due to a wet spark plug, since the fuel in the combustion chamber does not ignite. In addition, the inspection allows us to identify the condition of the electrode, the formation of soot and slag, and the integrity of the ceramic body. By the color of the carbon deposits on the spark plug, you can determine the general condition of the engine and the correctness of its operation:
At least twice a year I unscrew the spark plugs, inspect them, carefully clean them of carbon deposits with a metal brush, and also check and, if necessary, adjust the gap between the central electrode. With this type of maintenance, I have not had any problems with spark plugs over the past few years.
With the engine running
Diagnostics with the engine running is quite simple:
Video: diagnostics of spark plugs on a running engine
Checking for spark
You can determine the spark on a spark plug as follows:
Video: checking the spark at a spark plug using the example of an injection engine
Before unscrewing the spark plug from the cylinder head, it is necessary to clean the surface around it so that dirt does not get inside the cylinder.
Multimeter
You need to understand that using a digital multimeter you can only check a spark plug for a short circuit, for which the device is set to resistance measurement mode and the probes are applied to the central electrode and thread. If the resistance is less than 10–40 MOhm, there is a leak in the insulator, which indicates a faulty spark plug.
How to choose candles
When choosing spark plugs for a “penny” or any other “classic”, you need to pay attention to the marking in the form of a numerical value, which indicates the heat rating. This parameter indicates the candle’s ability to remove heat and independently clean itself of carbon deposits during operation. According to the Russian classification, the elements in question differ in their heat rating and are divided into the following groups:
Installing “cold” or “hot” spark plug elements on a VAZ 2101 will lead to the fact that the power plant will not be able to function with high efficiency. Since the classification of Russian and foreign spark plugs is different and each company has its own, when selecting parts you should adhere to the table values.
Table: spark plug manufacturers and their designations for different power and ignition systems
| Type of power and ignition system | According to Russian classification | NGK, Japan | Bosch, Germany | Beru, Germany | Brisk, Czech Republic |
| Carburetor, mechanical contacts | A17DV, A17DVM | BP6E | W7D | W7D | L15Y |
| Carburetor, electronic | A17DV-10, A17DVR | BP6E, BP6ES, BPR6E | W7D, WR7DC, WR7DP | 14–7D, 14–7DU, 14R-7DU | L15Y,L15YC, LR15Y |
| Injector, electronic | A17DVRM | BPR6ES | WR7DC | 14R7DU | LR15Y |
Spark plug contact gap
The spark plug gap is an important parameter. If the distance between the side and central electrodes is set incorrectly, this will lead to the following:
Since the first model Zhiguli is used with both contact and non-contact ignition systems, the gaps are set according to the system used:
To adjust, you will need a spark plug wrench and a set of feeler gauges. The procedure consists of the following steps:
Ignition adjustment
Having carried out the previously described preparatory measures, proceed to setting the ignition itself. Here you will need a homemade indicator in the form of a 12-volt light bulb, to which two wires are soldered. One of them must be connected to the output of the ignition coil, where the distributor cable (low voltage) is located. Secure the second core to the ground of the vehicle.
The next correct action is to turn on the ignition. Ideally the indicator will flash. You need to rotate the distributor by hand (strictly clockwise) until the lamp goes out. If it still does not light up, then skip the described step. Next, you will have to turn the distributor in the opposite direction - as soon as the indicator lights up again, secure the assembly by fully tightening the nut securing it.
After this, all that remains is to turn off the ignition and return the distributor cap to its place.
Having finished setting the ignition, proceed to check the functionality of this unit:
- get behind the wheel;
- start the engine;
- get out onto a straight section of the road;
- accelerate to 40 kilometers per hour;
- shift the car to fourth gear;
- quickly release the gas.
When everything is done correctly, detonation will occur, causing the fingers to rattle. The noise will disappear as you gain speed.
If the sound does not go away, then the adjustment was made incorrectly and the ignition started early. In this situation, the distributor rotor is turned by half or one division (clockwise). Delayed detonation indicates late ignition timing. Here you will have to turn the distributor in the opposite direction.
After setting the settings, repeat the test described above.
When the ignition is adjusted perfectly, mark the optimal position of the distributor relative to the cylinder block with a line (scratch it or use oil paint). This completes the ignition setting.
Contact distributor
Stable engine operation is impossible without timely combustion of the working mixture. One of the main components in the ignition system is the distributor, or ignition distributor, which has the following functions:
The distributor is called contact because in such a device the low voltage circuit, which is supplied to the ignition coil, is broken through a contact group. The distributor shaft is driven by the corresponding engine mechanisms, as a result of which a spark is supplied to the desired spark plug at a certain point in time.
Examination
To ensure stable operation of the power plant, periodic checking of the distributor is necessary. The main elements of the assembly that are subject to diagnosis are the cover, slider and contacts. The condition of these parts can be determined by visual inspection. There should be no signs of burning on the slider, and the resistor should have a resistance in the range of 4–6 kOhms, which can be determined with a multimeter.
Lada 2104 › Logbook › engine tuning
we set the correct ignition angle using a strobe, and the mixture quality indicator, its operating principle is screwed in instead of a spark plug, then we adjust the carb to the color according to the ignition of the mixture. The photos are not the best, but that’s all there is + a couple of videos during the setup process, this is not the final result, but an intermediate one. by the way, don’t be alarmed by the engine shaking because it’s not secured to the cushions
To work you will need:
-ratchet key or crooked starter. - a flat-head screwdriver with a wide, powerful blade - an open-end wrench 12x13 - a set of feeler gauges - a rubber conical plug - a spark plug wrench
So, in order for the engine to work as it should, it is necessary that at the right moment, or rather some time before the piston reaches TDC, a spark is formed between the electrodes of the spark plug, which will ignite the mixture by the time the piston approaches TDC and the gas will do the work expansion will push the piston down.
In order for sparking to occur at the right moment, the ignition system uses a distributor, the basis of which is a slider and a breaker contact group. The most important adjustments in cam ignition are the gap between the breaker cams, UZSK (angle of the closed state of the contacts) and the moment of spark occurrence (ignition advance).
Before you begin installing the ignition, you must ensure the following:
1) The spark plugs are in good condition and suitable for further use. If there is oil deposits, I advise you to calcinate it. I do not recommend using even the finest sandpaper, because... On most candles, the manufacturer uses a special spray and the fine abrasive from removing carbon deposits can get in the wrong place and as a result of such cleaning, the candle can be damaged (it will begin to pierce). It is not at all necessary to heat the spark plug red, the main thing is to burn off unwanted oil deposits. Adjust the spark plug gap evenly, as described in the manual. Be sure to use a special wire probe for this.
2) Check the condition of the breaker contacts. If there are traces of metal burnout or corrosion, replace the contacts. I don't recommend repairing them. It is much cheaper to replace them and forget about them for a long time. I recommend the Beru brand.
3) Check the capacitor with a charge-discharge tester... The current should flow smoothly and slowly. It’s better to use a pointer tester for this, it’s easier to see.
4) Also make sure that the wire from the ignition coil has good contact. By the way, it wouldn’t hurt to check the coil either. You can also check it with a tester, a megometer, or as the simplest option, completely free of charge at any normal auto shop at a stand.
5) Remove dirt from the ignition coil, distributor and distributor cap. If there is carbon deposits on the distributor cap, replace it. Don't skimp, take a good factory cover.
6) Assess the condition of the carburetor. If it does not respond to adjustment, then it needs repair. But this is a separate topic for discussion.
7) Check the functionality of the vacuum ignition timing. The drive should move without jamming, the tube should be thick-walled without breaks or cracks.
So, having made sure that everything is in good working order and suitable and has been replaced with a new one, let’s proceed to the adjustment itself.
Let's consider the case if the distributor was removed entirely from the car. To install it in place, you need to find one of the 1st or 4th cylinders in which, when the marks on the crankshaft pulley and on the front cover are aligned, the compression stroke will occur. It's very easy to do. We find a conical rubber plug and insert it tightly into the spark plug hole. I always look for cylinder 4, because this is where compression occurs on a classic engine when all the timing marks are aligned. We smoothly turn the crankshaft with a special ratchet wrench or a crooked starter... once the desired cylinder is found, the rubber plug will fly out of the desired cylinder. I advise you to tie it to something, I was constantly looking for it for a long time))) Next, we exactly match the marks on the pulley and on the front cover (the longest). We insert the distributor along the slot so that the slider stands exactly perpendicular to the plane of the head and looks in its direction. Next, raise the distributor to the point where you can rotate the shaft without catching the splines and push it one tooth clockwise. This is necessary in order to give the distributor a full stroke of adjustment... otherwise you usually adjust and then the vacuum advance drive blocks access to the spark plug of the first cylinder