How to remove the engine from Oka
Particularly small class cars VAZ and SeAZ “Oka” 1111 and 1113 were the only models of the domestic automobile industry that were equipped with two-cylinder water-cooled power plants.
These motors were very compact and structurally very well made. But, like any power unit, Oka engines required major repairs after long-term operation. Moreover, some of the restoration work, especially the crank mechanism and the cylinder-piston group, is much easier to perform with the engine removed, so you definitely need to know how to remove the engine from the Oka.
In general, removing the engine from the Oka is not a difficult operation, but you need to know the sequence of actions. You will also need the appropriate equipment.
Equipment and tools
To complete the work you will need:
- Set of open-end wrenches and sockets with cranks;
- Screwdrivers;
- Mount;
- Wooden blocks;
- Hoist or any other lifting mechanism;
Having all this, you can begin to remove the engine from the Oka with your own hands.
It should be noted that there are two ways to dismantle the power plant - lower the engine down or pull it up.
Next, we will consider the last method, which is why a lifting mechanism is needed.
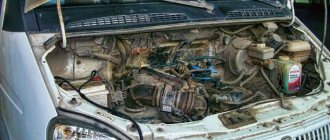
Removing Attachments
Also, for the convenience of performing work, it is better to drive the car into an inspection hole. Immediately after this, the negative terminal from the battery is removed.
Before starting work, you need to drain the engine oil and coolant system.
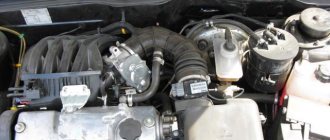
To make it more convenient to remove and disconnect engine attachments, you must remove the hood from the car. This will provide better access to the upper hanging elements.
Then all pipes and wiring from the engine are disconnected - the cooling system pipes going to the engine from the radiator, the pipes going to the stove.
As for the wiring, you will need to disconnect all connections going to the sensors:
You will also need to disconnect the wires from the spark plugs, starter, and generator. In the future, the generator will have to be completely dismantled.
The above list of works is shown below in the photo:
| 1. Removing the pipe | 2. Removing the heater system pipe | 3. Disabling the oil pressure sensor |
| 4. Removing the coolant sensor | 5. Removing the solenoid valve | 6. Spark torque sensor |
| 7. Generator shutdown | 8. Disconnecting high voltage wires | 9. Removing the speedometer cable |
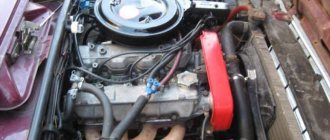
You will also need to disconnect:
Next you need to unscrew the exhaust manifold and remove it from the studs.
In general, removal of the Oka engine should be accompanied by preliminary dismantling of the gearbox and drive, but this may not be necessary.
Since the engine will still be disassembled, the method of removing the engine without a gearbox will require removing the cylinder head before removing the engine from the car.
The above list of works is shown below in the photo:
| 10. Removing the carburetor pipe | 11. Removing the brake vacuum hose and manifold heating | 12. Removing the air filter housing |
| 13. Removing the air damper drive | 14. Removing the throttle drive | 15. Removing the ground wire |
Powerplant removal method
The sequence of work is as follows:
- We put the car in the garage and immobilize it. For the convenience of carrying out some work, we jack up the front end, completely, and not just one side;
- drain technical fluids (oil, coolant);
- We dismantle the carburetor air filter along with the housing;
- Disconnect the throttle and air damper drive cables from the carburetor, as well as the XX solenoid valve wire;
5. Remove the high-voltage wires (from the spark plugs and coil);
6. Disconnect the wiring going to the spark torque sensor;
7. Loosen the clamp securing the gasoline supply pipe to the gasoline pump and remove it;
9. Loosen the clamps and remove the pipes from the thermostat housing that go to the cooling radiator;
10. Remove the pipes leading to the interior heater;
11. Loosen and disconnect the clutch cable;
12. From the gearbox, disconnect the speedometer drive, the wire of the sensor for turning on the reverse signal, as well as the ground wire put on the stud of the gearbox housing;
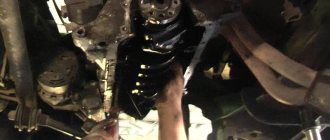
Then you need to move under the car
Removing engine mounting elements
First you will need to unscrew all the bolts securing the clutch housing from the power unit.
16. Removing the clutch housing
Then you should proceed to the engine mounting elements.
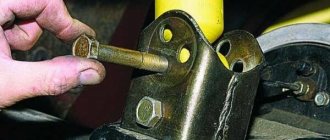
To do this, you will have to unscrew the bolts securing the motor mounts. First, the nut is unscrewed from the bolt on the front support. Since the power plant continues to rest on this support, in order to be able to pull out the bolt, the engine should be lifted slightly using a pry bar and the bolt removed. Next, holding the unit with a pry bar, insert a wooden block into the gap between it and the subframe. After this, it will be possible to unscrew the engine bracket mounting bolts.
| 17. Removing the front engine mount | 18. Lifting the engine with a pry bar, remove the bolt | 19. To unload the bracket, we place a block |
| 20. Using the “17” head, unscrew the 3 bolts securing the bracket | 21. Bracket mounting bolts when removed | 22. Remove the bracket with support |
In the same way, the rear right support becomes loose, followed by installing it on a wooden block and removing the bracket.
| 23. Using a 17 key, unscrew and remove the bolt | 24. Unscrew the 2 bolts securing the rear support bracket | 25. Remove the rear support |
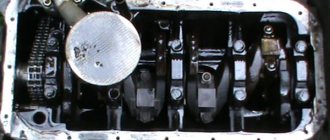
26. Removing the rear mounting bolt of the clutch housing is possible only after dismantling the rear support.
The photo shows a removed engine Removing the left engine mount
| 27. Place a block | 28. Using a key set to “13”, unscrew the nuts securing the left support bracket to the gearbox | 29. Using keys “17”, unscrew the fastening bolt |
Next, in the front part of the engine, the eye that was removed when dismantling the generator is installed in place. The rear eye is attached to the leftmost cylinder head stud.
The lifting mechanism is hooked onto these eyelets. To remove the motor, you need to move it all the way to the left so that the gearbox input shaft comes out of the flywheel. It is quite possible that for this you will have to tilt the engine a little, and at the same time moving it to the left.
After the shaft comes out of the flywheel and clutch discs, the power unit is carefully lifted up by the lifting mechanism. It is better to do this together - one will lift the motor, and the second will guide it so that it does not cling anywhere.
How to remove an engine on an oka video
Published: 3 years ago
No skills muffler pants. Intake pipe Do not remove or install.
How to remove the engine from Oka
Particularly small class cars VAZ and SeAZ “Oka” 1111 and 1113 were the only models of the domestic automobile industry that were equipped with two-cylinder water-cooled power plants. These motors were very compact and structurally very well made.
But, like any power unit, Oka engines required major repairs after long-term operation. Moreover, some of the restoration work, especially the crank mechanism and the cylinder-piston group, is much easier to perform with the engine removed, so you definitely need to know how to remove the engine from the Oka.
In general, removing the engine from the Oka is not a difficult operation, but you need to know the sequence of actions. You will also need the appropriate equipment.
Other small-scale Oka power units
Only VAZ 1111 and VAZ 11113 engines were serially installed on the car. It was with these power units that the car was supplied to retail chains.
As options to save production and meet environmental requirements, both SeAZ and KAMAZ tried to use power units from other manufacturers. This was due to the fact that AvtoVAZ refused to continue producing minicars and actually stopped supplying power units to complete the car.
So in 2004, a trial series of cars with a Korean Hyundai Atos engine was produced. 15 cars were produced for trial testing, but the program did not go into series.
Also this year, small-scale tests were carried out at SeAZ of cars with engines from the Melitopol plant MeMZ 245. The car was called OKA-Astro and was subsequently produced in small series at the Kamov automobile assembly plant. Another version of the Ukrainian power unit was MeMZ 247.1. This engine, which complied with Euro-2 requirements, was not supplied for mass production, although such equipment is rarely found on the secondary market.
In 2007-2008, a Chinese three-cylinder injection engine was installed at the Serpukhov plant, which developed 53 hp.
The sports version of the Oka uses the engine from Priora.
The Oka-based tracked all-terrain vehicle uses a VAZ 2131 engine.
As an option for garage tuning, there are several examples of cars using three-cylinder Volkswagen diesel engines.
The hopelessness that accompanied the Soviet automobile industry throughout the entire period of its existence was permanent. Still, it was not completely eradicated, and it timidly stepped into the 21st century along with new domestic developments. Although there remain some examples of cars from the country of the Soviets dear to the heart of the nostalgic automotive esthete.
Content:
Oka 1111, as it is
Oka 1111 is one of these examples. A nice, progressive in its time, but little promoted project. Half-eight engine, 33 horsepower, moderately stiff chassis, excellent, almost BMW-like handling and maneuverability. This is how we can briefly describe Oka as it is. The car has its fans, and there are many of them. This can be explained very simply - this is the cheapest minicar on the market. Cheaper than a Korean scooter. Seven years ago, in 2007, they asked for less than $4,000 for a new Oka.
For the money, the car worked perfectly, and with an average consumption of 5 l/100 km, it satisfied the needs of not too capricious motorists. This is the quintessence of minimalism, the most simplified design of the suspension and chassis, and there’s no need to talk about the interior. He looks frankly poor even if measured by the standards of the 1980s.
Features of repair and maintenance
Like any internal combustion power plant, the VAZ-1113 engine required periodic maintenance, and after its service life was exhausted, a major overhaul was carried out or a complete replacement of the engine on the Oka.
Overhaul of the Oka engine is carried out in case of severe wear of the cylinder-piston group and the crank mechanism. Moreover, although the engine life is approximately calculated by the manufacturers, it is greatly influenced by the characteristics of operation, the frequency of maintenance, as well as the quality of the technical fluids and fuel used.
In most cases, Oka engine repairs are performed without removing it from the car. In a number of systems and mechanisms, it is possible to remove components from the power plant for subsequent restoration or replacement, or even do everything on the unit. This applies to power systems, ignition, starting, electrical supply, cooling, as well as the gas distribution mechanism.
But removing the motor and disassembling it will be necessary if it concerns the cylinder-piston group and the crank mechanism, which includes the balance shaft system. As for the latter, they are a design feature of the two-cylinder engine.
The fact is that the pistons in Oka installations move in pairs, not separately. But at the same time, the power strokes in the cylinders are performed differently. For example, both pistons move upward, but in the first cylinder there is a compression stroke, and in the second - an exhaust stroke. After passing through the VTM, the first cylinder has a working stroke, and the second one has an intake stroke, and so on in a circle.
The balancing system prevents the occurrence of increased vibrations, which necessarily arise with such design and operation features of the power plant.
If the power unit has exhausted its resource, that is, the wear of the cylinder-piston group has reached critical values, or a serious breakdown of the crankshaft has occurred, the engine is overhauled. In this case, all work can be performed only on a removed installation.
Next, we’ll look at how to properly remove the power plant from the engine compartment of this car with your own hands, without resorting to the services of a service station.
Engine cost
You can buy a used Oka car engine for a small amount - from 6 to 20 thousand rubles. A new engine will cost two to three times more – about 50 thousand rubles. The minimum price of an Oka car in the basic configuration is two hundred sixty thousand rubles. It is best to purchase a car in the showrooms of official dealers, since the cost in third-party stores may vary.
The Oka car is a good vehicle, equipped with a reliable medium-power engine, the repair and maintenance of which will not require significant investment from the car owner.
Selection of pistons and rings
To begin with, we suggest you figure out how to choose replacement piston rings. Everything is quite simple here. The designers responsible for the creation of this engine tried to unify this unit as much as possible, thereby making it similar to other VAZ engines. That is why the dimensions of the Oka engine pistons completely coincide with the “eight” engine - they differ only in quantity. True, when choosing rings you need to focus on the size of your engine. If you have an Oka with a 0.65 cubic liter engine, then the rings from a 1.3 liter V8 will suit you, but if the engine capacity of your Oka is 0.75 liters, then you need to take the rings already from a 1.5-liter V8. The only drawback that motorists face when purchasing rings for their Oka is the lack of kits for this particular engine; as a result, they have to take a full set of rings for the VAZ-2108 and only use half of it.
The main difference from a car with a VAZ engine
In 2006, when Oka became the property of Severstal-Auto, SeAZ began producing a modification with a Chinese engine in place of the previous VAZ engine. As you know, before this the car was equipped with a VAZ-111 gasoline engine of 0.65 liters and a power of 29 horsepower at 5600 crankshaft revolutions per minute. The engine was paired with a four-speed gearbox. It was obtained by “cutting off” two cylinders from a four-cylinder engine – the first and fourth.
Over the years of its existence, the car has undergone significant modernization several times.
So the manufacturer has repeatedly modified the instrument panel, interior heater and body ventilation. The plastic body kit was improved, a new radiator grille and bumper were installed. The exterior and interior regularly underwent improvements, so the car looked visually better and became more comfortable. But the main difference between the SeAZ-11116-60 with a Chinese engine was that this machine, with a noticeably lower level of noise and vibration, developed much more power - 53 horsepower versus 32 horsepower.
Together with a 5-speed manual transmission, the Chinese internal combustion engine increased the acceleration dynamics of the vehicle, the maximum possible speed, and also, since 2008, ensured that the engine complied with Euro-3 requirements.
Removing Attachments
Also, for the convenience of performing work, it is better to drive the car into an inspection hole. Immediately after this, the negative terminal from the battery is removed.
Before starting work, you need to drain the engine oil and coolant system.
To make it more convenient to remove and disconnect engine attachments, you must remove the hood from the car. This will provide better access to the upper hanging elements.
Then all pipes and wiring from the engine are disconnected - the cooling system pipes going to the engine from the radiator, the pipes going to the stove.
As for the wiring, you will need to disconnect all connections going to the sensors:
You will also need to disconnect the wires from the spark plugs, starter, and generator. In the future, the generator will have to be completely dismantled.
The above list of works is shown below in the photo:
How to remove the engine from an oka
Sequencing
Let's move on directly to the process of replacing piston rings on a VAZ Oka without removing the engine (key points are shown in the photo). Everything is done like this:
5. Remove the protective cover of the timing drive, loosen the drive roller, and remove the belt from the camshaft gear. We unscrew the bolt of this wheel and remove it from the shaft (carefully so as not to lose the key);
6. Disconnect the pipes from the valve cover, unscrew the bolts securing it and remove it from the car;
7. Disconnect the vacuum regulator pipe;
8. Unscrew the bolts securing the spark torque sensor and move it to the side;
9. Unscrew the fuel pump and put it aside;
10. Unscrew the fastening of the spark torque sensor drive housing and remove it;
11. Unscrew the upper bolt securing the rear timing belt cover and move it to the side;
12. Unscrew the nuts securing the camshaft bearing housing and remove it;
Main breakdowns and their symptoms
The dismantling of the box from the car is carried out in case of certain breakdowns and the need for repairs.
The main types of breakdowns include:
The gearbox will also have to be removed if the clutch components are replaced - discs (driver, driven), release bearing or its fork.
Transmission malfunctions appear quite clearly in the form of:
Other malfunctions of the unit include wear of the seals and malfunction of the drive. But these problems do not require removing the gearbox from the car, with the exception of wear on the input shaft seal (it can only be reached from the clutch housing and for this the box must be removed from the car).
Then you need to move under the car
Removing engine mounting elements
First you will need to unscrew all the bolts securing the clutch housing from the power unit.
16. Removing the clutch housing
Then you should proceed to the engine mounting elements.
To do this, you will have to unscrew the bolts securing the motor mounts. First, the nut is unscrewed from the bolt on the front support. Since the power plant continues to rest on this support, in order to be able to pull out the bolt, the engine should be lifted slightly using a pry bar and the bolt removed. Next, holding the unit with a pry bar, insert a wooden block into the gap between it and the subframe. After this, it will be possible to unscrew mounting bolts .
In the same way, the rear right support becomes loose, followed by installing it on a wooden block and removing the bracket.
26. Removing the rear mounting bolt of the clutch housing is possible only after dismantling the rear support. The photo shows a removed engine.
left support bracket to gearbox
Next, in the front part of the engine, the eye that was removed when dismantling the generator is installed in place. The rear eye is attached to the leftmost cylinder head stud.
The lifting mechanism is hooked onto these eyelets. To remove the motor, you need to move it all the way to the left so that the gearbox input shaft comes out of the flywheel. It is quite possible that for this you will have to tilt the engine a little, and at the same time moving it to the left.
After the shaft comes out of the flywheel and clutch discs, the power unit is carefully lifted up by the lifting mechanism. It is better to do this together - one will lift the motor, and the second will guide it so that it does not cling anywhere.
Main stages of manufacturing
So, now you know what components are required for manufacturing. It is worth taking into account what kind of engine the Oka has. This is, in fact, half of the VAZ-21093 engine. It is simple, durable, reliable, but only if you change all components in a timely manner.
So, let's take a closer look at the manufacturing stages:
- First you make a frame from #10 channel and sheet metal. You should end up with a rectangular design.
- For an inter-frame hinge, a fist from a UAZ car is ideal.
- The rear and front axles are made from components from Oka or any other car.
- Install the motor on the frame. If you believe the reviews of the owners, the Oka engine is suitable for creating mini-tractors. It has sufficient power, reliability, and most importantly, spare parts for it are very easy to find. By the way, if you want to double the power, then install a VAZ-21093 engine.
- To improve cross-country ability, it will be necessary to increase the ground clearance, as well as develop fasteners for the coupling mechanism. The rear and front side members will need to be strengthened.
- The clutch consists of two V-belts that transmit rotation from the engine to the gearbox.
- You can take any gearbox – even one from Oka is ideal.
- Next, the steering gear components are installed.
- Install the gas tank, brake mechanisms and mount the electrical wiring.
We need to draw your attention to the fact that when assembling a homemade tractor, you will not spend very much money. And such a unit will pay for itself completely in one season.
Removal and installation of the engine VAZ "OKA" 1111 1988-2008
The engine, complete with clutch and gearbox, forms a power unit mounted on the car's subframe on three elastic supports. The supports support both the mass of the power unit and the loads that arise when the vehicle starts, accelerates, and brakes. The supports are located taking into account the center of gravity of the power unit, which helps reduce the transmission of vibrations to the body.
The manufacturer recommends removing the power unit downwards as an assembly with the subframe. The power unit can also be removed upwards. To do this, remove the hood and air filter, disconnect the wires and hoses from the engine, and the clutch and speedometer cables from the gearbox (see below for more details). Attach the slings to the eyes of the power unit (on the cylinder head and on the gearbox housing) and, having disconnected its supports from the subframe, remove the power unit using a lifting mechanism.
This section describes how to remove the power unit downwards along with the subframe.
You will need: keys “8”, “10”, “13”, “17”, “19”, pliers, screwdriver.
| 1. Disconnect the wire from the “–” terminal of the battery. |
| 2. Drain the oil from the engine crankcases and gearbox (if it is to be disassembled), as well as the coolant from the engine cooling system. |
| 3. Remove the air filter (see “Removing and installing the air filter”). |
| 4. Loosen the hub nuts and front wheel nuts. |
| 5. Disconnect the carburetor choke rod (see “Replacing and adjusting the choke rod”) and... | 6…throttle valve drive rod (see “Replacing and adjusting the throttle valve drive rod”). |
| 7. Remove the high voltage wire ends from the spark plugs. |
| 8. Disconnect the high voltage wires from the ignition coil terminals. | 9. Loosen the fuel supply hose clamp on the fuel pump inlet fitting and disconnect the hose from the fuel pump. |
| 10. Disconnect the block with the ignition system wires from the spark timing sensor by pressing the spring latch. | 11. Remove the protective cap and disconnect the wire tip from the coolant temperature sensor. |
| 12. Loosen the hose clamps and disconnect the cooling system hoses from the coolant outlet pipes and the thermostat. | 13. Disconnect the speedometer drive cable from the drive on the gearbox. |
| 14. Unscrew the fastening nut and remove the ground wire from the gearbox housing stud. | 15. Disconnect the wires from the starter traction relay. |
| 16. Disconnect the drive cable from the clutch release lever and remove it from the bracket on the gearbox housing (see “Replacing the clutch cable”). |
| 17. Remove the protective cap, unscrew the generator output nut “30” and disconnect the wires from the generator. | 18. Loosen the clamps and remove the hoses from the heater pipes. |
| 19. Remove the connector block from the reverse light switch on the transmission. | 20. Unscrew the nut of the coupling bolt of the clamp connecting the exhaust pipe and the additional muffler (resonator). |
| 21. Unclench the clamp with a large screwdriver and slide it along the pipe towards the resonator. |
| 22. Unclench the connection between the pipe and the resonator with a screwdriver, disconnect the resonator pipe from the exhaust pipe of the muffler. | 23. Disconnect the gearshift drive rod and torque rod from the gearbox (for more details, see “Removing and installing the gearbox”). |
| 24. Remove the front wheels and disconnect their drives from the steering knuckles, remove the shanks of the outer hinges from the wheel hubs (for more details, see “Removing and installing the front wheel drives”). | 25. Remove the protective cap and disconnect the tip from the sensor output of the engine oil pressure warning lamp (the sensor is located under the oil filter). |
| 26. Remove the four nuts securing the steering gear bracket to the subframe (two are shown, the rest are located symmetrically). | 27. Place wooden support blocks under the subframe and carefully lower the vehicle so that the subframe rests on the blocks. Unscrew the four bolts securing the subframe to the body and... |
| 28. ...raising the car, remove the power unit (engine and gearbox assembly) complete with subframe. | 29. If it is necessary to remove the gearbox, unscrew the bolt and nut securing the starter and... |
| 30. ...a nut located next to the muffler exhaust pipe bracket. |
| 31. Separate the gearbox from the engine and remove it. |
| 32. Install the power unit in the reverse order of removal. Fill the engine and gearbox crankcases with oil (if the oil was drained when removing or disassembling them), and add coolant. Check and, if necessary, set the ignition timing, adjust the carburetor air and throttle valve drives (see subsections “Replacing the rod and adjusting the air damper drive” and “Replacing the rod and adjusting the throttle drive”), clutch (see “Adjusting the clutch drive”) and gear shifting (see “Adjusting the gear shift drive”). |
↓ Comments ↓
Section 1. VEHICLE STRUCTURE
General information about cars Vehicle registration data
Possible engine malfunctions, their causes and solutions Useful tips Replacing the coolant Replacing the engine oil and oil filter Cleaning the crankcase ventilation system Setting the piston of the first cylinder to the TDC position of the compression stroke Adjusting the tension of the camshaft drive belt Replacing the tension roller Replacing the camshaft drive belt Removing, installation and troubleshooting of the flywheel Replacement of engine seal parts Cylinder head Adjustment of clearances in the valve drive Removal and installation of the engine Engine repair Lubrication system Cooling system Exhaust system Power supply system
Clutch Gearbox Front wheel drives
Section 4. CHASSIS
Front suspension Rear suspension
Section 5. STEERING
Inspection and check of the steering system on the vehicle Steering column Steering mechanism Steering linkage
Section 6.BRAKE SYSTEM
Checking and adjusting the brake system Replacing the brake fluid Bleeding the brake system hydraulic drive Master cylinder Brake vacuum booster Pressure regulator Replacing brake hydraulic hoses and pipelines Front wheel brakes Rear wheel brakes Parking brake
Fuses and relays Generator Starter Ignition system Lighting, light and sound alarms Windshield wipers and washers Engine cooling fan Instrument cluster Switches and switches
Possible body malfunctions, their causes and solutions Replacement of buffers Hood Side door Rear door Rear view mirrors Seats Heater Body care
Appendix 1. Tightening torques for threaded connections Appendix 2. Fuels and lubricants and operating fluids Appendix 3. Basic data for adjustments and control Appendix 4. Filling volumes, l Appendix 5. Oil seals Appendix 6. Layout of rolling bearings Appendix 7. Car electrical diagram : 1 — side turn signal repeater; 2 — front direction indicator; 3 - headlight; 4 — electric motor of the cooling system fan; 5 — sound signal; 6 - sensor for turning on the electric motor