How to change jet rods on a VAZ 2107 with your own hands
If the car remains stable while driving, it will be safe. This rule is equally relevant for passenger cars and trucks. The VAZ 2107 was no exception. The car could never boast of high handling. That's why engineers developed a system with jet thrusts. But even such elements can fail, raising questions about independent replacement.
- Purpose of thrust rods on the VAZ 2107
- Jet thrust malfunctions and possible consequences
- Checking the condition of the jet rods on the VAZ 2107
- Test sequence
- Video checking jet rods on a VAZ 2107
- Selection of thrust rods
- Replacing jet rods on a VAZ 2107
- Removing jet rods
- Repair and installation of jet rods
- Video of changing jet engines on a VAZ 2107
- Replacing bushings and silent blocks on VAZ 2107 rods
- Sequencing
- Conclusion
Messages [1 to 25 of 49]
1 Topic from the cast 04/01/2013 14:21:46
- caste
- Participant
- Inactive
- From: Severskaya station 918-345-05-47
- Registered: 25.02.2011
- Messages: 5714
Topic: replacing tie rod rubber bands in the field
Guys, who uses what to press the rubber bands out of the rods, what devices are there for this task?
2 Reply from umrnet 04/01/2013 14:59:08
- umrnet
- Participant
- Inactive
- From: Krasnodar YMR
- Registered: 11.06.2010
- Messages: 5828
Re: replacing tie rod rubber bands on a field
I was re-pressed using a vice. There seems to be another press for this matter.
3 Reply from the cast 04/01/2013 16:35:15
- caste
- Participant
- Inactive
- From: Severskaya station 918-345-05-47
- Registered: 25.02.2011
- Messages: 5714
Re: replacing tie rod rubber bands on a field
I have a vice at home, it’s already nice
4 Reply from 777 white 04/01/2013 16:51:52
- 777 white
- Participant
- Inactive
- From: Krasnodar
- Registered: 26.11.2009
- Messages: 565
Re: replacing tie rod rubber bands on a field
Why press them out? First, you press out the metal sleeve in a vice, cut the rubber band (with a knife or hacksaw blade), clean the seat, press the rubber band in a vice with a soapy solution (hemorrhoids can happen in this place, so it’s better to do everything slowly), press in the metal bushing. Seems like I've always done it this way
5 Reply from Werwolf 04/01/2013 18:04:49
- Werewolf
- Participant
- Inactive
- From: Korenovsk
- Registered: 13.02.2011
- Messages: 10054
- User Karma: 7
- drive2.ru/users/: HODOVIC
Re: replacing tie rod rubber bands on a field
In general, this is done without any vice, you knock out the bushing, then use a screwdriver to pry out the rubber itself, but with pressing in the bushings, it is better to have a conical bullet so as not to damage the elastic
Purpose
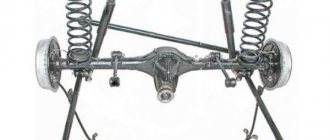
It is worth noting that this traction was used by automakers long before the appearance of the classics. Thus, the element was used on cars with dependent leaf spring suspension. The design of the rod has not changed for years. On the “seven” this element is a long metal pipe installed under the bottom near the rear axle.
The part is attached to the body using rubber-metal bushings. Why is jet thrust needed on a VAZ-2107? This element is designed to prevent lateral rocking of the car. Since the Zhiguli had a dependent suspension at the rear, this car leaned heavily when cornering. To stabilize its body and increase safety, the machine is equipped with jet thrust.
Replacing the silent blocks of the lower arms
This work will also be needed by those who are expecting to replace the lower arms, front springs on a VAZ 2107 car and the like.
You will need a tool of the following quality:
- Keys 22 (preferably a cap), 19, 13;
- Vise;
- Silent block remover or a piece of pipe of suitable diameter;
- Gas-burner;
- Hammer;
- Good jack;
- Chisel;
- Mounting blade;
- Spring ties;
- Time and patience.
I won’t write a detailed guide (you can google it by name), I’ll write the most interesting things.
I’m not a supporter of replacing silent blocks on a car (although I don’t rule out this option), because not everyone can do it without the proper skill, and you can break the damn thing if you’re stupid, as they say. For example:
The axle cannot be removed, I couldn’t find such a washer for sale
The bolts are hardened, but they also deteriorate
You need to remove the shock absorber and disconnect the lower ball joint from the steering knuckle.
We disconnect the end of the stabilizer bar from the lever and carefully remove it upward using a mounting tool. You can wrap electrical tape around the threads to prevent damage.
Jack up the lever from below (it’s better to remove the ball joint)
We remove the springs. These spring ties are not suitable for our suspension. You need to take one with one hook and a shorter one or special ones for classics.
Fits, requires skill
Not suitable for classics at all, the spring was removed using a crowbar
Hanging the hub
Pull the lever down
Unscrew the lever from the alignment bolts (beam bolts). We notice the number of alignment washers. Although I just threw them out (I still need to install new ones when adjusting the camber).
Next, remove the lever and clamp it in a vice (it’s better to remove the ball).
silent blocks with a torch
. Yes, we'll burn it out.
Using a chisel and hammer, knock out the remains.
What happened to me:
I tried to remove it with a puller and almost lost the second one - the silent block wouldn’t work,
I fucked for a very long time, about an hour
On the other hand, the inner bushing of the silent side was firmly stuck. I found out when I burned it out
It was then that I realized that the burner was steering in any way.
I beat it with a hammer (made it square) and removed it
A small scuff was removed with a needle file (small file)
I installed the silent blocks with a puller. You can use a pipe, they are pressed in until it stops. It is better to lubricate with graphite grease or lithol.
We change the breakup bolts according to their condition, tighten the nuts on the lever axis with a torque of 57-92 N*m on the assembled suspension.
Good luck to everyone and don't repeat my mistakes!
Step-by-step replacement of jet rods
The work is carried out on an overpass or pit. If this is not possible, then a flat area is found, the required part of the machine is raised and fixed.
To work you will need:
- a set of keys;
- WD-40;
- metal brush.
Replacement of jet rods is carried out as follows:
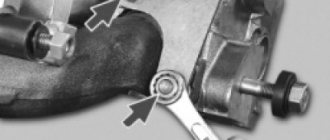
- The joints of the rods are cleaned with a special brush. After this procedure, the bolted joint must be treated with WD-40 and given time to soak.
- It happens that you can’t unscrew it the first time, then you need to re-process it and wait some more time.
For the greatest efficiency, take a wrench with a large “shoulder” and unscrew the nut, but this option is not suitable if you are working without a hole, but lying under the machine.
- When the nut reaches the edge of the bolt, several blows are applied with a hammer to displace it from the “home” area, since usually this element is strongly stuck in the bushing.
- Use a wrench to completely unscrew the nut and remove the bolt; if it does not come out, use a drift.
- If the rod is torn out alive, then the remaining parts of the mechanism are taken. This can be done using a mounting spatula.
- Next move on to the second fastening. At this stage, the lower part of the shock absorber is unscrewed, the spacer is pulled out and it is moved to the side so that you have access to the bolt.
- The nuts may be very tight to unscrew, but this is normal. The difficulty of the process is explained by the fact that locknuts are used for fixation. Its distinctive characteristic is that it is equipped with a nylon border around the edge, making the connection very tight.
- It will be more difficult later. The design is such that the bolt is mounted on the gearbox side. To get to it, you need to remove unnecessary parts from the left side (take out the axle shaft, remove the brake disc, etc.). Carrying out these activities will require a lot of time and effort. Therefore, it is recommended to clean the connection with a brush, treat it with WD-40, and then try to unscrew it
- If nothing works, then use a grinder. The head of the bolt is cut off in the area between the bracket and the silent block. An identical procedure is done on the other side.
- The mounting spatula removes the rod from the bracket.
Replacing rear torque rod bushings on a VAZ classic
Today we will tell you about the nuances, tips and secrets that VAZ classic owners use when replacing torque rods and rubber bushings of rear suspension rods. This entire article is based on both my personal experience and the experience of forum members. We have simply combined the main points on replacement and problems that you may have to encounter into one article and present it to you. If you still have questions, you can ask us on the forum in the appropriate topic in the “Chassis” section. So - diagnostics. What can make us climb into the rear suspension? Extraneous knocks, strange behavior of the car, expressed in wobbling along the road. Carefully inspect the condition of the rubber bushings - they should not be nicked, torn, etc.
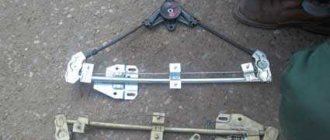
So I’ll say right away - replacing bushings is not a 5-minute task. In general, when replacing the bushings, I unscrewed each rod in turn and immediately after replacing, screwed it into place, then removed the next one. If you remove everything at once, installation may be difficult, since the bridge will move. Now I will describe the process itself - first I knocked out the metal bushings; some, due to the high wear of the rubber bands, fell out into my hands. Next, the rubber band - so as not to worry about pressing it out, I took a hacksaw for metal, removed the blade, threaded it into the hole where there was a metal sleeve, screwed it to the hacksaw and made two cuts so that a small piece of the sleeve fell out on its own, and then the remaining part was pulled out by hand. Pressing is more difficult.
You can use a pressing tool like this:
But you can go the other way. Initially, the rubber bushing is lubricated with a soap solution so that it “slips through” and then: the first method is to press it in a LARGE vice, sometimes not the first time, but it is pressed in; it is useless to press it in with your hands or a hammer. And if there is no vice, I used the weight of the car and a jack, that is, I laid down the rod, put a bushing soaked in the solution on it, then I put the jack on top of them and lifted the car with it. The machine uses its weight to press the rubber bushing into the rod. We perform the same manipulations with metal bushings.
Returning to the question of devices for pressing bushings, a ball from a bearing with a diameter slightly larger than the diameter of the bushing is very convenient; we place the ball on the bushing and press it in in a large vice, the ball carefully pushes the rubber band apart and the entire pressing occurs quickly and without any effort. I pressed it all the way, spread the vice, substituted something with a wider diameter than the bearing, I used the spread pliers, pressed it, and suddenly the ball was ready for new tests.
When disassembling (unscrewing) the rods, there are cases when the bolt has rusted to the metal sleeve, and it is impossible to get it out of there. If you knock it out, then you have to scatter the floor of the bridge there. There is only one way out -
Bulgarian Cut exactly along the bushing. First, cut from the nut side, gradually turning the bolt, since the grinder will not be able to cut off the entire bolt in one go, then cut from the head side, also turning the bolt by the head. For ease of work, cut off the rod itself so that it does not interfere.
When assembling, it is recommended to lubricate the bolts with grease. Lithol will also work. The next time you replace the bushings, you will thank yourself when you manage to avoid working with an angle grinder.
Let's get started
Having thoroughly cleaned the joints with a brush, treat them generously with universal lubricant. You need to wait until it completely penetrates inside. Next, select the head of the required size (19) and unscrew the nut that holds the rod on the free side. If it is tight, you can re-spray the threaded joint with lubricant. When the end of the bolt is level with the nut, take a hammer in your hands. It is necessary to strike the bolt several times and remove the latter out. After that we move on to the second side. To remove it, you need to unscrew the lower shock absorber mount.
Next, remove the spacer sleeve of the elastic element. This way we will get access to the second bolt of the VAZ-2107 jet thrust. If the nuts are difficult to unscrew, and even lubricant does not help, you can cut off the bolt with a grinder. Please note: do not knock out this element with a hammer, since it is close to the gearbox. At the next stage, you need to get the remains of the rod itself out.
When a VAZ-2107 needs to replace jet rods
As previously mentioned, rods are made of high-quality metal (mainly steel). This raw material can withstand heavy loads over many years of use.
The weak point of the rods is the eyes. These parts are welded to the rods and are not a continuation of them, and the welding has a certain service life. Over time, the solder joints may gradually become damaged or destroyed.
To avoid problems when driving and to prevent malfunction of the rods, you need to periodically check the condition of the spare parts. If deformation, cracks, or signs of destruction occur, the reaction rods must be replaced.
It is especially necessary to monitor the suitability of silent blocks, which often break,
unable to withstand the load. As a result of this, the fastening of the rods weakens, they begin to move relative to the base, ceasing to perform their direct functions.
In this case, there is no need to wait for the rubber bands to fail. If knocking noises occur while the vehicle is moving, inspect and identify damage to the rods, change them immediately. To do this, you don’t have to go to a service station; you can do everything yourself.
Step-by-step replacement of jet rods
The work is carried out on an overpass or pit. If this is not possible, then a flat area is found, the required part of the machine is raised and fixed.
To work you will need:
- a set of keys;
- WD-40;
- metal brush.
Replacement of jet rods is carried out as follows:
- The joints of the rods are cleaned with a special brush. After this procedure, the bolted joint must be treated with WD-40 and given time to soak.
- It happens that you can’t unscrew it the first time, then you need to re-process it and wait some more time.
For the greatest efficiency, take a wrench with a large “shoulder” and unscrew the nut, but this option is not suitable if you are working without a hole, but lying under the machine.
- When the nut reaches the edge of the bolt, several blows are applied with a hammer to displace it from the “home” area, since usually this element is strongly stuck in the bushing.
- Use a wrench to completely unscrew the nut and remove the bolt; if it does not come out, use a drift.
- If the rod is torn out alive, then the remaining parts of the mechanism are taken. This can be done using a mounting spatula.
- Next move on to the second fastening. At this stage, the lower part of the shock absorber is unscrewed, the spacer is pulled out and it is moved to the side so that you have access to the bolt.
- The nuts may be very tight to unscrew, but this is normal. The difficulty of the process is explained by the fact that locknuts are used for fixation. Its distinctive characteristic is that it is equipped with a nylon border around the edge, making the connection very tight.
- It will be more difficult later. The design is such that the bolt is mounted on the gearbox side. To get to it, you need to remove unnecessary parts from the left side (take out the axle shaft, remove the brake disc, etc.). Carrying out these activities will require a lot of time and effort. Therefore, it is recommended to clean the connection with a brush, treat it with WD-40, and then try to unscrew it
- If nothing works, then use a grinder. The head of the bolt is cut off in the area between the bracket and the silent block. An identical procedure is done on the other side.
- The mounting spatula removes the rod from the bracket.
Rod malfunctions
Actually, on the VAZ 2107, like on any other car, jet rods are installed so that the body does not “walk”, so that the driver’s safety is not at risk. And of course, like any other part, jet thrust can fail. The reason for this is most often the following factors:
- Constant loads (they cannot be avoided in any case).
- Torsional loads (for example, when hitting an obstacle).
- Exposure to water or chemicals on the road.
- It is important to periodically inspect the condition of the rods in order to promptly identify chips, deformation, and cracks.
All this is a sign that the part is failing and requires replacement. When inspecting, special attention should be paid to two parts - the eye (it is welded, which means it can break off more easily, because welding has its own service life) and silent blocks (they can break due to the load, after which the rod begins to move along the base, which means it stops performing its function).
BUSHING BLOCKS VAZ 2107
On the Internet, the specifics of replacing the silent blocks of the suspension of the VAZ 2107 and other cars of the domestic and foreign automobile industry are often discussed. The problem is actually urgent and is due to the poor quality of our roads. Since the silent block is one of the important elements of the vehicle suspension design, special attention must be paid to its selection and replacement.
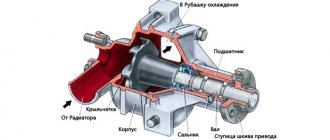
Silent blocks are designed to dampen vibrations that are transmitted from one suspension unit to another
WHAT ARE SILENT BLOCKS
The silent block (hinge) structurally consists of two metal bushings connected to each other by a rubber insert. The part is designed to connect suspension elements, and the presence of rubber allows you to dampen vibrations that are transmitted from one unit to another. The silent block must perceive and endure all deformations to which the car suspension is subjected.
WHERE ARE THEY INSTALLED
On the VAZ "Seven" silent blocks are installed in the front and rear suspension. At the front, levers are attached using this part, and at the rear, reaction rods (longitudinal and transverse) connect the axle to the body. To ensure that the car's suspension is always in good condition and handling does not deteriorate, you need to monitor the condition of the silent blocks and replace them in a timely manner.
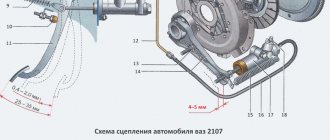
The front suspension of the classic Zhiguli consists of the following parts: 1. Spar. 2. Stabilizer bracket. 3. Rubber cushion. 4. Stabilizer bar. 5. Lower arm axis. 6. Lower suspension arm. 7. Hairpin. 8. Lower arm amplifier. 9. Stabilizer bracket. 10. Stabilizer clamp. 11. Shock absorber. 12. Bracket bolt. 13. Shock absorber bolt. 14. Shock absorber bracket. 15. Suspension spring. 16. Steering knuckle. 17. Ball joint bolt. 18. Elastic liner. 19. Cork. 20. Insert clip. 21. Bearing housing. 22. Ball bearing. 23. Protective cover. 24. Lower ball pin. 25. Self-locking nut. 26. Finger. 27. Spherical washer. 28. Elastic liner. 29. Pressure ring. 30. Insert clip. 31. Bearing housing. 32. Bearing. 33. Upper suspension arm. 34. Upper arm amplifier. 35. Compression progress buffer. 36. Buffer bracket. 37. Support cap. 38. Rubber cushion. 39. Nut. 40. Belleville washer. 41. Rubber gasket. 42. Spring support cup. 43. Upper arm axis. 44. Inner bushing of the hinge. 45. Outer bushing of the hinge. 46. Rubber bushing of the hinge. 47. Thrust washer. 48. Self-locking nut. 49. Adjusting washer 0.5 mm 50. Distance washer 3 mm. 51. Cross member. 52. Inner washer. 53. Inner sleeve. 54. Rubber bushing. 55. Outer thrust washer
WHAT ARE THERE ARE SOUND BLOCKS?
In addition to the purpose of silent blocks, you need to know that these products can be made of rubber or polyurethane. It is generally accepted that replacing rubber suspension components with polyurethane ones, where possible, will only improve the characteristics and performance of the suspension.
Silent blocks made of polyurethane are characterized by a longer service life, unlike rubber ones.
The disadvantage of polyurethane elements is their high cost - they are about 5 times more expensive than rubber ones. When installing polyurethane products on a VAZ 2107, you can improve the car's behavior on the road, reduce deformations in the suspension, and also eliminate the so-called squeezing, which is characteristic of rubber elements. This means that the suspension will operate in the condition intended by the designers at the factory. With the correct selection and installation of polyurethane parts, noise and vibration are reduced and shocks are absorbed, which indicates the better performance of such hinges compared to rubber ones.
Silent blocks made of polyurethane are considered more reliable than rubber ones, but are much more expensive
REASONS FOR FAILURE
When encountering failures of silent blocks for the first time, it is quite difficult to imagine what can happen to these products after long-term use. Over time, the rubber begins to tear, resulting in the need to replace the hinge. There may be several reasons why a product becomes unusable:
- High mileage of the car, the consequence of which was the drying out of the rubber, loss of its elasticity and the appearance of cracks and tears.
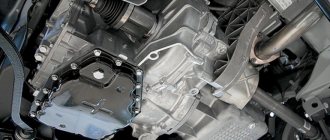
- Contact of chemicals with the rubber of the silent block. Since the suspension element in question is located near the engine, it is likely that it will be exposed to oil, which leads to the destruction of the rubber.
- Incorrect installation. Fastening the bolts of the levers should only be done after the car is installed on the wheels and not hung on a lift. If tightened incorrectly, the rubber of the silent block becomes strongly twisted, which leads to rapid failure of the product.
CHECKING CONDITION
It would be a good idea for the owners of the “Seven” to know how to determine that the silent blocks need to be replaced. High-quality products last for quite a long time - up to 100 thousand km. However, due to the condition of our roads, the need to replace them usually arises after 50 thousand km. You can determine that the rubber joints have become unusable by how you feel while driving the car. If the car begins to handle worse, the steering wheel is no longer as responsive as before, then this indicates obvious wear and tear on the silent blocks. To be more confident, it is recommended to visit a service station so that specialists can diagnose the suspension.
If visible signs of wear appear, the part needs to be replaced.
The condition of silent blocks can be determined independently by visual inspection. To do this, you will need to drive the car onto an overpass or inspection hole, and then inspect each of the hinges. The rubber part should not have cracks or tears. One of the signs of failure of silent blocks is a violation of wheel alignment. In addition, a sign of wear on the part in question is uneven wear on the tire tread. This phenomenon indicates an incorrectly adjusted wheel alignment, which may be causing the vehicle's suspension to malfunction.
There is no point in delaying the replacement of silent blocks, since over time the seats in the levers become broken, so the lever assembly may need to be replaced.
VIDEO: DIAGNOSTICS OF SILENT BLOCKS
Installation
If a grinder was used, it is important to remove all remnants of fasteners with a mounting spatula. How do you then replace the VAZ-2107 jet rods? After this, the new element is installed in the previous mounting locations. But installation may be difficult. Since the old rod could no longer cope with its task, the bridge could “move” a few degrees to the side.
To ensure that the new link is properly secured, rest the mounting blade against the bracket and unscrew the bridge until the holes line up. Next, tighten all the bolts and nuts. The same procedure is performed on the second side. For tightening, use the same wrench and a 19mm hex head.