If you don't adjust your interior heating before the cold weather sets in, you risk getting very cold. It’s easy to check if the fan is working: start the engine and switch the heater to the interior blowing mode. Its failure is accompanied by signs:
- warm air does not enter the cabin, the temperature in it does not change;
- switching modes is accompanied by extraneous sounds;
- The fan only starts at a certain speed.
The cause of the breakdown must be looked for not only in the VAZ-2110 fan itself, but also in its toggle switch or resistor. Let's look at the main reasons why this unit fails.
Why does the stove not work on a VAZ 2114 car?
Unfortunately, the heating system of the domestic automobile industry still leaves much to be desired.
This issue is especially relevant in winter. After all, being cold is not only unpleasant, but harmful, even dangerous to health. And here we are not only talking about the driver’s hypothermia, everything is clear about this. Glasses with a faulty heating system quickly freeze and become covered with frost and ice. Visibility on the road for the driver in such conditions is negligible. To find out why the stove on a VAZ 2114 does not work, you first need to understand how the stove on a VAZ 2114 works.
Heating in the interior of the VAZ 2114 is arranged according to the classic principle of the line of Samara cars.
If you have a mechanic
Gears shift poorly in a car with a manual transmission for three reasons. The first of these is a malfunction of the clutch when it does not completely disengage (drive). The first sign of this malfunction is that the reverse gear is engaged with a characteristic crash. The rear one reacts to this anomaly more noticeably than other gears, because it is the only one not equipped with a synchronizer.
The second reason is a defect in the gear selection mechanism of the gearbox. And finally, the third is excessive wear of the gearbox synchronizers.
There are also several clutch malfunctions in which manual transmission gears shift poorly:
- Air in the clutch release hydraulic drive or fluid leakage from it. The malfunction is eliminated by replacing failed components of the hydraulic system and pumping it.
- Worn or broken clutch release fork. The part requires replacement or repair.
- Warping (runout greater than 0.5 mm) or too thick new driven disk.
- Failure of the basket (temperature deformation of the pressure plate or its distortion).
- Loss of mobility of the support bearing of the gearbox input shaft (at the end of the crankshaft to which the flywheel is attached).
- Jamming of the clutch driven disc hub on the splines of the gearbox input shaft. To eliminate the defect, clean the splines of the gearbox hub and input shaft. It wouldn’t hurt to lubricate them a little with lithol.
- There is too much free play in the clutch release fork. Its value needs to be clarified with the manufacturer, since it is slightly different for different cars. Until you find out the value of this parameter for your car, set it from 5 to 8 mm. Too little free play of the fork is also undesirable, as it leads to clutch slipping and increased wear of the release bearing.
Excessive wear of synchronizers mainly occurs in those gears that are engaged more often: these are usually first, second and third. The rear one is not included in this list because it does not have a synchronizer. When your gear shifts poorly, and you assume that the reason for this is wear of the synchronizers, firstly, you should only have difficulties with this while driving. Secondly, in this case it switches better if you use double squeeze.
For those who don’t know what double squeeze is. To shift to a higher gear: depress the clutch, engage neutral, release and depress the clutch again, engage the gear.
Backlash in the so-called “helicopter” is one of the reasons for unclear gear shifting
To switch to a lower gear: double squeezing must be combined with re-engaging, that is, when the clutch pedal is released and the gearbox is in neutral, you need to press and release the accelerator pedal. This is how gears are changed in cars that do not have synchronizers. If the gearbox shifts easier using double squeezing, then the culprit for poor gear shifting is most likely worn synchronizers.
Look for damage or check that it is adjusted correctly. Don't even think about the clutch and synchronizers.
Repair of VAZ 2113—2115 stove fan
Why does the heater motor stop working? There are reasons for this, and there are several of them. However, most often the cause of malfunction is clogging. Dust gets everywhere, including inside the mechanism.
Cleaning the stove fan in some cases helps to improve the operation of the mechanism
Causes and signs of heater motor failure
With the onset of cold weather, correct and uninterrupted operation of the heater becomes more important. But according to the law of meanness, it is precisely at this time that frequent problems are observed that have their own reasons:
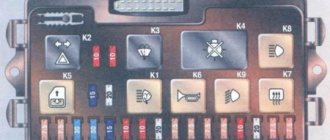
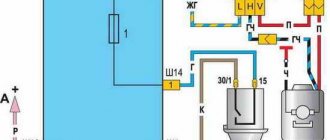
- The safety element fails, designed to monitor not only the heater along with its components, but also the glove compartment lighting, the optics washer motor, etc. This 30-amp fuse is located in a special block and is marked with the number F7. As a rule, the reason for its burnout is a short circuit. A burnt out element simply needs to be replaced.
Fuse F7 in the VAZ 2113 mounting block
The radiator of the VAZ 2115 stove deteriorates due to scale formation
If there is a malfunction, the additional heater resistor must be replaced
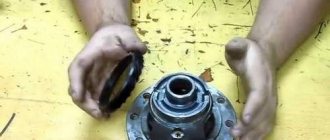
How to remove the fan
The VAZ 2113-2115 heater motor is removed as follows:
- First remove the side cover of the dashboard from the pedal side.
The side casing cover can be removed to facilitate the process of removing the fan.
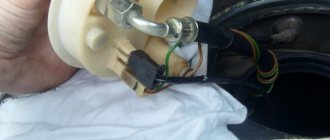
The positive wire plug connects the fan to the car's electrical system.
The negative wire of the fan is connected to the mounting bolt on the body
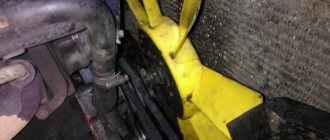
After this, you need to transfer the work to the engine compartment:
- Unscrew the protective cover hiding the motor.
- Then remove the screws holding it in place.
The fan clamps are simply unscrewed with a screwdriver
The top fan cover can be removed in place to make motor removal easier.
Video: how to dismantle the heater motor on a VAZ 2115
How is the replacement carried out?
Before direct replacement, it is recommended to check the motor, because it may not work:
- Place the fan on a flat surface.
- Connect the wires to the battery terminals.
A faulty element will not rotate at all or will do so intermittently, weakly and noisily. Before work, you must also remember to thoroughly clean all debris from the niche where the new motor will be installed. The replacement procedure does not take more than 40 minutes for an experienced motorist. All you need is a screwdriver, wrenches and a new fan. The activity is performed in reverse to the withdrawal process. The wiring terminals must be securely secured so that they do not loosen while the machine is moving.
It is recommended to select a completely new and high-quality motor (original production) as a replacement in order to protect yourself from unnecessary costs. A good fan will last for a long time.
Where is the VAZ 2113-2115 heater relay located?
Not all motorists who decide to carry out repairs and replacements themselves can quickly find a faulty stove. The relay is responsible for sufficient heating of the interior, so a motor malfunction may be associated with it.
Often this element simply wears out. This is not a repairable part, it only requires replacement. Therefore, it is important to know where the relay is located in order to replace it yourself in a timely manner. The element is located on the center console under the instrument panel, often in the mounting block, next to the fuse.
The VAZ 2113-2115 heater relay is located near the fuses
The heater motor is an important and indispensable element of the car heating system. Periodic maintenance and timely replacement of faulty parts will always help keep the car interior warm.
Functioning of the mechanism
The vehicle heating system is directly connected to the cooling of the internal combustion engine. To maintain the temperature of the power unit in a certain range, a special liquid is used - antifreeze. It circulates in closed circuits, taking heat from the engine and releasing it in the radiator. The process is also facilitated by the natural air flow that flows in when the car is moving, and a fan installed in close proximity to the radiator. But hot antifreeze is also used in the interior heating process. To do this, after activating the stove, the hot flow is directed to an additional radiator.
This element is located next to the torpedo. Hot antifreeze, passing through it, gives off heat. The heated air mass is blown into the cabin using an installed fan. The flow temperature is adjusted by mixing cold and heated air. In cars equipped with climate control, the process also involves sensors and ECUs that can independently maintain the set temperature.
CAUSES OF HEATING SYSTEM MALFUNCTION
If the VAZ 2114 stove does not work, then the reasons for this must be sought among the following possible malfunctions:
- Fuse problems
A failed stove fuse is one of the most common, and at the same time easy to repair faults.
The fourteenth is equipped with a heater fuse of type F7, with a current strength of 30 A. It is worth noting that a failed heater fuse will also cause the cigarette lighter, glove compartment lighting, electric water supply pump to clean the headlights, and rear window heating to fail, since all these systems operate from one fuse.
Situations often occur when installed fuses blow out one after another - the reason for this may be a short circuit, to identify the source of which you will have to go through the entire safety circuit
- Lack of contact inside the mounting block
Also a fairly common problem, the cause of which is the oxidation of wires during operation. The solution is quite simple; you need to sort out the wiring in the block in which they are fastened in front of the mounting block, and, if necessary, replace the contact group.
- Problems with the ignition relay
A stuck ignition relay can also be the reason why the heater fan on a VAZ 2114 does not work. This is revealed quite simply - if the fan starts working only when the car’s engine has completely warmed up, then the problem is due to the ignition relay. To eliminate them, you will need to completely replace the relay.
- The stove does not work in speed modes 1 and 2
If the fan turns on only at maximum speed (there are 3 in total), then the heater resistor needs to be changed. The design features of the heating system are such that in speed modes 1 and 2 the fan is powered through an additional resistor, and in mode 3 - directly from the battery.
- Fan motor problems
If the VAZ 2114 cooling fan does not work, but all of the above problems have been eliminated, then one reason remains - a failed VAZ 2114 heater motor. It can either burn out or have poor contact with the power supply due to loose mass, and the fan brushes also often get stuck.
You will need to replace the heater motor with a new one, because if it starts to “stand out”, then this will happen repeatedly in the future.
Functionality check
If you do not want to spend a lot of money on repairing and replacing the device, you need to first check whether such manipulations are required. To do this, you can try to return the displaced damper to its rightful place.
Traction
For this:
- Turn on the ignition;
- Switch the regulator to different positions;
- Manually move the flap;
- This way it can be returned to its original position.
Article on the topic: How to remove the engine on a VAZ 2110 (video)
Of course, you first have to dismantle the deflector to gain access to the damper. If this method works, the damper will be able to work again as before, which means it will respond to the regulator.
But this cannot be considered a full-fledged measure for restoring the functionality of the damper, since if the socket is already loosened, the unit will no longer be able to work normally. At first, you will apply the half-measures described above over and over again, but over time you will still have to replace the heater damper on the VAZ 2110.
Pay attention to the conditions under which the damper can be operated. If this happens only manually with the ignition on and the regulator turned to the extreme position, then the cause of the breakdown lies in the micromotor gearbox
Other suspects are the microfan with temperature sensor and the control unit.
If any of these components stops working normally or is completely out of order, then the heater damper will not work on the VAZ 2110. Only its replacement is required. Ignoring the problem will result in even greater repair costs in the future.
Replacement
Replacing a failed unit is not difficult. Follow certain rules and sequence of your actions to achieve the desired result.
- Disconnect the negative terminal from the battery.
- Lift the hood and in the engine compartment, remove all the mounting bolts that hold the plastic trim.
- For now, the overlay can be moved to the side so that it does not interfere with work.
- Remove the rubber seal, which also has its place in the engine compartment.
- Remove the protective cover from your heater motor. So you have reached the desired object and can begin replacing.
- On the sides of the motor are two bolts that hold your fan in place.
- Now go into the interior and remove the driver's side panel. There is a positive plug located there, which must be disconnected.
- Next, look for the negative wire. It is held on by one nut, which must be unscrewed.
- The disconnected wires are inserted into the hole in the body of your car, passing through the rubber seal.
- Remove the damaged motor. To do this, you need to turn it and pull it out through the right side.
Removing the motor-fan
As you can see, removing the device is not difficult. Having studied the condition of the fan motor, we can draw a conclusion regarding the need to replace it. Sometimes car owners get by with simply repairing brushes or replacing fuses.
Price issue
We advise you to choose a high-quality motor for replacement so that later there are no problems with its performance.
The motor itself will cost you about 500 rubles, and for the assembled device you will have to pay about 1000 rubles. Which option is preferable for you, decide for yourself.
Carrying out operations
Repairing and replacing a car's heater fan may require purchasing a new device. The price of original mechanisms is very high, so you can also consider purchasing analogues. However, it is worth refusing the cheapest offers on the market - they often have a very modest resource, which means that replacement operations will soon have to be repeated, thereby neutralizing the benefit from such an acquisition. As for repairs, not all service providers are ready to take on such an undertaking because of its complexity.
Let's consider the main stages:
- Dismantling panels
- Disabling the mechanism
- Fan notch
- Troubleshooting and replacement of worn elements (if repairs are carried out)
- Assembly and installation
- Connection
When performing such operations, you should check the wiring and contact group. Often when moisture gets in, they fail, making the operation of the mechanism impossible.
Causes of heater fan malfunction
Replacing the stove motor may be necessary due to several problems, therefore, before taking active steps to repair the heating device, it is necessary to find out the reliable cause of the malfunction.
First of all, as practice shows, problems can begin with a failed fuse. Such a malfunction results in damage to the cigarette lighter, the illumination of the glove compartment, the electric pump (through which water cleans the headlights), and the heated rear window.
The second most common problem is the lack of contact, which should be inside the mounting block. In this case, the motorist needs to check the wiring in the block. If you have questions with the ignition relay, then most likely you will have to change this device. If the heater is not working in the first and second speed modes, the resistor will need to be replaced.
As practice shows, the heater fan on a VAZ-2115 can be replaced only after all of the above problems have been eliminated, and the faulty heater cannot operate normally. A problem with the fan motor can occur due to its failure. A small device may burn out, have poor contact with the power supply, or be the result of stuck fan brushes.
What tools should be used for diagnosis?
You can check the power supply to the engine connector with a regular test. But when carrying out full diagnostics and identifying faults of a high degree of complexity, a multimeter is needed. If you have knowledge of using a multimeter, you can easily measure the power on the connectors and check the resistance, which will make it possible to quickly troubleshoot wiring problems or identify problems with resistors.
In addition, measuring resistance and diagnosing wires in this mode will greatly facilitate the search for a short circuit.
You can diagnose PWM controllers for electrical systems that control fan speed using an oscilloscope. But purchasing this device for diagnostics is not advisable due to its high cost.
Isn’t it better to use the diagnostic methods listed below, which in most cases will help identify the sources of malfunctions in the stove fan without expensive equipment. So let's get started.
If the fan cannot be started, this situation occurs due to:
- worn brushes. When performing the functions of a conventional DC motor for a stove fan, the main problem is the abrasion of the brushes, with the help of which voltage is supplied to the commutator. With strong abrasion of the copper-graphite brushes, the pressing spring force that creates the contact is reduced, which in turn leads to the fan operating at a variable frequency. For example, it turns on when you hit the front panel or hit potholes in the road.
- faulty electrical control circuits. The source of the problem is contacts that have been sealed off due to strong heating;
- break in wires, oxidized contact;
- blown fuse element. If a fuse constantly blows (after replacing it), the technician must find a section of the circuit with a short circuit.
Cleaning the radiator of a car heater
What to do if the stove blows cold air and the radiator needs to be flushed? There are several ways to do this.
1. Flushing the radiator with complete removal.
Dismantling a radiator is quite difficult; you cannot do it without knowledge of the car’s structure. However, in certain cases there is no other way to fix the problem. If you do not have positive experience with flushing the radiator, you should seek the help of professionals by contacting a service center.
Flushing with removal of the stove is required when other methods of cleaning the radiator have proven ineffective.
By removing the heater radiator, you can detect a number of faults. For example, you can see if the fan is functioning normally, and if there are problems, replace its motor.
In addition, only by dismantling the radiator can it be washed from the outside. If your car does not have a filter, be prepared for a large amount of dust and debris to accumulate on the air intake. The most dangerous is poplar fluff, which forms a thick caked crust. As a result, the heat exchanger stops blowing and generating heat.
You can assess the condition of the pipes, the degree of contamination of the radiator cells, as well as how tightly the air duct dampers fit when they are closed by removing the radiator. If in the closed position there are voids between the dampers and the stove, then air will come from outside, bypassing the radiator. Owners of not only budget but also expensive cars may encounter a similar problem. In the latter case, you should immediately contact a car service to solve the problem.
By dismantling the radiator, you can understand whether the cooling system as a whole is working. If the radiator is not functioning, cleaning will not help; you can solve the problem by replacing the entire cooling system. The cooling system becomes dirty gradually, but the moment the stove fails due to blockage is always unexpected. Repairing copper radiators involves sealing them, but if we are talking about aluminum, then replacing it will be a more expedient and cheaper solution to the problem.
Radiators are washed without using a pump, a sufficiently powerful pressure of hot water and a special bath. Washing is carried out using both homemade and professional cleaning products. Some methods are only suitable for a removed radiator, and using them at home is dangerous to health.
2. Washing with sulfuric acid.
To flush with sulfuric acid, the radiator must be removed, otherwise the rubber and plastic parts of the cooling system may be damaged. Today, this method is used very rarely and requires careful adherence to safety measures.
It is imperative to use special goggles, rubber gloves, a gown and a household respirator to protect against inhalation of toxic fumes. In addition, it is necessary to use special tongs or grips that prevent direct contact with the solution.
You also cannot do without a hydrometer, with which the concentration of the washing liquid is measured. Washing is carried out with a 15% solution of sulfuric acid. The hydrometer reading should be 1.1 g density per 1 cm3. The solution contains distilled water and battery electrolyte.
Remember that you should never pour water into acid; the acid must be carefully added to the water.
The method is suitable for flushing old copper radiators. Aluminum or zinc elements will fail after such treatment.
3. Cleaning with hydrochloric acid solution.
You should also not resort to this method if you lack experience. In addition, hydrochloric acid is not commercially available. As in the previous case, strict adherence to safety precautions is necessary.
If the contamination that has caused the stove to blow cold air is strong enough, then the cooling system should be filled with a 2% acid solution (50 ml per 1 liter of water). Then you will need to thoroughly and carefully flush the system with plain water. If the radiator is made of parts that are susceptible to corrosion, this cleaning method is not suitable.
4. Washing with caustic soda (caustic soda).
This method also causes heated debate. When using it, you must follow safety precautions; you cannot start washing without protective gloves; in addition, keep in mind that soda can corrode fabrics and is toxic.
Caustic soda is an alkaline detergent that cannot be found commercially. Using even a 5% solution will damage an aluminum radiator. The product is also harmful to zinc parts, zinc and aluminum alloys. It is recommended to be used if it is necessary to clean equipment before repair.
To prepare the solution, you need 50 g of caustic soda per 1 liter of distilled water. The radiator grille is placed in a bath filled with solution for several minutes, then removed and checked for dissolution of contaminants. If necessary, the procedure is repeated. At the end of the treatment, the radiator is washed with distilled water and dried.
Today, there are various ways to clean radiators from contaminants. Some of them raise reasonable doubts, since the necessary ingredients are not freely available, and the processing process is labor-intensive. It is better to resort to methods with minimal risk of damage to the vehicle and your own health, and also do not forget that you assume all the risks of such work.
Possible causes of a malfunction of the heater fan on a VAZ-2114
Heater fan installed on a car
Before eliminating a malfunction that has occurred, it is necessary to establish the causes of its occurrence.
So, according to the experience of many motorists, the most common reasons are:
- Fuse blown.
- Failure of the contact group.
- Relay failure.
- Resistor.
- Switch.
- The fan motor burned out.
Now that the causes have been discussed, we can move directly to elimination methods.
Elimination methods
Many motorists think that a heater fan failure is associated only with a fuse or combustion of the motor that turns it, but this is far from the case. Let's consider all possible reasons in more detail.
Fuse blown
Mounting fuse block where the heater fan fuse is installed
The most common cause of all auto electrician troubles are fuses that fail.
So, in the case of a fan, the first thing you need to do is check the integrity of the fuse. If it is burnt out, it must be replaced with a new one. If this does not help, then you need to look for the reason elsewhere.
The heater fan fuse is marked with an arrow in the diagram.
You can find the fuse in the mounting block marked F7 .
Since the fan requires a lot of energy consumption, the rated current is 20A , so the fuse must be set no less than this figure.
Failure of the contact group
Another reason that is quite common in cars is oxidation of the contact group. To eliminate this malfunction, you need to clean the contact connections or simply move them.
Since the mounting block is located under the hood and water can get into it, it is necessary to protect it from moisture. You can do this in this simple way.
It often happened that the connections and connectors themselves had to be changed because they failed and were completely destroyed due to corrosion.
Relay failure
Relay block on a car
A relay failure will cause the stove fan to turn on briefly.
Sometimes, as practice shows, it may not turn on the first time, or only when the power unit is heated. The solution is quite simple - replacing the relay . You can find it under the dashboard of your car.
Resistor
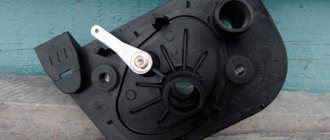
The process of dismantling the heater resistor
A resistor malfunction occurs when the stove operates only in the extreme right position.
In this case, power will not be supplied, but only in the right position it is supplied directly, bypassing all other elements. Therefore, to eliminate the malfunction it is necessary to replace the part that has failed.
Switch
A fairly common malfunction is considered to be a failure of the switch or simply a breakdown of the contact connections.
Of course, it is not recommended to carry out repair operations, since incorrect restoration of an element, especially in the electrical part, can lead to the others breaking down. So, the manufacturer suggests that car enthusiasts with experience in DIY repairs recommend replacing the complete heater control unit.
Fan motor burnt out
Location of the heater fan under the hood
Motor combustion is the most unpleasant reason that can happen in this situation.
So, you will have to replace the stove fan completely, which will entail expensive parts. Some motorists, in this case, look for used motors at salvage yards, which are much cheaper.
On the left is a burnt out motor, on the right is a new one.
Of course, it is unknown how long such spare parts will last, so it is better not to skimp and buy a new one.
Volkswagen Caddy › Logbook › Heater motor
Hello. Good day to all! Today there was a problem: the stove fan failed. Shows faint signs of life...barely audible in any gear. I checked with a tester the power is coming to the regulator. Apparently the fan has come to an end. Has anyone changed it? Do you want to do it yourself? the price is too steep... I would appreciate any help. Good luck to everyone
CONTINUATION I drove after what was written and listened. The motor actually makes some sounds as if it is stuck. While driving, I turned the heater on and off several times, everything remained unchanged. Sometimes the motor started spinning, but after 1-2 minutes it turned off. Arriving at the house, I removed the cabin filter and tried to turn the fan by hand. when turned off, it rotated freely without any extraneous sounds, but as soon as the stove was turned on, it barely noticeably began to rotate, then accelerating, then slowing down and stopping altogether... when I helped it with my hand and lifted it up a little, it clearly accelerated, but almost immediately stopped. About 2 months ago there was a similar picture, but it went away by itself, I just removed the air control unit and put it back and that’s it. Now I’m thinking that the motor itself or the motor resistor could have burned out. HELP. Maybe someone has encountered this. I’ll post if I figure it out.
Like 3 Subscribe
Prevention
Preventing stove malfunctions comes down, first of all, to maintaining the cleanliness of the cooling system. Antifreeze should be changed every two years, choosing only high-quality liquid, and under no circumstances should it be mixed with the remnants of another type of coolant (for example, antifreeze). When replacing antifreeze, it is worth cleaning the cooling system by flushing with distilled water to remove all deposits, including those inside the stove. It is also important to keep the radiators and cabin filter clean.
Helpful advice: check the operation of the stove ahead of time - at the beginning of autumn, so as not to be left alone with the first frosts, trying to quickly find and fix the breakdown.
Finding the reason
If the selected wash mode does not work, try to diagnose the cause of the problem based on the following knowledge:
- If rinsing and spinning can be started, then damage to the pump and other elements of the drainage system is automatically eliminated.
- The main “suspect” is the heating element (tubular electric heater). To find out whether it is in working condition, you don’t even need to disassemble the car - just touch the glass of the hatch 15-20 minutes after starting the cycle. Just to be on the safe side, run the wash at a temperature above 30°C. Warm glass - everything is fine, cold glass - the heating element is acting up.
- The next element under suspicion is the electronic module. Often switching does not work due to the fact that the module is broken or lost.
When the cause is found, it is time to fix the problem. It’s better not to mess with the electronic module, but changing the tubular element is entirely within your power.
Table 1
| What's broken? | Why did it break? | How to fix the problem? |
| Wash switch | The mode switch scrolls or jumps, preventing you from setting the desired option | Identify cracks on the display board in order to eliminate them |
| heating element |
| Replace the burnt out part. Its service life is 5–7 years. |
| The electronic unit |
| They “reflash” the module, solder the tracks, replace the control board |
Replacement
- socket wrench 10;
- socket wrench 8;
- screwdriver with a Phillips bit.
- We park the car on a flat surface and immobilize it with the parking brake.
- Open the hood and disconnect the negative terminal.
- Using a 10mm wrench, unscrew the fastenings of the air filter housing.
- Using a screwdriver, loosen the air duct clamp on the air flow sensor and remove the corrugation.
- We unscrew the screws securing the cover of the air filter housing and remove the filter element.
- Using a size 8 wrench, unscrew the air intake mount and remove it.
- Using a 10mm wrench, then an 8mm wrench, unscrew the nuts securing the fan casing around the perimeter (6 pieces in total).
- Disconnect the wire block on the fan connector.
- Carefully remove the fan casing along with the drive.
- Using a 10mm wrench, unscrew the 3 bolts holding the electric motor to the casing.
- We put a new one in its place.
- We install the structure in place, fix it, and connect the connector.
- We carry out further installation in the reverse order.
votes
Article rating
Treating gearshift lever play - Logbook Chevrolet Lacetti SW Broken Barn of the Year on DRIVE2
Replacing a gearbox (helicopter) / unclear gear shift for a Chevrolet Lanos 1.5
We lift the control mechanism housing by the lever and move it back, removing the rod from the hole in the front panel. We remove the lever from the holes of the rod and the scenes.
We check the clarity of turning on and off gears. Remove the left mudguard from the engine compartment. From the side of the engine crankcase, unscrew the two bolts 1 of the lower fastening of the clutch housing to the cylinder block, and with the head, unscrew the three bolts 2 of the lower fastening of the clutch housing to the crankcase.
We are trying to carefully detach the frame of the gearshift lever cover from the plastic case. Reinstall the removed parts in reverse order. We finally tighten the clutch housing mounting bolts to the required torques in the following sequence:
In this case, you should perform only those operations that are required in order to replace worn or damaged elements specifically in the case of your car. A malfunction of an element means the presence of mechanical damage on it, as well as the presence of play in the joints of the gearshift mechanism drive levers.
To replace the shift linkage, use a flat-head screwdriver to pry and then open the retaining element, then separate the linkage and ball joint. But that's just my opinion.
The main thing is that this does not affect the reliability of this mechanism. With the gearbox itself on my Lacetti for more than 10 years of operation, thank God, there were no problems, for which many thanks to her. On other cars, there were problems associated with howling at a certain speed.
HOW to correctly set up the gearbox on a CHEVROLET LACCHETI!
One was in fourth gear in frost below 15 degrees. The howl went away after warming up. My next action was to lubricate the hinges, bolt and pin, I don’t know who says it is necessary to lubricate, who doesn’t, I smeared it with simple lithol, then I also smeared the ears of the rod: After that, we put all this stuff in place: Using a screwdriver, we remove the rod tip lock tip from the ball joint of the drive input shaft lever.
Chevrolet Lacetti SW 2007, 109 l. With. — self-repair
Similarly, disconnect the other rod end from the output shaft ball joint. Using special pliers, we unclench and remove the retaining ring from the groove in the socket for the drive input shaft bearing.
We disconnect the input shaft and rocker arm. Remove the bearing and protective cap from the rocker arm. Similarly, on the other side of the rocker arm, remove the drive output shaft and bearing.
We assemble and install the drive in the reverse order. Old and new spare parts, and the same rod that was not brought to me... 7. My next action was to lubricate the hinges, bolt and pin, I don’t know who says it needs to be lubricated, who doesn’t, I smeared it with simple lithol, then I also smeared the ears of the rod : Oil seals pressed into the clutch housing sockets work on the cylindrical surfaces of the shanks.
Oil can be poured into the gearbox by unscrewing the breather. The gear shift lever is mounted on the floor tunnel in the plastic control housing and is connected to the control rod.