Broken gas tank? Fuel is leaking mercilessly, but is it still a long way to a car service center or garage? In this article we will look at how to repair a hole in a gas tank with your own hands using ordinary materials.
A hole in the tank can be a serious problem, especially if you encounter it on the highway.
Repairing a broken gas tank is quite simple. However, for repairs you will need some tools that should always be carried in the trunk. Before considering restoration options, it is necessary to identify the signs of a leak. Find out the cost of fuel system diagnostics online in 3 minutes
Don’t waste your time - use the Uremont search and get offers from nearby services with specific prices!
Get prices
Signs of a gas tank leak
A hole in the tank can occur for two reasons:
- Mechanical impact;
- Corrosion of metal.
Sometimes a careless collision with a bump or a serious impact of a stone against the walls of the gas tank can lead to a hole. Another common reason related to older cars is time and rust. In this case, you need to show insight and decide: is it worth repairing the part or is it more advisable to install a patch, take it to a car service center and install a new tank. The degree of rust corroding the walls of the vessel will help you make the right decision. If you see that corrosion will soon penetrate the gas tank and other places, it is better to change the part.
A number of signs may indicate a fuel tank leak:
- Increased gasoline consumption;
- A sharp decrease in fuel according to the dashboard;
- Smell of gasoline in the cabin;
- Puddle under the car.
If you notice one of the signs, check the other three. Once you are sure that the tank is breaking through, you need to act quickly! The first step is to determine the source of the leak. Most often, the gas tank breaks through from below, so finding the leak is not difficult - the stream itself will show you the way!
If the gap is on the side or at the top, it will be harder to notice. However, this nature of the damage will not allow all the fuel to leak out, and you will still have the opportunity to drive to the nearest workshop to make repairs.
Repairing a cracked metal gas tank
In order for gas tank repair to be not only competent, but also safe, certain rules must be followed. They boil down to the fact that all additional equipment will need to be dismantled, the fuel drained and the container washed.
When repairing a cracked gas tank, it is necessary to drain the fuel, remove the container and wash it.
How to remove the gas tank
Removing the gas tank involves removing the hatch, cable, neck, fuel sensor and pump. The list of certain elements, as well as the process of dismantling them, depends on the specific car.
Tools you may need:
- pliers;
- side cutters;
- screwdriver;
- wrench or socket of appropriate size.
Sequence of actions during dismantling:
- First, the remaining fuel is drained. For this purpose, the design of the tank has a special hole in the lower part. To prevent fuel from spilling on the ground, prepare the container in advance. If there is no plug, gasoline can be drained using a hose and a pump bulb.
Before removing the gas tank, it is necessary to drain the remaining fuel. - After emptying the tank, disconnect the connector, which is responsible for connecting the wires to the fuel level sensor. This connector may be located under the rear seat or in the luggage compartment. The element can be separated by snapping off the special tab. After this, disconnect the ventilation hose located at the bottom of the tank.
After the fuel has been drained from the tank, remove the connector with the fuel sensor wires, as well as the power supply to the fuel pump. - Using a screwdriver, loosen the clamp of the fuel supply hose and tighten the tube. If the hose does not come off, try turning it in different directions.
One of the stages of dismantling the gas tank is the removal of the fuel hoses, for which the fastening of the clamps is loosened - Removing fasteners. To do this, unscrew the nuts that secure the clamps securing the gas tank to the body, and then remove them from the studs. The free side is lowered, then the second side of the fastening is released.
To dismantle the tank fastenings, unscrew the nuts securing the fuel tank clamps - Remove the gas tank filler cap by simply unscrewing it. After this, the tank is moved to the side to release the neck from the rubber seal.
To remove the gas filler neck from the seal, you will need to remove the plug. - The ground wire is disconnected from the tank body. It is secured with a nut, which must be unscrewed with a wrench of the appropriate size. There are no longer any elements holding the fuel tank in place and it can be removed from the vehicle.
When nothing interferes with dismantling the tank, it is removed from the car
Cleaning the gas tank
After the fuel has been drained from the tank, it will need to be cleaned of contaminants, for example, by washing under running water using detergents. After drying the tank, it is necessary to clearly indicate the places of future work and understand whether there is a need for its dismantling or restoration is possible directly on site. Is it possible to repair a gas tank without draining the fuel? You need to understand that doing quality work, even with the slightest leak, is problematic. When all the preparatory aspects have been resolved, they proceed directly to the repair procedure.
To reveal the extent of the damage, the container must be washed and dried.
Necessary tools and materials to repair a cracked metal gas tank
Depending on the chosen repair method, the list of tools and materials used will differ. In general, you will need the following:
- tire pump for supplying compressed air;
- hose connected to a hot water supply;
- special cleaning liquids;
- petrol;
- drill;
- bolts and nuts;
- file;
- degreaser;
- sandpaper;
- primer paint.
How to solder a gas tank
One common method of repairing cracks in a metal fuel tank is soldering. To carry out the procedure, you will need a soldering iron with a power of more than 200 W, soldering acid and tin. Leave the tank neck open during operation. Let's start restoration:
- We determine the location of the leak.
- If any deformations are found, we straighten them out.
- We carefully clean the soldering area and degrease it, for which you can use any product (acetone, solvent, gasoline).
Before soldering, the damaged area is cleaned to bare metal. - Apply soldering acid to the soldering area.
- To make it easier to tin the problem area, heat it with an incandescent lamp or hairdryer.
To apply tin, the damaged area must be heated - We tin the metal. If the crack is large, we fuse tin in several layers until the damage disappears.
For large crack sizes, tin must be deposited in several layers - When the soldering area has cooled down, clean it of rosin with a solvent or other means.
After soldering is completed, the area is cleaned of rosin with a solvent.
On old gas tanks, in addition to eliminating the crack, it is appropriate to clean the tank from corrosion, and then apply primer and paint.
Video: do-it-yourself soldering of a gas tank
How to brew a gas tank with a semi-automatic machine
To carry out welding work on the fuel tank, you will need to pour water inside to prevent ignition of gasoline vapors. The welding site is cleaned to bare metal, removing corrosion using a wire attachment on a grinder or drill. If a large area is damaged, it is cut out, a metal patch of similar thickness is applied, and then scalded. After cooling, the container is covered with primer and painted.
Cold welding repair
When repairing a crack in a fuel tank using cold welding, the same preparatory measures are performed as for soldering (draining fuel, washing, drying, cleaning). If the damage is in an accessible place, the container does not need to be removed from the vehicle. When working with cold welding, you must take care to protect your hands, i.e. use rubber gloves. Then cut off the required amount of the composition and knead it well in your hands. As a result of the chemical process, the product will begin to soften. At this moment, it must be applied to the damaged area with great force, and then leveled.
One way to repair a gas tank is to use cold welding
For greater reliability, a piece of fabric is placed on top of the first layer, then the second layer is applied. Depending on the type of cold welding, it may require dilution with various means. In this case, it is recommended to perform the kneading procedure in a metal container.
Video: repairing a gas tank using cold welding
Sealing a crack with epoxy resin
Repairs using epoxy resin are resorted to when it is not possible to carry out a full restoration by soldering or welding. All epoxy components are mixed according to the instructions. The damaged area of the gas tank is thoroughly cleaned and a layer of resin is applied to it, after which it is covered with a piece of fiberglass or a clean rag soaked in the same substance. Several such layers are applied. When the patches are dry, you can fill the gas tank with fuel and continue driving. It is worth considering that epoxy resin, as well as cold welding, has an excellent expansion coefficient and low bending strength compared to metal. This suggests that repairing a fuel tank using such materials is a temporary measure.
Cold welding
This method is very simple and effective, and cold welding (a mixture of epoxy resin and hardener) can be purchased at almost any hardware store.
Having found the leak, you must first degrease and clean the working area with sandpaper. If you seal a hole without treating it, the patch will quickly fall off. But if you follow all the recommendations, your gas tank can live for more than one year. Of course, if by this time it has not rusted in other places.
After cleaning and degreasing, you need to prepare cold welding. To do this, heat and mix two components - epoxy resin and hardener. Your car engine is perfect for heating the mixture. In field conditions, this is often the only source of heat. Once you have prepared the mixture, find a fabric suitable for the patch, soak it in the resin and apply it to the damaged area of the gas tank. You should act quickly so that the mixture does not have time to harden.
This method is used by mechanics in car repair shops. Cold welding repair is one of the most common. Buy the mixture in advance at the store and carry it with you so that a gas tank leak doesn’t take you by surprise.
How to detect damage to the gas tank
The smell of gasoline is clearly felt inside the car;
- The fuel gauge begins to approach zero faster than usual.
- If you notice signs of a malfunctioning gas tank, you should stop the car and turn off the engine. Then you should carefully inspect the gas tank for damage and punctures. When they are found, act depending on the specific situation. Below are several ways to repair a fuel tank yourself on the road.
In order for gas tank repair to be not only competent, but also safe, you must adhere to certain rules. They boil down to the fact that all additional equipment will have to be dismantled, the fuel drained and the tank washed.
Repair using fiberglass
The procedure is similar to the previous method. The tools used here are epoxy resin and fiberglass. First, you should degrease and clean the surface where the patch will be applied. Then the fiberglass is soaked in resin and glued to the hole in the gas tank. For reliability, it is better to use two layers of material.
After hardening, it is recommended to treat the patch with an anti-corrosion agent or simply paint it. By protecting it from rust, you can be sure of a long service life for your tank.
It is not always possible to find epoxy resin and fiberglass in the trunk of a car. An ordinary rag and glue will do as a temporary patch. We soak several layers of fabric in superglue and seal the hole. For better adhesion, it is worth treating the surface of the gas tank. Such repairs, of course, will not provide you with long-term work, but you will be able to get to the service station.
How to weld a fuel tank
A leak in the gas tank occurs as a result of physical wear or due to damage with collapse of the housing. Fuel vapor accumulates in an empty tank, so welding and heating can cause an explosion. Many motorists ask how to properly seal a gas tank. There are several repair methods: argon arc and cold welding, soldering. Let's look at each of them in more detail.
General rules for repairing a gas tank
The presence of a leak is indicated by increased fuel consumption and a specific smell in the cabin. Even a minor crack is dangerous for the life of the driver and passengers. The leak area ignites when struck by a spark. Damage occurs as a result of cracking of the body during driving and exposure to corrosion. Defects occur when there is a malfunction in the vehicle's fuel system. The discharged pressure contributes to the gradual cracking of the walls. Microcracks gradually increase, causing leaks. Before welding the gas tank, you must follow the safety rules:
- be sure to drain gasoline or diesel fuel from the tank;
- thoroughly dry and dismantle the tank, inspect for damage;
- wash inside using specialized detergents;
- After washing with household chemicals, rinse thoroughly and dry.
Washing the tank allows you to completely remove explosive vapors. The repair method is selected based on the material from which the tank is made. Argon arc welding of a fuel tank is only suitable for metal containers; it is recommended to repair plastic products using cold welding; hot soldering is a universal method. Let's take a closer look at how to seal the gas tank yourself.
Cold welding gas tank repair
Cold welding is suitable for containers with hard plastic walls or for metal tanks. Glue does not adhere well to thin-walled tanks, so such repairs will be ineffective. The adhesive composition is selected in accordance with the type of container material. It is recommended to wear gloves when repairing a gas tank using cold welding. The crack is cleaned of contaminants and degreased with nefras.
Two-component mixtures are combined in the proportion specified by the manufacturer. The prepared solution must be used within 10-20 minutes depending on the brand name. The glue is applied to the damaged area in layers and smoothed, pressing it to the surface. 2-3 hours after repair, the tank is ready for use. The glue in the form of a bar is thoroughly kneaded with a damp hand and the crack is covered.
Cold Welding Selection
When choosing a cold weld, it is necessary to take into account that it must be resistant to gasoline. Only minor damage can be sealed with it. Moment superglue or similar special compounds from other manufacturers are perfect for eliminating leaks on the road. The rags are cut into patches, soaked in glue and attached to the hole in several layers. This repair method is temporary; it allows you to get home or to a service station and completely solder the holes.
To repair minor damage on your own, you can use epoxy resin with a hardener and fiberglass. The defect area is treated with sandpaper to increase adhesion. After the surface has dried, a glass cloth impregnated with resin is applied to the crack. Each subsequent layer is laid after the previous one has dried. After the last layer has hardened, the patch is treated with an anti-corrosion compound.
Soldering
Compared to cold welding, fuel tank soldering is more resistant to mechanical stress and external factors. To eliminate a leak, prepare a patch 4-5 cm larger than the area of damage. Repair of plastic products is carried out on the outer part of the walls of the gas tank with a 250-watt soldering iron. When sealing, you need to select a patch from the same material. The type of plastic is indicated on each part. Most often, gas tanks are made of ABS, polypropylene or polyamide.
For high-quality adhesion, a substrate of fine reinforcing mesh made of metal or copper is required. The substrate is fused into the wall of the gas tank, evenly distributing liquid plastic over the entire surface of the defect until a new uniform coating appears. The procedure is performed quickly so that the plastic does not harden, otherwise sagging will form.
In metal containers, you can seal the hole with a thin metal or copper patch. You can heat the case using a blowtorch or iron. The patch is attached with low-melting solder along the entire perimeter using a 500-watt soldering iron, having previously treated the joints with soldering acid. After soldering, you need to let the body cool, then cover the patched area with bitumen mastic or paint. The coating will protect the patch from corrosion.
Repair using electric welding
Welding a fuel tank using a argon arc welding machine and tungsten electrodes is considered the most reliable method. It reliably connects non-ferrous metal with alloy steel. Most gas tanks are made of aluminum, so inverter welding is not suitable for repairs. The repair area is cleaned of oils and dirt. The patch is welded around the entire perimeter, trying to maintain a homogeneous gas environment. The seam is smooth and durable. After cooling, the repaired area is painted or covered with bitumen mastic.
Plastic gas tank repair
Repair using epoxy glue is the fastest. This is a temporary measure to fix a leak along the way. You can patch the hole using a plastic welder - an extruder. Welding tanks using this method requires certain experience and knowledge of technology. It is recommended to practice on a small piece of plastic before welding. To correctly calculate the productivity of an extruder, you need to know the size of the cross-section of the crack. Welding begins from the edge of the fracture, laying the molten plastic welding wire evenly across the entire width of the hole with a small margin. For thorough welding, movements are made across the crack, completely filling the hole. In order for the seam to lie evenly, it is necessary that the hot air gun and the shoe of the device are evenly heated.
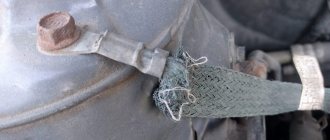
Rubber gasket
Repair using this method is very reliable, but not universal. Not every hole can be patched this way. To troubleshoot the problem you will need:
- A piece of rubber;
- Bolt;
- Screw;
- Screwdriver.
Rubber will be used as a gasket, so the material should not be too hard. First you need to widen the hole to such a size that the bolt can fit there. We insert a bolt and washer from the inside of the tank, and an elastic band from the outside. Tighten the nut using a screwdriver and wrench (pliers may also work).
But, as mentioned above, not every hole can be closed in this way. Since the rubber is installed from the outside, some holes in the bend of the tank may not be sealed. Also, if the hole is large enough or caused by rust on the metal, a bolt will most often not help. In such situations, it is more advisable to use the cold welding method or fiberglass. The presented repair method is more suitable for mechanical damage to the tank.
But if the bolt fits well and no leaks were found while driving, you can cover the patch with a layer of paint. This gasket will serve you for many more years.
Causes of gas tank cracks
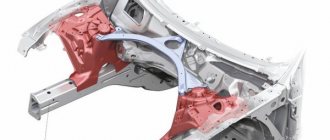
On most cars, the gas tank is located in the rear (right, left, under the rear seat). This design feature is explained by safety for passengers and the driver. In addition, vehicle handling is improved. However, the rear part of the body is quite often exposed to external damage during the operation of the car, as a result of which the gas tank also suffers.
The most common cause of cracks is mechanical stress leading to holes in the container. Considering the quality of Russian roads, sometimes even a slight impact is enough to cause a hole to form.
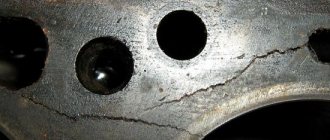
Significant causes of damage also include metal corrosion, which is an inevitable process. The more mileage a car has, the higher the likelihood of this type of problem. Less common are power system faults. Since a rarefied pressure is created in the middle of the tank as fuel is consumed, this affects the condition of its walls. During operation, small cracks may appear on them, and as a result of their enlargement, leakage occurs. This situation indicates the need to repair the gas tank.
One of the reasons for gas tank damage is corrosion.
What to do if your tank leaks
The appearance of a crack, hole or any other type of damage to the gas tank is typical not only for domestic cars, but also for foreign cars. When the seal of the tank is broken, it is necessary to fix the problem as soon as possible. Operating a vehicle with such a malfunction can lead to disastrous consequences, and danger threatens not only those in the car, but also those around them. Due to the fact that the fuel tank is a simple structure, restoring the tightness will not be difficult. However, much depends on the degree of damage and the feasibility of such an event. Since gas tanks are made of different materials, different repair methods are used.
Car repair in a car service center
If the gas tank is slightly broken, you can get by using the methods presented above. But if there is serious damage or corrosion, you must urgently contact a car service center. But how to find a service station if the car breaks down right on the highway? The Uremont.com service will help you. It contains more than 5,600 car services throughout Russia. Using this site you can find workshops located near you and carry out high-quality car repairs.
Using the map on the website, you will see the location of each service and determine the closest one to you. Register on Uremont.com and send a request to car services indicating the nature of the breakdown, car model and year of manufacture. In it you can also indicate the desired cost of repairs. After submitting your application, you will receive responses from various service stations with repair proposals. This algorithm of work will allow you to choose the workshop that is most suitable in terms of price and quality of service.
In addition, you can order a tow truck. To do this, indicate this need in the appropriate paragraph of the application. This service is especially necessary if you have broken the gas tank and are left without fuel.
With Uremont.com, repairs anywhere in the country will become faster and more profitable!
General rules for repairing a gas tank
If you discover a malfunction in the fuel tank, immediately turn off the car and turn off the ignition - high temperatures and electrical sparks can easily lead to the ignition of not only liquid fuel, but also its vapors. Armed with a flashlight, a soft brush and a rag, go look for a leak. Please note: brushes with metal bristles are strictly prohibited for any type of work near flammable materials. The further algorithm of actions is simple:
- Drain the fuel from the tank into a clean container of sufficient capacity . Determine the material of the part (hard or soft plastic, steel or aluminum).
- Inspect and feel the bottom and sides of the tank . A noticeable leak or barely perceptible moisture will indicate the approximate location of the breakdown.
- If the tank is damaged in a hard-to-reach place, remove it from the vehicle . In most cases, repairs can be made without removal.
- Using a soft brush, clean the damaged area and surrounding surfaces from road dirt, dust and salts.
- If necessary, remove material thinned by corrosion, burrs and chips ; Carefully trim the edges of chips and mother-in-law.
- Analyze the size and nature of the damage , and then decide on the feasibility and method of repair.
In all cases, except for extensive corrosion and long through cracks, repairs will cost less than installing a new fuel tank. Some simple breakdowns can be repaired immediately, which self-hardening composite materials help well with. We will talk about one of them today.