Dismantling the box
If you can hear an incomprehensible noise in the gearbox, the car becomes difficult to change gears or does not want to move at all, you may need to remove this mechanism.
Do-it-yourself repair of a VAZ 2109 vehicle can be done in any garage, having all the necessary tools at hand. The VAZ 2109 has a rather complicated gearbox removal, so you should prepare for this procedure in advance. The box is located deep enough, so it is almost impossible to remove it alone. In this case, you may need special crowbars, the help of other people and some tools in order to properly disconnect it. In general, you can seek help from a service center, where the service will be carried out using special equipment. But, you can repair it yourself by removing it carefully without damaging other important parts.
CLUTCH
The clutch of VAZ 2114, 2113, 2115 has a common structure. The clutch is a device located between the power unit and the wheels of the vehicle. This device takes over the engine speed. On VAZs 2114,2115,2114, the clutch is closed, dry, single-disk, with a damper installed on the driven disk and a pressure spring. The clutch is equipped with a cable drive that has no gap between the pressure spring and the bearing. The control is carried out by a pedal, which is installed together with the brake pedal on the same axis.
With a working clutch, the pedal travel from its top position, and “all the way”, is exactly one hundred and thirty-five millimeters. The pedal stroke, over time, during operation, can increase to one hundred and sixty millimeters, this is caused by wear of the driven disk linings. This increase in pedal travel is considered the maximum permissible; any increase in this gap will lead to the clutch starting to “lead”. This will be caused by an almost complete lack of contact between the slave and master disks. To eliminate this problem, you will need to adjust the clutch.
Clutch device
High-quality oil is the key to reliable operation of the gearbox
Repair manual for VAZ 2108, 2109, 2114, 2115 Wires and fuses
Despite the unpretentiousness of domestic cars, their units require proper care and prevention. For proper operation of the gearbox, high-quality oil is necessary. The best option for the VAZ 2114 gearbox is mineral oil. Its only drawback is the high price. Of the synthetic and semi-synthetic options, it is better to choose the first one.
When using it, you need to clean the seals in time. Oil category GL-4 is the most suitable type for the VAZ 2114. To ensure reliable and uninterrupted operation of the unit, it is necessary to check the oil level at least 3 times a week. The easiest way to check is to use a dipstick. To do this, you need to place the car on a flat surface.
15-20 minutes after stopping, pull out the dipstick, wipe it dry and insert it back. Then remove the dipstick and record the oil level, which should be at the maximum level. If the amount of oil is insufficient, top it up and check the level again. Due to the fact that the fifth gear is located higher than the others, it often lacks lubrication.
Experts recommend maintaining the oil level slightly above the maximum mark, which will extend the life of the gearbox. It is better to entrust the oil change to specialists, because the gearbox is one of the main units of the vehicle. You can carry out the procedure yourself, but you should adhere to the following recommendations.
- In case of replacing oil of one brand with another, the box must be flushed.
- Place the machine on the inspection hole.
- Remove the cap and clean it.
- Clean the breather and its holes with a brush.
- Prepare a container for draining and unscrew the dipstick.
- Tighten the plug and fill in new oil through the dipstick socket.
- Screw the dipstick and put on the cap.
The price of a gearbox for a VAZ 2114 with all parts and oil is quite high. There is no point in indicating a specific figure, since the price is constantly changing
But you shouldn’t skimp on this important device: not only the operation of the engine, but also the safety of the driver and passengers depends on the reliable operation of the gearbox. To save money, you can purchase a used box
But it is better to buy such a unit from a reliable supplier, otherwise there is no guarantee that the parts will not contain hidden defects and malfunctions.
Timely repairs and preventive measures allow VAZ 2114 owners to extend the service life and maintain the quality of the gearbox. This approach is the optimal solution for the uninterrupted operation of the unit and the engine as a whole. You should not neglect basic rules, such as timely oil changes, tightening fastening elements and eliminating minor problems.
We have collected a huge selection of videos about repair, tuning and maintenance of VAZ cars
Share photos and rate photos of other users
Cost of express gearbox replacement
Warranty 1 year or 60,000 km. mileage for work and VAZ gearboxes
| Phone number of the repairman: | Artem 8 /965/ 126 13 83 Vadim 8 /925/ 675 78 75 |
| Tow truck assistance /24/7/, dispatcher: | 8 /926/ 167 15 40 8 /985/ 888 68 14 |
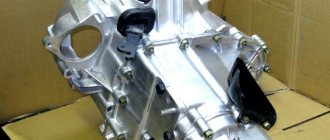
New gearbox VAZ 2109
Prices for additional work when repairing a VAZ manual gearbox:
Comprehensive troubleshooting / disassembly /
Replacing the clutch /as a separate job/
Removing and installing a manual gearbox as a separate job - without repair
Replacing the clutch with the gearbox removed
Gearbox diagram VAZ 2108 - VAZ 21099 - VAZ 2115:
gearbox shafts
gearbox gears
gearbox differential
gear selection
Most of the complaints from car owners of the VAZ 2115 family are characteristic noises from bearings. An example of such work on replacing bearings on shafts and gearbox seals in photographs:
Most of the complaints about the operation of the VAZ 2114 family gearbox are not only noise, as a rule it is a crunching noise when engaging 2nd gear. An example of such work in photographs is the replacement of bearings, oil seals, synchronizers, 2nd gear gears, 1st - 2nd gear clutches):
Gearbox repair VAZ 2108 - 2109 - 21099 - 2113 - 2114 - 2115
If you need urgent repair of a VAZ 2109 manual transmission, our service center guarantees fast professional assistance. After disassembly, diagnostics and troubleshooting, a specialist will repair the VAZ 2109 gearbox in a short time or completely replace the worn-out unit.
VAZ 2113 gearbox: technical features The next generation of front-wheel drive VAZs is equipped with a 5-speed gearbox: the VAZ 2113 has an updated main pair with a gear ratio of 3.7. The complex structure of the box does not allow unprofessional intervention: repair of the VAZ 2113 gearbox should only be carried out by specialists and only in a car service center. The modified design has a number of typical faults, which are especially common on older cars. Repair of the VAZ 2113 gearbox is required when extraneous noise appears as a result of wear of gears and bearings, problems with oil leakage, and failures when shifting gears while driving also occur. To accurately diagnose the malfunction and replace parts, you must contact a specialized service center: we offer repairs to the VAZ 2113 manual transmission on favorable terms. If you need to buy a VAZ 2113 gearbox, here you can choose and purchase refurbished units; they will cost very little. A used transmission can last for years if handled properly. Replacement will be a profitable solution if the unit is severely worn out and a large number of parts are required to restore it.
An example of disassembly - assembly of a VAZ 2113 gearbox, in photographs, just below. We change the set of bearings, oil seals, gear and clutch 1-2 gears:
Repair of the VAZ 2114 gearbox The VAZ 2114 gearbox has the same features as other representatives of this generation Lada. The front-wheel drive car is equipped with a 5-speed manual unit with a complex device; the mechanics require proper maintenance and careful selection of transmission oil. Repair of the VAZ 2114 gearbox is carried out in several stages:
- Disassembly and diagnostics. The owner needs to contact a car service if there are any extraneous noises, grinding noises, or difficulties when shifting gears.
- Defects of parts and their replacement. Repair of a VAZ 2114 manual transmission with a complete overhaul costs from 2,000 rubles, the cost of replacing parts is calculated separately.
- Assembly and adjustment of operating parameters. Repair of the VAZ 2114 gearbox is completed with final diagnostics to check the full functionality of the vehicle.
Also here you can buy a VAZ 2114 gearbox to quickly replace the unit and restore the vehicle’s performance.
VAZ 2115 gearbox To buy a VAZ 2115 gearbox without extra costs, use the services of our car service center. Here we offer refurbished units with a short period of use; we offer components in excellent condition. This is an excellent opportunity to save on repairing the VAZ 2115 gearbox: if the unit is badly worn, it is more profitable to replace it entirely rather than restore it. Repair of the VAZ 2115 gearbox is carried out similarly to the thirteenth and fourteenth models. The 5-speed manual unit is reliable and has become one of the reasons for the popularity of the model. However, gears, bearings and other parts are subject to wear, so over time, squeaks and extraneous noises appear, after which problems with gear shifting arise. In order for the VAZ 2115 gearbox to serve trouble-free, order its repair or replacement at our car service center; motorists are offered low prices for all types of services. Our specialists will complete the repair of the VAZ 2115 manual transmission in a short time, and customers are provided with a warranty card.
Main components of the box
Sequence of actions when repairing a gearbox on a VAZ 2109
How to replace the idle speed control on a VAZ 2108, 2109, 2114
When carrying out an operation such as manual transmission repair, you must adhere to the following sequence of actions:
- It is necessary to remove the gearbox (it should be noted that repair of the gearbox on a VAZ 2107 is carried out approximately according to the same principle). After removing the gearbox, you need to clean it from dirt using a rag and diesel fuel. The oil level dipstick is removed, after which the clutch housing is installed vertically. The clutch cable bracket must be removed. Unscrew the corresponding nuts and remove the back cover.
- It is necessary to unscrew the bolt securing the fifth gear fork. After this, you need to secure the shafts from turning and unscrew the nuts securing the primary and secondary shafts.
- The fifth gear gear is removed along with the fork and synchronizer from the secondary shaft. The thrust plate is removed from the synchronizer, and the fork is removed from the coupling groove. Next, the gear and ring are removed, after which the bushing is removed.
- The bushing is removed from the input shaft. Then you need to use an impact screwdriver to unscrew the four screws and remove the thrust washer from the secondary shaft.
- The retaining rings of the shaft bearings are removed, after which the retainer balls are removed. The reverse locking plug is unscrewed, the O-ring is removed and the locking spring is removed. The box needs to be tilted and the locking ball removed.
- You need to unscrew the twelve nuts and the crankcase mounting bolt. The gearbox housing should be separated from the clutch housing using a screwdriver. Subsequently, you need to unscrew the bolts of the gear shift forks (1-2, 3-4).
- After the rods and forks are removed, you need to remove the reverse gear axis. It should be noted that gearbox repair includes, first of all, disassembling the unit. However, without this, inspecting spare parts and determining their performance is impossible.
- Remove the intermediate gear, then remove the input and output shafts. The differential is removed from the clutch housing. Next you need to remove the gear mechanism. Then the gearbox is disassembled in the following sequence:
- clutch housing magnet,
- housing with speedometer drive gear,
- reverse switch,
- secondary shaft bearing,
- sump,
- input shaft bearing.
- In general, repairing a gearbox on a VAZ 2109 consists of replacing all worn-out spare parts. In particular, it is definitely necessary to replace all pressed out bearings. So, at this stage of work it is necessary to press new front shaft bearings into the clutch housing.
- After the gear rod is removed, you can repair the gearbox, that is, directly replace all damaged and worn components in the following sequence:
- protective cover for the rod hinge,
- clutch housing (small damage can be cleaned with sandpaper),
- after checking the bearing seats in the clutch housing, they must be replaced if their condition is unsatisfactory,
- roller bearings,
- gear shift rods,
- axle seals,
- input shaft oil seal,
- magnet (it should be cleaned first),
- The planes of the clutch and gearbox housings must be cleaned of old sealant. After which the gearbox is assembled.
- The shafts are installed in the clutch housing. After that, all rubbing elements are generously lubricated with oil and the magnet is installed in place. Sealant should be applied to the gearbox housing and clutch housing. In addition, the gearbox oil may need to be changed. After this, the work is considered completed.
Disassembling the gearbox on a VAZ 2109 - video instructions
https://youtube.com/watch?v=4nkUWTDiy1o
After the gear rod is removed, you can repair the gearbox, that is, directly replace all damaged and worn components in the following sequence:
Repair and replacement
It is quite difficult for novice motorists to even simply determine why their gearbox is not working. What can we say about replacing the gearbox seal on a VAZ 2114, which requires a certain skill and knowledge in the field of car repair.
Unfortunately, if you ignore the initial signs of a gearbox malfunction, this may result in a full-fledged need to replace the entire unit. Many are even afraid to ask the current cost of a new gearbox for the “fourteenth” model. But we will say. Today such a unit will cost you at least 15 thousand rubles. Moreover, this price does not include installation services. Changing an entire gearbox yourself is not an easy task.
Let's be frank. Situations in which a car is rendered unsuitable for transmission repair are very rare. Most often, something like replacing the gear selector rod seal on a VAZ 2114, gears, levers and other components is required.
It is difficult to carry out diagnostics on your own in a garage environment. To correctly identify a breakdown, you will need at least a lift and a driver’s extensive experience in car repair. But it is best to carry out diagnostics at a car service center with the appropriate equipment. Whether you entrust them with the repairs or handle this stage yourself is up to you.
The cost of repairing a gearbox on a VAZ 2114 is influenced by several factors:
- Location;
- Skill level of the craftsmen;
- Clauses of the concluded contract for the replacement or repair of the gearbox;
- Level of car service (regular garage-type service station or full-fledged car service with a large staff and new equipment).
The process of dismantling the gearbox takes about 5 hours. Assembly proceeds in reverse order.
Thus, in order to extend the working capacity of the gearbox installed on a VAZ, the owner of the vehicle must undergo maintenance and change the oil in a timely manner. It is recommended to give preference to synthetic oil options. If necessary, you can dismantle the gearbox yourself, following all the steps.
If you find an error, please select a piece of text and press Ctrl+Enter.
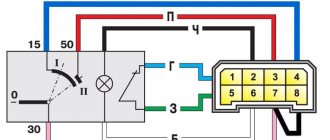
VAZ 2115 Gear shift
Repair and maintenance manual for Hyundai Accent
Gear shift and lever position
Manual box
The gear shift positions are shown on the handle. Before engaging reverse gear, you need to lift the ring under the lever handle.
When changing gears, fully depress the clutch pedal and then gently release it. It is not recommended to drive a car with one hand on the gearshift lever, as this increases wear on the gearbox.
When shifting from fifth to fourth gear, do not press the lever laterally, so as not to accidentally engage second gear, which will cause the engine to exceed the permissible speed and damage it.
Before engaging reverse gear, make sure that the car is at rest and your foot is not on the gas pedal. Move the lever from the neutral position to the right until it stops, and then engage the rear
move.
The table below shows the driving speeds at which the next gear should be engaged for the greatest fuel economy.
Gear shift. automatic transmission
At the base of the selector lever there is an illuminated dial showing the selector range position symbols.
P Parking R Rear
stroke N Neutral position
Forward gears:
D 1st. 4th gear 3 1st. 3rd gear 2 1st. 2nd gear 1 1st gear
You cannot set the P, R, or N position while the vehicle is moving. When re-setting the movement position, this leads to tragedy or damage to the box.
Selector lever positions
Pressing the gas pedal while moving the selector lever causes excessive wear on the gearbox.
To set the driving position, always keep your foot on the brake pedal. It is harmful to keep your hand on the selector lever, as this causes wear on the box.
Gear shift lever
Between placing the lever in the driving position and accelerating, you should pause quite a bit to allow the gear to engage.
D ›3 N › RR › PP › R 3 › 2
This position can only be set when the vehicle is stationary. The selector lever and gearbox are locked. Or maybe the engine has started.
You will like this position only when the car is stationary. You need to press the button on the lever handle.
Before starting, you should wait quite a bit for the gear
reverse.
In this position, the engine is disconnected from the box. Or maybe the engine has started. To prevent the vehicle from rolling down a slope, use the handbrake. To avoid overheating of the engine and gearbox, you should set the N position when stopping the car for long periods (for example, in traffic jams). When waiting for a traffic light to allow movement, set position D.
This position is used for normal driving. The car starts off in first gear, and then automatically shifts between 2nd, 3rd and 4th gears. The switching moment depends on the position of the gas pedal and the speed of movement.
In solving this issue, the 4th gear is locked. The car starts off in first gear and then automatically shifts between 2nd and 3rd gears. Position 3 is recommended when driving on zigzag roads and in heavy city traffic. When moving the lever from position D to position 3, the transmission immediately switches to 3rd gear, which causes a strong engine braking effect. This does not need to be done at speeds above 130 km/h.
This position is recommended when driving on mountain roads. At the same time, the engine power is better used and the engine braking effect increases. The transmission automatically switches between first and 2nd gears. 3rd and 4th gears are locked.
When moving the lever from position D or from position 3 to position 2.7, switching from third gear to second occurs only at a speed lower than a certain speed given in advance, in order to avoid an increase in engine speed to unacceptable values.
This position is recommended when climbing very steep slopes and when descending from a deposit. The positive point is that effective braking by the engine is ensured, and in addition, constant gear changes are eliminated, leading to overheating of the working water of the box.
Squeezing the gas pedal to the floor (kick-down)
Self-removal of the VAZ 2114 gearbox
The organizational activities of this process are as follows:
- Preparation of the necessary tools (a set of keys and screwdrivers) and equipment (hanging equipment, which, if missing, can be replaced with a board).
- Purchasing a special product “WD 40”.
- Disconnecting and dismantling the battery.
- Removing the starter.
Direct dismantling of the gearbox is carried out in accordance with the instructions given below:
- We install the car on an overpass (inspection hole) and dismantle the crankcase protection, fixed at three mounting points.
- Disconnect the clutch cable from the clutch release fork and remove it from the bracket.
- Compress the retaining spring and disconnect the speed sensor terminal block.
- Unscrew the bolt securing the bracket to the ignition module.
- On the bottom of the car we find the block with the reverse sensor contacts and disconnect it.
- We unscrew the bolts securing the gearbox to the torque rod, loosen the clamp and pull out the gear selector rod rod.
- We dismantle the wheel drives and replace one of them with a plug, and then securely fix it, which will prevent it from falling out.
- We release the bolts securing the ball joint to the steering knuckle located on the left side - this will greatly facilitate the dismantling of the box. In addition, we remove the mounting cushion for the gearbox to the power unit.
- Remove the clutch pan cover, and then unscrew the box mounting bolts (bottom left). Using hanging equipment (boards), we hang the power unit.
- Unscrew the bolts securing the gearbox supports (rear and left). While removing the rear support, the nut must be held with a second wrench.
- Using a screwdriver inserted into the gap between the clutch housing and the cylinder block, we move the gearbox until it is completely removed from the guide bushings.
- Moving the gearbox to the rearmost position, we pass the rear cover of the box over the front suspension. This will help disengage the input shaft from the clutch.
- Lowering the front part, remove the gearbox and take it out from under the car.
- The VAZ 2114 gearbox, the diagram, or rather, the dismantling instructions for which are described above, was removed from the car.
In conclusion of our story, we once again focus the attention of the car enthusiast on the fact that if the VAZ 2114 gearbox is humming, you should immediately take comprehensive measures to eliminate the causes of its (noise) occurrence, since they may be defects in the release bearing, input shaft bearing or increased wear gears
Device and technical characteristics
The design of the gearbox includes the following elements:
Functionally, the box is divided into two parts:
The function of the main pair is to reduce the engine speed transmitted to the crankshaft by almost 4 times (gear ratio - 3.7). The speed and acceleration of the car depend on the size and condition of the main pair.
The main gear of the gearbox is connected to the differential. The gear block of 1-4 gears is located in the gearbox on the input shaft. The removable fifth gear gear block is located above this block. The driven gears are located on the secondary shaft of the gearbox. The main pair connects the driven gears and the secondary shaft. The control unit, or control drive, includes a shift lever, a ball joint, and a rod for selecting a gear.
A feature of the standard gearbox is that the first speed is too short and the second speed is too long. This affects the acceleration dynamics when moving from first to second gear.
Repair of VAZ 2107 gearbox
Both four-speed and five-speed manual transmissions are installed on Zhiguli Classic cars from the factory - the units are quite reliable and unpretentious to the oil being poured and operating conditions. The “five-speed” disease is the fifth speed slipping, the 5th gear gear is weak and wears out quickly. 4-st. Gearboxes are more durable; they break only at the end of their service life or as a result of barbaric handling.
In order to repair a VAZ 2107 4-speed gearbox, you first need to remove the box. We proceed as follows:
- put the car on a pit (lift);
- drain the transmission oil from the box;
- in the cabin, remove the gear shift lever;
- dismantle the driveshaft, disconnect the exhaust pipe of the muffler from the crankcase;
- We disconnect the traverse from the bottom of the body;
- unscrew the bolts securing the box itself to the internal combustion engine, dismantle the gearbox.
Next, we disassemble the transmission unit:
- We pull off the stopper from the shank of the secondary shaft;
- Using a 30 mm socket, unscrew the nut and remove the shank;
- dismantle the speedometer drive, and then the rear gearbox housing;
- disconnect the lower metal tray;
- unscrew the nuts of the “bell” (clutch housing), disconnect this casing;
- unscrew the nut securing the flush shaft;
- remove the stopper from the input shaft;
- then we disassemble the rear part of the gearbox - remove the bushing from the secondary one (there is a ball under it, you need to try not to lose it);
- disconnect the fork and small reverse gear;
- We pull off the stopper from the secondary shaft, and then the large reverse gear;
- We remove the retaining ring of the shaft from the back of the housing and pull the gear off the shaft;
- unscrew the screws of the metal plate on the back of the case, dismantle the plate;
- inside the housing on the rod, unscrew the bolts securing the gear forks;
- dismantle the plate, springs and balls fixing the gear shift rods;
- we pull out the rods, take out the rear bearing of the shaft;
- we pull out the wash basin itself;
- Now you can pull out the shafts - “primary” and “secondary”.
We inspect the parts and carry out troubleshooting - install new spare parts, assemble the gearbox.
TRANSMISSION OIL
The VAZ 2114, 2113,2115 transmission consists of a large number of rubbing parts that require timely lubrication. For VAZ cars, it is better to use oils from the GL-4 group. A fairly universal gear oil is oil with a “viscosity index” of 75w90 (synthetic oil). This lubricant practically does not freeze in winter; the only disadvantage of “synthetics” is the higher noise level of the transmission. Oil is poured either through the dipstick or through the speed sensor (you must first jack up the vehicle). Before changing the oil, you need to get rid of the used oil. Transmission oil is changed every hundred thousand kilometers.
Typical gearbox malfunctions and possible causes
| GENERAL INFORMATION |
| SYMPTOM OF MALFUNCTION | POSSIBLE REASONS |
| Knocking noise at low speed | Wear of the inner or outer constant velocity joint (CV joint) |
| Wear of differential bearing seats | |
| Increased noise when cornering | Differential gear noise |
| Knocking noise when accelerating and decelerating the car | Loose engine mounts |
| Wear of the inner CV joint | |
| Wear of the pinion axle and mounting holes in the differential housing | |
| Wear of differential bearing seats | |
| Knocking sound when turning | Wear of outer CV joint |
| Vibration | Bearing vibration |
| Axle shaft bent | |
| Out of roundness of tires | |
| Wheel imbalance | |
| Wear of the CV joint of the axle shaft | |
| Significant angles in the CV joint (violation of the static suspension travel) | |
| Self-switching gears | Worn or misaligned gear shift drive |
| Shift drive sticking | |
| Breakage or loosening of the locking washers of the input shaft bearings | |
| Worn or deformed shift fork | |
| Increased noise in neutral in the gearbox when the engine is idling | Wear of the bearings of the input shaft gear block |
| Worn clutch release bearing | |
| Wear of input shaft gears | |
| Worn 1st gear or bearing | |
| Worn 2nd gear or bearing | |
| Worn 3rd gear or bearing | |
| Worn 4th gear or bearing | |
| Worn 5th gear or bearing | |
| Wear of secondary shaft bearings | |
| Increased noise only in 1st gear | Breakage, chipped teeth or wear of 1st gear gears |
| 1st and 2nd gear synchronizer wear | |
| Worn 1st gear or bearing | |
| Worn differential gears or bearings | |
| Wear of the main drive driven gear | |
| Wear of the lever and rods of the shift mechanism | |
| Increased noise only in 2nd gear | Breakage, chipped teeth or wear of 2nd gear gears |
| 1st and 2nd gear synchronizer wear | |
| Worn 2nd gear or bearing | |
| Worn differential gears or bearings | |
| Wear of the main drive driven gear | |
| Wear of the lever and rods of the shift mechanism | |
| Increased noise only in 3rd gear | Breakage, chipped teeth or wear of 3rd gear gears |
| 3rd and 4th gear synchronizer wear | |
| Worn 3rd gear or bearing | |
| Worn differential gears or bearings | |
| Wear of the main drive driven gear | |
| Wear of the lever and rods of the shift mechanism | |
| Increased noise only in 4th gear | 3rd and 4th gear synchronizer wear |
| Breakage, chipped teeth or wear of 4th gear gears | |
| Worn 4th gear or bearing | |
| Worn differential gears or bearings | |
| Wear of the main drive driven gear | |
| Wear of the lever and rods of the shift mechanism | |
| Increased noise only in 5th gear | Worn 5th gear synchronizer |
| Breakage, chipped teeth or wear of 5th gear gears | |
| Worn 5th gear or bearing | |
| Worn 5th gear or bearing | |
| Wear of the main drive driven gear | |
| Wear of the lever and rods of the shift mechanism | |
| Increased noise only in reverse gear | Breakage, chipped teeth or wear of the reverse gear intermediate gear, wear of the primary and secondary shaft gears |
| 1st and 2nd gear synchronizer wear | |
| Main gear drive wear | |
| Wear of the main drive driven gear | |
| Worn differential gears or bearings | |
| Increased noise in all gears | Insufficient oil level |
| Bearing wear | |
| Breakage, chipped teeth or wear of the gears of the primary and/or secondary shafts or wear of the shafts | |
| Oil leak in the clutch area | Transmission housing |
| Clutch release bearing lever | |
| Oil leak in the middle of the transmission housing | Transmission housing |
| Switching mechanism | |
| Reversing light switch | |
| Oil leak on the left side of the transmission housing | Crankcase cover |
| Oil leak from main gear | Bearing caps and final drive seals |
| Final drive pan | |
| Final drive pan | |
| Gear grinding when shifting gears | Clutch release bearing lever |
| Clutch release drive | |
| Input shaft or gear block | |
| 5th gear synchronizer | |
| 5th gear or bearing | |
| 1st gear or bearing | |
| 1st and 2nd gear synchronizer | |
| 2nd gear or bearing | |
| 3rd gear or bearing | |
| 3rd and 4th gear synchronizer | |
| 4th gear or bearing | |
| Reverse gear |
Disadvantages, breakdowns and problems of the Lada Samara 2 box
This gearbox is most often criticized for low reliability, unclear switching and howling.
Severe bearing wear is the most common cause of humming noise.
Due to the breakdown of the locks on the clutches, gears may switch off spontaneously
A crunching noise when shifting indicates that the synchronizers in the gearbox have already worn out.
The rocker often loosens, sometimes adjustment helps, but most often it just requires replacement.
Oil leaks from oil seals, as well as from under the pan gasket, are very common.
You can contact the site administrator by email: [email protected]
All texts were written by me, are authored by Google, included in the original Yandex texts and notarized. For any borrowing, we immediately write an official letter on company letterhead in support of search networks, your hosting and domain registrar.
Next we go to court. Don’t try your luck, we have more than thirty successful Internet projects and have already won a dozen lawsuits.
The car moves not only thanks to the operation of the propulsion system. It creates the necessary and sufficient torque, which, through the transmission installed on the car, drives the wheels of the car. That is, it is the transmission that converts the rotational force into translational force.
Removal and Installation Guide
To conveniently dismantle the box from the car, you need to use a lift or inspection pit. It is extremely inconvenient to carry out work on a flat surface.
Having fixed the VAZ 2115 on the lift, you need to open the hood, remove the terminal from the battery and starter, disconnect the ground and the clutch cable. Next, having unscrewed the clutch and starter mounting bolts, we fix the exhaust manifold of the VAZ 2115 engine with a lifting mechanism bracket.
After installing the engine support safety crossbar, we move on to the bottom of the car. We remove the protection, then dismantle the clutch housing after draining all the oil. We disconnect the reverse sensor, loosen the clamps and remove the rod from the rod joint intended for changing gears. We unscrew the stud mounting the VAZ 2115 engine with the gearbox. Then we disconnect the steering knuckles from the ball knuckles and carefully remove the axle gear to avoid it getting into the crankcase. Having completed this operation, we knock out the second hinge, while moving the wheels in different directions. If it is not possible to disconnect the wheel drive from the axle shafts, the box is removed as an assembly. Using special equipment, press the hinge out of the axle gear. When you have everything in a suspended state, unscrew the remaining mounting bolts, having first positioned the hydraulic lift. Lower the engine slightly on the safety cross member and the gearbox will easily come down.
Removing the primary and secondary shafts
During removal and installation, do not allow the input shaft to press on the release spring petals. This may cause damage which will incur additional costs.
It is better to leave it to a specialist to disassemble the box itself and replace worn gears. If you have never done this before, it is better to refrain from experimenting. It is not difficult to disassemble it, but not everyone can assemble it without certain skills. Even experts sometimes make mistakes because of which they have to disassemble everything again.
When the box is repaired, do not forget to fill in special gear oil before installing it on the car. It is much more convenient to pour it on the ground. Oil must be filled strictly according to the level. High-quality oil will ensure uninterrupted operation of the box, while extending its service life for many years.
Installation occurs in complete reverse order. The main thing is not to forget to replace all the old retaining rings and before starting installation, lubricate the outer surface of the clutch sleeve of the bearing that disengages the clutch. After the installation is completed, all that remains is to adjust the clutch pedal travel and the drive that controls the gear shift mechanism.
Always change gears smoothly, fill in high-quality oil and your gearbox will serve trouble-free for many years.
https://youtube.com/watch?v=2YKhDWGX0lw%2520
Prevention and care
The most important factor influencing the condition of the gearbox is monitoring the level and condition of the oil.
It is advisable to check the oil level once every three weeks. Use a dipstick to check.
It is recommended to change the oil to mineral grade GL4 or 75W90. If you fill in high-quality oil and follow the switching rules, then repair of the gearbox, as a rule, is not required. If the oil level is low, the upper fifth gear will experience increased stress and may fail.
Change of oil
If an oil change is required, after installation on the overpass (above the inspection hole), the following work is carried out:
- The cap is removed and cleaned.
- The breather and outlet openings are cleaned with a brush.
- Place a container for used oil and unscrew the dipstick.
- The old oil is drained. The box is washed to remove any remaining old oil.
- The plug at the bottom is screwed on. New oil is poured through the dipstick hole.
- The dipstick is returned to its place and the cap is screwed on.