To disassemble the gearmotor, unscrew the screws securing the gearbox cover 6 and remove it together with the limit switch panel 4.
Then unscrew the screws securing the gearbox housing 11 to the electric motor housing 8 and disconnect them.
Remove armature 9 of the electric motor.
To remove gear 3 of the gearbox, unscrew the crank nut, remove the retaining ring from the axle and remove the axle with gear and washers from the housing.
After disassembly, blow out the internal cavities of the electric motor with compressed air to remove carbon dust deposits and check the condition of the brushes and commutator.
The brushes must move freely in the brush holders without jamming, and the springs must be intact and have sufficient elasticity.
Clean the commutator with fine-grained sandpaper and then wipe with a clean rag lightly greased with petroleum jelly.
If the collector is severely burnt or worn out, it is better to replace the gearmotor with a new one. Check for signs of jamming on the armature shaft journals.
If necessary, sand them with fine-grained sandpaper.
When assembling, move the brushes away from the commutator so as not to break them or damage their edges, and insert the armature into the body with extreme caution, avoiding hitting the armature on the poles so as not to break them.
After assembly, to align the bearings, tap the gear motor housing with a wooden hammer, and then check it on a stand.
When installing the crank, position it so that in its final position it is parallel to the short wiper rod and pointed towards the electric motor.
Data for checking the gearmotor
Rotation speed of the gearmotor shaft at a supply voltage of 14 V, a load torque of 1.47 Nm (0.15 kgf m) and an ambient temperature of 25±10 °C, min -1:
— first (small) 30–40
— second (large) 55–70
Current consumption at the above load torque, A, no more than:
— at first speed 3.5
— at second speed 5
If the brush springs are damaged or have lost their elasticity, replace them.
Check the ease of movement of the brushes in the brush holder.
They should move freely without jamming.
Replace worn or chipped brushes.
When replacing, solder the leads of the new brushes to the brush holder.
Clean the collector with fine sandpaper if it is dirty or has marks, scratches, etc.
If the commutator is badly worn or burnt, replace the armature or gearbox with electric motor assembly.
If you find traces of jamming on the armature journals, clean the journals with fine sandpaper.
Replace a gear that has severely worn or broken teeth.
Clean burnt or oxidized contacts of the self-stop mechanism with fine sandpaper.
Welcome to VAZ Repair!
Today in the “Lada Granta Repair” section you will learn how to replace the Lada Granta windshield wiper drive at home if it malfunctions. “Kalinovody and Grantovody” claim that among the numerous shortcomings or, more simply, “sores” of Kalina and Granta, one can safely include the problem of the windshield wiper drive, the average service life of which is no more than 3-5 years.
These same “sores” manifest themselves in different ways:
- Slow speed of wipers;
- Failures associated with plastic parts (rods);
- Exit of wipers beyond the boundaries of the cleaning area, etc.
The problem is that the price of the trapezoid assembly with gearbox is quite high. Therefore, in case of a problem with lubrication, the gearbox does not have to be changed; it can be disassembled and lubricated; fortunately, there are plenty of instructions on the Internet. The trapezoid is another matter; here, as a rule, replacement is inevitable.
In my case, the problem was the following - during operation, the wipers began to travel more and more beyond the cleaning area, while constantly hitting the frill pillar (a plastic decorative trim at the bottom of the windshield). The decision was made - replacing the Lada Granta windshield wiper drive completely, that is, the entire trapezoid.
Instead of the “native” drive, it was decided to install another one - manufactured by Valeo, they are interchangeable, so they are installed without problems.
In order to replace the Lada Granta windshield wiper drive you will need the following set of tools:
- Key to “10”, “13”;
- TORX T20;
- Screwdriver.
How to replace the windshield wiper drive on a Lada Granta? Step-by-step photo report on DIY replacement
Welcome to VAZ Repair! Today in the “Lada Granta Repair” section you will learn how to replace the Lada Granta windshield wiper drive at home if it malfunctions. “Kalinovody and Grantovody” claim that among the numerous shortcomings or, more simply, “sores” of Kalina and Granta, one can safely include the problem of the windshield wiper drive, the average service life of which is no more than 3-5 years.
These same “sores” manifest themselves in different ways:
- Slow speed of wipers;
- Failures associated with plastic parts (rods);
- Exit of wipers beyond the boundaries of the cleaning area, etc.
The problem is that the price of the trapezoid assembly with gearbox is quite high. Therefore, in case of a problem with lubrication, the gearbox does not have to be changed; it can be disassembled and lubricated; fortunately, there are plenty of instructions on the Internet. The trapezoid is another matter; here, as a rule, replacement is inevitable.
In my case, the problem was the following - during operation, the wipers began to travel more and more beyond the cleaning area, while constantly hitting the frill pillar (a plastic decorative trim at the bottom of the windshield). The decision was made - replacing the Lada Granta windshield wiper drive completely, that is, the entire trapezoid.
Instead of the “native” drive, it was decided to install another one - manufactured by Valeo, they are interchangeable, so they are installed without problems.
In order to replace the Lada Granta windshield wiper drive you will need the following set of tools:
- Key to “10”, “13”;
- TORX T20;
- Screwdriver.
Why wipers may not work on Lada Granta
Incorrect operation of the wipers is included in the list of five malfunctions for which any operation of the vehicle is prohibited, even driving to the repair site. Therefore, you should take the issues of repair and diagnostics of the wiper mechanism very seriously.
Why might the wipers not work?
The most basic reasons why wipers on a Lada Granta may not work.
- The steering column switch for the wiper operation mode is faulty.
- The contact relay is faulty.
- The fuse is faulty.
- The wiper mechanism (motor, ramp) is faulty.
- Circuit break.
Let's consider each of these reasons separately.
Fuse blown
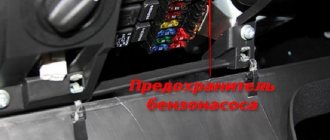
The most common situation is a blown fuse. Diagnostics should begin with it; to do this, replace the fuse with another one from the mounting block. The number of the windshield wiper fuse in the mounting block is F4. Detailed diagram of the mounting block is here.
The windshield wiper fuse is indicated by an arrow.
The wiper relay has “decided to live for a long time”
If, after replacing the fuse with a known good one, the wipers still do not work, then check the contact relay. The check is the same, it is replaced with a known good one.
Contact relay number K6.
The windshield wiper relay is indicated by an arrow.
Incorrect operation of the steering column switch
The car's wipers only work when the ignition is on. Therefore, if you try to turn on the windshield wiper with the ignition off and nothing happens, then this is not a breakdown!
Do-it-yourself replacement of the Lada Granta windshield wiper drive - step-by-step instructions
1. First of all, remove the wipers. This is done in the following way: it is necessary to remove two decorative plugs, under which there are mounting nuts with a key size of “13”, they must be unscrewed, and the windshield wipers must be removed from the slots along with the brushes and leads.
Note: After removing the wipers, do not turn them on so as not to have to worry about adjustments during assembly.
2. Next, you need to remove the frill (decorative plastic trim), for this you will need an “asterisk” - TORX T20.
Note: Some mounting screws are hidden under decorative caps.
3. Using a “10” key, you need to unscrew the nut (on the right), as well as 2 bolts (on the left) securing the trapezoid.
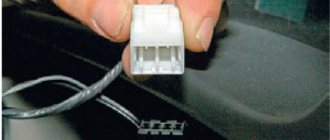
4. Now you can turn off the power; to do this, disconnect the wire from the battery and disconnect the connector. Now you can safely remove the entire trapezoid assembly.
5. Next, everyone can do their own depending on the need, some will have to replace everything, and for others it will be enough to wash everything and lubricate it properly.
6. After completing all the necessary work, you can perform assembly; it is performed in the reverse order.
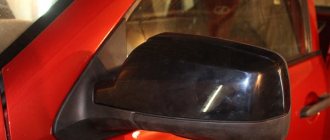
The new trapezoid works properly, while the cleaning area has increased (within the limits of what is permitted), it does not rub or touch anything anywhere
Source
Recommendations for selection
Let's consider several product manufacturers:
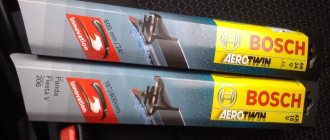
- Frameless Bosch Aerotwin. Belgian-made products are equipped with native fastenings; the main advantage is a long service life, as well as aerodynamics and the absence of extraneous sounds during operation.
- SWF VisioNext - also of the frameless type, equipped with a hook type mount. The products are manufactured by Valeo, which also produces many other types of components and parts for cars.
- Bosch Twin Spoiler frame brushes. Dimensions fit standard Granta windshield wipers. Despite the fact that the products are frame, they are quite reliable and have a long service life.
- Champion Aerovantage. This manufacturer has been on the market for quite a long time, during which time it has been able to win the trust of many of our compatriots. The products belong to the premium segment of the market and are equipped with a steel frame.
New Lada: Fuel tank volume Lada Granta: capacity and filling volumes
Repair of the windshield wiper system of a Lada Granta car
The windshield cleaning system includes a gear motor with brushes and a washer.
Removing the gear motor and windshield wiper trapezoid
We prepare the car for the job.
Disconnect the negative terminal of the battery
Using a Torx T20 screwdriver, unscrew seven self-tapping screws 6, Figure 1, and remove the right 1 and left 4 trims of the wind window facing frame.
Use a marker to mark the position of the wiper blades on the windshield.
Use a screwdriver to pry off the decorative cap
Remove the decorative cap from the brush lever
Using a 13mm socket, unscrew the nut securing the brush lever
Remove the washer and lever along with the brush from the shaft.
We also remove the left lever with the brush
We press the clamp of the wire block and disconnect the block of the instrument panel wiring harness
Using a 10 mm spanner, unscrew the nut securing the cleaner
Using a 10mm socket, unscrew the two bolts securing the purifier
We remove the gear motor with the windshield wiper trapezoid from the drainage box
We take out the wire holder from the hole in the box and remove the windshield wiper from the engine compartment
Use a marker to mark the position of the crank relative to the gearmotor shaft
Using a 13mm socket, unscrew the crank fastening nut.
Remove the crank from the gear motor shaft
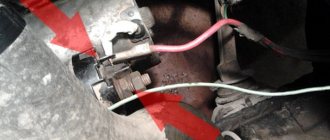
Using a 10mm socket, unscrew the three bolts securing the gear motor
Remove the gear motor from the bracket
Install the gear motor in reverse order.
To install the gear motor shaft in the correct position, connect the gear motor wire block.
Replacing the trapezoid and windshield wiper motor on a Lada Granta
The windshield wiper trapezoid, as a separate structural element, is quite reliable. However, there are times when this part of the car needs to be replaced. This need usually arises due to wear of the plastic bushings, souring or breakage of the windshield wiper arm drive shaft.
How to replace a windshield wiper trapezoid
To get started, we will need to remove the arms (leaders) of the windshield wiper blades. For this we need a 13mm head.
The fastening bolt is located under a plastic plug
After unscrewing the nut and shaking, remove the lever from the trapezoid shaft. Next, armed with a Torx 20 socket, unscrew the screws securing the plastic windshield trim and remove it. Then unscrew the two bolts and nut, as shown in the photo below.
Then we simply remove the trapezoid from the niche in the body, simultaneously disconnecting the wiring plug and, armed with a 10-size socket and a 13-size open-end wrench, loosen the bolts and nut securing the windshield wiper motor to the trapezoid.
We perform assembly in reverse order.
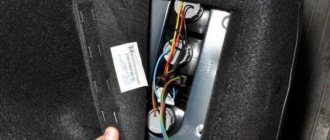
Removing the windshield washer pump and reservoir
We remove the pump and reservoir if the pump fails or the washer reservoir is damaged.
Disconnect the wire blocks from the pump terminals
Use a screwdriver to pry up the pump
Remove the pump from the reservoir hole
Remove the fluid supply hose to the washer nozzles
Windshield washer pump
The pump is sealed in the tank with a rubber bushing
Install the pump in reverse order. The pink wire should go to “+” and the black wire to “-”.
To replace the reservoir, remove the washer pump from it.
Using a 10mm socket, unscrew the nut securing the tank.
Removing the washer reservoir
When installing the tank, the protrusion on the tank should fit into the hole in the mudguard of the engine compartment
Source
Trapezoid and front wiper motor
Note
: For clarity, the hood has been removed in the photographs, although work can be done without dismantling it.
1. Open the hood and disconnect the wire from the negative terminal of the battery.
2. Use a flat-head screwdriver to pry up and remove the cap of the nut securing the windshield wiper arm.
3. Using a 13mm wrench, unscrew the nut securing the windshield wiper arm.
4. Mark with a marker and, lifting the lever up and rocking it up and down so as not to damage the paintwork of the hood, tear the lever off the splines.
5. Similarly, remove the second windshield wiper arm.
6. Using a TORX T20 bit, unscrew the two screws securing the air intake grille.
7. Carefully disengage and remove the left part of the air intake grille.
8. Using a 10 mm socket wrench, unscrew the nut and two bolts securing the front windshield wiper trapezoid.
9. Carefully remove the trapezoid of the front windshield wiper assembled with the electric motor from the niche, slightly turning the structure upward.
10. Pry up the latch...
... and disconnect the block of the windshield wiper wiring harness and the front wiring harness of the car.
11. We finally remove the front windshield wiper trapezoid assembly with the electric motor.
12. For subsequent correct assembly, use a marker or a knife blade to mark on both sides the location of the central rod of the trapezoid in relation to the bracket.
13. Use a 13 key to loosen the nut securing the central link of the trapezoid.
14. Unscrew the nut and remove the washer.
15. If, while unscrewing the fastening nut, the central rod of the trapezoid has shifted in relation to the bracket, then return it to its place, according to the previously applied marks.
16. Use a flat screwdriver to carefully pry...
... and then remove this rod from the splines of the electric motor shaft.
17. We move the central rod to the side...
... and using a 10 mm socket wrench, unscrew the three bolts securing the electric motor.
18. Remove the front wiper motor from the bracket.
19. We make the necessary repairs or replace parts and perform assembly in the reverse order. During assembly, ensure the correct mounting position of the central link of the trapezoid in relation to the bracket (according to the marks made during removal).
Replacing windshield wiper blades yourself
You do not need any special tool for this operation. Everything is done literally by hand and without unnecessary fuss. All you need to do is buy new ones that fit your car. Please note that the right and left wipers are often not the same length.
The brush replacement procedure itself is performed in a few simple steps:
- The windshield wiper arm is moved away from the windshield to a vertical position.
Hold the lever carefully, otherwise it may hit the glass sharply and damage it. First step of replacement. The 'wiper' is installed perpendicular to the glass - Open the plastic cover of the brush holder.
Hold the holder with one hand and pull the brush down. Remove the plug from the wiper - Take a new brush, put it on the holder and close the cap.
Pull the brush upward. The wiper is installed. You can repeat the operation on another windshield wiper. Pull the brush down towards you and remove
Video review of the procedure for replacing the trapezoid and electric motor of the front windshield wiper assembly Lada Granta
When purchasing a book in PDF
1. You will be able to download the book immediately after payment.
2. The book will be downloaded in PDF format, and you can download it to any device.
1. All books are of ideal quality, since we work with publishers directly.
2. Electronic books are in no way inferior to paper books and are their complete analogue.
3. Our company has offices in Ukraine, Russia and Poland, you can always contact us at a specific address.
4. All payments on the site are maximally protected and are made using global payment systems.
Trapezoid and front wiper motor
Note
: For clarity, the hood has been removed in the photographs, although work can be done without dismantling it.
1. Open the hood and disconnect the wire from the negative terminal of the battery.
2. Use a flat-head screwdriver to pry up and remove the cap of the nut securing the windshield wiper arm.
3. Using a 13mm wrench, unscrew the nut securing the windshield wiper arm.
4. Mark with a marker and, lifting the lever up and rocking it up and down so as not to damage the paintwork of the hood, tear the lever off the splines.
5. Similarly, remove the second windshield wiper arm.
6. Using a TORX T20 bit, unscrew the two screws securing the air intake grille.
7. Carefully disengage and remove the left part of the air intake grille.
8. Using a 10 mm socket wrench, unscrew the nut and two bolts securing the front windshield wiper trapezoid.
9. Carefully remove the trapezoid of the front windshield wiper assembled with the electric motor from the niche, slightly turning the structure upward.
10. Pry up the latch...
... and disconnect the block of the windshield wiper wiring harness and the front wiring harness of the car.
11. We finally remove the front windshield wiper trapezoid assembly with the electric motor.
12. For subsequent correct assembly, use a marker or a knife blade to mark on both sides the location of the central rod of the trapezoid in relation to the bracket.
13. Use a 13 key to loosen the nut securing the central link of the trapezoid.
14. Unscrew the nut and remove the washer.
15. If, while unscrewing the fastening nut, the central rod of the trapezoid has shifted in relation to the bracket, then return it to its place, according to the previously applied marks.
16. Use a flat screwdriver to carefully pry...
... and then remove this rod from the splines of the electric motor shaft.
17. We move the central rod to the side...
... and using a 10 mm socket wrench, unscrew the three bolts securing the electric motor.
18. Remove the front wiper motor from the bracket.
19. We make the necessary repairs or replace parts and perform assembly in the reverse order. During assembly, ensure the correct mounting position of the central link of the trapezoid in relation to the bracket (according to the marks made during removal).
Replacement of Lada Granta windshield wiper, windshield wipers, wiper motor
The Grant is equipped with a windshield cleaner and washer.
The windshield wiper consists of a gear motor with rods and two levers with brushes. The supply voltage is supplied to the electric motor of the gearmotor through an additional relay when the ignition is turned on. To protect the gearmotor from overloads, a bimetallic fuse is built into its internal circuit.
To supply washer fluid to the windshield, two washer nozzles are installed on the hood. The liquid is supplied to them by an electric pump through an elastic tube from the windshield washer reservoir mounted on the right mudguard in the engine compartment. The pump is installed on the wall of the tank.
In winter, a special antifreeze liquid must be filled into the windshield washer reservoir.
1. Prepare the car for work and disconnect the terminal from the negative terminal of the battery
2. Using a screwdriver, remove the plug from the windshield wiper arm.
3. Using a 13 mm socket wrench, unscrew the nut securing the windshield wiper arm and remove the arm.
If the lever sits tightly on the shaft splines, then in order not to bend the shaft, place a nut on the threads and use sliding pliers to press the lever off the shaft.
4. Similarly, remove the second windshield wiper arm.
5. Remove the air intake grille
6. Release the holder of the connection block of the windshield wiper gear motor.
7. Disconnect the windshield wiper wiring harness block from the vehicle's on-board network.
8. Using a 10 mm socket wrench, unscrew two bolts 1 and nut 2 securing the windshield wiper.
9. Carefully remove the glass cleaner from the air supply box.
If the windshield wiper is new or has been repaired, the arms should be installed last. Before installing the arms, connect the windshield wiper to the vehicle's on-board power supply and turn on the intermittent operation mode. Once the windshield wiper has completed a full cycle and stops, turn it off. And after that, set the levers in the lower position of the glass. If you cannot install the arms so that the windshield wiper works correctly, you should rearrange the crank on the gearmotor shaft (see below, “Windshield wiper - replacing the gearmotor.”
Video review of the procedure for replacing the trapezoid and electric motor of the front windshield wiper assembly Lada Granta
The book is not intended for sale in your country.
You can place an order for the paper version of this book on the website autoinform96.com.
Payment for goods and downloading of the book in electronic form (PDF format) is made on the website.
To do this, you need to find the book you are interested in and click on the “Buy” button. The price of the book is indicated on the button.
For convenience, the price on the website for residents of Russia, Belarus and Kazakhstan is presented in rubles.
For residents of Ukraine in hryvnias, and for all other countries - dollars.
After clicking on the “BUY” button, a payment window will open where you can select a payment system with which you can pay for the selected book using any bank card (Visa, MasterCard, MIR, etc.)
When you click on the “Pay by bank card” button, the Portmone payment system will open, which is the easiest way to make a payment.
In addition, the website offers four payment systems for payment:
- Yandex (payment from any bank cards, Yandex Money account, QIWI Wallet, terminals, etc.);
- Portmone (payment from any bank cards, Portmone account);
- PayPal (payment from any bank cards, PayPal account);
- WebMoney (payment from any bank cards, payment from WebMoney wallets).
How to set it up
The clock in the VAZ-2190 car is located on the liquid crystal display on the dashboard. The clock numbers are much larger than all the other numbers on the screen. In addition to the time, the display also displays the vehicle's daily and total mileage, fuel consumption and other data.
So, how to set the clock on the Lada Granta? To correctly set the clock on the new VAZ liftback model, you must clearly know where the following controls are located in the car:
- ignition switch - or, alternatively, side light switch on the dashboard;
- display control button (daily mileage reset button);
- windshield wiper control lever (right steering column switch).
The right steering column switch, in addition to all other functions, should scroll through the display operating modes in a circle, displaying information about the car's mileage, fuel consumption and the current time.
Payment via Yandex Cashier
After selecting payment via Yandex, the Yandex Cashier payment system will launch, where you need to select a convenient payment method (bank card, QIWI, Yandex Money account, etc.)
After specifying payment details and confirming payment, payment for the goods will occur.
If you have a bank card in a currency other than the ruble, then the money will be debited from the card at the rate of the Central Bank of Russia at the time of the purchase.
This payment method is optimal for residents of Russia, Kazakhstan and Belarus.
Official website of the Yandex Kassa payment system https://kassa.yandex.ru
Payment via Portmone
After selecting payment through Portmone, the payment system will launch, where you need to select the payment method: bank card or Portmone account.
The price in the Portmone payment system is converted into dollars at the exchange rate of the Central Bank of the country where you are located.
If you have a bank card in a currency other than the dollar, then the money will be debited from the card at the rate of the Central Bank of your country at the time of the purchase.
After specifying payment details and confirming payment, payment for the goods will occur.
Official website of the Portmone payment system https://www.portmone.com
Types of wipers for Lada Granta
Domestic VAZ models can be equipped with one of three types of windshield wipers:
- frame;
- hybrid;
- frameless.
By default, frame type is installed from the factory, as the most economical option. However, this design is short-lived and ineffective due to rapid wear and deformation under the rays of the sun. The basis of the brush is a metal strip with movable arms and a rubber cleaner.
The hybrid version of the wiper differs from its predecessor in that it is smaller in size and low-slung. The frameless model is made of impact-resistant plastic with a rubber seal at the end.
The non-contact option is considered the most effective, with a long service life and good adaptation to temperature changes.
There is a fourth type of brushes - winter ones. They are designed for use at sub-zero temperatures. The structure at the base is sealed with an additional layer of plastic. There is a special ledge on the surface for removing snow and ice from the windshield.
The method of fixing all four types is “J”-shaped. Previous modifications had an excellent mechanism, which is considered outdated and ineffective.
Payment via PayPal
After selecting payment via PayPal, the PayPal payment system will launch, where you need to select the payment method: bank card or PayPal account.
If you already have a PayPal account, then you need to log into it and make a payment.
If you do not have a PayPal account and you want to pay using a bank card via PayPal, you need to click on the “Create an Account” button - shown with an arrow in the picture.
PayPal will then prompt you to select your country and provide your credit card information.
After specifying the information required to make the payment, you must click on the “Pay Now” button.
Official website of the PayPal payment system https://www.paypal.com
Payment via WebMoney
After selecting payment via WebMoney, the payment system will launch, where you need to select the payment method: bank card or WebMoney wallet.
If you already have a WebMoney wallet, then you need to log into it and make a payment.
If you do not have a WebMoney wallet and you want to pay in another way, you need to select any of the methods that WebMoney offers and make the payment
After specifying payment details and confirming payment, payment for the goods will occur.
Official website of the WebMoney payment system https://www.webmoney.ru/
Downloading a book
After successfully completing the payment (by any method) and returning to the KrutilVertel store from the payment system website, you will be taken to the successful payment page:
On this page you need to indicate your e-mail, where access to download the book will be sent.
If you are already registered on our website, then simply follow the link to your personal account.
The book you purchased will be in your personal account, from where you can always download it.
Please note that after making the payment, you need to return back from the payment system website to the KrutilVertel website.
If for some reason you did not return back to the site and closed the payment system tab with a message about the successful completion of the payment, please let us know - we will send you a letter indicating access to download the book.
Problems when paying with bank cards
Sometimes difficulties may arise when paying with Visa/MasterCard bank cards. The most common of them:
- There is a restriction on the card for paying for online purchases
- A plastic card is not intended for making payments online.
- The plastic card is not activated for making payments online.
- There are not enough funds on the plastic card.
In order to solve these problems, you need to call or write to the technical support of the bank where you are served. Bank specialists will help you resolve them and make payments.
That's basically it. The entire process of paying for a book in PDF format on car repair on our website takes 1-2 minutes.
Source