What are thresholds for?
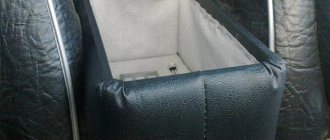
Car thresholds are one of the most vulnerable parts. They experience increased loads and may fail. Cars in which women and children are frequent passengers are at risk - children do not watch where they are, and constant contact with stilettos and other high-heeled shoes contributes to accelerated wear. Special linings will partially solve the problem.
Thresholds for Niva can be used in their pure form or with decorative overlays. For self-production of elements, a profile pipe is usually used.
Decorative elements made of stainless steel have a significant service life and look attractive. Manufacturing is carried out for specific car models. If the sills themselves give the car an attractive appearance and increase comfort when entering, then decorative overlays protect them from damage and extend their service life.
There are two types of pads:
Fastening is done using 3M tape; other methods are used less frequently. If you plan to protect finished structures with pads, first remove dirt and degrease. The procedure must be carried out at a temperature of 18 degrees or more. When the garage is very cold, the lining is first glued and then heated using an industrial hair dryer.
Mounting methods
Thresholds are mounted in two ways: manually or by welding. It depends solely on the type of part. Methods for connecting elements to the body:
- Removable method. For the most part, plastic and some metal structures are attached this way. For installation you will only need metal screws. Can be quickly replaced with a new or different model. The disadvantages include poor reliability of fasteners. It should also be noted that new holes must be treated with anti-corrosion compounds.
- Welding method. This is a radical fixation of metal and chrome models to the car body. This installation should be done by professionals. Once installed, you can safely step on the part; they can withstand the weight of a large adult person.
Dimensions and design description
The thresholds made of corrugated pipe on the Niva have a mass of about 150 kg, the main load falls on the front suspension, which can negatively affect its service life. The production technology is simple - a 50 mm pipe is cut and connected in the bending areas using bends. Then they are cut to form the desired angle and scalded in a circle.
Joints in visible places during the work are sanded using a grinder.
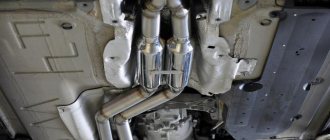
Pipes of standard sizes 15, 20, 25 can be conveniently processed using a pipe bender. It makes sense to remove the front bumper, hang a new element on standard fasteners - more powerful and heavier, it can be made from pipes, and install an electric winch on top. The protection for the pallet is stretched to the cross member from the bumper - it, together with the other elements on the bottom, acts as a ski. This makes it possible to overcome obstacles casually; a small stump on the road is not scary.
For manufacturing, pipes cut in half are used, connecting a pair of transverse pipes by 20. Bolts are used for fastening. One edge is fixed to the front bumper by the arch to the side members and using special brackets.
The next component of the thresholds is the protection of the front axle with a solid metal sheet; it should cover the entire structure. The front edge is mounted on the cross member of the front part of the suspension, the other is fixed on the transverse pipe of the power-type sills. At the end of the work, the transfer case, designed similarly to the protection of the engine sump, is protected with a special cover. 4 bolts are used for fastenings. Taking into account the specified dimensions, the following work plan has been drawn up. You can do the installation yourself.
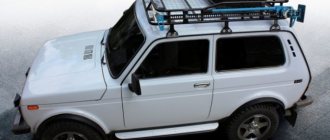
Thresholds made from a Niva profile with a cross-section of 50 mm effectively protect standard parts when the car is laid on its side. They also prevent negative impacts from sticks, branches, and protect against other damage. If there are no protective elements, the sides of the car will become very dented during use and will constantly need touching up.
How to make a pipe part yourself
You can make Niva thresholds from a profile pipe with your own hands to replace worn-out structures. Cars that constantly move off-road are at risk. Example - it is easy to tear off a long longitudinal rod from the bottom while driving over rough terrain with stumps, snags, etc.
The unit needs to be checked regularly - if the threshold is there and holds, it is not a fact that everything is in order with it. Fixation with mastic and dried clay is not what is needed for a safe and comfortable ride.
To make thresholds from a profile pipe, you need to prepare 80x40x2 mm products with a length of 3000 mm, and immediately buy a pair of connectors for the Niva. Reinforcement elements are replaced only when the old ones can no longer be used. If you do not plan to take new ones, cut the current products approximately 35 mm below the cutting line - this will allow both posts and the pipe profile to be welded.
At the bottom of the structure, you can additionally drain condensate and water. A small hole is enough; it is also closed with a plug. It is convenient to use a profile instead of thresholds; it will cost about 2 thousand rubles.
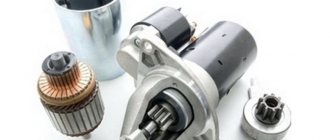
Generator - device, characteristics, operation check
Start the engine, let it run for a few minutes, then, pressing the gas pedal, bring the crankshaft speed to 3000 rpm.
Turn on the high beam headlights, heated rear window, and heater fan. Measure the voltage at the battery terminals, which should be above 13.2 V for generator 9412.3701 and 13.6 V for generator 371.3701.
If this is not the case, the voltage regulator with the brush assembly, the generator windings are faulty (open or shorted) or the contact rings of the field winding are oxidized.
The removed voltage regulator of the generator 9412.3701 can be checked by connecting a lamp (1–5 W, 12 V) between the brushes, and a power source to the “D” and “ground” terminals (DC only, “minus” to ground!) , initially with a voltage of 12 V, and then 15–16 V.
In the first case, the lamp should be on, in the second - not. If the lamp lights up in both cases, there is a breakdown in the regulator; if it doesn’t light up, there is a break or broken contact between the brushes and the regulator terminals. In both cases the regulator should be replaced. To check the generator regulator 371.3701, the current source should be connected to terminals “B” and “C” (“plus”) and “ground” (“minus”).
To check the valves of the rectifier unit, disconnect the wires from the battery, generator and from the voltage regulator terminal(s).
Connect the “plus” of the battery through a lamp (1–5 W, 12 V) to terminal “B” of the generator 9412.3701 (to terminal “30” of the generator 371.3701), and the “minus” to its body.
If the lamp is on, then there is a short circuit in both the block of “positive” and the block of “negative” valves.
To check the short circuit in the “positive” valves, connect the “plus” of the battery through a lamp to the “B” terminal of the generator 9412.3701 (with the “30” terminal of the 371.3701 generator), and the “minus” - to the terminal of one of the phase windings of the stator. If the lamp is on, one or more positive valves are broken.
To check the short circuit in the “negative” valves, connect the “plus” of the battery through a lamp to the terminal of one of the phase windings of the stator, and the “minus” to the generator housing. If the lamp is on, one or more negative valves are broken or the stator windings are shorted to the generator housing.
To prevent short-circuiting of the windings, remove the generator from the car and, having disconnected the windings from the voltage regulator and rectifier unit, check their short circuit to ground with a lamp or ohmmeter. The generator valves can also be checked with an ohmmeter without connecting the battery and test lamp.
The short circuit of additional diodes can be checked by connecting the “plus” of the battery through a lamp to terminal “D” of the generator 9412.3701 (to terminal “61” of the generator 371.3701), and the “minus” - to the terminal of one of the phase windings of the stator (to one of the mounting bolts of the rectifier block ). If the lamp is on, one or more additional diodes are broken.
A break in the main valves is determined by a sharp decrease in the output current (voltage drop under load). However, it can also be caused by an open or shorted circuit in the generator windings.
A break in the additional valves can be determined by the low voltage at plug “D” of generator 9412.3701 or plug “61” of generator 371.
3701 (below 14 V) at low and medium generator rotor speeds.
The serviceability of each diode (main or additional) can only be determined with a removed rectifier unit using an ohmmeter or a test lamp. If the rectifier unit fails, it is recommended to replace it as an assembly.
Also interesting: How to bleed the brakes on a Chevrolet Niva correctly
It is possible to replace individual valves, but the main valves will require repressing them in the holder - an operation that requires care and skill.
Read news about the new field
- Niva generator transfer bracket drawing
- Niva Chevrolet front hub repair
- Niva Chevrolet where is the starter relay located?
- Do-it-yourself Niva suspension lift. How to lift the front and rear suspension of a Niva car?
- Generator Niva 2121, 21213, 21214: which one is installed, replacement
- Generator Niva 2121, 21213, 21214: which one is installed, replacement
- Generator Niva 2121, 21213, 21214: which one is installed, replacement
- Generator Niva 2121, 21213, 21214: which one is installed, replacement
Installation features
When the original thresholds are worn out or rotten, new ones are required. The replacement procedure is carried out according to the following scheme:
If everything is done correctly, the new homemade thresholds will look no worse than the original ones, and will also harmoniously complement the design of the vehicle’s exterior. The same welding is used for connection with the spar. You can use 2121 channels on the Niva instead of a threshold - whichever is more convenient.
Strengthening thresholds
Power thresholds are made from a profile pipe with a cross-section of 3 mm. The procedure is performed as part of a standard replacement when the old products have served their purpose. Strengthening benefits:
The execution procedure is similar to that described above, only the steel profile is additionally welded. Motorists on the forums write that the work is labor-intensive and long, so it’s easier to immediately buy a reinforced unit. Similar services are provided at service stations.
Without welding, installation and reinforcement will not work.
Niva 2121 #5 Manufacturing of power thresholds.
The process moves from uprooting rot to renewing iron.
First of all, we return rigidity to the body.
We start with the manufacture of power thresholds.
We prepare the installation site - remove the unnecessary, modify the useful. We carefully review what we will treat and what we will change.
Since the car is for tourism and not for sports, we use a 40x80 profile. We dampen the ends of the profile. Since the part is located in the active sandblasting zone, all seams are sealed. From the outside it looks like this:
The water won't pass
After cutting the seam, we try the part in place:
When installed, the threshold will go even deeper into the body and will protrude by about 20mm.
What are the dangers of using homemade thresholds?
The main difficulty is the complexity of their production. Removable and non-removable structures must be made in accordance with the regulations, using welding, drawing and other technologies. You can save your budget, but you need the appropriate skills to carry out the work.
The top flange will be durable, practical and aesthetic if it is made from high quality raw materials. The same can be said about the shelf, stamping under the door, sidewall, bottom flange. If the work is performed incorrectly, parts may sag, rust, and as a result their characteristics will change.
The fastenings are made reliable, otherwise the thresholds may fall off, which will increase the risk of injury. The tightness of the connections prevents moisture and dirt from entering the joints. So there are no risks when using high-quality homemade thresholds, but making them that way is not easy. You need to work according to the described scheme and use high-quality materials.
Source
Thresholds on Niva: do-it-yourself installation options, photos, drawings
Hello! You all know about the existence of such a car as the Niva. Moreover, this crossover is produced by domestic and foreign manufacturers represented by AvtoVAZ and Chevrolet, respectively.
Today I would like to equally touch on the VAZ and Chevrolet, since all the proposed options are perfect for the domestic version of the crossover, for the almost American one. Still, Chevrolet is a brand from the USA. But that's not the point.
There are such elements as rapids on the Niva. This is special additional equipment aimed at performing several functions simultaneously. It all depends on what thresholds you decide to set. Therefore, I want to tell you about such overlays, what they are like, how installation is carried out and whether it is possible to make them yourself using available materials, drawings, video and photo instructions. Go!
DIY repair
Repairing linings and replacing niva thresholds themselves is work that is often done with your own hands. It is enough to use a stainless steel pipe or a finished part, and also have minimal welding skills.
Main types of thresholds for Niva:
- Welded - they form a single whole with the spar and the body, impart rigidity to the structure, and protect it from significant damage.
- Removable – used less frequently, protect the body and side members from gravel, stones, and sand. The element is removable; it is easier to replace an unusable part with a new one during repairs.
Restoration is carried out due to severe damage and corrosion. To remove dents, the part is removed, laid or placed on a convenient plane, and the damaged areas are pulled out with a mallet. In case of varnish/paint peeling, the problem area is masked.
Additionally, when restoring dents with damaged paintwork, an anti-corrosion compound is used.
If the part is non-removable, then the work is carried out from the outside. A small hole is made in a separate part of the product, an inverter is inserted into it, and the defect is pulled out under pressure.
Heavily rusted products are replaced. When this is not possible, completely clean the surface with emery, followed by degreasing. Welding is used in difficult situations.
General procedure:
- If the surface is covered with corrosion, clean it (this step can be skipped).
- The epoxy resin is diluted with a hardener, silver, and applied to a previously degreased surface.
- Place pieces of fiberglass on the resin and roll everything in place with a rubber roller.
- They are waiting for polymerization - the process takes about 12 hours.
- They sand down the uneven surfaces, apply a layer of primer, and paint.
During repairs, use a grinder, welding machine, workbench or base plate.
Why is this necessary?
What Nivas do you know? I can remember the following:
These are all good cars that could benefit from additional sill installation.
They have several main functions:
Protecting the thresholds with appropriate elements is considered a competent, although not mandatory, solution for the Niva.
Suggested options
There should be no problems with where to buy such elements. Go to Avito, browse the Internet, or just go to auto parts stores. The assortment is now huge, and the price is reasonable.
The question is what is your goal when setting thresholds. The type of elements directly depends on this.
In total, 3 categories of thresholds are offered for the Niva.
I can’t say specifically how much these or those thresholds cost. There are a lot of options, including a Boomer design and some unique designs, the prices of which are prohibitive.
But you can start with painted plastic parts. Installation is extremely simple; replacement is completed in a matter of minutes if the previous ones were damaged. If you prefer the repair option, that is, there are thresholds that can be restored but provide increased protection, take steel or chrome-plated products. The plastic is purely for decoration, so they will only get in the way when driving off-road.
Installation methods
If you purchased a set of thresholds for the Niva, you should first find out what installation method they are designed for before purchasing.
There are two connection methods in total.
Decide for yourself what to do in your case. I personally would first try the removable option, figure out which thresholds look better. If I had found the ideal solution, I would have welded it already.
Power thresholds Drawing — Chevrolet Niva, l., year on DRIVE2
Stones that fly out from under the wheels and can scratch the body also protect against collisions with other vehicles, and also provide protection when passing any obstacles.
A drawing of thresholds on a Chevrolet Niva is used as a substrate to facilitate landing, since the height of the SUV is not small. Their presence gives the car a more solid and elegant look Contents 2 How they are connected to the body Types of thresholds The first type is decorative, their design is made of plastic, and protects from minor impacts, dirt, sand and stones, and are usually suitable if the car is used in urban conditions. Therefore, if you decide to go off-road seriously, they will not protect you from serious impacts, since their design is fragile. Also, when you get into a vehicle, it’s better not to lean too hard on them. One of the advantages is that they are installed quickly and without any problems.
Part 1. Kenguryatnik What stood on the thresholds, there is not a hint of the drawing of the thresholds on the Chevrolet Niva deflection.
After installing the thresholds, you cannot use a standard jack; you have to buy a hydraulic one. Body threshold left right - rub.
Delivery, pickup. It is necessary that the product is installed perpendicularly.
In general, I advise everyone to install it. You can find out about the new crossover from Renault - Kadjar. The running boards are attached to the car using bolts. But if you do damage this product, know that it cannot be repaired and will need to be replaced immediately.
Self-production
There are a great many options for modifying the Niva. Of the most popular, I would highlight the following:
If you don’t have enough thresholds to be completely happy, and the options offered in stores don’t suit you, you can assemble the structure yourself.
The process is not the easiest. But experience suggests that the most difficult stage is the creation of drawings and blanks.
Therefore, the step-by-step procedure looks like this:
At this point, manufacturing, assembly and installation are completed. If you do not plan to perform any additional work on applying paint and varnish materials to the thresholds, then you can easily complete the job in 1-2 days.
Thresholds are a useful, practical and beautiful addition to the Niva, regardless of its model and manufacturer.
Thank you for attention! Subscribe, ask questions, leave comments and wait for new materials on our website!
Source
Communities › Kulibin Club › Blog › Body: Do-it-yourself power thresholds on Niva
Hi all! I want to tell you how I made power thresholds on my Niva. Since the thresholds on the Niva were rotten and were pierced with a screwdriver, I decided to replace them, and since the native Niva rapids are weak, I decided to make power ones, but with the condition that they did not differ in appearance from the original ones, or at least almost did not differ. After digging through a bunch of information on the Internet, I decided to go my own way. For this purpose, original thresholds, original floor and threshold connector, original threshold amplifiers (were not useful) and a 60x60mm square profile with a wall thickness of 2mm were purchased. Next, look at the photos and captions:
As a result, externally the sills look almost like original ones, since the trim is original, but a couple of centimeters shorter at the bottom, which helps to increase ground clearance, you can now jack it at any place on the sill without fear of bending it, six-month tests have shown the survivability of this design, I am satisfied with the work done . I hope my post will be useful to someone... If there is interest, I will describe here other improvements to the Niva, for example, repair and strengthening of cracked front side members, installation of power steering on the Niva, installation of electric fans and much more, but not all at once))) That's all for now))) and see you again.
I see that many people write about the lack of connection between the threshold and the spar, here, in addition, I’m posting a couple of photos of the connection between the threshold and the spar:
I haven’t made a more rigid design yet due to the fact that the car is not for competitions... I’ve been driving it for more than half a year now and no changes in the design have been noticed yet...
Making a Niva 2121 elevator with your own hands, drawings, dimensions
We will tell you how to properly perform tuning modifications in this material.
Do-it-yourself elevator - drawings, diagrams, sizes, types of kits. Lifting varies in the degree of intervention in the standard structure. For some, it is enough to raise the SUV by a few centimeters, and for others by as much as 20.
Extreme tuning – maximizing cross-country ability for traveling on severe off-road conditions.
- Regular jack
- Hijack jack
- Spring puller
- Balloon wrench
- Ratchet socket set
- Set of open-end wrenches
- Mount
- Wooden deck (stump)
It is advisable to perform such work with a partner. First of all, it's safer. Secondly, some lifting work is performed with four hands. Let's take the front suspension as an example.
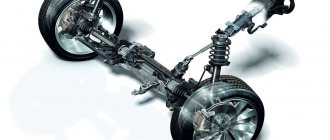
Raise the front end. You can safely cling to the standard bumper, only the jack is installed under the pipe securing it. By removing the wheel, we get full access to the lever and spring. The front suspension 21214 is made using a double wishbone design, which simplifies the task.
The lever travel is limited by the shock absorber. Unscrew its fastening and move it to the side. Next you need to free the suspension from the anti-roll bar. The mounting bolts may become stuck due to corrosion, so we will use a penetrating liquid (such as WD-40). The stabilizer silent block clamp can be pryed off with a pry bar.
Then disconnect the hub from the lower arm. To do this, you need to jack up the suspension and fix the steering knuckle of the wheel. You can tie it with wire. Then unscrew the 3 mounting bolts and release the ball joint.
We fix the spring with ties and lower the jack. We remove the old elastic element. In some cases, it is enough to simply lower the lever with your foot, and the spring will come out without the use of ties.
Remove the upper support rings from the old springs. With their help, the elastic element is centered in the cups.
They come together easily with a hammer and screwdriver. We install the rings on new, longer springs. We put the elastic elements in their regular places and jack up the lower arm until it is completely aligned with the lower cup. At the same time, an assistant centers the shock absorber eye and moves the steering knuckle to the mounting location of the lower ball joint. We tighten the ball “triangle” and attach the shock absorber mounting axis.
By manipulating the jack, we “catch” the mounting holes for the stabilizer bar clamp. With its bolts it should get into the normal place without distortion. After such modernization, the clearance increases by 30-50 mm. This is enough to install wheels of larger diameter, and the bottom will still rise above the ground.
The rear axle of the Niva can be lifted by installing spacer supports of increased height. When using a size of up to 50 mm (according to changes in front end height), no modifications to the rear axle are required. By lifting the rear axle, maintenance can be carried out on the axle and brake system.
The handbrake cable may need to be replaced. It is lengthened by a couple of centimeters. Otherwise, the Niva lift will lead to increased wear of the brake pads in the rear drums. Disconnect the lower shock absorber mounts and lower them until the springs stretch.
Also interesting: What to choose: Chevrolet Niva or UAZ Patriot
We take out the elastic elements and knock off the support rings from them. We clean the upper cup and carry out anticorrosive treatment. We install new supports of increased size and seat the springs using a jack. We fasten the shock absorbers, assemble the axle, and mount the wheels.
Such a lift will not arouse suspicion among traffic police inspectors, and the cross-country ability of your NIVA 2121 will improve. No drawings, much less homemade parts, are required. You buy new springs and about the rates, the rest is a matter of technology. Labor costs for an elevator of one NIVA are two people/one day off.
Making a Niva-2121 elevator with your own hands, the drawings, the dimensions of which are freely available, will not be difficult. Thanks to such a trick, you can make your car more stable on the road and overcome a lot of obstacles with it. Of course, to bring a truly high-quality Niva elevator to life with your own hands, you will have to work hard.
The process will take time and require effort, because even the easiest elevator requires a significant immersion in the technical aspects of the issue. However, the end result will live up to all expectations, allowing the modest Niva to show its exceptional side.
For lovers of hunting, fishing and country travel, as well as those eager to try themselves and their own “Niva” in driving a vehicle in difficult-to-pass places, we have the opportunity to offer an increase in ground clearance, which increases the cross-country ability of your car.
Niva tuning – suspension lifting.
At the moment, there are at least 6 types of suspension lifting for Niva and Sh/Niva, each is interesting in its own right and is negotiated during the preparation of the car for “off-road” at the request of the visitor, taking into account the distinctive features of the operation of his car and the sizes of wheels and tires he uses wants to put it on his car.
We often use a kit from the Russian club 'Korovka' as a base. This lift kit was made at the factory and was tested at competitions in Russia. The ground clearance increases by 5 centimeters, which actually makes it possible to install R15 235/75 or R16 235/70 tires (on the right wheels). In addition, this will provide a rise of another 4 centimeters.
In total, the increase in ground clearance will be 9-10 cm! In this version, “NIVA”, without loss of comfortable qualities, has the ability to be used both on paved highways and off-road, being in no way inferior to foreign-made SUVs.
Consequently, at the lower point of the RZM the clearance is 25 cm, and at the cut of the threshold - 44.5 cm.
Front suspension lift.
The lift is performed by installing targeted washers under the lower spring pad (they create a sufficient angle for the front spring). Under the upper arm (between it and the ball) another spacer washer is placed (i.e., we unload the arm).
The levers of the steering knuckles are swapped and the tips of the control rods already go from top to bottom (since subsequently the work done before, when the rod is fully turned, they will rest against the stabilizer, although at the request of the visitor it is possible to leave it as it was by changing the fastening of the stabilizer).
During lifting work, it is often necessary to change shock absorbers, springs, and resins on request. spacers, internal CV joint boots on tuning suspensions modified for this type of lift and create adjustments. spring bumpers.
Lifting the Niva suspension at the rear.
The lift is carried out by installing new rear spring cups, which are bolted on top of the standard ones, and brackets for moving the mounting points of the rear shock absorbers up 5 centimeters (bolted).
Also interesting: What is a cardan shaft? Key Features
The short upper rods of the rear axle are lengthened or made adjustable (for easy rotation of the shank, so as not to bite the crosspiece), the reaction rods of the rear axle are either reinforced with an angle or installed double; at the request of the visitor, a rear axle stabilizer “Tehnomaster” (Tolyatti) is added, although it will be needed adjust to the elevator machine, digest.
Similarly, it is preferable, on lifted cars, to use a rear CV joint. Those who begin to lift old or worn-out cars need to remember about the internal CV joints (the balls leave their place) and will need to prepare for their replacement. The solution to this difficulty is quite possible by reducing the drive angle by untying the front axle.
The outer CV joints are too little susceptible to this, it will be worse for them if the wheel becomes larger in offset, width and weight, and then they can “crunch”. Although even then the hub bearing has a hard time, especially if it had play before.
Although we have avoided this problem, since we install steering knuckles with 2 ball bearings (from the rear axle shaft), they do not need to be adjusted; they are tightened all the way, although it is much better with a torque wrench. The unit comes out maintenance-free, the hub is unloaded, rolling is easier and the dynamics of the car are much better. Steering knuckles are naturally of domestic production and with a guarantee.
When installing wide wheels after a lift, you will need to keep in mind the ball ones (when the weak ones “fly”), the pendulum will also be able to fly, and the installation of the latest gas shock absorbers results in a stiffening of the upper bracket of the lane. shock absorber (otherwise it tears, especially when the front end is heavier), the mounting of the rear shock absorbers can also be strengthened. It is preferable when lifting, replace the suspension with p/urethane instead of rubber.
Economical Niva suspension lift of 1.5-2 centimeters. In such a situation, we resort to replacing the rubber spacers for the springs with tuning ones (of greater thickness), installing washers, spacers for the upper ball joints and adjusting the spring bumpers (at the visitor’s request). In this implementation, the Niva gets wheels (correct) in size R15 215/75.
Like any change in the factory design of a car, lifting has a number of disadvantages. It is imperative that you familiarize yourself with this before proceeding with the installation of the equipment. The main points can be highlighted:
- Reduced service life of drives because the bend angle changes and the load on the nodes increases.
- The center of gravity of the car changes, stability decreases during sharp turns
- Increased load on the chassis, resulting in increased wear of parts.
- The service life of the transmission is reduced.
All this should be taken into account before starting work. It is not recommended to install a lift kit on a Chevrolet Niva with high mileage, since there is a high probability that many parts may soon fail. There is no need to re-equip the car if it is not planned to operate in severe off-road conditions, since the car was originally designed to overcome most obstacles.
Read news about the new Niva
- Diagram and location of the fuse box Niva VAZ-21213 and 21214
- How to make a Niva spar amplifier
- Engine VAZ 21213 Niva
- LADA Niva – Operating manual – Official LADA website
- Diagram and location of the fuse box Niva VAZ-21213 and 21214
- Farewell chord: LADA 4×4 Bronto frees up the production line for a new generation
- VAZ 2121 Niva 4x4 technical specifications
- Front bracket with platform for Lada4x4 winch, NP-00156, price 5870 rubles. Buy