There is a solution!
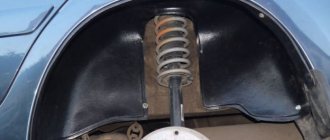
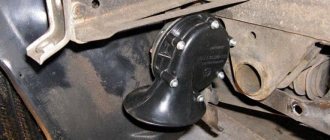
As many people know, the front fender liners of the “second Lada Kalina” are smaller in size than the standard lockers of the first family of cars. On the “first Lada Kalina”, this part is attached to the body through a special rubber profile (this profile is absent in the design of the “Kalina-2”). Attaching the rear fender liners, as the reader has already understood, can be done in the same way as was used when installing the Kalina-1 lockers. That is, a plastic part is attached to the arch using a flexible profile. The cross section of this “miraculous” profile is shown in the figure.
Rear fender liner fastening: profile, shield, self-tapping screw
Let’s immediately list what exactly we want to get:
- The plastic fender liner will hold onto the metal side of the arch, and we use a rubber profile as a fastening;
- On the side that is closer to the bumper, a plastic shield should be pressed against the arch liner (shown in the figure);
- The front inner corner of the fender liner will have to be secured with a self-tapping screw.
If the reader is completely satisfied with the listed features, the study of this review can be continued. Note that before installing the fender liners, it is necessary to wash and dry the inner surface of the arches, and in this case it is better to hang the car on a jack (the wheels are dismantled one by one). It makes sense to treat metal surfaces with an anti-corrosion compound. But there is no need to be too zealous - the metal will still be protected from mechanical influences. In this case, it is not necessary to carry out complex anticorrosive treatment, as shown here.
Installation of fender liners in the rear arches of the “second Kalina” without the use of screws
Let’s make a reservation right away that exactly one self-tapping screw will have to be screwed into each of the arches. But this installation option looks better than attaching the fender liners using self-tapping screws located around the entire perimeter. The last of these installation methods is discussed in the video. We, in turn, want to install plastic fender liners without harming body parts. And we will be able to fulfill this requirement at least 99%.
- There is a solution!
- Sequencing
- Alternative options
Sequencing
We will assume that all preparatory work (wheel removal, washing, anti-corrosion treatment) has been completed. The plastic fender liner purchased in the store needs to be modified - you need to cut off the horizontal side edge, which is located near the outer side of the arch, leaving a side 7 mm wide. This side, that is, the remaining part of the protruding edge, is “recessed” into the profile slot. The lower rear part of the fender liner is tucked under the bumper. So, from this part of the part the edge is cut off completely (a 7 mm wide edge is not needed here).
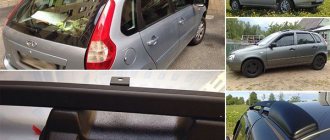
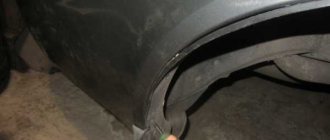
Rear plastic fender liners after installation
You can install the rear fender liners by following these steps:
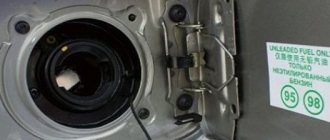
- The plastic shield that protects the bumper from dirt is dismantled, and the screws that secure the bumper to the arch are also unscrewed;
- The rubber profile is placed on the fender liner along its entire length, starting from the lower front corner;
- The fender liner is installed in its rightful place, tucking the metal side of the arch into the slot, and the rear part of the fender liner goes into the gap between the bumper and the surface of the arch;
- At the installation points of the self-tapping screws that secured the bumper, the fender liner needs to be drilled with an awl;
- The bumper mount is restored;
- The shield is being installed.
At the final stage, it is recommended to push the plastic inside the arch with your hands, drill a hole near the corner of the fender liner and screw a self-tapping screw into it. And to protect the metal from rust, you can use silicone sealant.
How to Install Fender Lockers on a Priora
Removing and installing the fender liner and wing protective casing on a VAZ 2170 2171 2172 Lada Priora
1 Operations performed when removing and installing the fender liner and fender guard on a VAZ 2170 2171 2172 Lada Priora 1.1 Tools required for removing and installing the fender liner and fender guard on a VAZ 2170 2171 2172 Lada Priora
1.2 Sequence of operations when removing and installing the fender liner and protective wing cover on a VAZ 2170 2171 2172 Lada Priora
2 How to install fender liners on a VAZ!
3 Installing fender liners (lockers) without screws, well, almost without them
Operations performed when removing and installing the fender liner and wing protective casing on a VAZ 2170 2171 2172 Lada Priora
To protect against dirt, fender liners are installed in the niches of the front wheels of the car. The ingress of dirt and moisture onto the car body shortens its service life, so it is recommended to monitor the condition of the wheel arch liners and, if they are lost, install new ones. In addition, I would like to note that the factory wheel arch liners do not cover the entire wheel niche, so replace them with those that will completely protect the niche from dirt. In the case of installing full-size arch protection, I would also like to note a slight improvement in the sound insulation of the car.
The tool required for removing and installing the fender liner and wing protective cover on a VAZ 2170 2171 2172 Lada Priora
You will need: keys “7”, “10”, TORX T30 wrench, screwdriver with a Phillips blade.
Sequence of operations when removing and installing the fender liner and wing protective casing on a VAZ 2170 2171 2172 Lada Priora
1. Remove the corresponding wheel.
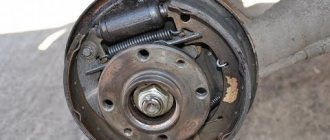
3. ...and remove the shield.
How to install fender liners on a VAZ!
WHO WANTS TO HELP IN THE DEVELOPMENT OF THE CHANNEL CLICK ON THE LINK, I WILL BE THANKFUL: ...
Installing fender liners (lockers) without screws, well, almost without them
I'll show you my idea on how to install fender liners
(lockers) without screws, well, almost without them. Self-tapping screws will come in handy...
4. Using a “7” wrench, remove the screw securing the front fender fairing to the sill.
5. Using a “7” wrench, remove one screw each securing the front wing fairing to the fender liner and fender, and using a “10” wrench, unscrew the two nuts securing it to the body...
6. ...and remove the fairing.
7. Use a 10mm wrench to unscrew the nut, and use a screwdriver to unscrew the screw securing the fender liner...
8. ...and remove the fender liner.
9. Remove the three screws securing the fender guard to the bumper.
10. Unscrew the nut securing the casing to the body bracket and the screw securing it to the bumper...
11. ...and remove the wing protective cover.
12. Install the removed parts in the reverse order of removal.
Note When installing the removed parts, check that all spring nuts are present on the wing housing...
Below, as an example, is a full-size arch that can be attached with screws or rivets. Full-length arch protection requires additional holes for fasteners, since its design is more developed. Holes can be drilled directly on site.
Alternative options
It is up to the owner to decide whether to install fender liners or not, and why it is needed in this or that case. The plastic arch protection installed on some foreign cars sometimes looks more impressive than the option we reviewed. In particular, an external edging (plastic strip) can be used, under which the edge of the fender liner extends. It is usually not possible to ensure a hermetically sealed contact between the outer overlay and the surface of the paintwork, and you can see what the consequences of all this are.
Installing rear fender liners on Kalina
| It is no secret that the factory installs fender liners on Kalina only on the front part of the car, while the rear arches are left without such protection. In this article we will tell you how to install rear lockers with your own hands. |
Kalina's front lockers are secured perfectly, but in order to install the rear fender liners, holes are often deliberately drilled in the body, damaging the factory paint, anti-corrosion and galvanization. As a result, after installing the wheel arch liners, dirt from the wheel collects in a poorly ventilated cavity and turns the locker attachment points into centers of corrosion.
To prevent drilling of the body, it is proposed to use a special profile rubber seal that secures the front locker to the bend of the wheel arch. (catalog number: “Flat seal” 11180-8403370-00).
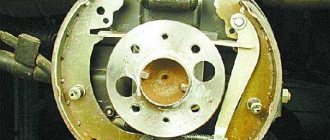
Preparation for installation : The installation process begins with washing the arches from dirt. After this, you need to remove the plastic shields that form the rear of the wheel arch and cover the bumper from dirt. Then unscrew the screws that secure the bumper to the arch.
Installing the rear locker : The length of the elastic is exactly equal to the length of the “metal” part of the wheel arch. The remaining part of the locker will need to be tucked under the rear bumper. At the locker, we partially cut off the flange that forms the edge of the wheel arch, leaving about 70mm. Due to the resulting edge, the elastic band will stick to the locker. On the part of the fender liner that will be tucked under the bumper, cut off the flange. We cut out the area where the bumper and wing meet. We put on an elastic band and put on a locker.
The rubber band should fit tightly on the metal flanging of the arch, the rest of the locker should fit into the gap between the bumper and the metal of the arch. We drive the awl into the holes in the bumper and make holes in the fender liner. We attach the rear bumper to the arch. We install a plastic shield that forms the back of the arch. In the hired version, the upper part of the shield pressed the lower part of the locker to the arch - it sits tightly.
To secure the front inner part of the locker, which is not adjacent to the side member, you should drill a hole and tighten it with a self-tapping screw. To prevent the formation of rust in the drilled hole, we apply silicone sealant around it and in the places where the locker adheres to the arch.
In the area of the mudguard, everything is done on the basis of its internal attachment to the arch. You can place the edge of the fender liner under the mudguard and tighten it, or install a large diameter washer or plate. It turns out that the shield seal simultaneously holds the locker with one edge and clings to the wing flange with the other.
Fender liners for Lada Granta - choice, price and do-it-yourself installation
The domestic automaker does not equip production Lada Granta models with fender liners (lockers), and therefore you will have to buy and install them yourself.
Not only has this model lost this element, they are often not found on Kalina or Priora, as well as on some foreign cars. What this is connected with is not known for certain. Let's figure out together whether fender liners are needed on the Grant and what role they play.
Let’s immediately note the fact that only rear lockers are missing on production samples.
Is it necessary to install fender liners on the Lada Granta?
The installation of lockers is often refused because the method of fastening them (with self-tapping screws) negatively affects the surface of the wing (rust appears). Another problem is that moisture accumulates underneath them - this has a very negative effect on the condition of the body.
Unfortunately, standard lockers for Granta are practically impossible to find in the auto parts markets now, but if you are lucky and notice them in a car store, buy them without hesitation. Before installing them, you will have to treat the body with an anti-corrosion compound for protection.
On the other hand, fender liners are necessary to improve sound insulation. Agree, the sound of crushed stone hitting the body in the cabin while driving is very annoying.
Try to drive a dozen kilometers on an uneven dirt road, and you will understand that without fender liners the nervous system will not last long: the hum, knocking and grinding quickly irritate not only the driver, but also the passengers sitting in the cabin. In addition, the main task of lockers is to protect the arch from mechanical damage and corrosion.
A paradoxical situation arises here: with fender liners, moisture accumulates between the plastic and the surface of the arch, and without them, water, dirt and gravel directly affect the metal of the body.
If you want to extend the life of the body of your Lada Granta, the wheel arches will have to be covered with lockers. Corrosion from self-tapping screws can be slightly compensated for. And without lockers, the body will begin to turn into dust after 2 seasons of such use (and in some cases even earlier).
In the winter season, in our megacities, roads are often sprinkled with reagents, from the influence of which the sills and bottom of the car begin to rot. Imagine what will happen to a body without installed fender liners - it will simply begin to rust after six months of active use.
Choosing the type of fender liner
The wheel arches of a car are perhaps the most vulnerable part of the body, subject to corrosion.
And if the Lada Granta body is treated with a special anti-corrosion compound to protect it from the aggressive environment of modern cities, and the bottom of the body has protective linings, then the car arches are not protected by anything.
They are constantly subject to mechanical damage and are in direct contact with water, which, together with temperature changes, has a destructive effect on both the wings and the car body as a whole. Let's figure out which fender liners to choose and how to install them correctly.
Plastic
There are a considerable number of factory-made products on sale for the Lada Granta, both sedan and liftback, because they are the same. They are made from high-quality and reliable material (plastic or high-strength polyethylene).
But you can often come across counterfeit security elements that are made from recycled materials - they are cheaper, but wear out very quickly, often fall off their fastenings and do not cope with their main task.
They can be distinguished by their hardness (low-quality products can be determined literally by touch - the material is very soft).
Having saved on lockers, you will most likely encounter the fact that in the cold the installed set will begin to crack and collapse, and in the warm season they will develop a very unpleasant smell: which indicates the cheapness of the plastic from which they are made.
High-quality fender liners for the Lada Granta are made of heat-strengthened plastic and are slightly more expensive than the nameless set on the market. They are sold in pairs or as a set for all 4 wheel arches of the car. There is another type of wheel arches - liquid. We'll talk about them further.
With or without sound insulation
Here we think everything is clear, the former protect exclusively the body from various influences, while the latter also have sound insulation, which can significantly reduce the noise level, especially when driving on a bad road.
Liquid
Liquid fender liners are a special composition that is applied to the surface of the wheel arch.
The versatility of this material allows it to be used not only to treat the inside of the wings, but also other parts of the body exposed to aggressive external environments and mechanical damage.
This material has excellent sound insulation characteristics and perfectly protects the body from fine water spray and small gravel. Liquid lockers are not without their disadvantages, so as not to go into detail - we will only consider the main advantages and disadvantages.
Pros of using liquid lockers
- Impacts of stones on plastic material are absorbed better than in the case of plastic;
- To install these lockers on the Lada Granta, you do not need to drill the body;
- The surface area of protection is not limited to the wheel arches;
- The material is universal and can be used on almost any car.
Disadvantages of using liquid lockers
- Demanding on the cleanliness of the surface (before applying the composition, you will have to clean the surface until it shines, otherwise it will not stick);
- To apply the composition you will need a compressor with a sprayer, which in almost 100% of cases cuts off the possibility of self-application;
- The material is very plastic, which is why you will have to frequently inspect the integrity of the layer in the wheel arches. If this is not done, the situation may worsen;
- The practicality of using liquid lockers in the winter is a big question: the arch becomes clogged with snow, the layer is frozen over with ice, which has a negative impact on the suspension.