Worth reading:
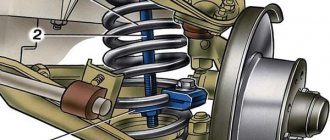
- Using a rope or wire, pull the upper arm higher, thereby providing access to the front suspension spring.
- Use a pry bar to pry the lower end of the spring and remove it from the lower arm support cup.
Also check out
- Remove the suspension spring, remove the spring gasket from the upper support cup. After this, you can replace the front suspension spring.
To do this, do the following:
- Use electrical tape to secure the gasket to the spring and install the part in place.
- Place the blade in the hole for the shock absorber, supporting the spring with it, and fix the lower coil. There is a screw surface on the lower arm that indicates the correct position of the spring. Installation should achieve this position
- Having installed the lower coil in the correct position, jack up the lever and load the spring. Using a mounting spudger, seat the spring onto the screw surface.
- Increase the load on the spring, install the stabilizer bar between the two studs that secure the bracket.
- Reassemble everything in reverse order.
After this, the replacement of the VAZ 2106 suspension springs can be considered complete.
You can check it out:
Replacing the front suspension springs of a VAZ 2106
When the integrity of the spring is compromised, damage and cracks appear, you need to urgently replace it. You can replace the front suspension springs of a VAZ 2106 car with your own hands; we will tell you in more detail below.
Consequences of faulty springs:
– The smoothness of the ride deteriorates. – There is a clear distortion of the front part of the body – A significant (noticeable) difference in height between the front and rear. – Clear traces of coils hitting each other.
We will need the following tool:
– Keys to “22″ and “13″. – Two jacks (screw and hydraulic). - Bolonnik. – Metal brush. - Hammer.
Replacing the front suspension springs of a VAZ 2106 with your own hands
1. While the car is “on wheels,” tear off the wheel mounting bolts with a bologna.
2. Jack up the car with a screw jack on the side where you are going to remove the suspension spring.
3. Next, you need to hang the wheel and completely remove it from the car.
After this, remove the shock absorber, this is done as follows:
4. To do this, use the key at “6, 13, 17 and 19”.
5. The rod must be kept from turning with a key.
6. Next, loosen the tightening of the nut and remove it.
7. Also remove the cushion washer, spring washer and upper shock absorber mounting pad.
8. Unscrew the two fastening nuts of the bracket to the lever and remove the spring washers.
9. Remove the shock absorber from the bottom using the mounting hole in the arm.
How to replace front springs on a VAZ 2101-VAZ 2107?
Note! Both front springs are replaced identically, so we will show you an example of replacement using only one spring!
Removal: 1) At the beginning of the operation, from the side on which you are going to replace the spring, first remove the shock absorber and then the wheel. (How to remove a shock absorber, see the article “Replacing front shock absorbers.” And how to remove a wheel, see the article: “Replacing a wheel on a VAZ”)
2) Next, loosen the two nuts that secure the lower arm to the axle.
3) Then put the car on the blocks and take your jack that holds the car, or just use a second jack. Place a jack under the lower arm and lightly load the suspension to make it easier to disconnect the stabilizer.
4) Then unscrew the two nuts that secure the stabilizer pad bracket.
Note! There are washers behind the nuts, so don't lose them when removing the nuts!
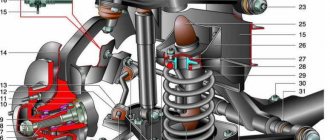
5) Next, remove the mounting bracket indicated by the red arrow, and then remove the cushion indicated by the blue arrow from the stabilizer.
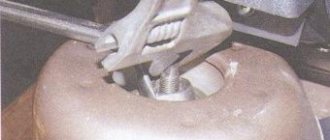
6) Next, slightly loosen the nut that secures the lower ball joint pin to the steering knuckle.
Note! The nut must be unscrewed until it coincides with the end of the pin. Once it aligns with the end of the pin, remove the jack from under the lower arm!
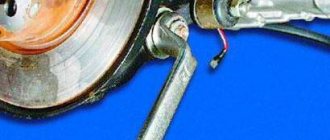
7) Now, taking a hammer in your hands, use it to apply several sharp blows to the surface of the steering knuckle, which is indicated by the red arrow.
Note! You need to strike until the hinge pin indicated by the blue arrow comes out of the steering knuckle!
After the lower arm drops down slightly and remains seated on only one nut, take the jack again and place it under the lower arm, but this time do not load the suspension.
9) Then completely unscrew the pin nut and slightly lower the lower arm down and, as a result, use a mounting blade to move the stabilizer bar through the upper stud, which is indicated by the arrow. And to complete the operation, remove the jack and completely lower the lower arm as shown in the figure.
10) Next, use a wire hook to secure the upper arm without disconnecting it from the steering knuckle.
Note! Try to secure the upper arm as high as possible in order to provide better access to the spring!
11) Next, carefully pry the spring at the bottom and then remove its lower end from the support cup and, as a result, remove the spring.
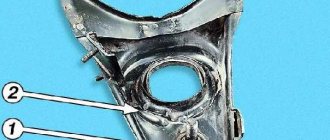
12) Now remove the spring gasket from the upper support cup located on the body.
Note! Replace cracked, heavily compressed and deformed gaskets with a new one!
Installation: 1) Taking the new spring in your hands, attach a new gasket to it using electrical tape.
Note! Install the gasket on the spring so that surface “A” is in contact with the spring coil, and convex “B” is at the very beginning of the screw surface!
For clarity, look just below the photo, in which the beginning of the helical surface of the spring “A” lies closer to the convex part of the gasket “B”!
2) Next, install a new spring with a new gasket on the body, to do this, take the mounting spatula again and push it through the hole in the lower arm, and then fix the lower part of the spring with the spatula.
Note! When installing, orient the spring so that the lower end of the spring coil “A”, after installing the spring, coincides with the helical surface of the lever, which is indicated by the letter “B”!
3) Then take the jack again and place it under the lower arm. After the stand, raise the jack little by little, thereby lightly loading the spring. Meanwhile, using a mounting spatula, guide the spring through the hole in the lower arm so that it rests on the screw surface of the support cup.
4) Now gradually increase the load and, therefore, throw the stabilizer bar, which is indicated by the blue arrow, through the pin “A”.
Note! During this operation, be sure to check whether the spring is installed correctly or not!
5) Next, install all remaining parts in the reverse order of removal.
Note! When you tighten the nuts securing the lower arm to the axle, do this only when the suspension is loaded with the weight of the car! (This applies only to those people who will make the replacement at the inspection ditch or overpass)
If you are working on a lift, then place some kind of support under the lower lever, for example, several large boards, and then lower the machine slightly so that the position of all the levers corresponds to their position under load! (Do the same when doing work on the site, but in this case, raise the lower arm with a jack)
- Keys for "22" and "13";
- Two jacks (screw and hydraulic);
- "Ballonnik";
- Metal brush;
- Hammer.
- While the car is “on wheels”, tear off the wheel mounting bolts with a “balloon”.
- Jack up the car with a screw jack on the side where you are going to change the suspension spring.
- Next, you need to hang the wheel and completely remove it from the car.
After this, remove the shock absorber, this is done as follows:
- To do this, use the key at "6, 13, 17 and 19".
- The rod must be kept from turning with a key.
- Next, loosen the nut and remove it.
- Also remove the cushion washer, spring washer and upper shock absorber mounting pad.
8. Unscrew the two fastening nuts of the bracket to the lever and remove the spring washers.
9. Remove the shock absorber from the bottom using the mounting hole in the arm.
10. Loosen the mounting nuts that secure the lower arm to the axle, but do not rush to remove them.
Now it’s the turn of the second jack (hydraulic)
11. Place it under the lower control arm, then raise it slightly to load the suspension and level the lower control arm.
12. Remove the stabilizer bar.
13. Unscrew the nuts of the stabilizer bracket and remove the bracket with the rubber cushion.
14. Unscrew the nut that holds the pin in the ear of the steering knuckle, but now you can remove the lower ball joint.
15. Lower the jack and knock out the support pin with a hammer; to do this, hit the lower ear of the steering knuckle several times.
16. With the lower ball joint removed, reinstall the jack under the lower control arm, but there is now no need to load the suspension.
17. After this, you can unscrew the ball joint pin nut completely, slowly, and carefully lower the lower arm down. Help yourself with a mounting spatula by moving the stabilizer to the side so that it does not catch the bracket mounting studs.
18. Now completely unload the suspension and move the jack to the side.
19. Prepare a strong rope or wire, with its help you need to pull the upper arm as high as possible in order to provide yourself with access to the front suspension spring.
20. Take a pry bar and use it to pry the lower end of the spring, then carefully remove it from the lower arm support cup.
21. Remove the suspension spring, remove the spring gasket from the upper support cup.
Now that nothing is in the way, the front suspension spring can be replaced.
To replace the front spring, do the following:
1. Take a new spring, attach a gasket to it (use regular electrical tape for this) and install it in place.
2. Install the mounting blade into the hole for the shock absorber and, holding the spring with it, fix the lower coil. By looking at the surface of the lower arm, you can see a helical surface indicating the correct position of the spring. Helping yourself with mounting, you need to adjust the correct position of the spring in relation to the screw surface.
3. Having set the correct position of the lower coil, install the jack under the lever and create a load on the spring, then use a mounting blade to finally seat the spring on the screw surface.
4. Increase the load on the spring and, using a mounting tool, install the stabilizer bar into a position between the two mounting studs of the stabilizer bracket.
Assembly is carried out in reverse order.
Now we can say that the replacement of the front suspension springs of the VAZ 2106 has been completed.
Replacing springs Lada 2106 (VAZ 2106)
We are preparing the necessary tools that we will need to replace the front suspension springs. We will need wrenches for “22” and “13”, two jacks, one of which must be either screw or hydraulic, a wrench for the wheel bolts, a metal brush for cleaning dirt and a hammer. Now you can start repairing the VAZ 2106, for this:
- Remove the wheel from the car and then remove the shock absorber (see Replacing the front shock absorber of a VAZ 2106).
- Loosen the nuts securing the lower arm to the axle, but do not remove them.
- Next, we place a hydraulic jack under the lower arm and raise it slightly in order to lightly load the suspension and level the lower arm and remove the anti-roll bar.
- Unscrew the nuts securing the stabilizer bracket, remove the bracket and the rubber cushion.
- Now we need to disconnect the lower ball joint; to do this, we partially unscrew the nut securing the pin to the steering knuckle ear, remove the jack and use a hammer to apply sharp and strong blows to the surface of the lower steering knuckle ear until the support pin pops out of the eye (see Replacement lower ball joint VAZ 2106).
- After we have disconnected the lower ball joint, we again place a jack under the lower arm, only this time we do not load the suspension.
- Now you can completely unscrew the ball joint pin nut and carefully lower the lower arm down, while using a mounting blade to move the stabilizer to the side so that it does not cling to the bracket mounting studs. We completely unload the suspension and move the jack to the side.
- Now we need to prepare a metal hook or some strong wire, with which we secure the upper arm in the highest position and thereby provide ourselves with convenient access to the front suspension spring.
- Next, we take the mounting blade in our hands and, by prying the lower end of the spring, carefully remove it from the support cup of the lower arm and remove the suspension spring. Remove the spring gasket from the upper support cup on the car body.
Signs of spring replacement
There are 3 main signs that indicate problems with the front springs. The presence of any of them or a combination of several indicate one thing - not everything is in order with the car.
Rolling the car to one side
To check the car for the presence of this defect, it is enough to place the vehicle on a flat surface without additional cargo inside. The unnatural skew of the car instantly catches your eye. If the body “leans” heavily on the left or right side, the front springs on the VAZ 2107 need to be replaced. A similar situation concerns an excessive slope on the front or rear axle.
But you definitely shouldn’t blame them alone, and here’s why. The design features of the suspension of VAZ cars from the “kopek” to the “seven” include a landing part in the upper part of the spring (popularly it is nicknamed “glass”). It acts as a top stop. During long-term operation of the vehicle, the glass tends to “fall through”. Externally, the body tilts to one side. The cause of the problem can only be diagnosed by removing the rubber cushion and glass. Typically, the failure of the glass occurs on the front springs, and especially often on the left wheel.
Extraneous noise in the suspension
A breakdown can be signaled by extraneous sounds, the source of which is located in the suspension area. This may include an obvious rattling or clanging sound, or a subtle knocking or grinding noise. Noises occur when the car drives on uneven sections of the road. For example, when hitting a bump or a wheel falling into a hole.
If atypical sounds are detected, a complete diagnosis of the vehicle's suspension and steering should be carried out. The source of the noise may be a ball joint, tie rods, or worn rubber gaskets. If everything is fine with them, the reason lies in the malfunction of the springs.
Extraneous sounds often indicate a split in a certain location. But sometimes the part breaks exactly in two. Then the car body looks skewed to the “sore spot”.
Metal fatigue
Auto mechanics often say that metal is “tired.” What does it mean? Metal fatigue means the loss of its initial properties due to prolonged use. Over time, the element copes worse with its assigned responsibilities.
Several extreme turns on both sides of the part fall into the risk zone, since they bear the main load. At the moment of compression, the rings are pressed tightly and hit each other. After some time, mining areas appear at the contact points of the rings. There is a transformation of the round rod, which gradually takes on a flattened shape.
A spring with a defect does not fully respond to road unevenness, and the suspension gently “sags.” If such a malfunction is detected, it is recommended to replace the part with a new one.
Replacement of front springs of VAZ 2107, VAZ 2106.
- Before replacing the front springs of a VAZ 2107, VAZ 2106, remove the front wheel, unscrew the stabilizer from the lower arm and the front shock absorber. To remove the front springs, we use a spring puller, consisting of two grips, and install the puller between the coils of the spring.
- We install the puller inside the front spring and remove it.
Replacement of rear springs of VAZ 2107, VAZ 2106.
- Unscrew the shock absorber from the rear axle bracket and...
We will make sure that the rubber gaskets are intact and, if necessary, replace them with new ones. Install the spring in reverse order.
In order to change the front suspension springs, you will need to arm yourself with wrenches (“13”, “22”), two jacks, a wheel bolt wrench, a hammer and a wire brush for cleaning dirt.
Removing the old suspension spring
- First, remove the wheel and shock absorber.
- Loosen the lower arm and axle mounting nuts, do not remove them completely.
- Place a hydraulic jack under the lower arm. Raise it a little to load the suspension part and level the lower arm. Then remove the anti-roll bar.
- Unscrew the fixing nuts of the stabilizer bracket, and then the bracket itself with the rubber cushion.
- Disconnect the lower ball joint. You will need to slightly unscrew the nut connecting the pin to the steering knuckle ear. Release the jack and use a hammer to strike the bottom eye until your finger pops out of the knuckle ear.
- After successfully disconnecting the lower support, we again place the jack under the lower arm, but do not load the suspension part.
- Now you can completely unscrew the pin nut and slowly lower the lower arm down. At the same time, it is necessary to move the stabilizer to the side with a mounting blade - it should not cling to the mounting studs of the bracket. After this, we completely unload the suspended part and remove the jack.
- Prepare a metal hook or thick wire to secure the upper arm as high as possible. It should not interfere with free access to the front suspension spring.
- Next, use a mounting blade to pry up the end of the spring and carefully remove this end from the cup of the lower arm support, after which we remove the suspension spring. Also remove the spring gasket from the upper support cup.
At this stage, the dismantling of the old spring of the suspension part is complete.
"Seven" and "Ten"
For appropriate repairs on the “classic” we will take the following tools:
- set of wrenches;
- wheel chocks.
Find out how much it costs to change brake pads and about replacing the rear strut on a Honda Stepwagon.
So, let's figure out how to replace the rear springs of a VAZ 2107. This is what needs to be done, and from the inspection hole.
- Unscrew and then remove the pressure regulator rod of the brake circuit system from the mount. It is also necessary to remove the brake hose tee.
- We unscrew the bolt of the lower shock absorber mounting, take it out, and remove the strut from the mounting.
- Next, having installed anti-roll pads under the front wheels, we lift the rear of the car with a jack so that the axle lowers.
- We take out the released defective part, as well as the lower and upper linings. We directly replace the spring from the rear suspension of the VAZ 2107, attaching pads to the new spare part.
- We do the assembly in reverse order.
From the instructions given it is easy to understand that the procedure is quite simple. At the same time, replacing the rear springs of a VAZ 2106 car is done in exactly the same way.
If we talk about a VAZ equipped with front-wheel drive, then the technological process of such repairs is just as simple. To make sure of this, below are instructions for replacing parts on a VAZ 2110.
For work, we will take the same tools as in the previous case.
- Having dismantled the back of the rear seat and also removed the upholstery, unscrew the top nut of the pillar.
- We jack up the required part of the car (using anti-rollback stops and the gear is engaged), unscrew the lower mount of the rack, and then remove the bolt.
- We release the lower end of the strut from the suspension bracket, and finally, we remove the strut along with our defective part.
- We take out the spring gasket in the wheel arch, as well as the washer and cushion inside the passenger compartment.
- We remove our broken part from the shock absorber.
- We attach the upper insulating gasket to the new spare part with a rope.
- We install the spare part on the rack, attaching the lower gasket.
- We mount the strut with the spring in the reverse order, compressing the coils with a jack, which we install between the lower coil and the beam.
Changing the springs of the Priora is carried out according to an identical scenario. As you can see, the process does not cause any particular difficulties, but the labor intensity is slightly higher than that of the “classics”.
Popular budget foreign cars
Additionally, we will try to figure out how much more complicated this process can be in relation to other running cars of a non-Russian brand. To have something to compare with.
First, let's describe how replacement is carried out for a car such as a Chevrolet Lanos. To carry out the work, we will need the following attributes:
- set of wrenches;
- wheel chocks.
In this case, the rack does not work inside the coils of the unit being replaced. Considering this fact, we begin manipulations.
- We unscrew, then remove the bolt of the lower strut mounting, and after releasing the lower part of the shock absorber, remove it.
- Next, we lift the rear of the car so that the broken part is unloaded and comes out of the sockets. We take it out, as well as the top gasket. Then we remove the lower gasket from the socket on the suspension beam.
- We install a new spare part along with the lower and upper gaskets.
- We carry out further assembly from the reverse.
Here, in fact, everything. It’s somewhat reminiscent of the Zhiguli “classics”, isn’t it? One thing is clear: the process is quite simple.
Let's see if there are any differences when performing this procedure in an equally popular budget car. Moving on to specifics, let's determine how the springs of the Daewoo Nexia are changed.
To carry out the process we will need:
- set of wrenches;
- wheel chocks.
That is, everything is the same. Begin.
- We unscrew the nut of the lower shock absorber mounting and remove the lower part of the strut from the bracket.
- To release the broken part, we lift the rear of the car, like on a VAZ “classic”. However, there is another method: we jack up the desired side until the tire is sufficiently lifted off the ground, then with another jack we press down from the body onto the wheel, the turns are released.
- We install the new spare part in the reverse order, not forgetting the lower and upper linings.
Well, apparently, the process of replacing the rear spring on the Nexia is reminiscent of the previous procedure.
In all cases of this repair, we must not forget about important details. First, stubborn threaded connections are pre-treated with a penetrating lubricant. Secondly, for your own safety, it is better to compress the coils with universal ties before removing the part. However, they will require additional costs; you can do without them only with extreme caution!
The price of torment
By the way, about costs. Not everyone will decide to even undertake such a seemingly minor repair. For those who find it easier to turn to qualified craftsmen, we will provide a table of the average cost of work in relation to large Russian cities. Here she is.
| City | Cost for 1 piece. |
| Moscow | from 500 rub. |
| St. Petersburg | from 500 rub. |
| Ekaterinburg | from 400 rub. |
In the second column, the price starts from the figure for VAZ cars; this type of repair on good foreign cars will cost twice as much.
So, the main difficulties associated with repairing rear springs were indicated. The information provided is intended to greatly help motorists who have problems of this nature.
You can change the rear springs yourself even in the absence of an inspection hole (only a jack is sufficient). You can find out the dimensions of the socket heads and spanners required to unscrew the upper or lower shock absorber mountings in the repair and operating manual for your car model. In some cases, having two jacks will make the process much easier.
Replacing rear suspension springs will be much easier if you use special ties. For example, on a VAZ 2101, 2102, 2106, 2107, you can remove the old spring and install a new one using conventional installation, but the design of the rear suspension of many other cars will not allow such a trick. We will show you how to change rear springs without zip ties, but we recommend using this method only if absolutely necessary. The price of screeds is not so high as to sacrifice your own safety.
DIY Replacement Guide
We will demonstrate the replacement procedure using the example of a VAZ 2101-2107. After reading the instructions, you can easily carry out this procedure on another car, since the basic provisions apply to all types of rear suspension.
- Loosen the wheel bolts.
- Raise and secure the rear part of the car on the supports. Be sure to install the wheel chocks diagonally (if the rear right side is raised, the chocks are installed under the front left wheel).
- Unscrew the lower shock absorber mounting. If for any reason problems arise with the bottom bracket, you can unscrew the top mount. The shock absorber will limit the travel of the beam (on cars with rear-wheel drive and all-wheel drive - the rear axle), so we need to disconnect one of its fasteners from the car body.
- Using a pry bar, pry the lower end of the spring by the coil to release it from the mounting groove. There is no need for such manipulations if the spring is slightly tightened with ties.
When tightening, be sure to ensure that the coils are tightly secured by the claws of the ties. If the spring jumps out, it can cause serious injury!
How to properly install new springs
On many cars, there are special grooves in the upper and lower cups for fixing the outer turns. During installation, it is important not only to clean the seats from dirt, but also to ensure that the outer turns are positioned correctly.
Just on the VAZ 2101-2107, the upper rubber spacer, like the metal ring, have a special groove. In order not to guess the location of the spacer, before installation, secure it with adhesive tape to the upper turn, and then install it in its assembled place. During the operation of the car, the rubber damper often sticks to the body, so to remove it you will need a large impact screwdriver or a crowbar. We recommend watching the video, which clearly shows the process of self-replacement.
Springs must be changed in pairs - on both sides of the axle at once.
Beam with silent blocks
This type of beam is installed on Daewoo Lanos, Opel Astra F, Vectra A and many other foreign cars. In order not to tear the silent blocks, it is advisable to unscrew their fastenings. If defects in rubber products are detected, we recommend replacing the silent blocks of the rear beam at the same time. Please note that replacement must be done one at a time, since the beam is attached to the body only with silent block fastenings and shock absorbers.
As practice shows, the rear springs can be changed without unscrewing the silent blocks. To increase the beam travel, it is enough to jack up the lower part of the beam on the opposite side. To do this, lift the body with a jack and secure it on the supports. Remove the wheels, then place the jack as close to the end of the beam as possible. Raising in this place will provoke lowering of the beam on the replacement side.
How to change springs without ties
If on a VAZ classic you can do without tightening, then on many other cars, removing old springs and installing new springs without tightening is simply impossible. In the absence of a puller, you can get out of the situation as follows:
- jack up the beam on the replacement side;
- Twist the spring with thick wire from two opposite sides. Remember that the effort is serious and you need to approach the matter responsibly;
- lower the beam and pull out the spring;
- compress the new spring using a stop and a lever in the form of a beam of sufficient length or a metal channel. Secure it in a compressed state with strong wire;
- install a new spring element;
- lift the beam until the spring contacts the pads;
- loosen the wire.
You should resort to this replacement method only if it is impossible to use safe repair methods!
Do I need to change springs when replacing struts and shock absorbers?
If they have not sagged and all the coils are in place, then it is not necessary to change the springs when replacing shock absorber struts.
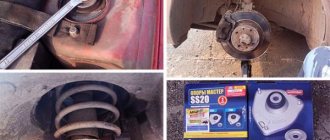
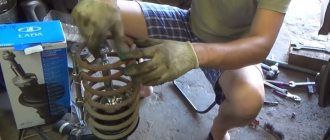
So, we continue to rebuild the suspension. Today we’ll look at how to change the front springs, since the factory ones have already reached 220 thousand and are pretty tired, although the ground clearance is normal. To do this, I purchased similar springs from VAZ JSC with new spacers and a front spring remover.
Before replacing, to compare the effect, we will measure the distance from the floor to the wheel arch of the front wings before and after replacement with new springs, silent blocks and shock absorbers.
As we can see, the car has a skew of 1 cm on the right side, which is not critical. Out of curiosity, let's measure the thickness of the new spring rod - if you subtract the painting, it is approximately 13 mm.
And the free length is 37.2 cm.
For work we will need: - Keys and sockets for 13, 22 - Central spring puller (brace) and ball joint remover (preferably) - Pry bar or large screwdriver, hammer, metal brush - WD-shaker or other “liquid wrench”
We hang the car, remove the wheel, remove the shock absorber, loosen the nuts of the silent blocks of the levers, remove the stabilizer bracket and cushion - we will also replace it with a new one.
Now loosen the nut securing the lower ball joint pin to the steering knuckle and tear off the pin. We have already discussed how to do this earlier. We place the puller plates under the maximum lower and upper coil of the spring and tighten until the lower end moves away from the cup and the tension between the levers is relieved.
It is worth keeping in mind that the puller is weak, the bearing under the lower plate fell apart when replacing the second spring, although it works well without it if you lubricate the washers. Production, it seems, is Kostroma. Now we fix the upper lever with the hub assembly, remove the ball joint pin from the steering knuckle and lower the lever down, carefully remove the spring with the spacer.
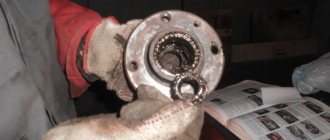
Inspect the spring for damage. As we can see, there are traces of corrosion and interturn wear.
Let's measure the remaining length in the free state - compared to the new spring, there has been a shrinkage of about 1 cm.
Now, using a puller, we tighten the new spring, placing the cups approximately under the second turn from above and below.
We put a new rubber spacer on the spring and fix it with tape or tape so that the end of the rod rests against the recess on the spacer. We carefully place the spring between the levers, orient the lower end of the rod so that it rests against the recess on the metal cup of the lever.
Using a jack, insert the ball joint pin into the steering knuckle and tighten it. Now we remove the puller and install the new shock absorber back. Also, we put on a new stabilizer pad and fix it.
We tighten the silent blocks of the levers under load and put on the wheel. Now let's re-measure the distance from the floor to the wing.
As we can see, the front suspension has risen by 3.5 cm, which shows us how much the old springs were already weakened - taking into account the length in the unloaded state, they lost about 2.5 cm in elasticity. Yes, and visually the lower arm has slightly changed its angle.
It remains to check the wheel alignment, since the angles of the levers have changed.
Hello, in this article you will learn how to replace the front springs on a VAZ 2101, 2102, 2103, 2104, 2105, 2106, 2107. Front springs are usually replaced when they sag significantly. Front springs usually sag for a long time, but if you often drive a loaded car, this will happen much sooner. As the springs sag on bumps, the suspension begins to “break through” more often, which makes the ride not entirely comfortable, and in some places not safe. The cost of new springs on the automotive market ranges around 800 rubles. To replace the front springs you will need: spring ties, heads or wrenches for 13, 22 and two jacks (one of them is better hydraulic). First of all, jack up the car, remove the wheel and shock absorber. Next, use a 22mm wrench to loosen the fastenings of the front suspension arm.
Now we slightly raise the lever with a jack and unscrew the two nuts securing the stabilizer bar bracket with a 13mm wrench
Then unscrew the nut on the ball joint pin
After this, you need to carefully lower the lever with a jack (be careful, the spring will force the lever down). Also, most likely, the anti-roll bar will catch on the studs, disengage it with a pry bar
Lower the lever all the way and remove the spring
Before installing the front spring in place, you need to tape a spacer to it with electrical tape and tighten the spring with zip ties
After this, carefully lift the lever with a jack, the main thing is that the lower coil of the spring fits into the groove on the lever
Now we tighten the nut on the ball joint pin, loosen and remove the ties through the lower technological hole in the lever and assemble everything in the reverse order.
Installing a new spring
A new gasket should be secured to the new spring using electrical tape and set to its original position. To begin, take a mounting spatula and, holding the spring with it, thread the lower coil through the hole for the shock absorber. Secure it. A helical surface can be seen on the surface of the lower arm, demonstrating proper spring seating. After orienting the lower spring coil according to the screw surface, place a jack and lightly load the spring. Using a mounting spatula, finally seat it on the screw surface. Then place the stabilizer bar between the two stabilizer bar mounting studs. The remaining elements should be assembled in the reverse order of dismantling.
Spring selection
Domestic roads are not famous for their excellent quality, everyone knows this. Therefore, for many car enthusiasts, a serviceable and well-chosen suspension is the main task in ensuring comfortable movement. The main suspension unit is the shock absorber strut, and the spring is its important element.
They determine the ground clearance and provide the load capacity declared by the manufacturer. In addition, springs affect overall handling. One of the main criteria that determines the characteristics of an element is rigidity. Ideal will help avoid car roll when making sharp turns. If the unit is selected correctly, the roll in turns, regardless of speed, will not exceed a few degrees.
How to determine hardness
The main task of suspension springs is to quickly return the body to its original position, as well as ensure the vehicle’s load capacity and ground clearance. The stiffness of a spring means its ability to resist compression. Excessively hard, for example, will cause a lot of unpleasant sensations when driving on uneven roads. Too soft - they will absorb all the bumps, but in corners the car will begin to roll heavily.
The rigidity of these parts is influenced by several factors.
- Diameter of the rods (the thicker, the tougher).
- External diameter (the larger this indicator, the softer the element).
- Number of turns (the more turns, the stiffer).
- Shape (you can find barrel-shaped, conical, cylindrical, and each type has its own advantages and disadvantages).
You can find out the stiffness of the springs by the code or marks on them. However, if they are applied with paint, then you will not be able to navigate by them, because during operation the inscription will simply be erased. If there are no stamped marks, determine the hardness yourself using a hand press, scales and a regular school ruler.
On floor scales you need to put a board with a thickness of more than 12 mm. The width should be greater than the area of the end part of the spiral, and this side should be installed on the board. A board of similar size is installed on the upper end part, and the length is measured with a ruler or tape measure. Using a press, you need to compress the spring by 40–60 mm and look at the results on the scales.
This is not the only way to determine hardness. Remember your physics lessons. The product in this case is defined as an object of initial length that is stretched and compressed. Denoted by the letter "L". Based on Hooke's law of longitudinal deformation, body changes should be considered proportional to the initial length of the object “L” and the applied pressure force “F”. Next you need to use the formula x=F*L/C. In this formula, “C” is considered as a proportionality coefficient, depending on the number of turns, their radius and diameter.
Spring checking rules
Most car enthusiasts pay attention to its condition only after characteristic signs of malfunctions appear, for example, knocking, creaking, etc. But, as practice shows, it is easier to prevent a problem than to correct the consequences of a breakdown later.
“Tired” coils that need immediate replacement can be identified by characteristic signs.
- When hitting bumps, the suspension begins to “punch”.
- The smooth running of the car disappears.
- Vibration in the body.
- The car falls over on one side.
- When planting the front or rear helixes, the difference in height of the front compared to the rear is immediately noticeable.
- Ground clearance decreases.
- Upon careful inspection, it is noticeable that the coils touch each other during compression.
A spiral part may cease to perform its functions for several reasons. The main and obvious one is the natural wear and tear of the metal. The second reason: mechanical damage. The third and sometimes the most common is systematically exceeding the permissible load capacity of the vehicle, as well as driving over uneven surfaces and potholes at high speed. Also, the cause of breakdown can be natural corrosion due to high humidity and the action of chemical reagents on the road in winter.
If a crack or other damage is visually detected, the element must be replaced. It would be a good idea to check how much the spirals have sagged (do this using compression and weights). When performing diagnostics, you need to pay attention to the gaskets: when they are worn out, they also need to be replaced. If minor defects are identified, urgent work is not required.
But if the following defects are detected, parts should be replaced immediately:
- the lower or upper coil has broken off;
- traces of severe corrosion and mechanical damage are visible;
- ground clearance has noticeably decreased;
- uneven height of the corners of the car (the body falls on one side).
To diagnose spring malfunctions, you will need not only ordinary wrenches and other familiar tools, but also ties for removal. Without them, removing, for example, the front spiral elements is quite problematic. Although experienced motorists know ways to get by without them.