Oil separator for VAZ 2108, 2109, 21099 engines
The oil separator is part of the crankcase gas removal system on engines 2108, 21081, 21083 of VAZ 2108, 2109, 21099 vehicles.
Location of the oil separator on a car engine
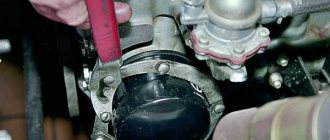
The oil separator is located under the valve cover of the engine of VAZ 2108, 2109, 21099 cars and is attached to its inner part using two 10mm socket bolts.
Oil separator device
The oil separator for engines 2108, 21081, 21083 consists of a set (package) of metal plates with many holes. The plates are connected into a package using a cotter pin. The oil separator closes the housing on top.
The oil separator is connected to the fittings of the crankcase gas removal system. Through the thick supply fitting, crankcase gases enter the oil separator, through the thin one they are discharged into the small branch of the exhaust system to the carburetor, through the middle one into the large branch of the system, and enter the engine air filter housing.
Engine oil separator device 2108, 21081, 21083 for VAZ 2108, 2109, 21099 cars
Purpose of the oil separator
The oil separator for engines 2108, 21081, 21083 of VAZ 2108, 2109, 21099 vehicles and their modifications is designed to clean crankcase gases from motor oil vapors present in them. This prevents unwanted oil from entering the engine air filter, then into the carburetor and onto the spark plugs.
This is a kind of filter that separates oil from gases.
Operating principle of the oil separator
Under the influence of vacuum, gases from the engine crankcase through the removal system enter under the engine valve cover, where the oil separator is located.
Gases pass through many holes in the oil separator screens, leaving behind the engine oil they have captured from the engine crankcase. The filtered oil flows into the cylinder head and flows through the channels back into the engine crankcase. Purified gases enter either the small branch of the removal system or the large branch, depending on the operating mode of the engine.
Oil separator malfunctions
The main problem with the oil separator is its clogging and contamination. The main factors influencing its contamination are high engine mileage and the use of low-quality engine oil.
A dirty oil separator prevents gases from being effectively removed from the car engine crankcase. As a result, the pressure in it increases, oil begins to ooze from under the engine seals and gaskets and is released through the exhaust system into the air filter housing and carburetor.
In addition, the efficiency of separating oil from gases in the oil separator decreases and contaminated gases enter the engine air filter housing (clogging the filter element) and then into the carburetor (clogging the jets).
Hence such malfunctions as: “failure” when pressing the gas, unstable idling, over-enrichment of the fuel mixture, carbon deposits on the spark plugs, smoke from the muffler, etc.
Notes and additions
— As a temporary (sometimes permanent) measure, many car owners route the hose from the breather not to the valve cover, but under the engine, directing crankcase gases into the atmosphere. Thereby avoiding the negative consequences of clogging the oil separator and crankcase ventilation system. This method is also effective for wear of the engine piston group.
Source
What to do if oil leaks from the engine of a VAZ 2109
The engine is probably the real heart of our vehicle. If it doesn’t work in any way, then our car won’t even be able to move, or it will break along the way. And so, if you see oil leaks in front of the hood, then immediately start repairing it; otherwise, you need to continuously pour oil, which is by no means inexpensive, and this will lead to increased wear on the rubbing parts of the engine.
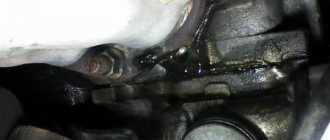
The oil in the power unit accumulates in the oil pan, and from there it reaches all the remaining components. The pan is attached to the crankcase with bolts, the gap between them is sealed with a rubber gasket or special sealants. It is in this particular place that it can appear to drip. It is not good if there is a through-and-through defect in the pan, so in this case all the oil will flow out without any residue.
It’s as if as soon as the oil pressure indicator lights up on the device panel, you need to immediately turn off the engine and make a visual educational program on the object of oil pouring. It is easier to find drips in transport; oil prints remain in the water. The truth is, repairing a boat is many times more difficult than repairing a car.
The crankshaft is located slightly larger than the pan; a pair of its ends protrude from the block. Near the main journals there is a seal in the form of rubber cuffs. The cuffs have the ability to work together, and oil starts to penetrate from there.
Another leak factor is damage to the crankcase ventilation. During operation of the power apparatus, exhaust gases do not escape into the exhaust pipe; fractions of them accumulate from inside your engine, therefore, the influence in the crankcase increases. In the established episode, the effect becomes such that oil is about to be thrown out through the cuffs. In this case, it is necessary to make ventilation and all gases will begin to retreat into the exhaust system.
At the very top there is a picture of a cylinder block. This is probably a very important component of the engine, so it’s as if the timing valves and the sorting shaft are located here. It is worth noting that cooling jackets and oil lines extending from the inside of the head extend from the block. The upper shot of the block is attached to the bottom shot, with a rubber seal between them. Oil also has the potential to occur. Oil often fills the spark plugs and the engine begins to operate intermittently. As soon as we have found an oil leak from the engine, it is necessary to eliminate this suddenly appearing automobile problem. The truth is that it is probably necessary to work only with the mind. As soon as you squeeze the valve cover, as if it’s not at all difficult, you need to remove the engine, disconnect the gearbox and change the cuffs behind the flywheel. Resetting the block head is also not entirely elementary. It is necessary to completely solder the coolant from the cooling system, disconnect the huge number of pipes and air ducts adjacent to it. Next you need to unscrew, and then tighten correctly, countless nuts on the studs.
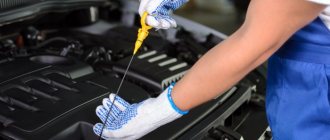
Overall, repairing an engine is probably a very tedious operation that is needed for a specific part of the skill. During repairs, it is necessary to thoroughly clean the engine forepeak, remove oil marks, then add fresh oil, change the oil pumping filter and drive a short distance. If the oil begins to squirt, then on a clean engine it will, therefore, where from. It is under no circumstances possible to pour old oil drained from the engine onto the territory, since it would probably be a big blow according to nature. There are special collection stations for similar fuels and lubricants, and we take used oil there.
Source
Cleaning the oil separator for engines 2108, 21081, 21083
Contamination of the oil separator on engines 2108, 21081, 21083 of VAZ 2108, 2109, 21099 vehicles leads to disruption of the crankcase ventilation system by reducing its permeability and efficiency of gas removal. As a consequence, an increase in crankcase gas pressure leads to the release of engine oil through the oil seals and engine gaskets.
In addition, the efficiency of cleaning crankcase gases entering the engine valve cover from engine oil is reduced and it is thrown into the air filter housing, contaminating the filter element, contaminating the carburetor and spark plugs. Hence the “dips”, triplings and other malfunctions.
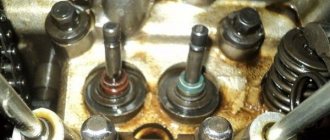
Contaminated oil separator screens, its body and valve cover of engine 2108, (21081, 21083)
The procedure for cleaning the oil separator (oil deflector) of engines 2108, 21081, 21083
— Remove the valve cover from the engine
— We clean it from contaminants
Using gasoline or diesel fuel, we wash the valve cover inside and out to remove engine oil and deposits. We do not wash the rubber gasket, as it may collapse.
— Remove the oil separator (oil deflector)
Using a “10” wrench, unscrew the two bolts securing the oil separator housing, remove the housing and the oil separator mesh underneath it.
Oil separator parts that need to be cleaned and washed
— We wash, clean and blow through the screens and the oil separator housing
We use gasoline, kerosene or diesel fuel for this. Clean the mesh cells with a metal brush. If it is heavily soiled, you can use a special brush attachment on the drill and clean it with it. We blow the parts with compressed air (tire pump or compressor).
Cleaned oil separator for crankcase ventilation system
We also clean the crankcase gas inlet and outlet pipes in the engine valve cover.
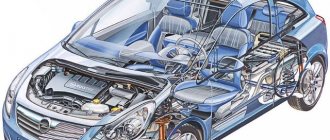
Design features of the engine on the VAZ-2114
Before moving directly to the process, you need to know some structural elements of the VAZ-2114 engine.
The valve cover gasket is located directly under the cover itself and this can be clearly seen in the diagram below.
So, first, let's look at what the engine consists of:
Now that all the elements are known, you can proceed directly to the replacement process.
A little theory
First, a little theoretical part. In any car engine, even a modern model, each system performs its duties, and there is nothing superfluous. Here we can draw a parallel with a person whose all organs are important and necessary. The main thing is to maintain a healthy lifestyle. Any car in this regard also needs regular maintenance.
The functions of all engine components and assemblies are constantly dependent on each other. And if a part breaks down in any system, the efficiency of the power plant is significantly reduced. The same applies to the crankcase ventilation system, in which a crankcase oil separator is simply necessary.
Engine crankcase ventilation system
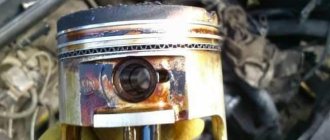
As a rule, pistons fit tightly to the cylinder walls of the engine due to compression and oil rings. Despite this design of the piston group elements, it is impossible to ensure complete sealing of the combustion chamber. And some of the gases from the burned fuel still break into the crankcase, which is why they are called crankcase gases.
Moreover, depending on the design of the engine, 10-30 liters of gas can flow into the crankcase from just one cylinder in one minute. Due to the fact that the pistons move at high speed, the crankcase gases are constantly enriched with oil particles 0.1-2 microns in size. Oil mist is also formed due to the rotating crankshaft, which is immersed in an oil bath.
The problem itself is that the accumulation of gases in the crankcase leads to an increase in pressure that is exerted on the lubricant consumable. And in the absence of an oil separator for crankcase gases, this leads to an increase in pressure inside the lubrication system, and the oil puts pressure on weak areas, which are oil seals and seals. As a result, oil leakage cannot be avoided, and the engine becomes oil starved.
Oil separator operation
The oil separator, which is an important element of the crankcase gas recirculation system, can operate according to one of two basic principles:
Using the labyrinth method, the speed of crankcase gases decreases. Due to this, larger drops of oil remain on the walls of the device, and then fall back into the engine crankcase.
Passing through the cyclic oil separator, the gases begin to rotate. Thanks to the centrifugal force generated in the device, oil drops settle on the walls of the oil trap, after which they flow by gravity into the crankcase. And to eliminate gas turbulence, a labyrinth crankcase oil separator is used, in which the oil becomes completely separable from the gases.
Operating principle of the oil trap
An oil separator is a device that is capable of separating and trapping oil particles in a gas or liquid stream. In a car, it is installed directly in the internal combustion engine to prevent engine oil from entering the intake manifold.
The device is an elongated flask, which is divided into 2 parts by a cone. It is along the walls of the cone that oil particles flow down. This occurs due to centrifugal force, which, from the flow of air mixture entering the apparatus through its upper part, carries oil particles into a separate cavity for collection through the lower part of the inertial cyclone filter.
Serious damage to the engine
Burnt gases have a negative impact on the oil and reduce engine efficiency. In fact, crankcase gases are unburnt fuel residues and contain many harmful impurities that have a detrimental effect on the environment. The presence of water evaporation in gases leads to the formation of an emulsion, due to which foam is observed in the oil. Because of it, the rubbing elements do not receive a sufficient amount of lubrication, due to which they wear out faster and fail. And the vapors themselves that fall on the oil dilute it. Various impurities are formed, which have the most destructive effect, reducing the durability of almost all parts with which the oil comes into contact. As a result, the engine life is reduced several times.
Consequences of untimely replacement
There are not many consequences, but they are quite compelling to change the gasket in time. Firstly, this is directly related to oil leakage, which reduces the volume in the engine. Even if the loss is insignificant, it may just be enough for the internal parts of the power unit to wear out faster.
Secondly, air constantly gets under the valve cover, which can affect the quality of the air-fuel mixture and the engine will begin to “eat” a sufficient amount of fuel.
Thirdly, dirt and foreign objects, as well as water during winter and rainy periods, can enter through the resulting cracks. This can negatively affect the operation of the power unit, cylinder head and other elements, as well as affect the performance of the entire system as a whole.
Fourthly, leaked oil contaminates the outer part of the block, onto which dirt clings. It can also affect the operation of the power unit and other elements.
More information about JTlab oil traps
An oil trap (oil washer) is a device for condensing oil vapor from the crankcase gases of an engine. Oil traps are designed to sift out (condensate) oil vapors and then collect them or drain them into the oil system of the internal combustion engine. On most conventional engines, crankcase gases are supplied directly to the combustion engine intake or turbine intake for TURBO engines. In this case, oil condenses in the intake manifold, cylinder head passages, cold part of the turbine, piping, intercooler, sensors and throttle valve. Over time, fine dust adheres to a thin layer of oil, and after several tens of thousands of kilometers, all parts of the intake system are covered with a layer of a thick mixture of oil and dust. This scheme has a lot of serious disadvantages - oil reduces the efficiency of the intercooler, leads to contamination of the turbine, intake, cylinder head channels, piping, leads to problems in the operation of the throttle valve, idle speed regulators, worsens sensor readings, but most importantly, oil can provoke detonation, which is a disaster for the internal combustion engine.
A wise decision
The increased pressure that is constantly applied to the oil worsens the properties of the lubricant over time. Without a crankcase gas oil separator on the Polo, for example, the lubricant itself ages faster and its service life is significantly reduced, which entails frequent replacement of consumables. To avoid unnecessary pressure in the engine crankcase, a special exhaust gas ventilation system is provided. However, the standard separator, which is installed by many manufacturers on cars, does not completely clean the crankcase gases from oil particles. Therefore, some car enthusiasts install an additional device.
Most drivers of domestic and foreign cars with impressive mileage have often encountered sticky oil deposits on various parts of the engine. Often this is:
By interacting with the mass air flow sensor, the oil can cause its failure, and replacing it costs 2500-3000 rubles. Isn't this a reason to take care of an additional measure in the form of a crankcase oil separator on a Citroen-Picasso or any other car?
see also
Comments 58
prntscr.com/liqrkv. My personal opinion. In the current version, it is made for non-fans of the car, so that there is a bypass from the crankcase gas reception area (bypassing the oil separator) directly into the intake manifold
Read more: Kia ceed 2008 diesel
The idea is completely correct, the execution is not very good. The grids need to be replaced with something of better quality to prevent them from being destroyed and getting into the engine. Someone wrote here that they will rust... What the heck. rust, this is the oil separator, everything is covered in oil. The last thing that will happen to the meshes is that they will rust. There are normal meshes made of thin wire. It is better to leave the standard grids, and use these as an addition.
Well, how are the washcloths?)
what is the effect after cleaning? I have never cleaned the crankcase ventilation of my VAZ 2115... what problems could there be?
absolutely true)))) because the place adjacent to the shaft is dry, so the seals quickly fail! Try it and you’ll understand! I just change the timing belt to a 16-valve every 20 thousand km because I like to play with the tachometer needle, already 2 replacements and the oil seals are not leaking))) and I also put 2 oil seals on the crankshaft at once))) you recess the first one deeper and the second one on top, and don’t worry that it doesn’t sit deep)))
In order for the cover, as well as the entire engine, to be clean inside, you need to fill in high-quality oil! and I’ll tell you this, there are three commandments for internal engine cleanliness: 1-fill only with high-quality oil (in my case, I drive 0W-30 Nissan original - only plastic containers!) 2-even though the factory recommends 10w-40, use 5W-40.30 (but you just need to take into account the wear of the rubber and metal seals, namely the seals! It is advisable to change everything, put it on sealant and lubricate the internal groove before installation with castrol LMX grease) 3-SHORTEN THE OIL CHANGE INTERVAL from 10,000 to 8,000, and in winter to 6,000 (as it often warms up) here are, in principle, 3 simple rules)))) and there is so much pleasure when you open the engine and everything is in light colors)))) and if someone says that there will be scuffs from synthetics, I will say so Lada 2112 1.5 16valve mileage 250,000 km, of which 40 000 km and sow the day on 0W-30 and nothing knocks or clatters anywhere, and you also need to take into account that the wife drives about 100 km on it every day, good luck to everyone)))
I absolutely agree about synthetics! I plan to replace the seals and wash the engine and the pan next year. If I understand correctly, then Castrol LMX grease should be applied to the oil seals?
In order for the cover, as well as the entire engine, to be clean inside, you need to fill in high-quality oil! and I’ll tell you this, there are three commandments for internal engine cleanliness: 1-fill only with high-quality oil (in my case, I drive 0W-30 Nissan original - only plastic containers!) 2-even though the factory recommends 10w-40, use 5W-40.30 (but you just need to take into account the wear of the rubber and metal seals, namely the seals! It is advisable to change everything, put it on sealant and lubricate the internal groove before installation with castrol LMX grease) 3-SHORTEN THE OIL CHANGE INTERVAL from 10,000 to 8,000, and in winter to 6,000 (as it often warms up) here are, in principle, 3 simple rules)))) and there is so much pleasure when you open the engine and everything is in light colors)))) and if someone says that there will be scuffs from synthetics, I will say so Lada 2112 1.5 16valve mileage 250,000 km, of which 40 000 km and sow the day on 0W-30 and nothing knocks or clatters anywhere, and you also need to take into account that the wife drives about 100 km on it every day, good luck to everyone)))
Read more: Replacing engine mounts for Renault Megane 2
Gold words! Is it possible to use 5W-40 all year round?
Why this mesh at all?
It separates the oil from the gases that enter the ventilation hose and returns it to the engine, preventing it from getting into the start!
I also worry about washcloths, especially Made in China - in my kitchen these rust very quickly.
good job. I cleaned everything myself more thoroughly) but I agree with everyone about the washcloths, it’s crap!
I was just thinking about this today, and then this topic came up and inspired me too)
What is the mileage, what kind of oil is it, and how long do you drive it from MOT to MOT? There's just a lot of varnish, and it's not good at all.
When I bought the car and went to the mechanic, he told me the mileage was 120-150 thousand. After that I drove about 38,000 km. www.drive2.ru/cars/lada/2…lnik/journal/289612/#post
I wouldn't do that, it's too risky.
Totally terrible! In which Murzilkas do you get all this) ) ) ? What kind of drugs are you taking?
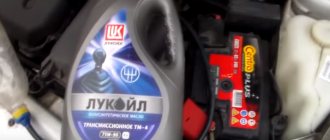
Over time, the sponges will turn into chips and fall under the friction surfaces of the camshaft, and down, and there is another shaft. Remove them as soon as possible, but if athletes do this, then they overhaul the engine after each race. Do you need it? Oil with good cleaning properties will cope with this dirt in one or two minutes, so change it. From personal experience, I poured regular Lukoil into such an engine for three years, removed the valve cover to adjust it, and everything was sparkling clean. The oil turned black after about 4000 miles. Draw your conclusions!
What oil are you running? I've never seen such a black motor. Your whole engine inside is just as dirty. And the fact that you only cleaned the valve cover from the inside won’t make it any better.
Read more: Bosch or Brown blender
Do you even read carefully? I wrote why I did it!
As for washcloths, I’m also not sure what’s good. Over time, it will crumble, this is China, and chips will get into the engine. And also according to the instructions for the car where the cutout for the camshaft needs to be coated with sealant on the corners. I did just that on my 15, and everything is great, I’ve already covered 15,000 km! And not a single leak!
+1 about washcloths, especially Chinese ones. At home, one of these was left in the sink a couple of times in a damp place and got rusty - so there’s no place for them in the engine.
Repair from the series "pinnal wheel, wiped glass")
Don’t judge too harshly, everyone starts with this at some point, but here’s the know-how right away) Respect for the purity)
Repair from the series "pinnal wheel, wiped glass")
totally agree with you))))
I don’t understand why you would put some kind of washcloths in there... the mesh looks much more impressive and clearly performs its functions better than washcloths, I think. for a clean lid +)
UralSvyazInform stands))))) in boots))) I’m talking about pants... Test topic
sponges are used in external oil separators, but not under the valve cover! Better get it before it's too late
The article is for those who plan to independently carry out work on replacing the cylinder head gasket on a VAZ 2114, 13.15 car.
So what is an oil trap?
An oil catcher, also called an “oil catcher,” is a device for additional separation of oil emulsion; in simple terms, the system is designed to clean the air from particles of engine oil, which can rise from the crankcase along with crankcase gases as a fine suspension and oil mist.
Oil evaporation can occur for various reasons, but, in particular, this phenomenon may be due to low-quality lubricant, which will begin to evaporate at operating temperatures. In this case, oil combustion products will settle on the intake manifold, throttle valve, idle air valve, etc., polluting some internal parts of the engine and complicating the operation of the engine as a whole.
Custom made oil catcher
Thus, the oil trap acts as a kind of filter that protects the engine from excessive contamination by crankcase gases and maintains its operating parameters by condensing oil vapors entering the intake system and then being sucked into the combustion chambers.
It is because of this oil mist on cars that it is recommended to clean the throttle body!
Over time, a film forms on the back of the damper, facing the engine, and then a whole thick layer of “oil” deposits, which is mainly the fault of the engine crankcase ventilation system.
The larger the layer of oil on the damper, the worse its response to opening and closing the throttle, “freezing” after releasing the gas pedal. Rough operation at idle.
We already told you how you can clean a mechanical throttle valve by cleaning it from this state:
Bringing him to this:
You can read more here:
Four simple tips that will make your car drive much better
It is precisely this kind of deposit throughout the intake manifold that the oil gas separator is designed to combat.
Relevance
Why do you need to install such a clever device? Due to high crankshaft speeds, oil flies through the crankcase ventilation breather and can end up on the carburetor assembly, and in the case of injection engines, on the throttle unit. And to prevent this from happening, just such a device is installed. Moreover, it is advisable to install it not only for those drivers who do not mind pressing the accelerator pedal to the floor. Those owners who have been using their car for quite a long time should also think about it. After all, during this period, the rings have most likely already worn out and do not provide proper sealing of the combustion chamber.
We change the valve cover gasket on a VAZ-2114 with our own hands: selection and replacement (video inside)
Even a novice motorist who just bought a VAZ-2114 is trying to master the art of self-repairing a car. Replacing the valve cover gasket is the first step in learning how to repair an engine. This process is not complicated and will require 20-30 minutes of time.
Below is a detailed video about replacing the valve cover on a VAZ-2114
The video will tell you how to replace the valve cover gasket on a car, and also tell you about the nuances and subtleties of the process.
Assembly process
There is no particular difficulty in assembly. The first step is to put a plug on one end of the coupling. The result will be something like a glass, but not for tea drinking. During operation of the most effective design of the crankcase gas oil separator, the plug will not have to be removed, and therefore for better reliability it is worth sealing it with a sealant. The next step is to place the metal sponge on the bottom of the cylinder. Just don't fill it out completely. In the upper part of the second plug, you need to drill two holes for the prepared plastic pipes. The edges of the tubes should be treated with silicone grease and installed in the prepared holes.
Looking at the inside of the plug, one of the pipes should be 1 centimeter shorter than the other. The longer one will be the intake one. Now all that remains is to fix the resulting cover in the rubber gasket. That's all - the homemade automotive gadget for catching crankcase gases is ready. If the owner has a delicate taste, then the product can be painted in the desired color and then allowed to dry thoroughly. Only after this can you proceed to further installation.
Communities › VAZ: Repair and Modification › Blog › Let's extend the life of the mass air flow sensor (do-it-yourself oil catcher)
The topic is already well-worn, I was tired of scooping oil out of the air filter pipe every 2 months, it was decided to make a simple and inexpensive oil catcher, because on the market they cost from 500 rubles and more...
So we will need 250 rubles, a couple of hours of free time and hands growing from our shoulders