1200 rub. for the photo report
We pay for photo reports on car repairs. Earnings from 10,000 rubles/month.
Write:
Checking the generator voltage regulator may be necessary when problems with the battery begin to occur. In particular, it began to undercharge or overcharge. When such a malfunction occurs, it’s time to check the generator voltage regulator relay.
The relay should turn off at 14.2-14.5V
The task of this simple device is to regulate the voltage of the electric current that is supplied from the generator to the battery. When it fails, the battery is either not charged enough or, on the contrary, overcharged, which is also dangerous, since this significantly reduces the battery life.
Agree that such a prospect is not very good because of one small detail. This is why it is so important to monitor the operating condition of the voltage regulator (it can also be called a pill or a chocolate bar). But in order to properly check the voltage regulator, you need to know its type and several important features.
Types of Voltage Regulators
Having understood what types of these devices there are, what their features and properties are, a complete understanding of the procedures carried out during testing will come. This will also give the answer to what scheme, in what way and how to check the generator voltage regulator. There are two types of regulators:
In the first case, it is meant that the regulator housing is combined with the brush assembly directly in the generator housing. In the second case, the regulator is a separate unit, which is located on the car body, in the engine compartment, and wires from the generator go to it, and wires from it go to the battery.
A special feature of the regulators is that their housings are non-separable. They are usually filled with sealant or special resin. And there is no particular point in repairing them, since the device is inexpensive. Therefore, the main problem in this regard is to check the generator voltage regulator relay. Regardless of the type of regulator, the voltage symptoms will be the same.
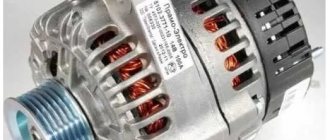
Voltage regulator VAZ-2110
The "tens" launch vehicle also has a semiconductor design. It is integrated into the generator, which allows you to maintain the required voltage directly at the output of the device.
The stock “tens” regulator is available under catalog number 1702.3702. It can also be used in generators of all Samar models.
On new modifications of the VAZ-2110, the voltage regulator may be marked 1702.3702-01. This is a new generation of relays that are manufactured using MOSFET technology, which can significantly reduce output power losses. In addition, these devices are characterized by increased reliability and resistance to overheating.
Symptoms of a problem
So, in case of low voltage, the battery simply will not charge. That is, in the morning you will not be able to start the car, the lights on the dashboard may not even light up, or troubles will arise while driving. For example, dim headlights at night, unstable operation of the electrical system (problems with electrical appliances - wipers, heaters, radio, etc.).
In case of increased voltage, there is a high probability of a decrease in the electrolyte level in the battery banks, or its boiling. A white coating may also appear on the battery case. When overcharging, the battery may behave inappropriately.
Signs, malfunctions and repair of the generator and voltage regulator
In addition, you can also identify the following signs of a faulty voltage regulator (in some cases, some of them may or may not be present, it all depends on the specific situation):
- the control light on the dashboard (although this may be a sign of other malfunctions, for example, that it has burned out, the contact has fallen out, and so on);
- after starting, the battery indicator on the dashboard does not go out, that is, there are obvious malfunctions in charging the battery;
- the brightness of the headlights becomes dependent on the engine speed (you can check this somewhere in a deserted place by placing the car against a wall and accelerating - if the glow changes, then most likely the voltage regulator is faulty);
- the car stopped starting normally the first time;
- The battery is constantly ;
- when the engine speed exceeds 2000 rpm, the indicators on the dashboard turn off ;
- the dynamic characteristics of the car decrease , this is especially noticeable at high engine speeds;
- In some cases, the battery may boil .
Reasons for failure of the relay regulator
The reasons for the failure of the voltage regulator may be:
- short circuit in the circuit, including interturn short circuit of the excitation winding;
- failure of the rectifier bridge (diode breakdown);
- reverse polarity or incorrect connection to the battery terminals;
- penetration of moisture into the housing of the regulator and/or generator (for example, when washing a car or driving in heavy rain);
- mechanical damage to the unit;
- natural wear and tear of the unit, including brushes;
- poor quality of the device being directly tested.
There are a number of simple methods for checking the regulator, regardless of whether the unit is removable or not.
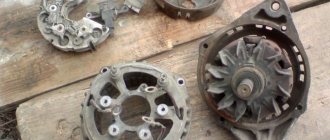
Replacement Tablet Generator VAZ 2107
Replacing a brush make yourself a VAZ 2107 generator
VAZ replacement nozzles and tips 2107
Welcome friends to the car repair site. Despite the huge number of foreign cars, cars of the VAZ family are still needed and are found among motorists who are knowledgeable about technology and appreciate the advantages of the Russian automobile industry.
Of course, operation and repair are indivisible concepts, and in the event of a failure of a particular unit, fault identification and troubleshooting can be carried out completely independently. Let's look at a simple example of repairing a VAZ 2107 car generator.
Content
Malfunctions and principle of operation of generator brushes
The electrical system of your steel stallion shows defects, when generator , a reddish warning light with a battery symbol lights up on the dashboard.
Quite often, wearing or freezing brushes is a must. Those who are familiar with the mechanism of operation of the generator understand that an excitation voltage is supplied to the armature through the brush, which not only drives the electronic machine (generator), but also regulates its output power.
READ Replacement Low Beam Lamp Gazelle
In particular, the regulation itself is determined by a special device, a relay controller, which can be implemented specifically on the brush holders or installed separately (on earlier models).
As a rule, this malfunction manifests itself gradually, initially accompanied by minor interruptions in the operation of the generator, which leads to its uniform failure, but other options are also possible, such as an unexpected malfunction.
How to remove the brushes from the generator and check the VAZ 2107 VAZ 2106 Mutual subscription to your channel
How to remove the brushes and check the VAZ 2107 generator
VAZ 2106.
VAZ 2107 brush replacement (WITHOUT REPLACEMENT)
VAZ 2107
, No downtime. parking while shifting gears.
Replace the VAZ 2107 generator brushes yourself
The brush repair itself usually comes down to replacing them, but first you need to remove the brush assembly from the generator body and assess the degree of wear, check for chips and cracks.
replacing generator brushes The VAZ 2107 procedure is simple and usually takes a few minutes, you do not need to remove the generator to replace the brushes, just disconnect the power cable, unscrew the two screws that secure the brush holder housing and carefully remove this assembly, make sure to disconnect the negative terminal in advance .
READ Replacing rear crankshaft oil seal Ford Focus 3
Warning! The battery(s) must be disconnected when performing any electrical work on the vehicle!
Check the disassembled assembly for freezing, jamming of the brushes and their protruding part, which should be at least 12 millimeters. In case of non-compliance, the part must be replaced. Brushes for the VAZ 2107 generator can be bought at almost any auto parts store.
After fixing the problem or purchasing a new one (it's better to buy small parts with a sample of the old ones so you don't have to change them), install them in reverse order.
Prank tips
If you noticed noise from your car's alternator brush before repairs, this may mean that the bearings of the VAZ 2107 alternator may be worn out, in which case it is necessary to remove and disassemble the VAZ 2107 alternator.
A worn bearing has an increased clearance of the rolling elements and is susceptible to it; this is the case when replacing it with a new one. Keep in mind that premature bearing failure is not only due to lack of lubrication.
This is often caused by excessive tension on the alternator drive belt; in addition, a tight belt can damage the cooling system pump bearing.
READ CVT Oil Change Nissan X Trail T31
Therefore, check this device regularly in accordance with the manufacturer's recommendations. It is better to habitually and regularly inspect the engine compartment while the engine is running; this will allow you to identify and eliminate previously encountered problems at minimal cost.
Correct diagnosis will help you avoid unnecessary work and unexpected breakdowns.
The simplest way to check the generator voltage regulator
The simplest method of checking the regulator is to measure the voltage at the battery terminals with a multimeter. However, it is worth immediately making a reservation that the algorithm given below does not give a 100% probability of failure of the regulator. Perhaps the generator itself has failed. But the advantage of this method is that it is simple and there is no need to dismantle the device from the car. So, the algorithm for checking the generator voltage regulator with a multimeter is as follows:
- Set the tester to DC voltage measurement mode at a limit of about 20 V (depending on the specific model, the main thing is that it displays values up to 20 V as accurately as possible).
- Start the engine.
- Measure the voltage at the battery terminals in idle mode (1000. 1500 rpm). If the regulator and generator are working properly, the value should be within 13.2. 14 V.
- Increase the speed to 2000. 2500 rpm. In the normal state of the electrical circuit, the corresponding voltage will increase to 13.6. 14.2 V.
- When the speed increases to 3500 rpm and above, the voltage should not exceed 14.5 V.
If during the test the voltage values are very different from those given, then most likely the machine’s voltage regulator is faulty. Remember that the voltage should not fall below 12V and should not rise above 14.5V.
How to choose a voltage regulator
When choosing the right regulator, you need to be guided by two parameters: the DC specification, as well as the accuracy of the output voltage.
Understand the requirements of the DC load to which the regulated voltage must be applied. Only on this basis can the controller type be selected. For the VAZ 2110, you should pay attention to the three-level voltage regulator. Such a device has many advantages, including:
- Problems also disappear when warmed up;
- The engine starts quickly during low temperatures;
- absence of unexpected and uncontrolled alarm activation;
- The performance of the vehicle's heating and cooling system improves.
Of course, such changes will be observed in pairs - a 3-level voltage regulator and a high-quality battery in the VAZ 2110.
Which voltage regulator to choose
To play it safe, you can purchase an Energomash regulator, which is ideal for the VAZ 2110. This device has received many good reviews from drivers who drive in difficult conditions.
Voltage regulator "Energomash"
Checking the combined relay-regulator
Checking the VAZ 2110 voltage regulator
To perform the corresponding check, it is necessary to assemble the circuit shown in the figure. To do this, use a charger or power supply with an adjustable load (it is important that it be used to regulate the voltage value in the circuit), a 12 V light bulb (for example, from a turn signal or headlight, with a power of 3.4 W), a multimeter, and the regulator itself voltage (this can be from a Bosch, Valeo or other generator). It is advisable to have the wires used for switching with “crocodiles”.
Checking the voltage regulator of the generator 37.3701: 1 - battery; 2 — ground terminal of the voltage regulator; 3 - voltage regulator; 4 – terminal “Ш” of the regulator; 5 — output “B” of the regulator; 6 — control lamp; 7 — terminal “B” of the voltage regulator.
If you assemble a circuit in which the voltage is at a standard value of 12.7 V, then the light bulb will simply glow. But if you use a voltage regulator to raise its value to 14.14.5 V, then if the relay is working, the light should go out. Otherwise the regulator is faulty. That is, when the voltage reaches 14.14.5 V (depending on the model of the machine and, accordingly, the regulator) and above, the light goes out, and when it drops to the same level, it lights up again.
Checking the VAZ 2107 voltage regulator
Checking the voltage regulator on VAZ 2108/2109 cars
Until 1996, a VAZ 2107 with a 37.3701 generator was equipped with an old-style voltage regulator (17.3702). The verification procedure is given above. After 1996, a more modern generator of the G-222 brand was used (integrated regulator RN Ya112V (V1).
As you can see, the verification algorithm for all regulators is almost the same. The only difference is the cutoff values when the relay is activated.
Operating modes of the VAZ 2110 regulator
Since the device has a three-level circuit, there should be three gradations:
- The minimum voltage that the regulator supports is 13.6 V, this applies to
- difficult operating conditions at high air temperatures;
- normal mode stabilizes the voltage at 14.3 V;
- the maximum is a voltage of at least 14.7 V for operation under load conditions at low air temperatures.
Installing a three-level relay is quick and hassle-free and is no more difficult than replacing the brushes. The instructions that come with the device explain in detail each step, including switching. The price of a three-level regulator for a VAZ 2110 is no more than 350 rubles, depending on the manufacturer.
Thus, after weighing the pros and cons of the device, you can significantly extend the life of the battery and stabilize the operation of electrical equipment in the car for little money. Good luck to everyone and stable voltage in the network!
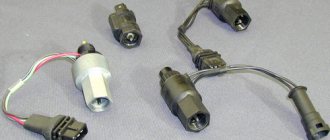
Checking an Individual Regulator
Checking the voltage regulator of the G-222 generator: 1 - battery; 2 - voltage regulator; 3 - control lamp.
As a rule, separate voltage regulators were installed on old cars, including domestic VAZs. But some manufacturers continue to do this to this day. The verification process is similar. To do this, you need to have a power supply with a voltage regulator, a 12 V light bulb, a multimeter and a directly tested regulator.
To check, you need to assemble the circuit shown in the figure. The process itself is similar to the one above. In normal condition (at a voltage of 12 V), the light bulb lights up. When the voltage value increases to 14.5 V, it goes out, and when it decreases, it lights up again. If during the process the lamp lights up or goes out at other values, it means that the regulator has failed.
Checking relay type 591.3702-01
Relay test diagram type 591.3702-01
You can also still find a voltage regulator of type 591.3702-01, which was installed on rear-wheel drive VAZs (from VAZ 2101 to VAZ 2107), GAZ and Moskvich. The device is mounted separately and installed on the body. In general, the test is similar to that described above, but the differences are in the contacts used.
In particular, it has two main contacts - “67” and “15”. The first of them is a minus, and the second is a plus. Accordingly, to check it is necessary to assemble the circuit shown in the figure. The verification principle remains the same. In normal condition, at a voltage of 12 V, the light bulb lights up, and when the corresponding value increases to 14.5 V, it goes out. When the value returns to its original value, the light comes on again.
A classic regulator of this type is a device of the PP-380 brand, installed on VAZ 2101 and VAZ 2102 cars. We provide reference data regarding this regulator.
| Adjustable voltage at regulator and ambient temperature (50±3)° C, V: | |
| at the first stage | no more than 0.7 |
| on the second stage | 14,2 ± 0,3 |
| Resistance between plug “15” and ground, Ohm | 17,7 ± 2 |
| Resistance between plug “15” and plug “67” with open contacts, Ohm | 5,65 ± 0,3 |
| Air gap between armature and core, mm | 1,4 ± 0,07 |
| Distance between second stage contacts, mm | 0,45 ± 0,1 |
Testing a three-level relay
Regulated power supply
Some car owners install on their cars, instead of standard “chocolate bars,” three-level relays, which are technologically more advanced. Their difference is the presence of three voltage levels at which the battery power is cut off (for example, 13.7 V, 14.2 V and 14.7 V). The appropriate level can be set manually using a special regulator.
Such relays are more reliable and allow flexible adjustment of the cutoff voltage level. As for checking such a regulator, it is completely similar to the procedures described above. Just do not forget about the value that is set on the relay, and accordingly, check it with a multimeter.
Generator check
There is one method by which you can check the performance of a car generator equipped with a regulator relay 591.3702-01 with diagnostic elements. It is as follows:
- disconnect the wires that went to pins 67 and 15 of the voltage regulator;
- connect a light bulb to it (excluding the regulator from the circuit);
- Remove the wire from the positive terminal of the battery.
If, as a result of these actions, the engine does not stall, then we can say that the car’s generator is in order. Otherwise, it is faulty and needs to be checked and replaced.
Recommendations for increasing the service life of the regulator
In order to increase the service life of the voltage regulator, it is necessary to adhere to several simple rules aimed at implementing preventive measures. Among them:
- do not allow excessive contamination of the generator, periodically inspect its condition, and, if necessary, dismantle and clean the unit;
- check the tension of the alternator belt, tighten it if necessary (either yourself or in a car service);
- monitor the condition of the generator windings, in particular, do not allow them to darken;
- check the contact on the control wire of the relay-regulator, both its quality and the presence of oxidation on it;
- Perform periodic voltage checks on the vehicle battery with the engine running.
Technical characteristics of the VAZ-2110 launch vehicle
The voltage regulator relay for the VAZ-2110 generator has the following characteristics.
| Regulation voltage with battery at a temperature of 25°C and a load of up to 3A, V | 14,4±2 |
| Regulation voltage with battery at a temperature of 25°C and a load of more than 3 A, V | 14,4 ± 0,15 |
| Operating temperature range, оС | -45…+100 |
| Maximum output circuit current: standard/agreed with the manufacturer, A | 5/8 |
| Permissible long-term exposure to high voltage, V | 18 |
| Permissible exposure to high voltage for up to 5 minutes, V | 25 |
Types of relay-regulator
To exaggerate, there are only two types, but each works on the same principle, namely, “cuts” or increases the voltage to the desired level.
- Combined with brush assembly. Usually it is mounted on the generator itself, in the housing where the brushes are located, there is also a relay regulator.
- Separate. Usually it is mounted on the car body, the wires go from the generator to it, and only then to the battery.
The housings are non-separable and tight and of a different type (often filled with sealants or special adhesives), that is, they cannot be repaired. To be honest, they are quite cheap, especially for our VAZs, so it’s easier to buy a new one than to tinker with an old one.
These are the most common types, of course, previously there were so-called ones combined with terminals, but they didn’t catch on because the device is not very convenient, so I won’t talk about them.
If your relay is “broken” and is constantly recharging, then it’s worth changing it, but first you need to make sure that this is the problem. Now there are only two ways to check: - without removing it on the car itself, and checking an already removed relay. Let's look at both options.
How to check the relay - regulator without removing it from the car?
Indirect signs
If your “regulator” is out of order, you will notice it very quickly, especially if it is winter and frost outside. The fact is that there will be either an “undercharge” or an overcharge of the battery . If the charge is under-charged , you simply won’t start your car - you come to the parking lot, insert the key, and the car barely turns the engine, or doesn’t start at all, sometimes even the lights go out.
When recharging , almost the same thing will happen, only the reason will be boiling away of the electrolyte from the battery cans. It can be indirectly determined by the rapid decrease in electrolyte in the banks, and a white coating on the top of the battery, as well as on parts of the body underneath it. It’s worth thinking about it and checking the regulator relay.
However, this is not our method, we need to make sure more precisely.
Correct Method
To do this, we will use our voltmeter; we need to measure the voltage at the battery terminals with the engine running. To begin with, I would like to note that when the engine is not running, the normal voltage should be within 12.7V, perhaps a little less, but if you already have 12V, then the battery needs to be recharged! Or look for reasons for undercharging.
Checking the combined relay-regulator of the car
First we will check the combined relay-regulator circuit together with the brush assembly. These are now installed on many foreign cars, and by the way, on many domestic cars (often labeled Y212A).
As you understand, it is necessary to remove the generator and disassemble it, since this combined unit is attached at the back next to the generator shaft, along which these brushes run. For this:
- We look for a special “window” on the back of the generator where the brushes are immersed.
- Unscrew the fastening bolt.
- Remove the brush assembly.
- We clean it - as a rule, it will be covered in graphite dust; the brushes are made of graphite, using special carbon.
Then we need to check it, but for this we assemble a certain circuit, it is advisable to use a power supply with an adjustable load or a charger. We also need to take a regular 12V light bulb from a car, for example from a “dimensions”, we will need wires to assemble the entire system.
We may need a battery, because many chargers do not work without it. But from the wire from the battery we connect the relay-regulator, to the brushes of which we connect a 12V light bulb, this can be done with small alligator clips, the main thing is not to break the graphite elements. A small diagram for understanding.
If you connect everything in a calm state, the light will simply light up and stay lit, this is normal, since the brush assembly is a conductor of electricity from the shaft. Let me remind you that in a calm state, the voltage on the brushes will be approximately 12.7V.
Now we need to raise the voltage on the charger to 14.5 V, the lamp will light, but when this threshold is reached it should go out! That is, 14.5 V is a kind of “cutoff” for a further increase in voltage! If you lower the value, the lamp should light up again. Then your relay-regulator is working, it passed the test.
If the voltage reaches 15 - 16V and the light is on, this means the relay has failed and needs to be replaced! It does not cause a “cut-off” and will help recharge the battery. Here's a simple check. Now a short video on the topic.
Dismantling
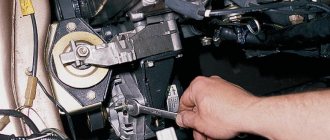
To disassemble, remove and repair or replace the generator, you will need to do the following.
- Drive onto an inspection hole or overpass to have access to the bottom and engine compartment.
- Remove the battery, otherwise it will not allow you to get to the nut that holds the generator you are looking for.
- Next, the same nut and adjustment bar are removed. Here you will need a 17 mm wrench. Use an extension cord. This will make the task easier; you will have to apply less force to unscrew the fastener.
- In the engine compartment, remove the shield that performs dirt protection functions.
- Now the drive belt is removed and the wires are disconnected.
- Be sure to remove the protective cap and use a 10mm wrench to unscrew the nut that holds the tip and positive cable of your battery.
- There is another nut on the fixing bracket, which will also have to be unscrewed.
- That's it, you can remove the generator. Just remember to pull out the long bolt first.
- When removing, keep an eye on the buffer sleeve. It won't be good if you lose it.
Dismantling works
This completes the procedure for removing the generator. You can proceed with partial repairs or complete replacement of the unit.
Belt
Often, the solution to a poorly functioning alternator is simply adjusting the belt.
Belt
- For the device to work effectively, it is necessary to ensure normal deflection of the belt;
- The deflection size should be 6-10 millimeters with a force of 98 N or 10 kgf;
- To adjust or replace the belt, you need to move the generator slightly to the side, towards the cylinder block;
- By rotating the adjusting bolt, you can adjust the belt tension.
If this measure does not help, you will have to pay attention to the voltage regulator and brushes.
Brushes and regulator
It is not recommended to repair the generator brushes, as well as the voltage regulator if they are worn out.
Experienced specialists advise purchasing a complete unit that includes both elements. Replacement is completed in a matter of minutes.
Brushes
But we will definitely tell you how you can change the brushes on your car’s generator with your own hands.
- Disconnect the negative terminal from the battery and remove the battery.
- Remove the generator following the instructions above.
- You can replace the brushes without removing the generator, but this causes certain difficulties. It is much easier to remove the unit.
- Remove the cover, which is the protective casing of the generator.
- The wires and the generator itself are disconnected from the brushes. To do this, simply unscrew a couple of bolts.
- On the right side of the dismantled device there is a nut that can be unscrewed by 13 millimeters with a spanner.
- Now lift the voltage regulator lever, which will allow you to get to the brushes.
- Using new brushes, install them in place of the old ones and reassemble the assembly in reverse order.
When reassembling, proceed as carefully as possible so as not to damage the repaired generator with your own hands.
Relay
Quite often, the cause of failure is not the generator itself, but its relay.
There may be several reasons for replacing the relay.
| Cause | Peculiarities |
| Brush wear | The most common reason. This is due to the fact that when the brushes wear out, the contact with the relay disappears, because the generator does not receive enough power, and the operation begins to fail |
| A breakdown appears in the circuit | As a result, the voltage in the system increases and the device fails. |
| Wires break | The contact loses its original adhesion quality |
| Broken fasteners or housing | It’s better not to let the situation come to this, otherwise a short circuit will occur, and then it’s not far from all the devices failing |
If there are signs of a malfunctioning generator relay, be sure to replace it immediately.
Relay test
Many people, out of inexperience or ignorance, believe that when the battery cannot hold a charge, the culprit is solely the alternator. But in practice, the relay regulator is often the cause. To check it, you need to perform several operations:
- Raise the hood of your car.
- Start the engine and engage second, or even better, third gear.
- Remove the negative terminal from your battery. This way you will be able to avoid a short circuit.
- If the engine continues to run after disconnecting the terminal, the relay has failed.
- If the car turns off, then the problem should be looked for in the regulator itself.
Three level relay
Many experts advise installing three-level relays on the VAZ 2110.
The regulator-relay is installed on board the car, and the panel and generator brushes are installed directly into the generator.
Three levels of regulation allow the battery to remain charged for a long time, plus its service life is significantly extended.
These three levels are as follows:
- Minimum. Required to ensure vehicle operation even in conditions of elevated, extreme temperatures. The engine will not stall while driving in hot areas and will be able to withstand the load on covered slopes. This level is relevant for the summer season;
- Norm. The second level, which ensures normal operation under standard conditions without increased loads;
- Maximum. Allows you to confidently operate the car in subzero temperatures and makes it possible to start the engine with a discharged battery.
Purchasing such a relay regulator will ensure reliable operation of the battery and the entire vehicle. Therefore, you should not refuse such an acquisition.
Testing an Individual Relay
Similarly, you can check a new type of regulator, that is, a separate one, here the verification process is much easier. For example, let’s take a model like Y112B; they were installed on many domestic cars before (VAZ).
This is a separate element, so we simply unscrew it from the body (sometimes from the generator cover) and attach it to our stand. Once again, I would like to remind you that it is advisable to have a 12V power supply, then the testing process will be much easier. If not, we use a charger (with adjustment modes) and connect it according to the lower diagram.
The check is the same, we increase the voltage to 14.5 V, the lamp should go out, if not, or turns off at a voltage much higher, then the relay has failed and needs to be replaced.
Checking the removed voltage regulator
To make sure that it is the LV that has failed, and not the generator itself, it should be checked separately. To do this, you will need to disconnect it from the main device. The procedure is as follows:
- Remove the negative terminal from the battery.
- We find the place where the launch vehicle is attached to the generator. Unscrew the 2 screws that secure it.
- Disconnect the yellow wire going from the regulator to the generator.
- We dismantle the launch vehicle.
To diagnose the device, you will need a power supply with the ability to adjust the output voltage, a light bulb (12 V) with a socket and a pair of wires. The verification algorithm is as follows:
- We assemble a “control” from a lamp and wires and connect it to the regulator brushes.
- Set the voltage on the power supply to 12 V.
- We connect the “plus” from the power supply to the “D+” terminal of the regulator, and the “minus” to its “ground”.
- We look at the lamp: it should be lit.
- We increase the voltage on the power supply to 15-16 V. If the regulator is working properly, the lamp should go out. If this does not happen, the LV must be replaced.
Old type or check 591.3702-01
This is a very old type of relay; it was installed on “penny” cars, as well as on many rear-wheel drive cars. It has also always been separately mounted on the body, but the check here is slightly different in terms of contacts.
If you take their markings, then there are only two of them - “67” and “15”. The first contact “67” is a minus, as is the relay body itself, but “15” is a plus. The principle of operation is the same, we connect our charger - we start checking, increase the voltage to 14.5V, then look at the lamp. If it turns off well, no, it’s bad, replace it.
There is another “life hack” - if you connect a light bulb, bypassing the regulator relay, to the wires that went to pins 15 and 67, then remove the wire from the positive terminal of the battery - if the engine does not stall, then the generator is “live”.
What else could it be?
Often, the culprit for charging problems may not be the regulator itself, but its terminals; over time, like many on a car, they oxidize - which prevents the generator from working normally and recharging our battery, so first, before changing this unit, try to clean it, remove oxides and other deposits. By the way, this also applies to the battery terminals; they need to be cleaned and protected at least once a season.
Therefore, first of all, if the multimeter gives you 11 or slightly below 12V at the terminals of the machine, try cleaning the terminals and contacts first, then measure again. It is quite possible that this is the reason.
This is where I end the article, I think it was useful, read our AUTOBLOG.
(
14 votes, average: 4.21 out of 5)