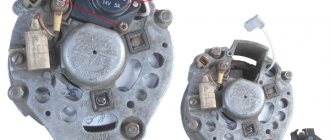
Technical characteristics of generators VAZ 2108, 2109, 21099
The generator of VAZ 2108, 21081, 21083, 2109, 21091, 21093, 21099 cars is a synchronous, three-phase electric machine, alternating current with electromagnetic excitation.
It has a built-in rectifier (diode bridge) based on silicon diodes and an electronic voltage regulator. In addition, there is a rotor - the rotating part of the generator and a stator - the stationary part. The rotor is driven by a belt from a pulley on the engine crankshaft. On VAZ engines 2108, 21081, 21083 there is a V-belt, on 2111 there is a poly-V belt. A number of cars were equipped with generators made in Bulgaria, Slovenia, and Germany. Their characteristics are similar to domestic generators, but they may differ slightly in design.
A 37.3701 generator is installed on VAZ carburetor engines , and a 9402.3701 generator is . Both generators are similar in design and characteristics, the only differences are in the amount of current supplied (9402.3701 is more powerful).
Technical characteristics of generator 37.3701
— The amount of current supplied (at 6000 rpm -1 and voltage 13 V) – 55 A
— Voltage value – 13.6 – 14.6 V
— The direction of rotation of the rotor is right
— Maximum rotor speed – 13000 rpm -1
— Gear ratio engine/generator 1/2.04
Technical characteristics of the generator 9402.3701
— The amount of current supplied (at 6000 rpm -1 and voltage 13 V) – 80 A
— Voltage value – 13.2 – 14.7 V
— The direction of rotation of the rotor is right
Notes and additions
A normally working, serviceable generator of VAZ 2108, 2109, 21099 cars and their modifications produces a voltage in the range of 13.6 V - 14.6 V. This can be visually tracked using a voltmeter on the instrument panel, or it is better to measure the voltage with a voltmeter (multimeter, autotester...). Based on this, generator malfunctions come down to just two problems:
- the generator does not provide charging current at all , or provides it in a small volume (the voltage is low - the voltmeter needle is in the red zone or close to it);
— the generator produces too much charging current (the voltage is higher than normal, the voltmeter needle points too far to the right).
In the first case, the battery is undercharged and, after some time, starting the engine will be problematic. In the second case, the battery is overcharged and, as a result, its electrolyte boils away (the battery “boils”), the plates fall off, and then the final failure occurs.
It is advisable to have at least the simplest tester in order to diagnose generator malfunctions with a high degree of probability. In addition, based on the instrument readings, you can also draw certain conclusions about the performance of the generator set.
Several articles on our website provide the most common malfunctions of VAZ 2108, 2109, 21099 car generators, recommendations for diagnosing and eliminating them.
In addition, articles on the design and technical data of generators for VAZ 2108, 2109, 21099 cars, their electrical circuits and connection diagrams have been added. We hope that all this will help many car enthusiasts in independently solving problems that arise when operating their cars.
Source
Generator VAZ 21099, VAZ 2109, VAZ 2108
Cars of the VAZ “8, 9, 99” family equipped with a carburetor, fuel injection system (injector) are equipped with generators of type 37.3701, 94.3701.
Both power supplies are AC, three-phase, with pre-installed rectifier and voltage regulator. The rotation side is right.
The first type of power source (hereinafter - IP) is driven by a V-belt, and the second - by a poly V-belt from the crankshaft pulley. Some production models of the “eight” and “nine” are equipped with IP made in Slovenia, marked AAK-5102.
If AAK-5102 fails, it can be completely or partially replaced by 94.3701. The process of self-prevention is not at all complicated, but it requires knowledge and initial experience in vehicle maintenance. Carrying out diagnostics in a non-professional manner does not guarantee the functionality of the equipment.
Features of work
What might a faulty unit look like, how to remove and disassemble the generator, how is it rebuilt? If the device does not charge the injector or carburetor of a VAZ 21099 or 2109, first of all, let's look at the features of its functioning, namely the power circuit.
Generator power circuit
Node power circuit
So, what does the scheme include:
- The VAZ 2109 generator itself.
- Negative diode.
- Additional element.
- Positive diode.
- The warning light also informs the driver that the battery is low.
- Vehicle dashboard.
- Voltmeter.
- The fuse box is installed in the engine compartment under the windshield opposite the driver's seat.
- Resistor elements installed in the same block.
- Ignition relay "nine".
- The castle itself.
- Battery
- Capacitor device.
- Winding.
- Generator voltage regulator relay installed in the engine compartment.
It should be noted that the connection diagram for the VAZ 2109 generator is relevant for all cars with front-wheel drive of the eighth line - both 2108 and 21099 (the author of the video is Semyon Pedan).
What generator is installed on the VAZ 21099, VAZ 2109, VAZ 2108
| Specifications | 37.3701 | 94.3701 |
| Limit current strength at a voltage of 13.5 V and speeds above 5500 rpm | 56 | 81 |
| Adjustable voltage range | 13,5-14,4 | 13,3-14,6 |
| Gear ratio | 01.01.1970 | 01.01.1970 |
| Capacitor capacity | 2,3±15% | 2,1±15% |
Note to the driver. If the IP drive belt breaks along the way, and you don’t have a spare one at hand, cut a 25 mm wide ring from the car inner tube.
To significantly reduce current consumption when the power unit is running, it is necessary to turn off the maximum number of current consumers: radio, radio, lighting, cooler, stove heater.
Generator set price for VAZ 21099, VAZ 2109, VAZ 2108
| Catalog item | Serial number | Price | |
| A2110-80A (original) | BOSCH (9501.3801) (original) | From 3000 – 3200 | |
| 9501.3801 | FINWHALE 687-04 | 62022 / 180545 | From 3000 – 3200 |
| 9568.3749 | 922.3801 | SKL622RS | From 3000 – 3200 |
| 3701010 (HORT) | 3701024 | Contitech | From 3000 – 3200 |
| 3701971 | 3701953 | Electro 3701747 | From 3000 – 3200 |
| *prices are as of August 2021 |
The principle of operation of the power supply VAZ 21099, VAZ 2109, VAZ 2108
There are 6 coils mounted inside the generator set, the material is copper, the connection is star-shaped. The stator is a stationary structure, and the rotor rotates inside the stator. Magnetic brushes are pressed into the back of the rotor axis, and the excitation winding is wound and sealed.
After the key is turned in the ignition switch, the current from the battery creates a magnetic field, passing through the graphite brushes and copper winding. Alternating current is converted to direct current.
On the front side of the IP there are two power outputs with polarity “+” and “-”. Terminals with the appropriate polarity are connected to the battery.
To turn the generator set you will need a battery. After the battery has accumulated the spent amount of energy, the generator distributes the excess to other power sources. Thus, the size of the on-board network is maintained within an acceptable range.
Replacement and repair of generator on VAZ 21099, VAZ 2109, VAZ 2108
Power supply location: engine compartment, to the right in the direction of travel of the vehicle.
Required materials and tools:
- open-end, spanner wrenches;
- knob, heads;
- torque wrench for precise clamping force;
- new drive belt as needed;
- plastic spatula for removing the belt;
- screwdrivers with a set of bits to change the brushes.
Step-by-step replacement instructions:
- We turn off the car engine.
- Open the hood.
- Loosen the terminals and remove them from the battery.
- Loosen the bolt that secures the bracket.
- We bring the generator set down.
- Remove the drive belt.
- We remove the IP from the engine compartment for further prevention.
- Upon completion of the diagnostic work, install the parts in reverse order.
After dismantling the IP, the master cleans it, performs an initial inspection, and determines possible breakdowns. The components are replaced with new ones, the terminals on the rotor are cleaned.
The part cannot be installed if cracks are found in the housing. Subsequent operation of the technical device is unsafe.
We check the integrity of the rotor winding with a multimeter. The diode bridge is also subject to prevention. Do not forget to check the integrity of the fuse, replace it with a new one as necessary, and observe the amperage.
Subject to the recommendations of specialists, subsequent maintenance of the power source after 30 - 40 thousand km.
To extend the life of electrical equipment, follow the technical inspection schedule. Purchase parts with original catalog numbers; a complete list of serial numbers is indicated in the table data.
Contact service station specialists for help if you encounter any difficulties with repairs or maintenance of electrical installations.
Source
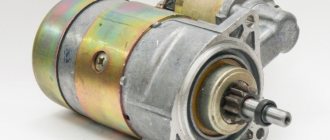
Starter and its possible malfunctions
Starter VAZ 2109
A starter is precisely the device without which it is impossible to start a car engine. This is its main task. Structurally, the starter is the same as an electric motor. And like any unit, as a result of wear of parts, it can fail. For example, electrical repairs in a VAZ 2109 car are not very difficult. However, dismantling the starter is particularly difficult. In principle, this applies to all models in this series. If difficulties do not frighten you in this process, then you can safely begin diagnosing faults and repairing the starter. To check the functionality of the starter, first of all, it is necessary to put the battery in order. It must be charged. Next, you need to turn on the ignition and carefully listen to the operation of the starter. Signs of its breakdown may include the following:
- The solenoid relay does not operate. There is no characteristic click.
- The starter shaft does not rotate or rotates at insufficient speed.
- When you turn on the starter, you hear a specific “ratcheting” sound. This means that the starter gear does not fully engage with the flywheel.
All of the above indicates that the starter requires repair. And for this it needs to be dismantled. This procedure assumes the following:
- First of all, you need to disconnect the battery terminals.
- Then disconnect the contact cables from the starter.
- Next, unscrew the three nuts securing the starter to the crankcase.
- We remove the starter.
After cleaning and washing, the unit is ready for diagnostics and disassembly. In order to diagnose the operation of the starter, you need a fully charged battery. Next, connect the negative terminal of the battery to the starter housing and check the functionality of the solenoid relay with the positive contact. If the positive wire is connected to the relay contact bolt, the starter shaft will move forward. If you connect the positive wire after the relay, the starter rotor should rotate. In the first case, if movement does not occur, then the relay must be replaced. In the second case, in the absence of movement, it is necessary to check the condition of the brushes (see Replacing the starter brush and all about it), slip rings and stator windings. If defects are identified, a decision is made to eliminate the problem and further repairs are carried out.
Recommendation: When disassembling, the stator parts must be laid sequentially in a previously prepared place. This will prevent you from mixing up their assembly.
Fuse and relay box: purpose and need for replacement
VAZ 2109: fuse box repair
This device plays a very important role in the safety of electrical units. Its main purpose is to prevent a short circuit in the electrical circuit in the car and thereby avoid a fire, as well as quick access to relay devices. The main reason for the need to replace this device is the excessive load that appears as a result of the simultaneous inclusion of several units in the electrical circuit. This additional load can lead to overheating of the electrical network and its rupture.
Replacing the fuse box
To replace the block you will need a Phillips and flathead screwdriver. The block is replaced in the following order:
- First you need to remove the negative terminal of the battery.
- Then, turning the three locks 90 degrees, remove the cover of the mounting block.
- Next, unscrew the bolts securing the fuse box to the front panel.
- Carefully remove the block from the studs.
The ninth VAZ model also has an additional relay. It is located on the right side of the steering wheel. In order to dismantle this relay, it is necessary to disconnect the supply wires and use the R8 key to unscrew its fastenings to the panel. The new unit must be installed in the reverse order.
The best generators for VAZ
If the generator is seriously damaged, it does not have to be repaired, but completely replaced. Parts necessary for repair may be missing, or the breakdown may not be repairable at all. Meanwhile, the on-board voltage and the quality of battery charging depend on the good operation of the power unit. It's a shame when, despite a good motor, electrical equipment does not work properly.
And if we are talking about VAZ cars, then sometimes a replacement is in demand due to the lack of power of standard devices. Modern automakers offer many additional devices that increase the level of comfort when traveling, but they also consume a large amount of electricity, and old devices cannot cope, so they have to be replaced with more powerful ones.
Many people are interested: which generator to buy if they have a VAZ? Here you need to consider them separately by model, so before you go shopping, read the recommendations of specialists and compare them with your wishes and capabilities.
Difficulties in reworking
Since the work is quite labor-intensive and takes a lot of time, we recommend performing the steps in stages. The quality of components and their assembly play an important role during work. Beginners may have difficulty securing some elements, so it is better to call for help from a familiar car service specialist or a person who has replaced a carburetor with an injector before.
Replacing a carburetor with an injector will require you to be careful and careful. You will need to replace a lot of parts, and this is quite difficult for a beginner to do. But if you wish and strictly follow the instructions, you can perform a really serious modernization of your car and save a lot on car service costs.
Welcome! A generator is an integral part of any car, the generator supplies current to the on-board network, which is generated when the generator pulley rotates. Thanks to this, the battery does not have to work constantly and after starting the engine, it stops supplying current to the on-board network of the car, and only one starts supplying it. generator, but there are cases when it fails (Over time, this usually happens because sand and other types of dirt get into the generator, or the generator can simply burn out due to a short circuit) and it becomes impossible to drive a car, since One battery turns on, and when it is completely discharged, the car will stall and simply won’t go anywhere, so the generator needs to be changed when it becomes unusable or repaired (we will still touch on the topic of repairing the generator in this article).
Generators for VAZ 2106 and 2107
The generator on the VAZ 2106-2107 costs the same as on the VAZ 2101 - G221. If you install additional external current consumers that operate constantly, this will lead to undercharging and insufficient current will be supplied from the relay regulator. These additional devices include:
- powerful audio systems;
- fog lights;
- TV;
- preheater;
- additional heater;
- fridge.
Any similar device will lead to greater power consumption and, consequently, to premature battery discharge, even when the engine is running at high speeds. Standard devices for 2106 were developed a long time ago and are not designed for modern energy-consuming add-ons.
In this case, it is recommended to replace the standard generator with a more powerful unit.
What to install?
G 222
If you need to increase the current power, then, when deciding which generator is better to install on the VAZ 2106 or 2107, instead of the standard one, take the G 222, which was installed on the VAZ 2105, Nivakh. It would seem that it itself is no better than the standard one on the “six”, but you can take an upgraded version that will be more powerful. Unlike the 221, this unit is designed with a built-in regulator relay, assembled into one unit with brushes. The G 221 gives an output of 42 A, and the 222nd - 50 A. Increasing the cross-section on the rotor winding increases the power, although the design is completely similar to the G 221. However, to install it on the 2106 you will need minor modifications. The easiest way is to install brushes from G 221. They fit perfectly in place of the relay. This modification is quite feasible even for car enthusiasts who do not have the skill.
It can be installed on a VAZ 2106 G222 with a standard regulator, but then it is necessary to change the connection diagram of the electrical machine.
On 2107 everything is installed without problems.
Check the voltage at medium engine speeds at the battery terminals, if it is 14 V at 2500 rpm, then everything is fine. You can drive with a more powerful unit by connecting additional options.
Generator 2108
This installation has greater efficiency, delivering a current of 55 A. It is installed on both 2106 and 2107.
The mount is identical to the standard ones, there are no problems during installation. Just remember to remove the battery terminal. You'll have to tinker with the connection to 2106. There are 4 wires going to the standard device. On the “eight” - three, since the voltage relay is built-in. To get a good result, insulate the black wire, connect the rest according to the standard system. The light bulb - the discharge indicator will light up when the generator is running, and will go out if there is no charging.
It is useful to make some more minor modifications. Instead of the old relay, install a regular power one. Then the light comes on only when the engine starts and at low speeds.
On 2107 you only need to add a power relay.
2107-3701010
An even more powerful installation is from the VAZ 2107i, producing 80 A, which can also be installed on the VAZ 2106–2107. With such equipment it is possible to install any electrical systems. For VAZ 2106 only 2107-3701010 is suitable; You can use any generator of this series for the carburetor “seven”.
When installing this equipment on 2106, it is better to modify it: replace the relay regulator with a similar one from G 222.
Units and devices that make up the electrical circuit of a car
The importance of each device or unit as a whole for the vehicle’s electrical supply system is unconditional. As already mentioned, there are many of them. But among the main ones, the following should be noted:
It is for these units that we will consider a number of breakdowns and malfunctions, the causes of their occurrence and methods of elimination.
Battery and its possible malfunctions
The purpose of this device is that it provides power to the vehicle's electrical system with direct current at a voltage of 12V. This current creates the necessary conditions for the correct operation of all components of the car's electrical circuit, both when the engine is turned off and when it is started (meaning the operation of the VAZ starter). The condition of the battery and other units is indicated to the driver by a lamp installed on the instrument panel. If the lamp turns on while the engine is running, this means that the battery is not being recharged. The possible causes of this problem and how to resolve it will be discussed in the next subsection. In general, normal battery operation depends on its timely maintenance:
- Monitoring the electrolyte level in the battery sections and, if necessary, adding distilled water.
- Timely battery recharging.
Recommendation: Battery maintenance must be performed carefully and protected from mechanical damage. The terminals must also not be short-circuited.
Car generator and its possible malfunctions
Generator VAZ 21099: repair
The main purpose of a car generator is that when the engine is turned on, it begins to generate electricity, which ensures the operation of the car's electrical circuit equipment. The generator is located in the engine compartment and is connected to the engine via a belt drive. As many car enthusiasts have already seen, nothing lasts forever in a car. Any component or assembly of a car may sooner or later require repair. And a car generator is no exception. On a VAZ 21099 car, repairing a generator, provided the proper conditions, tools and equipment are available, does not present any particular difficulties. However, this will require certain knowledge. And the following instructions will help with this. However, first you need to note the signs and causes of generator failure:
- The first reason is purely mechanical in nature. When the generator operates, extraneous noise appears. These noises indicate bearing failure. In this case, it is necessary to disassemble the generator and replace the failed bearing.
- The second reason is a decrease in voltage at the “output” of the generator. In this case, the warning light “lights up”. This may indicate that the brushes are worn out and the contact of the winding with the rotor is broken. The tension of the generator drive belt may also be loosened. To eliminate this problem, it is necessary to accordingly: replace the brushes and remove the slack from the drive belt.
- The third reason for generator failure is an increase in voltage at the “output”. As a rule, in this case, fuses blow out quite often. In this situation, it is necessary to check the functionality of the diode bridge of the generator and, if necessary, replace it. Failure of the diode bridge can also be safely included in the second cause of breakdowns.
Note: In the event that the car generator fails, power to the electrical equipment begins to flow from the battery and the car will travel exactly as long as the charging of this battery is sufficient.
How to carry out initial diagnostics of generator faults
- To check the condition of the bearings, turn on the engine and touch the generator housing with your palm. If the bearing wears out significantly, the vibration will be very noticeable. It cannot be confused with anything.
- To check the condition of the generator drive belt, the engine must be turned off. Carefully and visually check the integrity of the belt. Next, by pressing, you need to determine the level of belt deflection. It should not exceed 15mm.
- The voltage at the “output” is checked using a voltmeter. It is necessary to turn on the engine and measure the voltage at the battery terminals. With a working generator, it will be from 13.6V to 14.0V. If you don’t have a voltmeter, you need to buy one. The thing is very necessary and inexpensive. Its price is no more than 100 rubles.
Checking the condition of the brushes and voltage regulator relays
Before dismantling the generator, in order not to do unnecessary work, it is necessary to check the condition of the brushes and the functionality of the voltage regulator. They are located at the rear of the generator housing. The brush holder with regulator can be disconnected without dismantling the generator. To do this you need to do the following:
- Disconnect the negative terminal of the battery and thereby de-energize the vehicle's electrical circuit.
- Disconnect the contact wire from the brush holder.
- Next, using a Phillips screwdriver, you need to unscrew the two mounting screws and remove the brush holder.
As a small addition to the clarity of troubleshooting individual problems, we invite you to watch the video:
Caution: When removing the mounting screws, be extremely careful not to miss them on the crankcase guard. Getting the screws out will be problematic.
After disconnecting the brush holder, you need to check the condition of the brushes. There should be no cracks or chips on them. The brushes must protrude from the brush holder at a distance of at least 4 mm. If these deviations from technical standards are detected, the brush holder along with the relay must be replaced. Next, we check the serviceability of the voltage regulator. To do this, you need to draw up a diagram, which is shown below:
Voltage regulator test circuit
With this scheme, if the power source voltage is 12V, the control lamp will “light up”. If the voltage is raised to 15V, the lamp will go out. A discrepancy between the turning on and off of the control lamp indicates that the unit is faulty and needs to be replaced.
Lada Priora - generator replacement
The Priora requires a powerful generator; the car has a lot of electronics and a weak installation cannot cope with it.
A generator labeled 5102.3771 is recommended for the Priora, providing a power of 80 A; on luxury versions with even more electronics, a 115 A device is installed. Then which generator is better to install on the Priora?
Car owners recommend a unit produced by KZATEtm Samara plant under number 9402.3701-14, producing 115 A.
There is no need to modify it during installation, you just need to find the connector, because there are differences from the standard one. You can use a plug from a VAZ-2108 from the limit switch for turning on the reversing lights, which costs only 20 rubles.
Next, you will have to make a little modification when connecting to the “B+” power terminal in order to fit it to the desired size.
The cost, of course, of domestic units is higher than that of Chinese or Bulgarian ones, sold for 2200 and 3000, respectively. For Russian ones they ask for about 4000. But if you need repairs with Russian-made components, you can easily find spare parts.
Dismantling the generator
First of all, you need to disconnect the battery to completely cut off the power to the car.
- disconnect all wires from the generator;
- loosen the nuts holding it in place;
- lift the device and remove the belt;
- completely unscrew the screws of the fixing bar from the cylinder block;
- under the engine there are bolts securing the bracket - they need to be removed;
- the generator is removed.
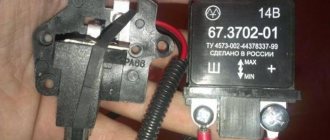
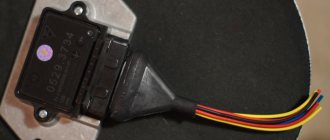
Relay regulator VAZ 2109
1 – brush holder, 2 – brushes, 3 – voltage regulator
Diagnostics of the VAZ 2109 generator regulator relay
Check the serviceability of the VAZ 2109 voltage regulator. Connect a 12 V test lamp to the brushes. Apply 12 V voltage: “ ” to the terminal, and “–” to the “ground” of the brush holder. The indicator lamp should light up
Which generator is better to put on a VAZ 2110
VAZ 2110 factories install KATEK generators with a current of 80 A. The service life is 140,000 km, which is approximately 10 years of vehicle operation. Answering the question of which generator is better to install on the VAZ 2110, experts recommend products from Russian manufacturers.
What to consider when choosing
- Russian manufacturer or foreign? Of course, first of all, Russian manufacturers are preferable. If only because it is easier to find spare parts in the event of a minor breakdown. If you purchase a generator for a VAZ 2010 from a not so popular company, it may be difficult to find spare parts, and they will not cost you so much.
- Current strength. Factory models for VAZ 2010 - 3771 or 94.3701 - are designed for 80 A, this current is enough, even if there are additional devices that consume it. More powerful ones - 120 A - are installed in the presence of powerful acoustics, no harm is done to the battery, and you will provide all energy consumers with uninterrupted current.
- It is better to purchase a generator if there is a warranty on it. There may well be a defective product, and the warranty will provide the opportunity to replace it with a new one.
Generator Manufacturers
It is best for 2010 to purchase a standard generator from KATEK or KZATEtm Samara plant, and about 50% of owners do just that, according to statistics. They are reliable, cope perfectly with their functions, creating the necessary tension.
Among the foreign-made generators, we can recommend Bosch, Delphi and Denso, which are also reliable and popular.
Generators for VAZ 2114
The generator initially built into the 2114 is low-power, and if it also breaks down and you decide to purchase a new one, the question arises: which generator is better to install on the VAZ 2114? It is important here that the unit is more powerful, but there is no need to change the fastenings.
- The most successful replacement option for a VAZ 2014 is a generator from a Priora or Kalina with air conditioning. This installation has a power of 115 A, which is 35 A more than the characteristics of the units.
Installing these generators for 2014 usually does not cause problems, however, it will be necessary to replace the pulley, but it only costs about a hundred rubles and is not difficult to find.
- The Eldix brand generator also has a power of 115 A and works well. The disadvantage is that it is almost impossible to find spare parts, and even if there is a minor breakdown, you will have to replace the entire generator instead of repairing it.
Please note that a lack of charging voltage can occur simply due to oxidation of the battery terminals; keep an eye on them by cleaning them regularly.
Checking for serviceability
Repair of the VAZ 2109 or VAZ 21099 generator is carried out in case of failures in the operation of the unit. There are several ways to determine generator malfunctions. The most optimal of these is diagnostics using a multimeter, but you will also need an assistant to carry it out. We will tell you further about how to check the generator on a VAZ 21099 or 2109 using a tester.
So, to determine generator faults with a multimeter, follow these steps:
- First of all, it is necessary to diagnose the VAZ voltage regulator. As practice shows, if the generator on a VAZ 2109 or VAZ 21099 does not work correctly, the problem may lie in the functionality of the three-level voltage regulator. This is especially facilitated by overvoltage in the electrical circuit. To check, you need to set the voltage measurement mode on the tester. So, start the engine and measure the voltage at the battery terminals or at the terminals of the generator unit itself. If everything is normal, then this parameter will fluctuate around 14-14.2 volts. Then press the gas and check the parameter again - it should increase, but no more than 0.5 volts. If the indicators on a VAZ 2109 carburetor or VAZ 21099 injector are different, this indicates that the element is not functioning correctly. Most likely, the VAZ 2109 voltage relay will have to be replaced.
- Next, the diode bridge of the generator is diagnosed. The bridge itself consists of six elements, three of which are considered positive and the remaining three are considered negative. Some diodes have mass at the anode, and the other part at the cathode. To check the diode bridge of the VAZ generator, the tester is switched to sound mode, that is, when the probe outputs are shorted, you can hear a characteristic sound. You are required to test each diode in different directions, and the sound should be heard in only one of them. If during testing the sound is heard in both directions, this indicates that the diode is broken. The best option would be to replace the diode bridge.
- Before disassembling the unit and repairing it, check the functionality of the stator; it is a steel cylinder, inside of which the winding of the mechanism is located. For diagnostics, you need to disconnect the stator leads from the diode bridge. First, inspect the element visually - there should be no signs of damage or burning. The multimeter is set to resistance measurement mode. First, measure the resistance parameter between the winding terminal and the housing (any terminal can be used). The obtained indicators should be high and tend to infinity. If the readings are 50 kOhm, this indicates the need to replace the generator.
- Using a multimeter, you can also check the performance of the rotor - it is a steel rod with a wound winding. At one end of the rod there are rings through which the brushes of the VAZ generator pass. You need to dismantle the rotor and visually inspect the condition of the generator winding and bearing. The integrity of the winding can be checked using a multimeter, after which the resistance parameter between the rings is measured. The results obtained should be no more than a few ohms. Replacing the VAZ 2109 generator brushes is required if they are worn out.
Node diagnostics with a tester
Generators for VAZ 2115
VAZ 2115, created on the basis of the “nine”, adopted the main components and assemblies from it. Accordingly, there are also many problems with equipment. If the car has a carburetor engine, it can be equipped with a 55 A generator 37.3701, which differs from the above in the mounting method. However, this voltage is not enough for the constant use of modern audio systems, fog lights and other energy-consuming options. Which generator is better to install on a VAZ 2115 - car owners definitely recommend installing it with a power of at least 80 A. Now on the VAZ 2115, as well as on 2113-2114, three-phase 94.3701 with an output of 80 A are installed.
For more power, you can install a 90 A Priorov generator KZATE 9402.3701 in 2015, which is suitable for the mounting and pulley. A reliable unit will provide you with the necessary energy for any number of energy-consuming devices.
Summarizing the above, it can be noted that when buying a generator at a VAZ to replace a broken one or to increase power, it is better to choose Russian models, since they are most suitable in design and you will not have to carry out expensive modifications. In addition, you will always find the necessary
Source