Checking the Lada Kalina generator
To complete the work you will need an assistant, as well as:
— multimeter (in voltmeter mode with a measurement limit of 15–20 V);
Let's start the engine. If the battery charge indicator light on the instrument panel lights up, check:
— voltage supply of -12 V to the excitation winding of the generator when the ignition is turned on (pin 1 of the generator connector);
— tension of the generator drive belt.
1. Warm up the engine to operating temperature (at least 80˚C)
2. Turn on all powerful consumers of the car’s electricity (heated rear window, electric heater fan, high beam headlights, heated seats).
3. Pressing the gas pedal and monitoring engine operation using the tachometer, keep the engine crankshaft speed within 3000-3500 rpm.
4. Using a voltmeter, measure the voltage at the terminals of the battery. If the generator is working properly, the voltmeter should show a voltage of at least 14 V.
If the voltage is less, the generator drive belt may be loose, the generator circuit is faulty, the generator voltage regulator is faulty, the brushes in the generator are oily or worn, or the generator itself is faulty.
5. Turn off all electricity consumers, and the voltmeter should show a voltage no higher than 15.1 V.
If the voltage is higher, the voltage regulator is most likely faulty.
6. Using a stethoscope, we evaluate the condition of the generator bearings based on noise. A strong hum indicates wear of the bearing or bearings (the front bearing most often fails).
About the principle of operation of a car generator
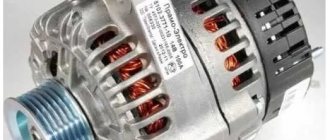
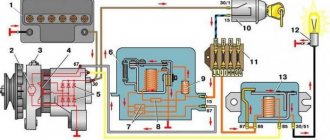
The operation of the Lada Kalina generator unit is based on the following principle: an alternating current is induced in the stator winding, which is subsequently transformed into direct current through a rectifier module located on the body of the unit. The generator cover is also equipped with an electronic voltage regulator and a brush holder. The rotor of the device receives torque from the crankshaft pulley. The transmission link is a poly V-belt.
The basic characteristics of the generator set include the following parameters:
- maximum generated current – 85-90 Amperes;
- operating range of on-board voltage – 14.4-15.1 Volts;
- rotation ratio of the motor and rotor – 1:2.4;
- right-hand direction of rotation.
The housing of the unit is held together by pins that tighten the stator with the covers. The mounting sockets of the indicated covers contain bearings, which ensure the ability of the rotor to rotate. The rear bearing is installed inside the cover with a minimum gap. The front element is equipped with the ability to slide along the surface of the rotor shaft. It is fixed inside the front cover with a slight interference fit, and a pressure plate covers it from the outside. The back of the device is protected by a plastic casing.
Checking and tensioning the generator drive belt
A loose belt and poor condition can be identified by a characteristic “whistle”, especially when starting the engine.
To perform the work, you can remove the right front wheel or install the car on an inspection ditch or overpass.
1. Remove the right side of the engine mudguard.
2. Visually check the condition of the generator drive belt. We apply a force of 98 N (10 kgf) to the belt exactly in the middle between the generator pulley and the engine crankshaft pulley. (You can use the steelyard).
3. To adjust, remove the windshield washer reservoir.
4. Using a 19-mm open-end wrench, unscrew the locknut of the tensioning mechanism.
By rotating the adjusting pin with a socket wrench by 8, we change the tension of the generator drive belt (clockwise we increase the belt tension, and counterclockwise we decrease it).
Excessive belt tension can lead to failure of the front alternator bearing.
5. Check the tension of the generator belt (see above) and, if necessary, repeat the adjustment.
6. After making sure that the belt is tensioned correctly, hold the adjusting pin and tighten the locknut.
7. Install the engine splash guard.
Replacing the alternator drive belt and tension roller
1. We loosen the tension of the generator drive belt.
2. Remove the belt from the generator pulley and the crankshaft pulley
3. Rotating the tension roller, check its condition.
When replacing the generator drive belt, check the condition of the tension roller.
It should rotate easily, without jamming or noise.
The faulty roller should be replaced.
If necessary, you can replace the roller without removing the tension mechanism from the engine.
You can swing the generator pulley and rotate it to determine the condition of the bearings.
If it is necessary to disassemble the tensioning mechanism, use a 13 mm spanner to unscrew the two bolts securing the adjusting pin and remove it complete with the upper bracket and threaded tip.
Using a 13mm socket wrench, unscrew the bolt of the lower fastening of the tensioner and remove it assembled with the tension roller.
Using a screwdriver, remove the protective cover from the roller.
Using a 17mm socket wrench, unscrew the roller mounting bolt (shown by the arrow).
We disassemble the parts of the tension mechanism, treat areas damaged by corrosion with penetrating lubricant with a rust converter.
Lubricate the threaded part of the adjusting pin with any grease. We replace faulty parts.
Installation
1. Install the roller and assemble in reverse order
2. First, put the belt on the crankshaft pulley and then on the generator pulley.
3. Adjust the belt tension.
Generator check
To check the generator set, you need to start the engine and increase the speed to approximately 3000 rpm -1.
We turn on all consumers: - external lighting, high beam headlights, heater fan, rear window heating, windshield wiper, etc.
We take a voltmeter and measure the voltage on the battery, this needs to be done together. One maintains engine speed, and the second assistant measures the voltage.
The voltage must be at least 13 V. If the voltage at the battery terminals is less than 13 volts, then the generator windings are faulty (open or shorted). The voltage regulator may be faulty or the rotor slip rings may be oxidized.
To make sure that the voltage regulator is working properly, turn off all consumers except the high beam headlights and measure the voltage on the battery again.
The voltage must be at least 14 volts. If the voltage is less, the regulator should be replaced. The regulator can be changed without removing the generator.
For removal of the voltage regulator, see the article “Generator Repair”.
To check the valves of the rectifier unit, it is necessary to disconnect the wires from the battery, generator and the “+” terminal of the voltage regulator.
We take a conductor, connect it to the “+” of the battery, and through a light bulb (1-5 W, 12 V) connect it to the “B+” terminal of the generator, and connect the “minus” to the generator housing.
Guide to replacing the Kalina generator yourself
So, let's proceed to a very detailed description of all the types of work that need to be performed. First of all, we need to loosen and release the belt tensioner and then remove it. So be sure to check out this Alternator Belt Replacement Guide first. After this, you can proceed directly to removing the device from the car.
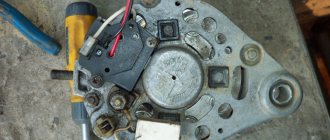
First, we disconnect the plug, which is secured with a plastic latch, just lightly press it and pull it to the side, it will come out without any problems:
And the wire terminals that are under the rubber protective cap, pry it off and unscrew the nut:
Then we unscrew the nut securing the upper part of the Kalina generator, this is clearly shown in the photo below. You can first move it with a knob, and then work with a ratchet handle:
And tapping the protruding bolt a little so that it moves, remove it from the back side, as shown in the photo below:
Next, we proceed to the lower fastening bolt, and proceed by analogy, only if necessary, hold the nut on the reverse side, since it can scroll:
Be careful when removing this rod as there are bushings there. Hold them immediately so that they do not fall and get lost. And holding the generator body with one hand so that it does not fall, we remove this bolt with the other hand:
Now almost everything is ready and you can safely remove this device from the engine compartment, turning it slightly from side to side, finding the most convenient position for its removal.
To replace the generator on the Lada Kalina, we purchase a new one and install it in the reverse order of removal, putting all the bushings in place in the same places as they were. The price of a new generator ranges from 4000-5000 rubles, so you will have to fork out a little.
Checking the voltage relay
Car battery charging time calculator
Online calculation of battery charging time. Calculator for calculating how long you need to charge your car battery with a charger
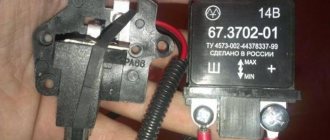
Checking the generator voltage regulator may be necessary when problems with the battery begin to occur. In particular, it began to undercharge or overcharge. When such a malfunction occurs, it’s time to check the generator voltage regulator relay.
The relay should turn off at 14.2-14.5V
The task of this simple device is to regulate the voltage of the electric current that is supplied from the generator to the battery. When it fails, the battery is either not charged enough or, on the contrary, overcharged, which is also dangerous, since this significantly reduces the battery life.
Agree that such a prospect is not very good because of one small detail. This is why it is so important to monitor the operating condition of the voltage regulator (it can also be called a pill or a chocolate bar). But in order to properly check the voltage regulator, you need to know its type and several important features.
Changing the generator regulator relay on a Lada Kalina with your own hands
Any electrical equipment fails sooner or later. Thus, the most common generator malfunction on the Lada Kalina remains the regulator relay. Replacing this element is not difficult, but requires certain knowledge and skills.
Video on replacing the voltage regulator relay on a Lada Kalina:
This video story tells about replacing the generator regulator relay on a Lada Kalina, the nuances of installation and configuration.
Types of Voltage Regulators
Having understood what types of these devices there are, what their features and properties are, a complete understanding of the procedures carried out during testing will come. This will also give the answer to what scheme, in what way and how to check the generator voltage regulator. There are two types of regulators:
- combined;
- separate.
In the first case, it is meant that the regulator housing is combined with the brush assembly directly in the generator housing. In the second case, the regulator is a separate unit, which is located on the car body, in the engine compartment, and wires from the generator go to it, and wires from it go to the battery.
A special feature of the regulators is that their housings are non-separable. They are usually filled with sealant or special resin. And there is no particular point in repairing them, since the device is inexpensive. Therefore, the main problem in this regard is to check the generator voltage regulator relay. Regardless of the type of regulator, the voltage symptoms will be the same.
About the Kalina generator tensioner
In April 2011, a pilot batch of 1000 elastic belts 1118-1041020-07 manufactured (Germany) was installed. These Kalinas do not have an alternator belt tensioner, all problems caused by its absence are solved, like the Lada Granta. On other Lada Kalina cars, the alternator belt tensioner is present.
Symptoms of a problem
So, in case of low voltage, the battery simply will not charge. That is, in the morning you will not be able to start the car, the lights on the dashboard may not even light up, or troubles will arise while driving. For example, dim headlights at night, unstable operation of the electrical system (problems with electrical appliances - wipers, heaters, radio, etc.).
In case of increased voltage, there is a high probability of a decrease in the electrolyte level in the battery banks, or its boiling. A white coating may also appear on the battery case. When overcharging, the battery may behave inappropriately.
Signs, malfunctions, repair of generator and voltage regulator
In addition, you can also identify the following signs of a faulty voltage regulator (in some cases, some of them may or may not be present, it all depends on the specific situation):
- the control light on the dashboard (although this may be a sign of other malfunctions, for example, that it has burned out, the contact has fallen out, and so on);
- after starting, the battery indicator on the dashboard does not go out, that is, there are obvious malfunctions in charging the battery;
- the brightness of the headlights becomes dependent on the engine speed (you can check this somewhere in a deserted place by placing the car against a wall and accelerating - if the glow changes, then most likely the voltage regulator is faulty);
- the car stopped starting normally the first time;
- The battery is constantly ;
- when the engine speed exceeds 2000 rpm, the indicators on the dashboard turn off ;
- the dynamic characteristics of the car decrease , this is especially noticeable at high engine speeds;
- In some cases, the battery may boil .
Causes of malfunction
There are several reasons for the failure of the regulator relay on a car. Let's consider the main ones:
- A short circuit in the on-board network, which led to the failure of the regulator relay. This happens quite often because the generator itself serves as the power source and there is no fuse between it and the current produced to protect it.
- Wear. Like any part in a car, the regulator relay can wear out.
- The brushes are worn out.
How to determine that the regulator relay has failed?
Let's consider the main options:
- Insufficient battery charge means that after the ignition is turned off, the car has difficulty starting or may not start at all.
- The light shines normally at 2000 rpm, but dims at idle.
Once the root causes have been sorted out, you can move on to the replacement process.
The process of replacing the generator regulator relay
So, the process of replacing the generator regulator relay will require dismantling the product itself, but it will not require a pit, and all operations can be carried out from the engine compartment. Let's take a step-by-step look at how to replace the generator regulator relay on a Lada Kalina:
- We remove the “minus terminal”.
- To replace the relay, you will have to dismantle the generator.
- Having loosened the generator mounts, let it loose a little and remove the belt.
- Remove the wire block from the connector.
- We unscrew the nut that holds the contact group of wires and dismantle it.
- We unscrew the bolts of the upper and lower fastenings and take them out.
- We dismantle the generator.
- When the generator is removed, you can proceed to replacing the relay.
- We unclip the three plastic latches of the back cover and remove it.
- Disconnect the diode bridge.
- Unscrew the nut and remove the bushing on the contact group bolt.
- Unscrew the two screws that hold the regulator relay in place.
- We dismantle the relay.
- Assembly is carried out in reverse order.
Thus, the Lada Kalina generator regulator relay was replaced.
Choice for Kalina
Selecting a Lada Kalina relay regulator is quite easy. There are no original analogues, but it fits with VAZ 2110, Priora or Grants.
Therefore, as experience and practice show, car enthusiasts, as a rule, install the original, if they do not change the generator to a more powerful one.
Reasons for failure of the relay regulator
The reasons for the failure of the voltage regulator may be:
- short circuit in the circuit, including interturn short circuit of the excitation winding;
- failure of the rectifier bridge (diode breakdown);
- reverse polarity or incorrect connection to the battery terminals;
- penetration of moisture into the housing of the regulator and/or generator (for example, when washing a car or driving in heavy rain);
- mechanical damage to the unit;
- natural wear and tear of the unit, including brushes;
- poor quality of the device being directly tested.
There are a number of simple methods for checking the regulator, regardless of whether the unit is removable or not.
Let's sum it up
As it turned out, repairing or replacing the generator in a LADA Kalina car does not require much effort, so such manipulations are accessible even to inexperienced owners; a connection diagram is used to make the task easier. An important point in operation is periodic diagnosis of the condition of both the unit itself and its component elements, including the tension system. Timely prevention will significantly extend the life of the unit, and the owner of LADA Kalina will have considerable savings.
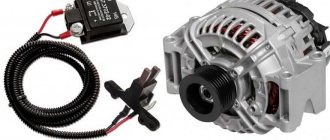
Lada Kalina cars are equipped with generators of two brands - 5132.3771 or 9402.3701-06. The standard Kalina generator is a three-phase alternating current device, which has a built-in rectifier unit and an electronic voltage regulator.
There are very different reviews regarding the quality and reliability of the devices with which these cars are equipped during factory assembly. If the unit fails, you can replace or repair it yourself.
The simplest way to check the generator voltage regulator
The simplest method of checking the regulator is to measure the voltage at the battery terminals with a multimeter. However, it is worth immediately making a reservation that the algorithm given below does not give a 100% probability of failure of the regulator. Perhaps the generator itself has failed. But the advantage of this method is that it is simple and there is no need to dismantle the device from the car. So, the algorithm for checking the generator voltage regulator with a multimeter is as follows:
- Set the tester to DC voltage measurement mode at a limit of about 20 V (depending on the specific model, the main thing is that it displays values up to 20 V as accurately as possible).
- Start the engine.
- Measure the voltage at the battery terminals in idle mode (1000. 1500 rpm). If the regulator and generator are working properly, the value should be within 13.2. 14 V.
- Increase the speed to 2000. 2500 rpm. In the normal state of the electrical circuit, the corresponding voltage will increase to 13.6. 14.2 V.
- When the speed increases to 3500 rpm and above, the voltage should not exceed 14.5 V.
If during the test the voltage values are very different from those given, then most likely the machine’s voltage regulator is faulty. Remember that the voltage should not fall below 12V and should not rise above 14.5V.
As mentioned above, the regulator can be separate or combined with a generator. Currently, almost all foreign cars, and most modern domestic cars, have combined relays installed. This is due to the specifics of their work and space saving.
Replacing the voltage regulator and checking it on viburnum
Welcome! Voltage regulator - it is installed on the generator and is directly connected to it, thanks to it, the entire current that the generator gives out changes and flows more evenly, for example, the more you turn the engine of a car (increase the speed, that is), the generator will work stronger and much more give out current, all this happens because the generator is connected to the engine (namely, it is connected to the crankshaft), but the voltage in the on-board network will also change from this (The more current the generator gives, the stronger this current increases in the entire on-board network car), therefore, when the speed increases, the light will constantly burn stronger, and when it decreases, it will dim because the current strength will decrease, so no matter what happened, a voltage regulator was invented, thanks to which the current strength in the on-board network always remains the same, but it changes when you turn on additional devices that need more current, that is, for example, you turn on the high beam headlights of a car and the current supply increases through the regulator so that there is enough power for these headlights, in addition, the current supply flowing through The regulator is constant and does not jump higher or lower, so the headlights work in the same mode and do not shine either stronger or weaker.
Checking the combined relay-regulator
Checking the VAZ 2110 voltage regulator
To perform the corresponding check, it is necessary to assemble the circuit shown in the figure. To do this, use a charger or power supply with an adjustable load (it is important that it be used to regulate the voltage value in the circuit), a 12 V light bulb (for example, from a turn signal or headlight, with a power of 3.4 W), a multimeter, and the regulator itself voltage (this can be from a Bosch, Valeo or other generator). It is advisable to have the wires used for switching with “crocodiles”.
Checking the voltage regulator of the generator 37.3701: 1 - battery; 2 — ground terminal of the voltage regulator; 3 - voltage regulator; 4 – terminal “Ш” of the regulator; 5 — output “B” of the regulator; 6 — control lamp; 7 — terminal “B” of the voltage regulator.
If you assemble a circuit in which the voltage is at a standard value of 12.7 V, then the light bulb will simply glow. But if you use a voltage regulator to raise its value to 14.14.5 V, then if the relay is working, the light should go out. Otherwise the regulator is faulty. That is, when the voltage reaches 14.14.5 V (depending on the model of the machine and, accordingly, the regulator) and above, the light goes out, and when it drops to the same level, it lights up again.
Checking the VAZ 2107 voltage regulator
Checking the voltage regulator on VAZ 2108/2109 cars
Until 1996, a VAZ 2107 with a 37.3701 generator was equipped with an old-style voltage regulator (17.3702). The verification procedure is given above. After 1996, a more modern generator of the G-222 brand was used (integrated regulator RN Ya112V (V1).
As you can see, the verification algorithm for all regulators is almost the same. The only difference is the cutoff values when the relay is activated.
How to replace the voltage regulator and check its serviceability on a VAZ 1117-VAZ 1119?
Checking the voltage regulator for serviceability:
1) At the beginning of the operation, you will need to find where the generator itself is located and after you find it, move your hand to the side with the rubber cover indicated by the red arrow, this cover covers the “B+” terminal; in simpler words, this is the positive terminal and it comes from the generator to this terminal (By the way, it is also indicated by a blue arrow) you will need to connect the positive wire of the voltmeter and after connecting it, throw another wire (Minus wire) coming from the same voltmeter to ground (The places where you need to connect the wire , indicated by a green arrow), after the operation has been completed, a DC voltmeter will show you the voltage in the vehicle’s on-board network.
2) After everything is connected, start the engine of the car and turn on the headlights, when the engine is started, let it run for a while (About 15 minutes) and after this time has passed, at medium speed engine, measure the voltage in the on-board network, which you should have in the range of 14.4-15.1 V.
Note! If this voltage is either more or less, then replace the voltage regulator with a new one!
3) Now, as for the capacitor, to check whether it works or not, you just need to use a megohmmeter to connect the leads that go from it to the contact of the capacitor; when connecting, your resistance should initially decrease and then become infinite (What kind of infinity do you have on the device? it’s very easy to understand, for this, without connecting anything, first look at the numbers that the megohmmeter shows, for example, if it shows 0, then this will be infinity), if this is what happened, then in this case the capacitor is fully operational and does not require replacement, otherwise, replace the capacitor with a new one.
Note! Capacitor - it is built into the voltage regulator itself, and as such it serves as a filter for current, thanks to it the voltage in the network is equalized; for example, it can pass high-frequency currents through itself well, but will delay low-frequency currents!
Replacing a voltage regulator with a built-in capacitor:
Removal: 1) At the beginning of the operation, you will need to remove the minus terminal from the battery, you can read about how to do this “here”, and then you will need to press the latch to disconnect the wire block from the generator, for clarity it is also indicated in red arrow.
Recommendations for increasing the service life of the regulator
In order to increase the service life of the voltage regulator, it is necessary to adhere to several simple rules aimed at implementing preventive measures. Among them:
- do not allow excessive contamination of the generator, periodically inspect its condition, and, if necessary, dismantle and clean the unit;
- check the tension of the alternator belt, tighten it if necessary (either yourself or in a car service);
- monitor the condition of the generator windings, in particular, do not allow them to darken;
- check the contact on the control wire of the relay-regulator, both its quality and the presence of oxidation on it;
- Perform periodic voltage checks on the vehicle battery with the engine running.
Following these simple rules will allow you to increase the resource and service life of both the generator and the vehicle voltage regulator.
Results
Checking the voltage regulator relay is not a difficult task, and almost any car enthusiast with basic repair skills can handle it. The main thing is to have the appropriate tools for this - a multimeter, a power supply with a voltage regulator (although you can connect it to a battery with a charger), a 12 V lamp and pieces of wires for mounting the appropriate circuit.
If during the inspection you find out that the regulator is out of order, then it must be replaced (repair work is usually not carried out). The main thing is not to make a mistake when choosing it and purchase the part that is suitable specifically for your car.
Source
Checking an Individual Regulator
Checking the voltage regulator of the G-222 generator: 1 - battery; 2 - voltage regulator; 3 - control lamp.
As a rule, separate voltage regulators were installed on old cars, including domestic VAZs. But some manufacturers continue to do this to this day. The verification process is similar. To do this, you need to have a power supply with a voltage regulator, a 12 V light bulb, a multimeter and a directly tested regulator.