Replacing the rotor with rings
Replacement on a VAZ 2110 generator
Sometimes it is not possible to replace the rings separately. The rotor also has to be replaced. This situation occurs when the rings reliably “stick” to the rotor. But you can try to restore the rings by placing them in a sulfuric acid solution. They cannot be kept in solution for a long time, as whole particles may disintegrate. To replace the rotor and rings, you must:
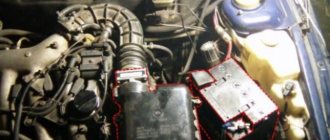
- Place markings on the covers of the generator (to make it easier to assemble them later, otherwise you can confuse their location).
- Remove the plastic casing. This is easier to do after the three latches securing it are bent away.
- Remove the two screws that secure the electronic voltage regulator.
- After this, you will have access to the generator relay. It must be removed, otherwise it will interfere with the work process.
- Remove all fastenings of the unit and condenser.
- Then unhook the three winding tips coming from the stator.
- Remove the block and capacitor. If you need to replace the capacitor, you need to unscrew the nut that secures it. Then remove the washer along with the bushing. Now it’s the turn of the wires that attach the capacitor to the contact bolt. After this, you can remove and replace the capacitor itself.
- Unscrew the generator coupling bolts. There are four of them in total. There are usually flat washers and spring washers underneath the screw heads. They are very small, but perform an important function. You can’t lose them, otherwise you’ll have to buy new ones, but finding them on sale is not easy.
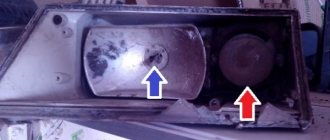
- Remove the generator cover from the side where the slip rings are located. In this case, you can help slightly with a screwdriver, as if pulling the lid towards you.
VAZ 2110 in the generator slip rings
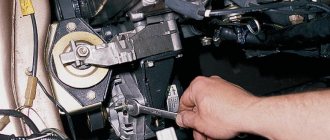
Remove the nut securing the generator pulley. Remove the washer and pulley.
- Disconnect the thrust washer.
- Remove the generator rotor.
- It has a spacer ring that needs to be removed.
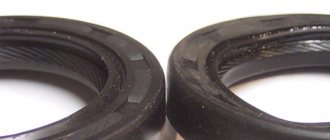
- At this stage, you need to carefully inspect the slip rings. It is possible that they will also have to be replaced. If they are worn out or there are scratches on their surface, then replacement cannot be avoided (by the way, it is not necessary to install new rings - they can be thoroughly sanded).
- A multimeter should measure the resistance of the rotor winding.
- You should also check if there is a short circuit between the winding and the rotor housing. To do this, you need to use a 220 V lamp. One of its wires must be connected to the body, and the other must be connected in turn to each of the slip rings. Moreover, if there are no short circuits, the lamp will not light.
- Insert the new rotor into place.
- Assemble everything in the opposite order.
Assembly
The generator is assembled in the reverse order. First, install the rotor into the front cover. Since it will fit tightly in the bearing, it can be driven in, but only through a wooden spacer.
Then we put the back cover in place, it will also have to be stuffed, and also through a spacer made of wood.
We tighten both generator covers with bolts, having previously installed the back cover according to the marks.
We reinstall the removed elements (regulator, diode bridge, brushes, etc.) and secure them.
If the brushes are very worn, it is better to replace them immediately, so that after a short period you do not have to go into the generator again to replace them. We put the protective cover in place.
We install the assembled generator on the car, fix it with fasteners, adjust the belt tension, connect the wiring, and check its functionality.
If all work is done correctly, it will work silently.
All replacement work takes no more than 2 hours and allows you to fully restore the functionality of the generator.
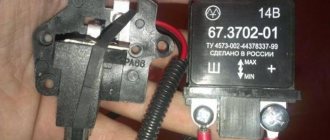
Replacing the VAZ 2110 generator regulator relay.
VAZ 2110: replacing the handbrake cable on your own
There are many different types of regulator relays that are installed on generators of VAZ cars, and despite describing everything here (because the article is already long), I decided to write a separate article “review of the VAZ regulator relay” if desired check it out.
To replace the regulator, you need to unscrew two bolts and remove the contact wire. Before installing a new relay, make sure that the brushes move freely and do not jam. Replacing slip rings and bearings possible malfunctions of the VAZ 2110 generator. There is nothing difficult in the installation, I think you can handle it.
We're sorry, but the requests coming from your IP address appear to be automated. For this reason, we are forced to temporarily block access to the site.
To continue, please enter the characters from the image in the input field and click "Submit".
Cookies are disabled in your browser
. We will not be able to remember you and correctly identify you in the future. To enable cookies, follow the tips on this page.
Replacing the rotor with rings
Replacing the power window of a VAZ 2110 on your own
Replacement on the VAZ 2110 generator
Sometimes it is not possible to replace the rings separately. The rotor also has to be replaced. This situation occurs when the rings reliably “stick” to the rotor. But you can try to restore the rings by placing them in a sulfuric acid solution. They cannot be kept in solution for a long time, as whole particles may disintegrate. To replace the rotor and rings, you must:
- Place markings on the covers of the generator (to make it easier to assemble them later, otherwise you can confuse their location).
- Remove the plastic casing. This is easier to do after the three latches securing it are bent away.
Note: you need to bend them very carefully, as they are quite delicate. Moving too quickly can cause them to break.
- Remove the two screws that secure the electronic voltage regulator.
- After this, you will have access to the generator relay. It must be removed, otherwise it will interfere with the work process.
- Remove all fastenings of the unit and condenser.
- Then unhook the three winding tips coming from the stator.
- Remove the block and capacitor. If you need to replace the capacitor, you need to unscrew the nut that secures it. Then remove the washer along with the bushing. Now it’s the turn of the wires that attach the capacitor to the contact bolt. After this, you can remove and replace the capacitor itself.
- Unscrew the generator coupling bolts. There are four of them in total. There are usually flat washers and spring washers underneath the screw heads. They are very small, but perform an important function. You can’t lose them, otherwise you’ll have to buy new ones, but finding them on sale is not easy.
- Remove the generator cover from the side where the slip rings are located. In this case, you can help slightly with a screwdriver, as if pulling the lid towards you.
Scheme for Priora
The amount of electrical voltage generated by the generator depends on two physical characteristics: the speed of rotation of the rotor and the magnitude of the magnetic field created by the stator. The regulator changes the second value.
In older designs, a resistance was connected in series with the stator winding. The main disadvantage of this method is the additional load on the on-board network.
Generator relay. Photo source: https://avtoarsenal54.ru/raznoe/generator-ot-kaliny-na-prioru.html
The Priora 115A generator voltage regulator relay periodically cuts off the current supply to the generator excitation winding. The higher the engine speed, the more often the shutdown occurs, and the amount of generated voltage decreases.
Repair and replacement of the stator of the VAZ 2110 generator.
VAZ 2110: replacing the windshield yourself
The generator stator has three windings. These windings are connected together on one side and to a diode bridge on the other. They are wound on a plate-type metal core.
First of all, we visually inspect the stator windings for damage. Damage can be different, for example, chipped insulation, burnt windings, visible breakage of windings. If such causes are identified, it is advisable to replace the stator.
But if everything seems to be in order, we proceed to check it with a multimeter.
You need to set the device mode switch to a sound signal and connect the probes to the windings one by one and take measurements.
Since the ends of the windings are connected to one point, all three outer wires must ring each other. Above in the photo, I indicated the alternate connection of the device in different colors.
If, when checking one of the windings, no sound signal is heard, it means there is a break somewhere and the stator needs to be replaced. You can, of course, rewind the winding, but more experience is needed here, so it is better to replace the entire stator.
In the same way, we check whether the windings are shorting to the stator housing. Replacing valve stem seals for VAZ 2110 | car enthusiasts. To do this, we connect one probe to each winding terminal in turn, and the other probe to the stator housing.
We can finish this with the stator and move on.
Generator model on a VAZ 2114 car
If on early VAZ 2108-09-099 models a generator of the 37.3701 series was installed, then on the VAZ 2110-2115 the brand 94.3701 began to be used. Generators of this series have significant power - the rated current (maximum output current) of such units can be 80A, 90A, 105A, and even 120A (manufacturer StartVolt). The price of the device starts somewhere from 3,500 rubles and can reach 5,000 rubles or more. The price depends on the manufacturer, the technical characteristics of the generator, the region of sale and the seller himself. Other main characteristics are:
Generator 94.3701 is an electrical machine that generates alternating current; direct current is obtained through a rectifier (diode bridge) located at the output of the electrical circuit of the machine. Type 94.3701 is used on VAZ passenger cars with an electronic engine control system (ECM), the units are capable of operating at temperatures from - 40º to + 45ºC, permissible humidity 90%. Products are sold both on the domestic market and exported to countries with different climatic conditions.
Disassembling the generating device
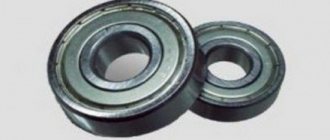
It is noteworthy that generators come in two types: old and new. The differences between them are in the diameter of the shaft. A 15 mm shaft is installed on old generators, 17 mm on new ones. This means that different bearings should be selected for replacement. The 302nd is suitable for a 15mm shaft, and the 303rd for a 17mm shaft. As for the rear bearing, it goes with all generators and is marked as 202.
So, disassembling the generator begins:
- First, remove the plastic cover;
- then the diode bridge is dismantled;
- remove the tablet (regulator with brushes);
- To unscrew the pulley nut, you will have to clamp the generator in a vice, and then use a 24mm socket.
Advice. The gene must be clamped in a vice very carefully so as not to damage its parts. To avoid damage, the pulley is clamped using rubber gaskets.
- the relative position of the covers of the generating device is marked;
- then the tightening screws are unscrewed.
It is also recommended to treat the joints of the covers with the device body with WD-40.
take a mounting spatula or an ordinary, but flat screwdriver, and halve the gene.
Replacing rings
Disassembling the generator
This partial disassembly of the generating device is sufficient to replace the slip rings and the bearing on the shaft (armature bearing).
Method for replacing ring block 1
Further actions:
- the anchor is clamped in a vice;
- the bearing is pressed out;
- then use a knife to remove the plastic contact protection, which is located directly under the bearing;
- after this, you need to open the bracket of the contact block and tear out the soldered wires so that you can remove the old slip rings (again, you can use a knife).
Further:
- a new block with rings is put on the shaft (a spacer and light blows from above on the block with a hammer - the main thing is that the tails of the block accurately hit the seats);
- the wires are tucked into the proper places and sealed.
Note. During the soldering process, it is recommended not to use soldering acid (if used incorrectly, liquid can easily get inside the winding). After this, crimp the soldered contacts with pliers.
Next comes the assembly process:
- put the contact protection back on (it should fit tightly);
- then a new bearing is installed.
Replacing the rotor with rings
Replacement on the VAZ 2110 generator
Sometimes it is not possible to replace the rings separately. The rotor also has to be replaced. This situation occurs when the rings reliably “stick” to the rotor. But you can try to restore the rings by placing them in a sulfuric acid solution. They cannot be kept in solution for a long time, as whole particles may disintegrate. To replace the rotor and rings, you must:
- ? Place markings on the covers of the generator (to make it easier to assemble them later, otherwise you may confuse their location).
- ? Remove the plastic casing. This is easier to do after the three latches securing it are bent away.
Note: you need to bend them very carefully, as they are quite delicate. Moving too quickly can cause them to break.
- ? Remove the two screws that secure the electronic voltage regulator.
- ? This will give you access to the generator relay. It must be removed, otherwise it will interfere with the work process.
- ? Remove all fastenings of the unit and condenser.
- ? Then unhook the three winding tips coming from the stator.
- ? Remove the block and capacitor. If you need to replace the capacitor, you need to unscrew the nut that secures it. Then remove the washer along with the bushing. Now it’s the turn of the wires that attach the capacitor to the contact bolt. After this, you can remove and replace the capacitor itself.
- ? Unscrew the generator coupling bolts. There are four of them in total. There are usually flat washers and spring washers underneath the screw heads. They are very small, but perform an important function. You can’t lose them, otherwise you’ll have to buy new ones, but finding them on sale is not easy.
- ? Remove the generator cover from the side where the slip rings are located. In this case, you can help slightly with a screwdriver, as if pulling the lid towards you.
VAZ 2110 in the generator slip rings
? Remove the nut securing the generator pulley. Remove the washer and pulley.
Note: the rotor must be stationary. To prevent it from spinning, it should be clamped as much as possible, and a small piece of plywood should be placed under it.
- ? Remove the thrust washer.
- ? Remove the generator rotor.
- ? There is a spacer ring on it that needs to be removed.
- ? At this stage, you need to carefully inspect the slip rings. It is possible that they will also have to be replaced. If they are worn out or there are scratches on their surface, then replacement cannot be avoided (by the way, it is not necessary to install new rings - they can be thoroughly sanded).
- ? The resistance of the rotor winding should be measured with a multimeter.
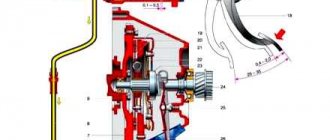
Assembly and disassembly of the generator Lada Priora (Lada Priora), VAZ 2170, VAZ 2171, VAZ 2172
You will need: flat and Phillips blade screwdrivers, 8" and 10" wrenches, 8" and "24" socket wrenches, hammer, tester.
1. Remove the generator from the Lada Priora car (see “Removing and installing the generator”).
2. Remove the voltage regulator (see “Checking and replacing the voltage regulator with brush holder”).
3. Unscrew the three nuts securing the rectifier unit and the two nuts securing the remote bushings of the “plus” terminal and the generator excitation terminal.
5. Unsolder the six leads of the stator winding.
This is what the removed rectifier unit looks like from the side of the protective casing.
. and so on the stator side.
This is what a capacitor looks like, which is non-removable.
7. Check the “negative” diodes by connecting the “positive” (red) probe of the tester to the “negative” plate (bus) of the rectifier unit, and the “negative” (black) probe alternately to the three contact terminals of the diodes in three mounting places (one at a time) stator windings of the VAZ 2172. If the diodes are in good condition, the tester will show 580–620 Ohms.
8. Connect the “negative” (black) probe of the tester to the “minus” plate of the rectifier unit, and the “positive” (red) probe alternately to the same three contact terminals. If the diodes are working properly, the tester will show an infinitely high resistance.
9. If the tester shows low or close to zero resistance, then the diode is “broken,” if the tester reading tends to infinitely high resistance, regardless of the color of the connected probes, then the diode is “broken.” In both cases, the rectifier unit must be replaced.
10. Check the “positive” diodes in the same way, but only relative to the “positive” plate of the rectifier unit or the “B+” terminal of the generator.
11. Check the stator windings with a tester for the absence of a break (diagram with solid lines) and for the absence of a short circuit to the VAZ 2170 Priora starter housing (diagram with dotted lines). When taking measurements, make sure that the winding leads do not touch the generator cover.
12. Mark the relative positions of the Lada Priora generator covers.
15. Remove the stator from the cover.
16. Inspect the stator. There should be no traces of the armature touching the stator on its inner surface. If there is wear, the bearings or alternator covers must be replaced.
17. Place the spanner on the nut and through its hole, insert the hex key into the shaft hole. Unscrew the nut with a spanner wrench, holding the shaft from turning.
18. Remove the spring washer and pulley from the rotor shaft.
19. Remove the rotor shaft from the bearing. If necessary, screw the pulley fastening nut onto the rotor shaft and press the rotor shaft out of the bearing through a wooden spacer with light blows of a hammer.
20. Inspect the cover on the drive side (assembled with the Lada Priora generator bearing).
21. If, when rotating the bearing, you feel play between the rings, rolling or jamming of the rolling elements, the protective rings are damaged or there are lubricant leaks, replace the bearing, and if cracks are found in the cover, especially in the places where the generator is attached, it is necessary to replace the cover of the Lada Priora generator.
22. To replace the bearing or cover, remove the four screws securing the bearing thrust washer.
24. Using an aluminum spacer, press the bearing out of the VAZ 2171 generator cover with light blows of a hammer.
25. Press the new bearing into the cap using a socket of the appropriate diameter.
26. Inspect the slip rings. If they have burrs, marks, scratches, signs of wear from brushes and other defects, the rings must be sanded. If damage to the rings cannot be removed with sandpaper, turn the rings on a lathe, removing a minimum layer of metal, and then sand them.
27. Check the resistance of the rotor winding with a tester by connecting it to the slip rings. If the tester shows infinity, it means there is a break in the rotor winding and needs to be replaced.
28. Check that the rotor winding is not shorted to the housing by connecting the tester leads to any slip ring and the rotor housing. The tester should show infinity.
29. Check the ease of rotation of the bearing on the slip ring side. If, when rotating the bearing, you feel play between the rings, rolling or jamming of the rolling elements, the protective rings are damaged or there are lubricant leaks, the bearing must be replaced.
What causes rings to wear off?
Alternator rings for VAZ 2110
The following generator parts can cause slip ring failure.
Stator
On its inside there should be no traces from the rotor that would appear during its operation. Otherwise you will have to change it.
Generator VAZ 2110
Of course, if you are sure that the stator is completely intact, then you should not carry out such manipulation. But if there is even the slightest suspicion that it is malfunctioning, then it is better to check it. A faulty stator can lead to rotor failure again.
Bearing
- See if the generator bearing located on the rotor rotates correctly. It should rotate freely on the slip ring side without jamming.
- If it dangles too much or, on the contrary, is very tightly clamped, then it needs to be compressed.
Lid
- The generator cover on the slip ring side may have damage, cracks or other defects.
- In this case, it needs to be replaced, otherwise it will have a bad effect on the contact rings, leading to their abrasion.
What does it look like and where is it installed?
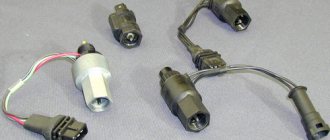
Now let's find out where the VAZ-2107 charging relay (carburetor) is located. Initially, this device was placed away from the generator on the arch under the hood (on the left side). On newer “sevens” equipped with an injection system, the voltage regulator was combined with a brush assembly.
The first voltage regulators were based on electromagnetic relays; they worked quite slowly and required constant intervention. The problem is that mechanical elements wear out very quickly. In addition, it was constantly necessary to adjust the gaps in the relay. Modern semiconductor devices operate silently, quickly, without electromagnetic relays. One silicon crystal can perform the functions of several mechanical relays.
Source
Replacing worn alternator rings
VAZ 2109 on a generator
When using a generator, sooner or later some of its components wear out. Of course, it’s as easy as shelling pears to buy a new mechanism, but why spend your money if you can fix the generator yourself? This does not require much experience or the use of special tools. The generator of the VAZ 2109 car may fail for some reasons, which are indicated in the repair book. There you can also find instructions for disassembling the device. The most common cause of generator failure is the wear of its rings:
- First you need to purchase new rings from a special store.
- The generator is removed from the engine compartment.
- Use a large open-end wrench to press on the mechanism bearing. The rotor is clamped in a vertical position, after which the outer ring of the bearing is removed using the lower horn. If you cannot perform such manipulations, then you need to try to pick up this bearing with a flat-head screwdriver. The part is removed so that it does not warp when moving.
VAZ 2109 generators
- When the bearing is removed, you can immediately see a plastic plug in the shape of a cross; this is also removed. Under the plug there are two contacts that need to be bent, releasing the outputs of the rotor winding. For these actions it is better to use a screwdriver or pliers.
- The present contacts are broken off and the old shank is removed.
- As a rule, purchased rings will not fit right away; they need to be hammered in with a small hammer. If necessary, they can be processed with a file. In rare situations, new rings turn out to be short, so to solve the problem you need to put a plastic bushing on the shaft that will prevent distortion. Otherwise, the brushes will wear out much faster.
- The contacts are bent as tightly as possible; they can even be soldered to the winding itself, which is covered on top with a plastic casing. Only after this is the bearing mounted. Before installing the generator in its place, you need to lubricate its rings; such measures will help reduce the likelihood of their wear during the grinding process.
- As a result, the generator resource should last for at least two years.
- After installing the bearing, it is necessary to evaluate the ease of its operation on the part of the replaced slip rings. If there is play, rolling or jamming, the bearing will need to be replaced.
- The generator cover, placed on top of the rings, must be completely intact; cracks, holes or other damage are not allowed. If such defects are still present, the cover is replaced.
Recommendations
Replacing rings
When operating your car, it is recommended to often pay attention to the voltmeter, which indicates the battery charge. If the indicator goes beyond the red limit line, this means that the generator is not supplying enough voltage or stops working altogether. In such situations, you must immediately turn off all additional energy consuming devices and go to the place of repair.
In fact, changing the slip rings of the generator is not so difficult, there are videos and photos, but it is much more difficult to identify faults. To do this, you need to understand at least a little about the topic. Today, the Internet provides an excellent opportunity for non-professionals who want to save money on repairing their car to do the repairs themselves. Of course, you will need detailed instructions, which are also provided online, and spare parts, the price of which will directly depend on the chosen manufacturer.
Mandatory generator maintenance
VAZ 2109 generator
Such actions include:
- cleaning external surfaces;
- checking the fixation of the generator to the machine engine;
- checking the reliability of fastening the wires of the generator and voltage regulator;
- checking the tension of the generator drive belt. If it is weak, the operation of the generator will be unstable, but if, on the contrary, it is strong, the belt and bearings will wear out faster. It is advisable to check this parameter after 10 thousand km. mileage;
- checking the generator belt itself, cracks and delamination are not allowed;
- checking the condition of the generator bearings. To do this, remove the belt and rotate the rotor by hand; if there is any jamming or play, noises and clicks are heard, the bearings must be replaced.
Based on this listing, we can conclude that you do not need special knowledge or skills to independently maintain the generator.
Note! Such checks can be done until a breakdown occurs.
How to check the tension of the alternator belt
VAZ 2109 generator
If we are talking about the VAZ 2109, then its alternator belt should normally bend by about 10...15 mm, if you apply force, then 100 N. It is best to evaluate the belt tension with a special indicator; if this is not possible, you can get by with a household steelyard.
Note! If it is necessary to tighten or loosen the belt, you need to loosen the nut, move the generator to/from the engine, and then tighten it again.
Checking the mechanism using the indicator light
It is advisable to check the operation of the generator when turning on the engine using the indicator light located on the dashboard. When the ignition is turned on before the engine is activated, the light lights up, this indicates its functionality. After starting the engine, the light goes out, which indicates normal operation of the generator. If the light glows brightly or operates at full heat when the engine is active, then most likely the belt is tensioned or broken. This may also indicate a problem with the circuit or the generator itself.
Note! The generator set will normally have a voltage of 13.5-14.2 Volts. This value can be measured at the battery terminals using a voltmeter.
Generator check
An active battery charge indicator light does not always indicate internal problems with the generator. Typically, alternator failure is simple and noticeable. Before dismantling the generator, it would be useful to become familiar with the mechanism diagnostic diagram. In some cases, you will need a voltmeter with a scale of at least 15 Volts. If during diagnostics it is clear that the circuit is working properly and the problem lies in the generator, then after dismantling the generator, all circuits are checked, including the relay regulator.
Note! When installing “powerful” acoustics or other voltage-consuming devices, a standard generator is unlikely to cope with such a load. The way out of this situation is to replace the generator or modify it.
Rotor check
Using a multimeter in resistance measurement mode, ring the excitation winding (on the rotor).
To do this, attach the measuring probes to the slip rings.
The resistance of a serviceable winding should not be in the range of 2.3 -5.1 Ohms.
- If there is no resistance at all, then there is a break in the winding.
- If the resistance is lower than expected, then there is most likely an interturn short circuit.
- If it is higher, then there may be poor contact or the winding leads to the slip rings are not properly soldered.
We also measure the current consumed by the excitation winding. To do this, we apply +12 volts to the slip rings and connect a DC ammeter to the open circuit. The current consumed by the winding should be within 3-4.5 Amperes. If the current is too high, it means there is interturn ignition in the rotor winding and it requires replacement. The maximum current of the relay regulator is 5 Amps, so if the rotor winding current is too high, the voltage regulator also needs to be replaced.
The insulation resistance can be checked with a high alternating voltage of 220 volts by applying voltage through a 220 V, 40 W incandescent lamp, one contact is connected to the slip ring, the other to the metal rotor housing. If there are no short circuits to the housing, the lamp should not light. If the lamp filament glows even just a little, then there is a current leak to ground. This winding requires repair or replacement.
Take precautions when working with high voltage!
general description
In principle, the Priora generator is not bad.
But its power is not enough on luxury models with installed air conditioning. You may hear advice to install an additional diode bridge. But, unfortunately, this option is suitable for those who understand electrical circuits and are comfortable with a soldering iron. The easiest way is to install a three-level voltage regulator. First you need to check the operation of the generator. Measure the voltage at the positive terminal of the generator and the battery terminals. Without load, the voltage should be at least 13.8 volts, under load - at least 13.5. An ideal option at low temperatures in winter is 14.8-14.3 volts. If there is a difference in the readings, then the contact at the generator output should be cleaned. This can be done with a wire brush or sandpaper. If the parameters are below acceptable values, then you should check the condition of the brushes on the generator and think about replacing the voltage regulator.
Replacing the rotor with rings
Replacement on the VAZ 2110 generator
Sometimes it is not possible to replace the rings separately. The rotor also has to be replaced. This situation occurs when the rings reliably “stick” to the rotor. But you can try to restore the rings by placing them in a sulfuric acid solution. They cannot be kept in solution for a long time, as whole particles may disintegrate. To replace the rotor and rings, you must:
- ? Place markings on the covers of the generator (to make it easier to assemble them later, otherwise you may confuse their location).
- ? Remove the plastic casing. This is easier to do after the three latches securing it are bent away.
Note: you need to bend them very carefully, as they are quite delicate. Moving too quickly can cause them to break.
- ? Remove the two screws that secure the electronic voltage regulator.
- ? This will give you access to the generator relay. It must be removed, otherwise it will interfere with the work process.
- ? Remove all fastenings of the unit and condenser.
- ? Then unhook the three winding tips coming from the stator.
- ? Remove the block and capacitor. If you need to replace the capacitor, you need to unscrew the nut that secures it. Then remove the washer along with the bushing. Now it’s the turn of the wires that attach the capacitor to the contact bolt. After this, you can remove and replace the capacitor itself.
- ? Unscrew the generator coupling bolts. There are four of them in total. There are usually flat washers and spring washers underneath the screw heads. They are very small, but perform an important function. You can’t lose them, otherwise you’ll have to buy new ones, but finding them on sale is not easy.
- ? Remove the generator cover from the side where the slip rings are located. In this case, you can help slightly with a screwdriver, as if pulling the lid towards you.
VAZ 2110 in the generator slip rings
? Remove the nut securing the generator pulley. Remove the washer and pulley.
Note: the rotor must be stationary. To prevent it from spinning, it should be clamped as much as possible, and a small piece of plywood should be placed under it.
- ? Remove the thrust washer.
- ? Remove the generator rotor.
- ? There is a spacer ring on it that needs to be removed.
- ? At this stage, you need to carefully inspect the slip rings. It is possible that they will also have to be replaced. If they are worn out or there are scratches on their surface, then replacement cannot be avoided (by the way, it is not necessary to install new rings - they can be thoroughly sanded).
- ? The resistance of the rotor winding should be measured with a multimeter.
Note: if this tool shows that there is a break in the rotor winding, then it urgently needs to be changed. You can also try to rewind it, eliminating the break. But this process is quite complicated.
- ? You should also check whether there is a short circuit between the winding and the rotor housing. To do this, you need to use a 220 V lamp. One of its wires must be connected to the body, and the other must be connected in turn to each of the slip rings. Moreover, if there are no short circuits, the lamp will not light.
- ? Insert the new rotor into place.
- ? Assemble everything in the opposite order.
Design, principle of operation and possible breakdowns of the generator
The very first generators, which were once installed on cars, were created according to the collector principle. They were a simplified design, but were unreliable, short-lived and could not ensure uninterrupted operation. Therefore, for many years, designers puzzled over how to create a more complex type of device, the operation of which would not have such numerous flaws.
This is how selenium nodes appeared, and after them more advanced silicon nodes. This design ensured synchronous current supply; in addition, it turned out to be more compact, economical in materials costs and durable. The generator for VAZ is presented in a synchronous three-phase version. The presented device has the following design. The body is made of duralumin or other light alloy metals, which can significantly reduce the weight of the part.
Generator structure: 1 – casing; 2 – output “B+” for connecting consumers; 3 – noise suppression capacitor 2.2 μF; 4 – common terminal of additional diodes (connected to the “D+” terminal of the voltage regulator); 5 – holder of positive diodes of the rectifier unit; 6 – holder of negative diodes of the rectifier unit; 7 – stator winding terminals; 8 – voltage regulator; 9 – brush holder; 10 – back cover; 11 – front cover; 12 – stator core; 13 – stator winding; 14 – spacer ring; 15 – washer; 16 – conical washer; 17 – pulley; 18 – nut; 19 – rotor shaft; 20 – front rotor shaft bearing; 21 – beak-shaped pole pieces of the rotor; 22 – rotor winding; 23 – bushing; 24 – tension screw; 25 – rear rotor bearing; 26 – bearing sleeve; 27 – slip rings; 28 – negative diode; 29 – positive diode; 30 – additional diode; 31 – pin “D” (common pin of additional diodes)
To ensure that the system does not overheat, there are special holes in the body of the VAZ generator, through which the system is cooled, which is especially important during intensive operation of the unit. The main role here is played by bearings and rotor
The brush assembly is also a critical part; it transmits the voltage force throughout the system.
If even one part fails, the entire assembly loses its functionality. Before you begin repairing the VAZ 2110 generator, you should understand by what symptoms you can determine that the unit is faulty. There are many of these symptoms, but the main ones are:
Now, having made sure that the breakdown is obvious, we repair the VAZ generator. If, after disassembling the device, you notice that the contacts, brushes or relays are deformed, then you just need to replace the defective parts.
It also happens that the chain breaks, then you have to tinker longer. You will need to purchase a new winding and arm yourself with a soldering iron. The work is painstaking and intricate, requiring attention and accuracy. But generator repair only consists of eliminating damaged areas, which can be done independently.
Diode bridge
It is possible to replace a damaged diode with a new one. To do this, unsolder its legs (after remembering the location of the color mark) and remove it from the plastic holder. Before installing a new diode, the contacts should be cleaned of dirt and epoxy resin. When soldering, make sure that the color mark is positioned correctly. The soldering areas are then protected with varnish or epoxy resin.
If several diodes are damaged, then it would be more advisable to replace the entire rectifier unit.
When installing the unit and tightening it, the stator ring terminals must be centered. Otherwise, part of the winding will not work, which will lead to a voltage drop at the output of the autogenerator.
After installing the repaired generator on the car, the voltage at its terminals should be in the range of 13.6-14.2 V.
Replacing the rotor with rings
Replacement on the VAZ 2110 generator
Sometimes it is not possible to replace the rings separately. The rotor also has to be replaced. This situation occurs when the rings reliably “stick” to the rotor. But you can try to restore the rings by placing them in a sulfuric acid solution. They cannot be kept in solution for a long time, as whole particles may disintegrate. To replace the rotor and rings, you must:
- Place markings on the covers of the generator (to make it easier to assemble them later, otherwise you can confuse their location).
- Remove the plastic casing. This is easier to do after the three latches securing it are bent away.
- Remove the two screws that secure the electronic voltage regulator.
- After this, you will have access to the generator relay. It must be removed, otherwise it will interfere with the work process.
- Remove all fastenings of the unit and condenser.
- Then unhook the three winding tips coming from the stator.
- Remove the block and capacitor. If you need to replace the capacitor, you need to unscrew the nut that secures it. Then remove the washer along with the bushing. Now it’s the turn of the wires that attach the capacitor to the contact bolt. After this, you can remove and replace the capacitor itself.
- Unscrew the generator coupling bolts. There are four of them in total. There are usually flat washers and spring washers underneath the screw heads. They are very small, but perform an important function. You can’t lose them, otherwise you’ll have to buy new ones, but finding them on sale is not easy.
- Remove the generator cover from the side where the slip rings are located. In this case, you can help slightly with a screwdriver, as if pulling the lid towards you.
VAZ 2110 slip rings in the generator
Remove the nut securing the generator pulley. Remove the washer and pulley.
- Disconnect the thrust washer.
- Remove the generator rotor.
- It has a spacer ring that needs to be removed.
- At this stage, you need to carefully inspect the slip rings. It is possible that they will also have to be replaced. If they are worn out or there are scratches on their surface, then replacement cannot be avoided (by the way, it is not necessary to install new rings - they can be thoroughly sanded).
- A multimeter should measure the resistance of the rotor winding.
- You should also check if there is a short circuit between the winding and the rotor housing. To do this, you need to use a 220 V lamp. One of its wires must be connected to the body, and the other must be connected in turn to each of the slip rings. Moreover, if there are no short circuits, the lamp will not light.
- Insert the new rotor into place.
- Assemble everything in the opposite order.
Possible malfunctions and ways to eliminate them
The need to repair a generator unit may arise for various reasons. As practice shows, the most common of them are failed brushes or bearings. Read below about repairing these components.
Brush replacement procedure
Replacement of VAZ generator brushes is carried out as follows:
- First of all, you need to release the three latches on the device’s body, on its sides. These latches secure the cover to the mechanism.
- The cover itself can be detached and put aside. This will allow you to access the regulator.
- There are two bolts on the regulator that secure the device - they need to be unscrewed. Then pull the regulator and remove it.
- Assess the condition of the brushes - if they are working, then the length of these elements should be at least 0.5 cm. If their size is smaller, then you have two options - either repair it by replacing the brushes, or change the device assembly. If repairs are being made, you will need a soldering iron since the brush assembly is soldered to the relay. First, you need to unsolder the wires connected to the brushes, and then dismantle the assembly, replacing it with a new one and securely soldering it to the relay contacts. Or you simply change the relay, and further assemble the device in the reverse order (the author of the video is the IZO channel)))LENTA).
REPLACEMENT OF GENERATOR BRUSHES. GENERATOR VOLTAGE REGULATOR RELAY. VAZ, LADA.
How to change bearings yourself?
To replace the bearings, follow these steps:
- On the dismantled generator, you need to block the rotor; to do this, use a screwdriver, then unscrew the pulley.
- Next, by pulling the latches, you need to remove the device casing. You need to make marks on the two halves of the case, and then, using a screwdriver, you will need to remove the front cover.
- Then you will need to knock the bearing out of its seat; to do this, you will need to place it on a more suitable object. Alternatively, you can use a 27mm socket.
- After this, you can take a new bearing device and fill it with grease. This element should be hammered through the old one. To make the device more securely fixed at the installation site, you can use a chisel to flare the edges.
- Now let's move on to the rear bearing. To do this, you need to place either a thick screwdriver or a thin chisel under it, and hit the top several times with a hammer, while simultaneously moving the screwdriver in the opposite direction. The device can be dismantled using an open-end wrench.