VAZ 2114 fuel pump does not turn off
- Registration
- Entrance
- To the beginning of the forum
- Forum Rules
- Old design
- FAQ
- Search
- Users
I turn on the ignition, the fuel pump turns on and does not turn off as expected after a few seconds. The relay does not click. Tell me, is this relay faulty or is there some other reason why the pump does not turn off?
Today I checked in more detail. The relay actually clicks as expected after 2-3 seconds, but the pump does not turn off. I pulled out the relay completely; (the fuel pump relay which is in the middle) works and starts without the relay. I noticed that there is no middle fuse. I installed the fuse, started the car, turned off the ignition key - it does not turn off, the engine runs. I pulled out the middle fuse, without it it works as expected. I read that the fuse, which I don’t have, is responsible for the air flow sensor, etc. Do you think it’s necessary to put everything in order, does this affect fuel consumption and will the car pass diagnostics with such bells and whistles. The engine is running a little. Fuel consumption in the city is about 12 liters.
Probably the pump control burned out in the ECU, so the pump was connected directly to the ignition. everything seems to be fine, but if there is a serious accident, the engine will stall and the pump will not turn off, and if the fuel pump is damaged, nothing good will happen.
Source
When the ignition is on, the fuel pump runs continuously
There is a problem, I don’t understand what’s wrong! The engine starts and runs normally, without any complaints. When the engine warms up, after a while the fuel pump turns off and does not respond to the ignition. It sits for 15-20 minutes and starts working again. What is the problem?
It is impossible to say exactly what the problem is that the fuel pump on the VAZ 2114 turns off after the engine warms up due to insufficient description, and yet we will consider options for what could cause this to happen.
The reasons for this can be divided into two parts - mechanical and electrical. Moreover, often one part can become a consequence of the second.
One of the simplest malfunctions that can give this result is a clogged fuel tank ventilation system. The tank lid is not airtight; it has drainage holes through which air passes. Everything is very simple here - air is needed so that a vacuum is not created in the tank as fuel is consumed. If the drainage holes are clogged, as the vacuum in the tank increases due to insufficient air supply, it will be more difficult for the pump to pump fuel into the system. This leads to an increase in the load on it and on the relay for its activation. When the critical load is reached, the relay simply turns off the pump.
And now how everything happens on a car: while the car is standing, air still penetrates the tank and the pressure in it equalizes. After starting the engine, the fuel pump actively pumps fuel, and since air does not flow in the required quantity, a vacuum appears. As the engine warms up, the vacuum increases and the load on the fuel pump and relay increases. To prevent the pump from failing at “one fine moment,” the relay turns off the power to the circuit.
Once you stand for 15-20 minutes, air enters the tank again, equalizing the pressure, and the whole cycle begins again.
A clogged fuel inlet grid of the fuel pump can give approximately the same result. But here everything happens not because of a lack of air, but because the pump needs to supply a certain amount of fuel, and it is very difficult to do this through a clogged mesh. It starts to work under load and the relay turns off the power after a while. This can also happen due to a clogged fuel filter.
There may also be problems with the fuel pump itself. Burnt wires connecting to it, insufficient weight, wear or damage to the electric motor creates an increased load on the fuel pump relay, which causes it to operate after a certain time.
Before you start searching for the cause of this malfunction, you must first check the power supply circuit of the fuel pump.
After the engine stalls, you must immediately find its relay and check its temperature with your hand. If the element is very hot, then this is a signal that the entire circuit is working under heavy load. But what causes the heating still needs to be determined.
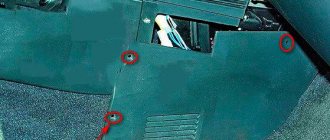
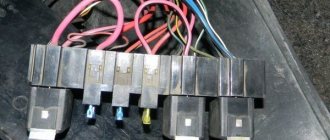
It is located on the VAZ 2114 on the passenger side, under the side decorative panel of the center console. There are three relays and fuses for them. The fuel pump relay is installed in the middle.
When checking the temperature, you should immediately evaluate the condition of the fuse, as well as the contact of the relay itself in the seat. By the way, this element can also fail, causing its operation to be incorrect. It’s easy to check its functionality; just close its contacts immediately after the engine stops. If the fuel pump starts to work, the relay must be replaced.
If everything is in order with this element, and a malfunction appears, then the cause should be sought in the components of the fuel system. The pump performance and filter throughput are checked. Indeed, due to excessive load on the pump due to a malfunction, clogged filter, fuel inlet mesh or tank ventilation system, the relay will turn off the pump after a certain time to prevent burnout.
Another item to check is the crankshaft position sensor. Initially, it may seem that the DPKV has nothing to do with the fuel supply system, but this is not so. Indeed, based on the readings of this element, the electronic unit controls the power system and the fuel supply circuit too. If the wiring to the sensor is not operating correctly or is damaged, the unit may turn off the power to the pump at certain moments.
In general, when searching for the cause, you should start from the relay and fuse, and then check both the mechanical and electrical components of the circuit of the fuel supply elements.
VAZ 2110 fuel pump constantly works
Welcome to ChipTuner Forum.
Theme Options
I read similar topics. None of them contain a similar solution, and the symptoms are slightly different. In general, I decided to write.
Engine 21124, ECU January 7.2 itelma, I205DO54. Complaint: After turning on the ignition, the fuel pump constantly runs. It turns off along with the GR. Before me, they were tinkering with the wiring (relays, the previous ones are new), so I decided to start by replacing the ECU. I installed January 7.2+. The EBN worked as it should for three seconds. I put it back to 7.2 - it works constantly again. It seems clear that the problem is in the ECU. BUT. I put this 7.2 in my car (also a 124 engine) and the EBN works correctly for three seconds, then turns off. It seems like the ECU has nothing to do with it, you can dig the wiring. Which is what I did, a lot of the time. The wiring was completely confusing. Everything is fine with the wiring. Next, I install all the replacement ECUs on that car, including the Kalinovsky one. With all the blocks (three pieces), the pump worked correctly, turning off after three seconds. Except for my January 7.2, into which I uploaded the I205DO54 firmware (I specified it specifically, this is important). With this unit, the EBN again works constantly, without turning off.
Finally confused, I update the client block with all Itel firmware for January, flashed the flash together with the EEPROM (only all FFs are there). The EBN does not turn off, it works. And only when I sewed up A205DM53 did everything work. The EBN began to turn off after the required three seconds, and after starting and then turning off the ignition, it turned off immediately. And not like before, turn off along with the GR.
I couldn’t find an explanation for this, but Avtelov’s firmware worked (although in the indents it is marked with the letter I), and Itelmov’s firmware did not allow the EBN to turn off.
This will seem like nonsense to many, but I’m writing only because I’ve wasted a lot of time; it would be easier to send straight away for a new ECU and close this issue. And if it weren’t for this accident, with the reflashing from a deadlock situation, I wouldn’t have made the car. I couldn’t even imagine that Avtelov’s firmware would help.
I haven’t found an explanation for this, maybe someone will have some thoughts on this. If you need additional information, ask questions. It was such a day, I just took the ECU apart three times. I didn’t understand what, but I found an antidote. Maybe it will be useful to someone as a solution to the problem.
Source
Models of fuel pumps for VAZ 2114/2115 cars
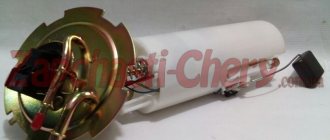
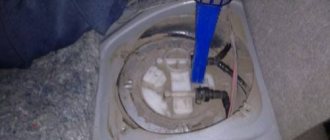
VAZ 2114/2115 cars are equipped with 1.5 cm 3 and 1.6 cm 3 gasoline engines with a distributed injection system. A submersible electric fuel pump is used to supply fuel. It is part of the fuel module installed at the top of the gas tank (under the rear seat). In addition to the pump, the module includes a fuel accumulator (cup), a coarse filter and a fuel level sensor with a float.
To supply fuel in VAZ 2114/2115 cars, a submersible electric fuel pump is used
The VAZ 2114/2115 fuel pump is a conventional DC electric motor in a sealed housing with a one-way valve at the outlet. An impeller of a special shape is located on the electric motor shaft. Its rotation ensures the fuel supply.
Pinout BN VAZ 2113, 2114, 2115
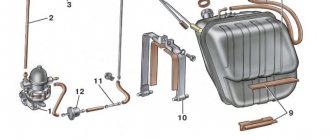
— block headlights; — gearmotors for headlight cleaners*; - fog lights*; — ambient temperature sensor; - sound signals; — engine compartment lamp switch; — electric motor of the engine cooling system fan; — generator; — low oil level indicator sensor; — washer fluid level sensor; — front brake pad wear sensor; — wire tips connected to the common windshield washer pump**; — windshield washer pump; — headlight washer pump*; — wire ends for connecting to the rear window washer pump on VAZ-2113 and VAZ-2114 cars; — low oil pressure indicator sensor; — engine compartment lighting lamp; — wire lug for connecting to the wiring harness of the engine control system; — gear motor for windshield wiper; — starter; — a block connected to the wiring harness of the ignition system on carburetor cars; — coolant temperature indicator sensor; — reversing light switch; — low brake fluid level indicator sensor; - accumulator battery; — low coolant level indicator sensor; — relay for turning on fog lights; - mounting block; — brake light switch; — plug socket for a portable lamp; — hydrocorrector scale illumination lamp; — switch for the parking brake indicator lamp; — block for connecting a backlight lamp; — switch for instrument lighting lamps; - Understeering's shifter; - hazard warning switch; — front seat heating element relay; — ignition switch; — rear fog light circuit fuse; - fuse for the front seat heating elements; — door lock circuit fuse; — front ashtray illumination lamp; — ignition relay; - cigarette lighter; — glove box lighting lamp; — switch for the glove compartment lighting lamp; — heater fan electric motor; — additional resistor for the heater electric motor; — heater fan switch; - heater switch illumination lamp; — lamp for illuminating the heater levers; — gear motors for electric windows of the front doors; — power window switch for the right front door (located in the right door); — gear motors for locking front door locks; — wires for connecting to the right front speaker; — gearmotors for locking rear doors; — wires for connecting to the right rear speaker; — door lock control unit; — wires for connection to radio equipment; — headlight cleaner switch*; — rear window heating element switch; — relay for turning on the rear fog lights; — block for connection to the heating element of the right front seat; — rear fog light switch; — switch for the heating element of the right front seat; — fog light switch*; — switch for external lighting lamps; — left front seat heating element switch; — block for connection to the heating element of the left front seat; — wires for connecting to the left front speaker; — power window switch for the left front door (located in the left door); — power window switch for the right front door (located in the left door); — wires for connecting to the left rear speaker; — side direction indicators; — courtesy light switches on the front door pillars; — courtesy light switches on the rear door pillars; - lampshade; — ceiling lamp for individual interior lighting; — block for connecting to the wiring harness of the electric fuel pump; — trunk light switch; — instrument cluster; — trunk lighting lamp; — display unit of the on-board control system; - trip computer*; — block for connecting the wiring harness of the engine control system; — rear exterior lights; — rear interior lights; — pads for connecting to the rear window heating element; — license plate lights; — additional brake signal located on the spoiler.
Source
Symptoms of a problem
A malfunction of the fuel pump of VAZ 2114/2115 cars can be diagnosed by the following symptoms:
- when the ignition is turned on, there is no sound of the pump running;
- the engine does not start or starts with difficulty;
- the power unit is unstable at idle, the speed “floats”;
- “dips” appeared during acceleration;
- the motor has lost power.
The same signs also appear when other elements of the fuel system malfunction.
Before you begin diagnosing or replacing the fuel pump, you should make sure that:
- the fine fuel filter is not clogged (it is changed every 7 thousand kilometers);
- the injectors and fuel pressure regulator are operating normally;
- The sensors for mass air flow, throttle position, and oxygen quantity are working properly.
If the detected malfunction is accompanied by the lighting of the “CHECK” lamp on the dashboard, you should set the error code and decipher it.
Characteristics of faults
There are several indicators according to which one can judge whether the fuel pump on a VAZ 2114 or its components are damaged. But at the same time, be sure to check whether there really is a problem with the fuel pump, because you can spend money on purchasing another one, but in reality it turns out that the problem is not in it:
Most car owners purchase a complete fuel system, including a filter, sensor, float, intake chamber and pump. This acquisition costs around 3 thousand rubles. It is more profitable to buy one pump, the price of which is less than 1 thousand rubles. It happens that if the pump breaks down, the remaining components of the fuel system remain in good working order and are ready for subsequent use.
The principle of operation of the fuel pump and basic operating rules.
The operating principle of an electric pump is quite simple. Thanks to electric current, the pump moves the fuel mixture under a certain pressure. The operating principle of the mechanical analogue is somewhat different, but also not particularly difficult. The stop pushes the pump lever, which actuates the rod. This creates a regular back-and-forth movement of the membrane, due to which the fuel mixture enters the carburetor. As a rule, gasoline pumps are unpretentious to operate and do not require much attention. But at the same time, like any car device, the gas pump has certain operating rules. To maintain the good condition of the fuel system element, the fundamental factor is the use of high-quality fuel.
The use of fuel with various impurities contributes to premature wear of the element. Thus, it becomes clear that the correct operation of the pump largely depends on the condition of the fuel filter. Regular replacement of a clogged filter will avoid considerable costs for repair and maintenance of the fuel system pump. The electric analogue has its own characteristics, based on which you should not allow maximum gasoline consumption. The fact is that the electric pump is cooled by the passing fuel flow. If the gasoline level drops below the minimum allowable level, the pump stops cooling and wear on the working component increases. If these rules are not followed, the pump may gradually malfunction. Over time, the car owner may face unpleasant consequences. Insufficient supply of the fuel mixture leads to a decrease in engine productivity. If the pump is significantly clogged, the car will simply refuse to start.
Diagnostics
A malfunction of the VAZ 2114/2115 fuel pump can be caused by:
- malfunctions in the device’s power supply circuit;
- failure of starting and protection elements (relay and fuse);
- wear of electric motor parts.
Checking the electrical circuit
At the beginning of the diagnosis, you should check the electrical circuit of the fuel pump. To do this you will need:
- car tester (multimeter);
- crosshead screwdriver;
- two pieces of wire about 2 m long.
Checking the electrical circuit is carried out in the following order:
- Turn on the ignition without starting the engine. When the key is in the first position, a click should be heard, characteristic of turning on the relay, followed by a slight whirring of the pump electric motor. If there is no click, the relay is faulty or is not receiving power. If there is a click, but no buzzing, the wiring coming from the relay or the pump motor itself is faulty.
- Under the glove compartment, find an additional mounting block consisting of three relays and three fuses. The pump relay is located in the middle, and the fuse is located to the left of it. Remove the fuse from its socket, test it with a multimeter, and if the result is negative, replace it. When replacing the fuse, please note that it is rated for a maximum of 15 A.
The relay and fuse for the fuel pump on the VAZ 2114/2115 are located in the mounting block under the glove compartment.
Set your multimeter to voltmeter mode. Connect one probe of the device to the relay terminal to which the pink wire fits, and the second to the car body. Turn on the ignition. The device should show the on-board network voltage in the range of 11.7–12.4 V. If there is no voltage, the problem may be a broken wiring or a malfunction of the ignition contact group. In this case, it is better to contact an auto electrician. If power is supplied, check that the relay is working. With the ignition on, use a screwdriver or a piece of wire to close the contacts to which the pink and gray wires go. This closes the circuit bypassing the relay. If the fuel pump works, replace the relay.
The ground wires of the fuel pump are attached to the body with a self-tapping screw
The fuel pump whistles and hums
Let's start with the fact that the proper operation of the fuel pump involves a certain noise or soft humming sound after turning the ignition key. In other words, the fuel pump hums while it creates operating pressure in the line. This process lasts 2-3 seconds, after which the driver can hear a slight click. This click is produced by the fuel pump relay.
Note that many drivers of cars with mileage of 100 thousand km or more. and more note a slightly increased noise level from the fuel pump. The fuel pump may hum or whistle louder when you turn the ignition key. At the same time, there are no problems with engine starting, fuel consumption and smooth reactions to pressing the gas pedal while driving. The car practically does not lose any dynamics, allowing you to drive with a humming gas pump for tens of thousands of kilometers.
A stronger or progressive whistle and hum of the fuel pump is a reason to immediately identify and eliminate the breakdown, which involves checking the functionality of individual elements of the engine power system. In this case, increased noise level of the fuel pump usually occurs for the following reasons:
- dirty fuel filter and fuel pump strainer;
- the fuel line is clogged;
- the fuel pump motor fails;
- fuel injectors are clogged;
- the pressure regulator in the fuel rail is faulty;
Causes and their identification
The reasons why the fuel pump does not work may be: violation of the integrity of its diaphragm, accumulation of dirt in the valve area, contamination of the filter, if the spring has lost its elasticity, the housing has become leaky, normal natural wear and tear of pump parts. Electrical malfunction occurs only when exposed to it. Now on modern cars it is quite reliable. Several can be highlighted. Faulty wiring (dirty or rusty wires can cause interruptions in operation), dirt in the tank, clogged fuel filter, frequent and long-term driving of the car with a minimum amount of fuel and, of course, the usual natural wear and tear of pump parts.
To diagnose a pump in electrical systems, you will need to find the pinout of the electrical connector of the fuel module that is suitable for the car model. To understand that there is no power to the fuel pump, connect the “control” contacts to the corresponding pins and start the car. Attention! The light coming on will mean that everything is normal and there are no problems with the supply voltage.
Using exactly the same method, you can at the same time check +12 V and the ground located in the electrical switch, which is designed to close. If the fuel pump does not turn on when the ignition is turned on, but there are no defects in the electrical circuit, the reason is in the fuel pump.
If you hear that the pump hums but does not pump, you need to check the pressure in the steering rack and external wiring. If everything goes well and no failures are detected. Try to look for the problem in the electric motor of the pump. This device moves gasoline inside the pump. It is worth understanding that the terminals may oxidize, and as a result, the power supply and operation of the pump stops. Therefore, you need to take the time to check both devices. Be sure to clean/resolder the terminals.
This part is located next to the fuel pump ground. In theory, proper operation of the relay assumes that when the ignition is turned on, the pump creates pressure and then turns off. After which a click should be heard, indicating that the relay is turned on. Afterwards there is a click indicating it is turned off. A sign of a problem will be that the relay does not click, that is, it does not work. To fix this, the relay needs to be replaced.
When checking, do not forget about the fuse. It is located in the block. It must be marked FUEL PUMP. We pull it out and inspect the contact. If it is whole, then there is no reason to worry. A damaged one will indicate a burnout and it is worth replacing such a fuse.
Another reason for poor operation or lack of operation of the fuel pump may be incorrect connection of various electrical equipment or security systems. This happens due to mixed up contacts and due to a complete or partial lack of power.
The fuel pump is very noisy: troubleshooting
In most cases, an increase in noise level occurs due to an increasing load on the gas pump, which becomes more difficult to pump the required amount of fuel. Overheating or failure of the pump itself is less common.
At the initial stage, it should be understood that if the gas pump makes a sound (albeit different from normal), then power is supplied to the device and the pump itself reacts to the supply of electricity. Based on this, the problem can be localized faster. Before diagnostics, it is recommended to replace the fuel filter to eliminate the possibility of a decrease in throughput in this area.
There is also a simple solution that allows you to quickly check the status of your device. The method involves removing the return hose and inserting it into a separate container suitable for pouring gasoline. Next, you need to measure how much fuel is drained back into the tank. The norm for many gas pumps is a minimum value of 1.5 liters per minute or more. The disadvantage of such measurements can be considered very approximate readings, which do not allow obtaining accurate data.
If the check shows that the pump does not produce the required pressure or constantly works to maintain it, then you need to change or clean the fuel pump strainer. To do this, you will need to remove the fuel pump, which is usually located in the rear of the car under the seat. Please note that on cars that have been in use for a long time, in parallel with replacing the mesh, it is necessary to wash the gas tank itself. The fact is that dirt and deposits will quickly damage the new filter.
After replacing or cleaning the pump filter, you should also check the pressure regulator in the fuel rail and clean the injection nozzles. In most cases, these procedures can reduce the noise level or almost completely eliminate the whistling and hum of the fuel pump. If the pump continues to make noise, then there is a high probability that the pump motor needs to be replaced.
Checking the fuel pump
To check the fuel pump, you need to measure the fuel pressure in the fuel rail and check the pump itself for pressure “into the wall”.
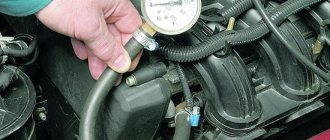
To check the fuel pressure, you need a special device, a fuel pressure gauge; you can also use a regular pressure gauge with a hose, connecting it to the ramp through clamps.
Then the pressure of the fuel pump is checked, which it presses into the wall; for this it must be dismantled (on 1.5-liter engines you can simply clamp the return line). In this way, the power of the pump is checked when checking the pressure “into the wall”; a good pump presses pressure up to 8 bar.
Main causes of overheating
Most likely, if there are no characteristic reasons for overheating, the pump has simply outlived its useful life. Simply replacing it can completely eliminate the problem. On the other hand, if the cause is not eliminated, the new pump will also heat up like the old one, and the money spent on the purchase can be considered lost.
However, this rarely happens. More often than not, problems are actually related to the pump.
Here are the main causes of overheating.
- Dirt. A device used for a long time will overheat faster. It is necessary to check all pump elements, including the filter mesh. Clean or replace consumables if necessary.
- External damage, such as a crack or something similar. The cause may also be wear of the device’s gears or rollers protected by hydraulic superchargers.
- Driving with Chek-Engin. Some motorists ignore the warnings that the car sends. They continue to drive, although the system notifies that there are problems, including those related to the fuel pump.
- Driving with a red light. It lights up on the instrument panel if the volume of fuel liquid in the tank is critically small. It is especially dangerous to travel with a half-empty tank in hot weather. The fuel pump will soon overheat.
- Refueling at questionable gas stations. Pumping low-quality fuel also negatively affects the operation of the pump. If the fuel contains a large amount of sulfur, the commutator will gradually become covered with a dark coating, contact with the brushes will deteriorate, and sparking will begin inside the device, which will lead to overheating.
- The main filter is clogged. This is a separate part installed in the section of the fuel line. It has the ability to retain small particles of debris that get into gasoline.
- Violations in the voltage circuit, short circuits. This is also a clear reason for overheating of a modern type electric pump. With such problems, the pump begins to turn on in starting mode, and as a result overheats.
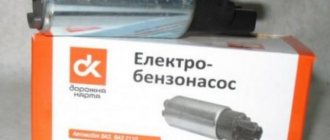
Replacing the fuel pump motor
The reason for replacing the fuel pump module motor is low gasoline pressure or sudden changes in pressure, which is recorded by a pressure gauge during the diagnostic process. Also, the imminent failure of the motor is indicated by the fact that the fuel pump is humming or whistling.
In this case, it is often possible not to change the pump assembly, which will save money. The device must be removed (similar to the situation with cleaning or replacing the mesh filter), after which it is disassembled. The motor itself is replaced and can be purchased separately. The housing and fuel level sensor can be left from the old fuel pump. At the same time, it is recommended to replace the gas pump gasket and other rubber seals, which are not designed for re-installation after removal, that is, they are disposable.
Fuel pump system
The fuel pump itself does not work; it is part of a special station, the so-called “fuel pump cup”. This part is a bracket for mounting the fuel pump in the tank. Also, a special coarse fuel filter is put on the fuel pump, which allows you to keep the fuel pump from dirt getting into it. A fuel level sensor and a fuel pressure regulator are installed on the glass. Together, all these parts form the fuel pump station, or popularly the “glass”.
The fuel pump does not turn off and overheats
One of the common malfunctions is that after turning the ignition key, the fuel pump does not turn off, that is, it hums constantly. In the list of the main reasons, auto electricians highlight:
- burning (sticking) of the contacts of the controlled circuit of the fuel pump relay;
- short circuit in the electrical wiring to the pump;
Less commonly, a malfunction of the ECU or the pressure sensor on the pump occurs (which depends on the fuel pressure device of a particular vehicle), which also forces the fuel pump to work constantly. Another reason could be injectors that are “pouring”, which does not allow the pump to create pressure in the rail and start the engine. You can check the condition of the spark plugs. If the spark plugs are flooded, then you should check the injector chain for a break.
Now a few words about pump overheating. If the fuel pump on the injector overheats, this manifests itself in a decrease in its performance and unstable engine operation. The electric fuel pump itself is submersible, that is, it is located in the fuel tank directly in the gasoline. This arrangement allows the device to effectively cool itself in the fuel. A low fuel level below 1/4 tank during active vehicle operation in high outside temperatures can cause such overheating.
What functions does the fuel pump relay perform, signs of breakdown. Where is the fuel pump relay installed, how to properly check the fuel pump relay.
Purpose, design features, installation location of the fuel pressure regulator of an injection engine. Signs of RTD malfunctions, checking the device.
Why is it necessary to clean the fuel pump mesh? When is it better to change and how to clean the fuel pump mesh? How to properly remove the fuel pump, subtleties and nuances.
How to change a fuel pump. Location of the fuel pump, releasing pressure in the system, unscrewing the fuel lines, removing the pump, reassembling.
How to determine why the fuel pump does not pump or works poorly. Fuel rail pressure, pump diagnostics. Wiring, relays, fuel pump fuses.
Mechanical and electric fuel pump, design and principle of operation of the device, types of pumps and main malfunctions, operating features
How to check fuel system pressure
Once you know the fuel pump is delivering fuel, a fuel system pressure test can sometimes identify the source of the problem. In the next series of tests, you will use the fuel pressure sensor to check the pressure in the system.
1. Relieve pressure in the fuel system.
If your vehicle's fuel system has a Schrader valve or test port (similar to the air valve on your tires), cover the valve with a shop rag and gently press the valve with a small screwdriver. Use a rag to catch the fuel. This valve is similar to the air valve on your tires. If your fuel system does not have a test port, you can remove the fuel pump fuse and start the engine. He will die in a few seconds due to lack of fuel. Reinstall the fuel pump fuse.
- Connect the fuel pressure sensor to the test port. If you do not have the correct adapter to connect the sensor to the Schrader valve, try removing the valve and connecting the sensor to the fitting; however, if there is no test port, disconnect the fuel line from the rail (this is the line coming from the fuel filter) and connect a T-adapter to the line so you can reconnect the line to the fuel rail and connect the sensor as well.
- Start the engine and let it idle. NOTE: The repair manual for your specific vehicle may include a power-on test. Check your manual if necessary.
- Compare fuel pressure to specifications. Check the pressure reading on the pressure gauge and compare it to the specification in your vehicle's repair manual (if the vehicle does not start, turn the ignition key to the ON position and read the fuel pressure. Compare the reading to the specification in your manual for the pressure switch). The injection system typically produces 15 to 40 pounds per square inch (psi) (100-280 kPa) or more, depending on the application. The reading includes pressure from the fuel pressure regulator (FPR). So if your readings are out of specification, you may have a problem with your FPR, so keep measuring.
NOTE. New modern fuel systems do not use FPR in the injection system; rather, they vary the voltage at the pump or use an internal pump valve to regulate system pressure.
A. What to do if the pressure is correct
- With the fuel pressure sensor still connected and the engine idling, disconnect the vacuum line from the fuel pressure regulator (FPR - the small metal cylinder that connects to the fuel rail).
- Make sure the vacuum line is completely dry. If you find traces of fuel inside the hose, it is sucking fuel from the pressure regulator because the diaphragm is torn. Replace the fuel pressure regulator.
- Fuel pressure should increase from 3 to 10 psi. Otherwise, check the vacuum line: if there is no vacuum in the line, check that the hose is properly connected and not damaged, and that the vacuum port is not restricted; If there is vacuum in the line, but the pressure does not increase when you disconnect the vacuum hose, replace the fuel pressure regulator. For best results, perform the test described in the next section, Testing FPR with a Vacuum Pump.
- Stop the engine and wait at least 5 minutes. Compare the pressure reading with the specification (for pressure holding) in the repair manual. If the pressure drops below the specified value within five minutes, you may have detected a leak somewhere: check the fuel lines, fuel pump, injector or pressure regulator for leaks.
- What to do if your blood pressure is low
- Place a rag over the fuel return line.
- Pinch the hose using suitable pliers to block the flow.
- Watch the pressure gauge; If the pressure remains low, the fuel pump is not getting enough voltage or the pump is worn out. However, if the pressure increases, replace the FPR.
- What to do if your blood pressure is high
- First, perform the test described in the next section, “How to Test FPR with a Vacuum Pump.”
- Then turn off the engine.
- Disconnect the fuel return line.
- Blow through the return line to ensure it is not blocked. If the return line is blocked, find where it is.
NOTE. The video below provides an idea of how to check the voltage and ground at the fuel pump electrical connector.
Signs of a malfunctioning gasoline compressor.
The first indicator of pump dysfunction is improper operation of the car engine. If the car is unstable in motion and begins to randomly pull out or brake, the fuel compressor is most likely faulty. Also, improper operation of the pump may be indicated by uncharacteristic sounds during vehicle operation and deterioration in vehicle acceleration. When functioning correctly, a gasoline compressor operates almost silently. Otherwise, it becomes necessary to diagnose the device. If during operation of a mechanical analogue leaks of working fluid are detected, it also becomes necessary to check the fuel system component.
We are looking for fuel system faults.
To determine whether the pump is faulty, it is necessary to recall the main components of the fuel system. The system includes: a tank, a fuel compressor, a filter element, fuel lines, an injector and a pressure controller. A malfunction of one of the above components inevitably leads to a loss of pressure in the fuel system. Let's look at the most common fuel system faults.
Gasoline tank.
Special conductors connect the tank to the atmosphere to prevent deformation of the internal cavity. Due to a breakdown in communication with the atmosphere, the tank may discharge. In this case, low pressure occurs in the fuel system.
Gasoline pump.
Due to a malfunction of the element, it can change the pressure in the system. There may be several reasons:
- The compressor develops insufficient pressure. Subsequently, the pressure in the fuel system decreases.
- The pump valve does not hold pressure, resulting in a rapid drop in pressure in the system after the starter is turned off.
- Clogged gasoline pump filter. As a result, the fuel pump does not pump or its productivity is significantly reduced.
Filter element.
If the element is clogged, the fuel conductors do not allow enough gasoline to pass through. In this regard, the pressure in the system decreases. If the filter element breaks through, the injectors quickly become clogged. As a result, the correct function of the fuel system is impaired.
Fuel conductors.
While using the vehicle, the fuel conductors may become pinched. If the supply line is compressed, the pressure may decrease. Accordingly, if the drain conductor is pinched, the pressure in the system will become high. The use of low-quality gasoline can also lead to a decrease in the throughput of the line due to clogging of the conductors with impurities.
Pressure regulator.
If the regulator gets stuck in one of the positions, the pressure in the system can be changed. If the regulator is held open, the pressure in the system will decrease. Otherwise, increase.
How to check the operation of the fuel pump?
Why the fuel pump on the VAZ-2114 does not pump, and what to do
First, you should check the fuse. To do this, check the instructions for its location. Next, you should check the voltage at the pump. Before doing this, be sure to check if everything is in order with the battery. The voltage at the fuel pump terminal must be checked using a multimeter or tester. The instruction manual always indicates the required voltage.
Using a tester, check the voltage supply to the fuse. Often this is where the electrical circuit breaks.
If the search does not yield results, then the voltage should be checked on the contacts themselves. All contacts must be in place and connected to ground. A broken contact or its oxidation leads to failure of the fuel pump system. If no broken contacts are detected, but the voltage drops by more than 1 volt, then the problem is in the wiring or oxidation of the contacts. There should be no short circuit in the wiring.
If, after checking the voltage, contacts and fuse, you do not find any problems, then the problem lies in the fuel pump itself. In this case, the fuel pump will most likely require replacement. In practice, it most often turns out that replacement is a last resort. First, you should try to restore and test the fuel pump again.
Before you check the fuel pump, you need to remember that, as mentioned above, pressure is the most important characteristic of the fuel pump, so it is worth measuring its level.
How to check the pressure in the fuel rail?
You will need a pressure gauge that measures pressure in the range from 7 to 10 atmospheres. If you choose a pressure gauge with a large margin, you risk getting less accurate measurement results. Specialized stores sell a kit for measuring pressure, but you can also design your own device.
If you want to assemble the device yourself, you will also need a hose with an internal diameter of 9 millimeters. You will also need plumbing tow, with which you can seal the connection between the pressure gauge and the tube. All parts are connected and tightened using a clamp. You will also need a car spool. Next you need to perform a series of actions:
- Place the car on a level surface that is prevented from rolling, turn off the ignition and open the hood.
- Check that the injection nozzles have access to the fuel rail.
- Find the fuel pressure plug and remove it. Then you should unscrew the nipple using the spool.
- Prepare an empty container (a regular bucket will do) and a clean rag. This is necessary to collect residual fuel, which under pressure can splash out in different directions. Therefore, take care of the safety of your skin (especially your face and eyes).
- Connect the device to the fitting and begin checking the mechanism.
Checking the pressure in the fuel rail should occur in four operating modes of the power unit:
- when the ignition is on;
- at idle engine speed;
- code the fuel pressure regulator tube is reset;
- when the drain tube is compressed.
Fuel rail pressure measurement results
The results may vary slightly for different car models, but in general they should be as follows:
- when the ignition is turned on, the pressure must be at least 3 atmospheres,
- at idle engine speed - at least 2.5 atmospheres,
- when the pressure regulator tube is reset - at least 3.3 atmospheres,
- when squeezing the drain tube - at least 7 atmospheres.
Fuel rail pressure fluctuates slightly during preparation. When you press the pedal, it suddenly takes on a value of 3 atmospheres; when you release the pedal, it drops to 2.5 atmospheres. When fuel enters the fuel system, turn off the ignition and begin observing the pressure gauge. The pressure in this case should drop to 0.7 bar and remain unchanged.
If the pressure drops to zero, there may be a problem with the fuel pressure regulator. In this case, the regulator must be replaced immediately. The cause could also be the fuel pump check valve.
It is necessary to observe the behavior of the pressure gauge even at 3,000 engine speeds. A drop in pressure will indicate a faulty fuel pump. Sometimes the fuel pump cannot reach the required pressure for a long time. In this case, the problem lies in a clogged fuel filter, which needs to be replaced, or in a dirty fuel pump mesh (read more about where the fuel filter is located).
If the above methods do not reveal a malfunction of the fuel pump, you will have to diagnose other units (DPZD, IAC, mass air flow sensor, compression in the engine and some other indicators and parts).