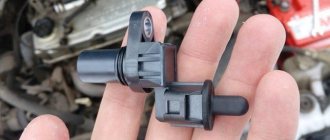
The throttle position sensor on a Lada Priora car is necessary to determine the required amount of fuel depending on how open the throttle is. A signal is sent to the ECU and at this moment it determines how much fuel to supply to the injectors.
The TPS on the Priora is located in the same place as in all similar cars of the front-wheel drive VAZ family - on the throttle assembly in close proximity to the idle air control.
In order to replace this sensor, you will need very few tools, namely:
- short and regular Phillips screwdrivers
- Magnetic handle is preferable
Photo report on repairs
It is advisable, before any repairs related to the electrical equipment of the car, to disconnect the battery, for which it is enough to remove the negative terminal.
After this, slightly bending the latch of the plug lock, disconnect it from the throttle position sensor:
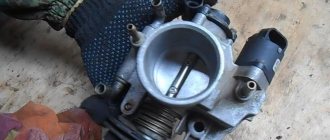
Then unscrew the two screws that secure the sensor itself to the throttle. Everything is clearly shown in the photo below:
And we can easily remove it after both screws are unscrewed:
The price of a new TPS for Priora ranges from 300 to 600 rubles, depending on the manufacturer. It is advisable to install one that matches the catalog number on the old factory sensor.
When installing, pay attention to the foam ring, which is clearly visible in the photo above - it should be without damage. We put everything in place and connect the wires that were removed.
The injection engine control system consists of a mass of interconnected sensors and detectors. Each of them regularly transmits data to the electronic control unit, and it already makes a decision on how much fuel to supply to the combustion chambers, how to adjust the ignition timing at a specific moment, what gear to engage in the automatic transmission and how to more rationally distribute torque among the axles and wheels if the car is all-wheel drive. We have gone far because today we are interested in one tiny sensor, without which the operation of a gasoline injection engine would be impossible. This is the throttle position sensor.
Content:
Signs of a faulty TPS on a Priora: how to determine if the sensor is broken
Characteristic signs that the TPS on the Priora is failing are the following manifestations:
- drop in engine power;
- increased fuel consumption;
- the occurrence of jerks when accelerating the car;
- decrease in dynamics;
- problematic engine starting (especially when cold);
- possible engine detonation;
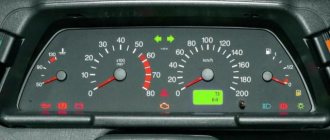
- floating speed - if the sensor shows at idle that the damper is open, then the ECU will try to reduce the speed, which will lead to a process of changes;
- delayed engine response to changes in throttle position.
The Check Engine indicator is displayed only when there is no signal from the TPS. The corresponding error codes are displayed on the Priora's on-board computer:
- P0122 - the signal from the TPS is low (i.e. weak).
- P0123 - the signal level from the TPS is high.
The signs described above only indicate that the problem is with the sensor circuit, so it remains to find out what exactly is faulty and how the breakdown can be repaired.
What is a throttle position sensor
Each of the sensors in the engine control system is a simple detector that is designed to perform one specific task. In our case, the position sensor determines the angle of movement of the throttle valve, which in turn repeats the movement of the accelerator pedal. For all its apparent simplicity, the sensor is not so simple, since it may have a simple contact design, or it may have a more complex and precise operating mechanism. More specifically, the sensors can be
- Contactless.
- Film resistive.
Resistive sensors are much simpler in design, cheaper, but also fail more often. They are almost an ordinary variable resistor with three contacts.
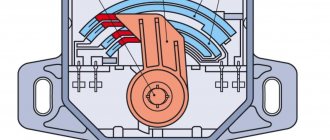
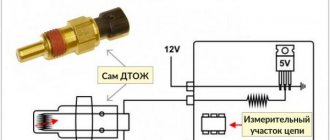
Operating principle of the sensor
To make it easier to understand the scheme of its operation, let’s imagine it this way, as a variable resistor mounted on the throttle valve axis with a moving part. Voltage is constantly supplied to the sensor, and depending on the position of the damper, the position of the sensor changes, and, consequently, its resistance also changes. It sends an impulse to the electronic control unit, which in turn, based on sensor readings, builds a recipe for supplying fuel to the combustion chamber - the amount of fuel, the amount of air, the ignition timing, the opening or closing of the exhaust gas recirculation valve. In short, based on the readings of this small sensor, the entire engine control plan for the next few seconds is prepared.
Regardless of the type of sensor, the voltage limit for its operation ranges from 0.5-5 volts, depending on the engine model. Injection cars VAZ 2110, 2112, Priora, Kalina use a working range from 0.7 to 4 volts. That is, when the throttle valve is completely closed, the pulse at the sensor output is 0.7 volts, and when it is fully open, it is 4 volts. Other cars may have different voltage characteristics, but the essence of the sensor’s operation does not change.
Malfunction of the Priora crankshaft sensor (DC)
Throttle position sensor: how to check, replace, adjust
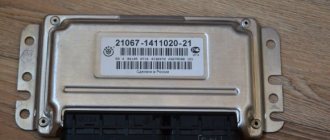
Since 2004, the Russian manufacturer VAZ has completely abandoned the production of cars with engines operating with a carburetor system. A switch was made to an electronic engine control system, or ECM (Electronic Engine Control System).
In common parlance, drivers call this option a car with an injector. Although this is not entirely true. The injector, to be precise, in this system is a fuel injection nozzle, and the basis of control here is the ECU (Electronic Control Unit).
Simply put, a computer and sensors, including the crankshaft.
About how the esud system works, details
So, the modern “Priora” is no longer a “penny” of the 70s, or even a “nine” of the 90s. This is a completely modern car, most of the functions and malfunctions of which are controlled and monitored by a computer. Under the control of various ECUs are:
- engine control;
- power steering;
- anti-theft system;
- anti-lock wheels;
- electrical package;
- climate control.
It is clear that the most complex and delicate device is engine control. It is this system that is connected into a single organism by the largest number of actuators and sensors. Any electronic system of a car consists of two groups.
- Sensors
- Actuators (AM).
IMs carry out computer commands. And the computer itself issues these commands, focusing on tables stored in long-term memory and data received from sensors. And it so happens that it is the crankshaft position sensor that plays a key role in this.
Purpose and principle of operation of the crankshaft sensor
Like most Priora systems, the crankshaft sensor is based on the Hall effect. The current is applied to a magnetized rod containing a semiconductor, which dramatically changes conductivity when passing near the metal. That is why the DC is directed by the working part to the generator drive pulley. Evenly spaced teeth run along the rim of the pulley. And only two are missing. The secret is that the pulley is installed in only one position relative to the crankshaft sensor, and it corresponds to TDC (Top Dead Center) of the first cylinder of the engine. That is, according to the DC data, the computer determines that it is time to open the injectors and supply a spark to the cylinders.
Malfunctions and their symptoms in the Priora crankshaft sensor
Upon careful reading of the previous part, it will become clear that only the Priora DC informs the on-board ECU that the crankshaft has begun to rotate and it is time to start the engine. Therefore, the main and only, in general, sign is the engine not starting. So, the starter turns, but there is no ignition. For an “injection” engine, you should first of all think about the crankshaft sensor.
Attention! However, it is always necessary to remember that only Priora computer diagnostics will provide the most accurate and reliable information! Only it will show a complete picture of the malfunction. DC failure can be either mechanical damage or internal failure of the main semiconductor. In any case, the engine stops starting
In any case, the engine stops starting
DC failure can be either mechanical damage or internal failure of the main semiconductor. In any case, the engine stops starting.
You just need to keep in mind that a wire breakage of the Priora crankshaft sensor connector has similar symptoms. But this is easily checked by a tester.
The probes inserted into the connector, with the ignition on and the wires in good condition, should produce a voltage of about 4 volts. If not, there is a problem with the wiring.
Replacement D.K
Replacing a faulty crankshaft sensor is the easiest way. It is located in a special slot to the right of the generator drive pulley. It is secured with just one 10mm bolt. Therefore, to replace it in the event of a malfunction, you only need one key of this number. You need to remove the connector, unscrew the bolt and pull out the faulty unit. Insert new one and tighten. Connect the connector. That's all the repairs.
The video clearly shows the replacement of a faulty DC on injection engines:
Maintenance and replacement of TPS
The practice of servicing and replacing the sensor does not change either. And all this is necessary when the diagnostic computer shows that the sensor is giving deliberately incorrect readings. Nobody repairs them; even expensive sensors are tried to be replaced entirely. Their job is too important to save on them. A faulty throttle angle sensor can manifest itself in a variety of ways. Since it works in all engine operating modes, it is not possible to immediately determine its malfunction by eye. In any case, when the first signs appear, which may include:
- instability of idle speed;
- failures when changing the speed;
- high fuel consumption;
- uneven acceleration;
- hard start,
and also in some cases when the emergency warning lamp is triggered, it would be useful to check the functionality of the sensor.
How to clean the throttle valve on a Priora yourself
Throttle position sensor lada kalina
To carry out such a procedure, it is not at all necessary to go to the service. Everything can be done independently. Cleaning the throttle valve on a Priora is not a complicated procedure, and it will take a little time to do everything - about half an hour. It should be warned that before starting work directly, you need to let the engine cool down - this is a matter of your own safety.
In order to clean the Priora throttle valve, you need a minimum set:
- set of wrenches;
- screwdrivers - flat and Phillips;
- cleaning agent - it’s difficult to name a specific one, their choice today is quite wide.
However, first of all, we need to get to this node. We put the car in neutral, not forgetting to apply the parking brake. Next, remove the plastic engine cover and the cap from the expansion tank. After this, loosen the clamps holding the air pipe and carefully remove it. While performing these operations, you can at the same time inspect the engine and engine compartment for possible leaks.
Next, remove the damper heating pipes, having first loosened the clamps. To prevent dirt from getting inside, you can plug the pipes with a rag. After this, it is advisable to disconnect the hose used to ventilate the fuel tank. Now all that remains is to unscrew the bolt, remove the throttle cable and remove the damper itself.
The first stage of work is completed, and you can proceed directly to cleaning. Using a pre-purchased product, thoroughly wash the damper and all its channels. In the latter case, you can use a knitting needle with a rag wrapped around its end. Remove and wash the idle speed sensor. To do this, you will need to unscrew 2 bolts. At the same time, we carry out visual diagnostics for various kinds of visible defects. The work is considered complete if no traces of dirt are visible on a clean rag that you run through the channels.
Now all we have to do is replace the gasket and put the damper in place. All work here is carried out in reverse order. I would like to warn you that everything needs to be done very carefully so as not to accidentally drop anything inside the collector. As you can see, there is really nothing complicated in this procedure. Everything can be done on your own with minimal effort and time.
After the damper is put in place, you should check how effective this procedure was
In particular, pay attention to starting the engine - it should start, as they say, with half a turn. There should not be any extraneous sounds. Next, try the car on the move, switching from high to low gear, or even better, to “neutral”
A normal decrease in speed will be the main sign that everything is done correctly
Next, try the car on the move, switching from high to low gear, or even better, to “neutral”. A normal decrease in speed will be the main sign that everything is done correctly.
Checking the position sensor
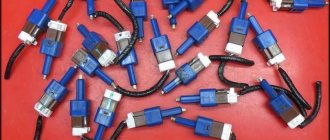
Before you check the throttle position sensor on any car, you need to estimate its average mileage. As a rule, contact sensors die already at 70-80 thousand km, while non-contact sensors last much longer. Therefore, if the sensor is old, it is better to immediately put it on the shelf and replace it with a new one. This pleasure is not so expensive, since back in 2015 you can buy a sensor for a Priora or dozens for 300 rubles. It will be either a Moscow or Kursk device. A sensor with the inscription “GM Made in Russia” is already offered for 800-900 rubles. Frankly speaking, there is not much difference, judging by the reviews.
How to remove and check the sensor?
Throttle position sensor VAZ 2114 price
Access from above to the Priora DD is difficult due to the intake module located above it. The easiest way to get to the sensor is from below, first removing the engine protection or at least unscrewing and folding its front part. When working from above, you will have to do everything by touch. In any case, before starting work, it is necessary to disconnect the ground wire attached to the “negative” terminal from the battery.
To remove the crankcase protection, you need to:
- unscrew 5 nuts with a 10mm head;
- unscrew the 2 19 nuts installed on the back of the shield;
- remove protection.
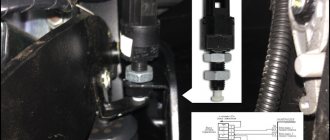
- by pressing the metal latch of the DD connector, disconnect the block of wires going to the controller;
- using a 13mm wrench, loosen the bolt securing the sensor;
- Unscrew the bolt and remove it from the threaded hole, removing the sensor.
Photo of dismantling the knock sensor
- We connect a multimeter to the DD terminals. We set the device to voltmeter mode, choosing a measurement limit of up to 200 mV.
- We take a metal object - pliers or a bolt - and lightly tap it on the DD.
When you tap on a working sensor, the voltmeter will show voltage surges. A faulty DD will not react in any way. A more accurate diagnosis of a removed sensor can only be done using a special stand.
In the photo - diagnostics of the knock sensor
Installation of a new DD is carried out in the reverse order of dismantling. Experts recommend installing a similar Bosch instead of the “native” one. Before going to the store for a new sensor, you should write down the markings of the removed sensor. The bolt securing it to 13 must be tightened with a slight force - 10.4–24.2 Nm (1.1–2.5 kgf). Tightening too tightly will affect the operation of the sensor.
Verification technology
To check the sensor, you first need to determine whether it is direct or reverse. So, on Daewoo Lanos cars, almost the same sensor is installed as on VAZs, only they work in different directions. That is, in the closed position of the damper it can produce 5 volts, or maybe 0.5 if the graphite contact tracks are turned in the other direction. Be that as it may, to check the sensor you need a multimeter and a couple of minutes of free time.
When connecting a multimeter to the sensor, it should show the minimum or maximum voltage, depending on the engine, and when rotating the throttle, change the voltage value smoothly and without jerking. If there is even the slightest dip in the readings in any range, the contact tracks have worn out and such a sensor must be replaced. That's all you need to know so that the throttle position sensor does not ruin our lives. Happy travels to everyone!
The degree of importance of every part of the car, be it an expensive steering mechanism or a cheap throttle position sensor of a Priora car, is difficult to overestimate, because the operation of the entire mechanism depends on the coordinated work of the parts.
Removing and cleaning the throttle assembly
Throttle position sensor
Many owners of carburetor cars are familiar with such a procedure as flushing the carburetor. But the owners of injection cars, including Kalina, think that if the car has fuel injection, then there is no need to clean or rinse anything. In fact, the Kalina injector throttle assembly also needs regular cleaning. Of course, you shouldn’t do this constantly every 10,000 km, but I would recommend doing this procedure once every 50 thousand km.
Before removing the throttle body from the vehicle, first familiarize yourself with the accessories:
List of necessary tools for removing the assembly
- Flathead and Phillips screwdrivers
- Head for 13
- Extension cord short
- Ratchet or crank
- Pliers (in some cases)
Before starting repairs, disconnect the battery by removing the negative terminal, since you will then have to disconnect the sensor plugs, and the turned on power will be of no use.
Instructions for removing the throttle assembly from Kalina 1.6 8 valves
The first step is to disconnect the inlet pipe that runs from the air filter to the unit itself. Loosen the clamp as shown in the photo below:
You also need to loosen the thin hose that extends from the inlet. It is better to do this from the side of the valve cover:
Then we disconnect the thick pipe and this thin hose and move them to the side so that they do not interfere with us in the future:
Then you need to unscrew all the hose clamps that are connected to the throttle assembly. Three of them are at the top:
And the fourth is at the bottom of the throttle; the photo below clearly shows its location:
If you have problems removing the hoses, you can use pliers. Carefully grasp the seat of the hose and twist it along the tube. Like this, as shown in the picture:
Now we disconnect the plugs from the sensors, which are located on the inner side of the unit. The result should look like this:
There is very little left: unscrew the two nuts securing the unit to the manifold. The most convenient way to do this is with a ratchet with an extension - for the lower nut, and for the upper one you can do without it.
And remove this entire structure from the studs:
All that remains is to free yourself from the throttle cable. To do this, take a flat-head screwdriver and pry up the metal bracket on one side, approximately as shown in the photo below:
Then we pry this latch with our finger and take it out:
Then we take the throttle cable with our hand and lower it to the very bottom so that it is opposite the removal hole:
And on the reverse side, pressing a little on the holder, move the cable to the side and calmly remove it:
That's all ready - now the throttle assembly can be removed completely, because there are no more obstacles to this:
Cleaning or flushing the Kalina throttle
After my mileage, just under 50,000 km, the condition inside was quite normal, I did not find any strong deposits or soot. There was only a little dark coating, something like soot on the walls:
I didn’t wash it, but just took a dry, clean rag and thoroughly wiped everything inside to a factory shine. If you decide to do a full flush, first unscrew the sensors from the assembly. Black plaque also accumulates in their seats, which will need to be removed.
It is convenient to clean the internal cavity with an old toothbrush. After carrying out all the procedures, we wipe everything dry with a napkin or a clean rag and air it inside so that not a single grain of sand or dust remains.
We carry out the installation in the reverse order, connecting all the wires and hoses in place. The result of the work done showed that it was not in vain that I tried and experimented with my Kalina. Now, when starting the engine, the engine began to “shoot” as it should be on a new car.
ladakalinablog.ru
TPS functions
The throttle valve is an element included in the engine intake system. Let us immediately note that the design of the throttle assembly is the same for both the 8-valve engine and the 16-valve engine. The meaning of its activity is to regulate the air entering the engine. The throttle position sensor transmits information to the manifold about the current state of the bypass valve. There are two types of sensors - magnetic (non-contact) and film. Its design is similar to an air valve, in which, when open, the system pressure and atmospheric pressure are identical; when closed, the pressure becomes close to vacuum.
The sensor includes a variable and constant resistor with a resistance of up to 8 ohms. The output voltage changes depending on how the damper is positioned. The system has control, thanks to which the fuel supply is regulated.
When the sensor is faulty and the readings are distorted, the fuel supply is disrupted, engine operation is disrupted, and in some cases the engine fails.
In addition, a working sensor will protect the gearbox and ignition switch.
What can cause sensor failure?
There is nothing eternal in this world. Usually the TPS fails for natural reasons; the base along which the slide moves is simply worn out. Sometimes incorrect operation of the sensor is caused by the fact that the movable core fails. And damage to one of the tips entails the appearance of a number of scuffs, which can cause damage to the remaining parts. Ultimately, this can cause reduced or no contact between the slider and the resistive layer.
Signs of a car going into emergency mode:
- if at the moment of idling the revolutions “float”;
- if the engine stops when the pedal is abruptly released;
- if the speed hangs in the same range even when switching to neutral gear;
- if the Check engine light on the dashboard comes on.
TPS problems and their diagnosis
As you know, eternal parts for cars have not yet been invented. And the breakdown of the TPS can be foreseen; for this you need to inquire about the possible reasons for the failure of this part. Here are the main ones:
- Abrasion of the sprayed base layer, which serves to move the slider (the result is incorrect TPS readings).
- Failure of the movable type core (the result is deterioration of the contacts between the slider and the resistive layer).
How can you figure out problems with this sensor yourself? To do this, you can independently diagnose the operation of your diagnostics:
- Listen to the VAZ-2110 engine idling: the breakdown is obvious if you notice that its speed is in a “floating” state;
- a malfunction is present if the engine stops after this action.
- There is a problem with the TPS if the car starts to move jerkily, which indicates an incorrect supply of fuel to the system.
Experts say that most often the sensor fails when the resistive track is heavily contaminated or is completely broken. To verify the opposite, you need to check the working condition of the TPS.
How to check the throttle
Checking the throttle is a simple process. It is enough to have a multimeter or just a voltmeter. Adjustment can take place in your garage. To do this, the corrugated tube responsible for the air supply is disconnected, thoroughly washed with alcohol and wiped with a soft cloth. The same procedure is done with the intake manifold and the damper itself.
Inspect everything carefully. If there is no mechanical damage, the sensor is adjusted. Use a wrench to loosen the screws. The damper rises and drops sharply until it stops; If you don't hear the impact, you need to repeat it again. The screws are loosened until the product finishes “biting.” And only after that the fasteners are fixed with nuts. Then the TPS bolts are unscrewed and the housing is rotated, the sensor is set so that the voltage changes only when the damper is opened. Everything returns to its place, the bolts are tightened, the adjustment is complete.
Which sensor is better - non-contact or film?
If the sensor breaks down, it is best to buy a new one. The main thing is to be able to make the right decision. You must choose a quality product and try not to be seduced by cheap Chinese counterfeits. In addition, it is better to buy a contactless sensor; it is more reliable than a film sensor and is inexpensive.
Having repaired or purchased a high-quality TPS, you can use your car for several more years, forgetting about this problem.