Way out
What to do if the car door does not open from the inside or outside? In fact, there are not so many solutions.
- Call a qualified service technician to open the door or lock. Considering current prices, just one call will cost the owner half the average salary. So it's not fun for everyone. This service can only be used in extreme situations;
- Remove the door hinges and unscrew the lock fastening: this option is more suitable when the front doors are jammed. The bottom line is this: if the door cannot be opened either from the outside or from the inside, then you need to use a Phillips screwdriver to unscrew the two hinges of the rear door that follows the “problem” door. In this way we will provide access to the rear wall of the lock mount. Here it’s a matter of chance, you can unscrew two bolts the first time, or spend 10-15 minutes doing this. After unscrewing the bolts, disconnect the rear wall of the door lock from the body. All that remains is to make an effort to pull back the door, and everything is ready;
- Next, it is necessary to remove the mechanism itself and do diagnostics, look for the cause, but this is “a completely different story”;
- Unscrew the rubber seals and get to the lock hook: the solution to the situation is very good, both for the domestic and foreign automobile industry. No matter which door is jammed, you need to remove the upper rubber seal between the glass and the outside of the door. Before us will be a space one centimeter wide, which must be used with maximum efficiency. The idea is to find a piece of wire, bend it at the end, creating a kind of small hook.
- Lower it into the space created in the area of the door lock, and pull the hook from the inside. I’ll say right away that the task is not easy and requires half an hour of practice. As a rule, you can open the lock 10-15 times. And then the standard procedure for finding the cause.
What to do if the rear doors are jammed?
Depending on the design of the car, try to reach from the luggage compartment side to the lock mounting with a Phillips screwdriver. In this case, the longer the screwdriver handle, the better. Be prepared for the fact that you will have to completely immerse yourself in the trunk and carry out work.
There are known cases of VAZ and GAZ vehicles being opened, but there are no cases of foreign cars. The procedure will take more than an hour. It is easier to get to the mount in a car with a station wagon or hatchback, since the distance is minimal, and therefore in the field of view, unlike a sedan.
Door assembly
The door assembly must be done carefully. The plastic rivets that hold the VAZ skin in place are very fragile. They often break during door disassembly. Therefore, it is better to replace them with new ones. Otherwise, the casing will fly off while driving or begin to rattle when listening to music loudly.
To replace the rivets you will need a flathead screwdriver. Pull the dowel out of the door hole. Then insert a new rivet into the panel. There is no need to store the old kit. These parts are disposable.
After collecting the cladding, carefully press it against the door. Don't press too hard. Align all the dowels and rivets. Secure the cladding with light pressure. Tighten the screws and put the speakers in place.
Now you know what to do if the front door of a VAZ 2110 does not open from the inside or outside. The cost of repair will be no more than 300 rubles, excluding new screwdrivers. The work will take 30 minutes. Anyone can remove the door and install the tip, even without specialized skills. At a service station they will charge 500 rubles for such a service.
Autopsy with inside
To open the door from the inside you need a screwdriver, wire, and patience. The algorithm is as follows:
How to replace the door trim on a VAZ 2170-VAZ 2172?
Removal: 1) At the very beginning of the operation, the trim from the door opening handle will need to be removed, the trim itself is fastened with one screw, it is also indicated by an arrow in the photo below for clarity, as soon as you unscrew this screw, carefully pry up the trim with a sharp knife or a thin screwdriver (see small photo) and then remove it and put it aside so as not to interfere.
2) Now proceed to removing the inner door handle, to do this, unscrew the two internal screws that secure it (By the way, your cover may still cover these screws, so remove it) and then remove the inner handle from the door trim; when the handle is removed, squeeze Use your hand to secure the wire block to the power window buttons and then disconnect the block itself (see the small photo below, where the wire block is indicated by an arrow) and thereby remove the inner handle completely from the trim.
Note! Before performing this procedure, we recommend that you disconnect the minus terminal from the battery, this especially applies to you if you are changing the casing in rainy weather, because if moisture gets on the electronics (In our case, on the wire block), a short circuit will occur due to this maybe because of which the wiring will fail, for more details on how to remove the minus terminal from the battery, read the article entitled: “Replacing the battery”, everything is written in the first paragraph!
3) But not all cars will have electric windows on the trim, for example, if we take the rear trim, then on most cars of the Priora family (depending on the configuration) electric windows are not installed, but mechanical windows are installed and the handle is still present at the back, so it ( If you have one) you will have to remove it, this is done as follows: use a screwdriver to press the latch away from the handle itself (see photo 1) and then the latch is brought to the top (see photo 2) and as soon as the latch is removed, you can remove the handle itself from socket (The socket is a ring that will be behind the handle, in general, as soon as you remove the handle you will understand what we are talking about).
4) Well, after all the operations performed (This only applies to the trim that goes to the rear doors, but if you remove the front door, then also read point 4 and don’t forget about point 5) you can disconnect the trim from the door, for this you can use a screwdriver (We recommend this do, because the paint can be scratched) insulating tape is wound and with this screwdriver the trim is picked up in all places where it is fastened to the door with clamps (The places where the clips that secure the trim to the door are indicated by arrows in both photos below, but only in the photo numbered 1 the front door trim is shown, and photo number 2 shows the rear door trim).
Note! Don’t forget to also unscrew the door lock button, it turns out counterclockwise and also has a thread inside, for clarity so that you understand which button we are talking about, it was indicated in the photo just below with an arrow!
5) In conclusion, let’s point out the fact that the rear and front trim are attached almost identically, but only in order to remove the front trim, you will also have to unscrew the lower screws (Indicated by arrows) and as soon as they are unscrewed, pry up the trim with a screwdriver and then remove it completely from the car.
Installation: The new casing is installed in its place in the reverse order of removal, all broken fasteners are replaced with new ones (This is the case if you did not change the casing, but removed it to access other parts).
Signaling issues
The “root” of door blocking is often the incorrect operation of the alarm system. The key fob probably didn't work. This may happen due to low batteries. You can try changing the batteries on the remote control if the driver's door in a vehicle does not open. This could be a software glitch. In this case, sometimes emergency mode helps. Does the indicator indicate open doors? The right path to the service station is that the doors are broken.
Failed Hacking Attempt
Amateur thieves who decide to steal a car and fail to deal with the lock leave behind a lot of problems for the motorist. The first step when the driver's door does not open is to inspect the lock structure. When using only the key fob to open the doors, you can block them to avoid a repetition of the unpleasant incident in the future. The locks can be fixed; there is no need to change them - this will add additional costs. What else could lead to a depressing situation?
Seat belt problems
Sometimes it doesn’t even occur to you why the driver’s door does not open, and the reason may be trivial: the seat was not fully retracted. An oversight made by the owner of the vehicle himself leads to a sad event. The door structure is blocked from the inside. When placing the belt over the locking mechanism, there is a risk of jamming the entire system.
If the driver's door does not open from the inside, to free yourself from “car captivity” you need to push the seat belt away from the inside of the car. It must be inserted while simultaneously pulling the door handle. In this case, it seems that the driver is trying to open the door, but when the belt is removed, it will begin to function perfectly.
Causes of problems opening the door
The first step is to understand the causes of the breakdown.
Usually the prerequisites appear long before the “hour X”. The driver just doesn't notice them. At first, the malfunction is manifested by a single idling of the handle. Why is it difficult to open the door handle on a VAZ 2110 from the inside:
- the plastic rod end is worn out;
- the lock got wet after washing;
- a foreign object got inside;
- the door is frozen;
- The battery died when the child lock was on.
The first reason is most common. The VAZ rod end is made of plastic. Over time, the material dries out and becomes brittle. The tip breaks during daily use. The driver's door lock may become jammed.
To prevent problems in winter, after washing your car, do not immediately drive outside from the garage. Wait until the doors dry. Additionally, wipe the locks with a dry cloth and treat them with an antifreeze agent. If it is not possible to stay longer in the box, drive the car into a warm garage or indoor parking. The latter are available in all major shopping centers.
About mechanical problems
A case where the driver's door closes and does not open, although you can safely exit through the passenger seats, indicates the appearance of mechanical defects within the structure. Common “illnesses” include broken rods and broken cables synchronizing the handles. It is impossible to do without dismantling the panel from the inner surface of the door system and without the experience of a locksmith.
Algorithm of actions in case of jamming with central locking
Most often, the driver's door with central locking does not open on frosty days. The following problem is observed: the levers on the key fob open, you can only enter from the passenger side, or all the doors except the driver's open. It happens, on the contrary, all the doors are jammed, the driver's door can be opened with the key. All this could be a sign of a blown fuse: its electrical circuit stops working. In such a situation, there can be a huge number of reasons for this, including faulty wiring, broken wires; a specialist will be able to accurately determine them after diagnosis. It is worth calling a specialist to unlock it. What advice can you give to a car owner?
- From time to time it is necessary to open the doors with a key. This will help prevent the cylinder from sticking and will keep the locking mechanism in working order.
- There is no need to try to warm the locks using a hairdryer or boiling water.
All doors are locked
If it is impossible to get inside, you have to act decisively; the damage will be calculated later. An effective method is using two wooden rulers or thin metal plates. If the driver's door does not open, the reasons can be varied, and in the absence of time to find an answer to this question, drastic measures have to be taken: rulers must be inserted into the crack between the seal and the roof. You will need a wire that needs to be bent to form a loop at the end. She pushes herself inside the cabin. The task of the loop is to hook the button and pull it towards you. Didn't give in? Calling a specialist is the only option. How else can you get to the steering wheel?
The rear doors do not open - the child lock is “activated”
Protection against opening the rear door from the passenger compartment is available on every car. It's called child protection.
On the Lada Granta, in my opinion, this function is implemented better than on previous cars of the VAZ family. Then the child could actually accidentally pull the lamb in the door, but now, to activate it, you need to use a flat object, but more on that below.
Activating the child protection function
- There is a special plastic lever in the door body that must be turned to the right (clockwise) - then the door will not be able to open from the passenger compartment.
- To return everything back, you need to open the door from the street (external handle) and return the lever to its original position.
Another tactic
If a person is far from a service station, and there is no opportunity to invite a specialist, it is recommended to try such manipulations.
- If there are problems with the front doors, you will need to remove the door hinges and unscrew the lock fasteners. A square screwdriver enters the “battle” with a jammed lock. It will help to unscrew the two hinges of the rear door, located behind the front door in one row. The measure helps to get to the lock fastening. The two bolts are disconnected and the locking mechanism wall is removed. All that remains is to pull back the door structure.
- For interior work you will need the same tool. You can remove the door trim, handles, remove the electrical wiring for now and lift the glass. This way provides access to the lock. Again, a wire with a loop at the end will come in handy. You need to get to the “heart” of the device and pull the hook. It is better to use a flashlight to carry out the procedure efficiently.
Instructions for removing the cladding on Kalina
The first three operations are performed the same way for all Lada Kalina doors. The exception is the trunk hatches of hatchback and station wagon cars, where the disassembly procedure is much simpler. Here's what to do:
- By hand, unscrew and pull out the cap of the latch designed to lock the door lock from the inside.
- Using a Phillips screwdriver, remove the 4 screws holding the music system speaker.
- Remove the speaker and disconnect the wires from it.
Unscrewing the blocker and acoustics
Advice. The acoustics can be attached either to the door card itself or to the metal door frame. If, after removing the speaker, you observe the first option, then during assembly it is better to redo the fasteners by drilling holes for self-tapping screws. The acoustics should be mounted to the door, not to the upholstery.
Attaching the speaker to the casing is wrong
The further procedure of work differs depending on the location of the door that you are disassembling.
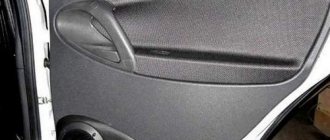
Front passenger door
Here the decorative panel is held on by 8 clips, 2 screws securing the internal handle and two self-tapping screws located under the plastic pocket. The algorithm for dismantling it is as follows:
- Using an awl, carefully pry the edge of the plastic plug hiding the screw in the door handle and remove it. Remove the second screw cover in the same way.
- Remove both handle screws.
- Pull the door opening handle towards you, unscrew the fastening screw and remove the lever. After which you will be able to remove the entire handle.
- Unscrew the 2 screws at the bottom of the door card, under the plastic pocket.
- Take a flat head screwdriver and pry the top right corner of the trim panel to disengage the first tab. Grab the casing with your fingers and release the remaining pistons manually.
- After separating the panel from the door, disconnect the wires coming from the power window button. To do this, pry the connector tab with a screwdriver and pull the block out of the button block. Dismantling of the cladding has been completed.
How to prevent such situations?
"Forewarned is forearmed!"
To prevent difficulties, do not forget about timely lubrication of the locking elements. Fasteners and hinges require close attention. Children should not be allowed to hang on the doors or lean on the body themselves: this leads to their deformation. The slightest misalignment can cause the locking device to jam.
Blocking is caused by poor-quality drying during the washing process, or a sharp decrease in air temperature after the heat. We advise you to constantly monitor the condition of the seals, wipe them from condensation in rain or snowstorms. You can prevent condensation from forming by not immediately closing the doors before leaving the “swallow” in the cold: the advice is to keep them open for a while. It is highly not recommended to use a lighter to “freeze” locks. A good alternative option is a keychain-defrost, a special anti-freeze spray.
Rubber gaskets must be lubricated with silicone grease containing water-repellent substances. Thanks to this technique, a film coating is formed that serves as good protection. In winter, it is better not to leave the “steel horse” in the cold; the best solution would be to use a heated parking lot.
Currently, many car enthusiasts are asking the question: why doesn’t the driver’s door open (despite efforts) on a new or not so Priora? It is worth noting in this regard that all problems mainly arise from the fault of the central locking. The situation is aggravated by the fact that the owners simply do not find the necessary information.
The main signs of a malfunction in the locking system installed by the manufacturer on Priora are as follows:
- the door does not close;
- does not open;
- unlocks on its own.
Moreover, car enthusiasts often complain that it is impossible to open the lock with a key, from a key fob or from the inside.
In reality, in about 90 cases out of a hundred, the culprit of the malfunction is the lock installed directly inside the driver's door.
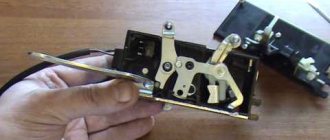
Device
The weakest point of the Priora locking system is the microswitch. The electrical package itself, used on the model in question, is a rather complex device. It is his responsibility to receive the owner’s command to unlock or lock the door. Having received a certain signal, it activates certain electrical networks that supply the drive. In this case, the electrical package can perceive orders in two ways at once:
In the first case, having sensed the order to close, the immobilizer turns off the alarm and energizes the electric drive of the lock, closing or, conversely, opening the contact groups of the microswitch.
Then the latter, all the time the lock is locked, monitors whether an order has been received to open the doors.
Why is everything arranged this way? Everything is simple, because the command in this situation can be received not only from the key fob, but also from the switch if the car owner used the key. This allows the immobilizer, when the security alarm is activated, after detecting a raised blocker, to immediately begin to act according to the alarm protocol.
So, the biggest problem of the Priora is water getting inside the door. As a result, the contact groups of the microswitch quickly oxidize and become overgrown with verdigris, similar to moss. The volume of the working surface increases significantly and the contacts stick together. In addition, the oxides have fairly good conductivity. As a result, the passing tension is perceived as an order to unlock or lock the doors.
It is possible to get rid of such a malfunction only after replacing the blocker, or the microswitch itself.
Other most common problems and ways to eliminate them are described below.
The door does not open in cold weather
Most often this happens after washing a car or driving in the rain, when dampness gives way to negative temperatures. Usually the larva freezes completely in the lock. Sometimes the lubricant in the drive or rod also hardens.
Knowledgeable car owners advise warming up the constipation (for example, with a hairdryer) and then lubricating it with WD-40. Moreover, the procedure must be repeated after each significant wetness of the car.
In addition, it will also help:
- turning on autostart with constant heating of the interior;
- disassembling the door and adjusting the lock components;
- use any silicone-based lubricant.
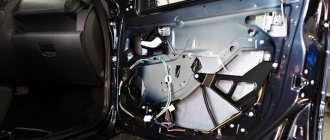
Step-by-step removal of the front door card
To replace the casing, you will need a set of screwdrivers, but it is worth stocking up on spare clips, which are necessary for fastening the casing.
First, for safety reasons, you need to remove the negative terminal from the battery.
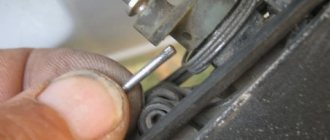
- Unscrew the door lock button until you can remove it completely.
- Use a screwdriver to pry up the screw cap that secures the trim to the door.
- Using a cross-shaped tool, unscrew the screw itself.
- Do the same procedure with the screw located in the armrest recess, as well as its two screws at the bottom of the card.
- Pry the top of the handle with a flat tool to remove it.
- Unscrew the two screws inside the handle that are found under the top trim.
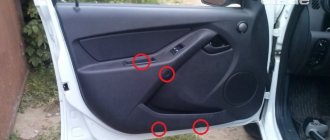
- Once the trim is no longer attached to the door, you need to start removing it from the lower front edge. To gain access to it, just use a flat tool to pry the edge that fits tightly to the metal of the door.
- As you remove the upholstery material, you must disconnect the pins holding it. At such moments you should be extremely careful not to damage them. In total, there are 8-9 pistons (clips) on the Lada Granta door, and they are located along the perimeter of the upholstery fabric, but closer to the edges.
- From the corner, move in both directions at once while removing the card.
- Remove the lock lock rod from the hole.
- Disconnect the exposed block with the power window wires by squeezing the locking element. In cars that do not have power windows, remove the lever seal from the handle hinge.
- Only then can you completely remove the door trim.
If the door does not open with the key fob
First of all, you should make sure that the button itself is working. The battery often runs out.
Further, if the indication goes off after using the key fob, then most likely the wires leading to the lock installed directly in the door have simply frayed.
This, in particular, is also indicated by non-working window regulators.
In such a situation, you will have to disassemble the door (that is, remove the trim from it) and check the integrity of the chains. It will also be necessary to inspect the fuses - they usually blow out from the slightest overload, and their damage leads to failure of the locking system.
Another common factor is a poorly charged battery, because it is from it that all systems installed on the car are powered. In cold weather, as you know, the battery discharges the most. Moreover, if the battery is disconnected for a while, then the immobilizer often starts to work incorrectly.
Sometimes mechanical problems can interfere with opening, but in this case the door cannot be unlocked with anything.
Replacing the door trim on a Priora
Welcome! The door trim is an exclusively decorative thing, besides this, it no longer serves any purpose in cars, thanks to it the metal door inside becomes more beautiful, and it also becomes more pleasant to drive cars because on some trims there are platforms on which you can rest your hand, In addition, in the event of a side impact (as a result of an accident), the human body suffers less, unlike if the car were without trim.
Note! It is most convenient to replace the trim in the garage or on the street, provided that there is a lot of space, because in this case you will have to open the door completely, and to replace this item, you will need to stock up on: A screwdriver, and be sure to have a set of clamps that secure the trim (These clamps can be can be found in any auto store, it’s just that when removing the trim, these latches break and have to be replaced with new ones), and you’ll also need a wrench, because you’ll have to work with the electronics (This is only if you have power windows installed on your door)!