To ensure stable operation of a modern car engine, many different sensors are used to collect information about the operation of a particular system. Based on their data, the electronic control unit adjusts the quality of the fuel mixture, regulates its quantity entering the combustion chambers, determines the desired ignition timing, and turns on and off various additional mechanisms.
In this article we will talk about what the oxygen sensor (lambda probe) of the VAZ-2114 is, consider its design and principle of operation. In addition, we will try to understand the malfunctions of this element and methods for eliminating them.
What is an oxygen sensor
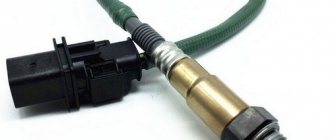
An oxygen sensor is an electromechanical device designed to determine the quantitative oxygen content in exhaust gases. Its use is mandatory for all cars with an environmental class above Euro-2.
Why is it needed? The fact is that modern environmental standards require a car to have a minimum content of harmful compounds in its exhaust. It is possible to achieve their reduction only by forming an ideal (stoichiometric) fuel mixture. It is for these purposes that the oxygen sensor, or, as it is also called, the lambda probe, serves. The electronic control unit, having received information about the oxygen content in the exhaust, increases or decreases the amount of air to form the mixture.
How does it work?
This element features a ceramic tip. The latter has a zirconium dioxide coating. Measurements are made using the electrochemical method. The essence of the work is extremely simple. One side of the electrode comes into contact with the exhaust gases, and the other with the atmosphere. With different concentrations of O2 in the atmosphere and exhaust gases, a voltage is generated at the tip of the electrode. Its value depends on the concentration of O2 in gases. The higher it is, the lower the voltage indicator. If a rich fuel-air mixture enters the cylinders, the system will be overfilled with oxygen and the lambda value will decrease. Conversely, if a lean mixture enters the chamber (where there is less than 14 kilograms of air per kilogram of gasoline), the lambda will be high. The ideal value of λ is one.
How does an oxygen sensor work?
The VAZ-2114 lambda probe has a fairly simple design. It is based on a ceramic element with two electrodes. They are usually coated with zirconium dioxide. One of the electrodes is in contact with air (placed outside the exhaust pipes), and the second is in contact with exhaust gases.
The operating principle of the device is based on the potential difference that occurs between the contacts of the device during engine operation. The electronic control unit sends an electrical impulse to the sensor and analyzes its changes. Based on the increase or decrease in voltage at the probe contacts, the ECU “makes a conclusion” about the amount of oxygen in the exhaust.
Description, principle of operation
The basis of the sensor design is a solid gas-tight electrolyte, which is a ceramic material made of zirconium dioxide and yttrium oxide. The internal and external surfaces of the element are covered with porous platinum, which acts as electrodes.
The device is installed in the exhaust manifold, where it is heated by exhaust gases to a temperature of 300-400 degrees. The heated sensor becomes conductive for oxygen ions and begins to function.
The element becomes most effective and reliable at temperatures above 350 degrees.
The lambda probe compares the oxygen concentration in the exhaust gases with the oxygen content in the internal chamber. The internal chamber of the device is isolated from the exhaust flow and communicates with the surrounding air, which is used as a control gas. Due to the receipt of different oxygen concentrations, a potential difference occurs, which is transmitted in the form of signals to the engine control system.
In stoichiometry, lambda is the ratio of the actual air content to the desired one. If lambda is 1, then the actual amount of air is equal to the required amount. Lambda >1 is a lean mixture, lambda <1 is a rich mixture, that is, there is not enough oxygen to burn the fuel. To ensure normal afterburning of CO and CH on the catalyst in the presence of a certain amount of oxygen, a second oxygen sensor is placed behind the catalyst. Within 5-7 minutes after starting the engine, the electronic on-board unit (ECU) adjusts the composition of the working mixture, taking into account data from other sensors and averaged parameters. When the lambda probe warms up to operating temperature, the ECU includes its parameters in the general calculation formula.
Lambda probe: signs of malfunction (VAZ-2114)
Failure of the “fourteenth” oxygen sensor is usually accompanied by the following symptoms:
- the “CHECK” warning light lights up on the instrument panel, warning the driver about an error;
- engine operation at idle speed is unstable (the speed fluctuates, the engine periodically stalls);
- a noticeable decrease in the power and traction characteristics of the power unit;
- the car “jerks” when accelerating;
- increased fuel consumption;
- excess level of toxic substances in exhaust gases (determined by measurement at a specialized station).
What can the electronic control unit tell you?
If a warning light comes on on the dashboard, indicating errors in engine operation, and its lighting is accompanied by the above problems, it is advisable to test the controller. Today this can be done both at a service station and at home. Of course, if you have a special tester and a laptop (tablet, smartphone) with the appropriate software. When connected, this device will give you codes for possible problems.
For VAZ-2114 vehicles, a malfunctioning lambda probe may indicate its malfunction with the following errors:
- P0130 – incorrect sensor signal;
- P0131 – excessive oxygen level in the exhaust gases;
- P0132 – oxygen content too low;
- P0133 – weak or slow sensor signal;
- P0134 – lack of sensor signal.
Checking a lambda probe with 4 wires with a tester. Methods for checking LP
So, we come to the question that worries every car enthusiast: how to check the lambda probe sensor at home? To do this, you will need a regular tester (multimeter) or voltmeter.
Lambda probe 4 wires
The first step is to warm up the engine, and then measure the resistance on the heater wires. As a rule, these are two white wires, the polarity between which may not be observed. The normal resistance between them should be from 2 to 10 ohms . If this value is different, then the sensor is faulty.
Lambda probe voltage graph
Let's move on. Now you need to connect the negative wire of the tester to the engine housing. In this case, connect the positive contact to the signal wire of the sensor itself. Typically this will be the black wire. With the engine warm, press the gas pedal and accelerate to 3000 rpm . Hold the pedal in this position for about three minutes. At this time, the lambda probe is warmed up. Now you can check whether the oxygen sensor is turned on.
The voltage between the motor housing and the signal (black wire) of the part should fluctuate between 0.2 and 1 volt . For every 10 seconds , the sensor should turn on about 10 times . In cases where the tester shows 0.4-0.5 volts and does not turn on, we can conclude that the lambda probe is faulty.
You also need to know that when you press the gas pedal sharply, the tester should show a voltage of about 1 volt . When the pedal is suddenly released - zero volts .
That's all for us. We hope that your sensor is fully operational and performs its intended functions. If you have any questions, please leave them in the comments.
The VAZ 2114, like any modern car, is equipped with a complex electronics system and a variety of sensors, through which the ECU (electronic control unit) receives information about the current state of various vehicle systems - the engine, brakes, fuel supply system, battery and generator.
The lambda probe, also known as the oxygen sensor, is an essential device; if it fails, the car will not be able to operate properly. In this article we will understand what a lambda probe is: we will study the design features, the principle of operation, and also consider the technology for checking and replacing a failed oxygen sensor.
Oxygen sensor
What can happen to the lambda probe
The lifespan of the lambda probe for the “fourteenth”, declared by the manufacturer, is 80 thousand kilometers. But this does not mean at all that it cannot fail much earlier or last twice as long.
The cause of a malfunction of the VAZ-2114 lambda probe may be:
- overheating of the working element;
- violation of the tightness of the connection between the sensor and the exhaust manifold body;
- clogging of the device contacts due to the use of low-quality fuel, or oil (coolant) getting into gasoline.
What kind of lambda probe for VAZ-2114
On the first Samar models of the fourteenth model with one and a half liter engines, sensors 0 258 005 133 were installed. This lambda probe ensured the operation of the power unit in accordance with the requirements of Euro-2 standards.
Since 2004, VAZ-2114 engines began to be equipped with Bosch sensors 0 258 006 537. They differ from the previous modification by the presence of a heating element. It is noteworthy that all oxygen sensors for the “fourteeners” are interchangeable.
Where is the oxygen sensor (lambda probe) located?
For 1.5l engine
Exhaust system for 1.5l engine
The lambda probe (number 11) is installed in the exhaust system on the exhaust pipe. It is screwed in from the top, in front of the resonator or spacer (if there is no resonator). In other words: put the car in a pit, and look throughout the exhaust system for a sensor sticking out at the top. The oxygen sensor is the only sensor that is installed in the exhaust system - so you won't miss it.
For 1.6l engine
Exhaust system for 1.6l engine
The exhaust system of this engine is slightly different from the exhaust system of the 1.5L. Pay attention to the figure: In this exhaust system, 2 oxygen sensors are planned (number 2) - both are located on the catalytic collector. These engines are equipped with both 1 and 2 oxygen concentration sensors: Euro-2 toxicity standard - 1 oxygen sensor, Euro-3 - 2 oxygen sensors.
We check the performance of the oxygen sensor with our own hands
How to check the lambda probe on a VAZ-2114 for functionality? Full diagnostics of the device can only be done using an oscilloscope. But it is possible to determine whether it is working or not without complex electronics. To do this, you only need a voltmeter. Connect its “negative” probe to ground, and the “positive” probe to terminal “B” in the sensor connector, without disconnecting it from the on-board network. Turn on the ignition and look at the voltmeter reading. The voltage at the device terminals must match the battery voltage. If it is less, it means there may be a break in the sensor circuit.
If the voltage is okay, check the sensitivity of the working element of the probe. To do this, connect the “negative” probe of the volt sensor, and the “positive” probe to contact “A”. The voltage should be within 0.45 V. If this indicator is exceeded by more than 0.02 V, the sensor must be replaced.
Diagnostics
Periodic maintenance involves a range of testing and adjustment work.
Before checking the lambda probe yourself, knowledge of the design features of the engine and specifically the elements of the lambda probe is required.
Diagnostics includes two stages: visual inspection of visible elements and a detailed check with removal of the sensor.
Visual inspection includes:
- inspection of electrical wiring and connection points. Damage, exposure of the live part of the wire or unstable connection of the connector are unacceptable.
- Inspect the external elements of the oxygen sensor for the absence of solid deposits or carbon deposits.
Detailed check:
Checking the electrical wiring of the VAZ 2114 oxygen sensor with a multimeter. It will reveal the conductivity and resistance of the wires.
The same method can be used to check the on-board computer. The signal that it supplies to the device we are studying is equal to 0.45 V. If a test with the engine running reveals a deviation in this indicator, diagnostics of the on-board computer is necessary.
To check the lambda probe, you must do the following:
- warming up the engine to a temperature of 80–90 °C;
- stopping the engine;
- connecting a multimeter to a lambda probe;
- starting the engine and raising the speed once to 2500 rpm;
- disconnecting the vacuum pipe from the fuel pressure regulator;
- Check the voltage at the oxygen sensor. The further process will depend on how many volts it produces. 0.8 V or less is an indicator of a faulty lambda probe. In this case, the VAZ 2114 oxygen sensor must be replaced.
To check whether the sensor detects a lean fuel mixture, it is necessary to artificially block the air supply paths to the engine. If the readings on the multimeter are 0.2 V or less, the sensor is working properly. If the indicators are different, it has an internal defect.
Service centers offer a different type of diagnostics. It is carried out using a diagnostic computer connected to the vehicle's on-board computer. All current or past errors remain in its history.
When detecting an error in any vehicle system, it saves it and assigns a personal code. The service center remains to find the decoding of this code and take measures to eliminate the malfunction.
Repair or replacement
Having determined that the lambda probe of the “fourteenth” is faulty, you can either try to repair it or simply replace it. Restoring the sensor involves cleaning its contacts from carbon deposits. This may be the reason why the device has stopped functioning normally.
To begin, the sensor must be unscrewed from the manifold or exhaust pipe. This is not always easy to do. The fact is that its body very often sticks to the specified elements of the exhaust system. In this case, anti-rust liquid (WD-40 or similar) can help. Treat the joint with this liquid and wait half an hour.
When the sensor is unscrewed, pay attention to its body. It is not removable. The contacts that we have to clean are located behind the slots in the case at the bottom.
Important: do not clean contacts mechanically (knife, sandpaper, file, etc.)! This will only aggravate the situation and permanently disable the sensor.
Contacts should only be cleaned using chemicals. For example, orthophosphoric acid. Simply place the lower part of the probe in acid for half an hour, and then dry it on a gas burner.
There is no need to disassemble the sensor by sawing its body. As practice shows, after such a procedure, its performance does not return.
If you decide to replace the lambda probe, buy a new device that meets the specifications from a car dealership and install it in place of the old one. With the ignition on, start the engine, warm it up and check if the CHECK warning light is on.
DC replacement technology
To change the VAZ 2114 oxygen sensor yourself, you will need open-end wrenches 22 and 17, wire cutters, any liquid for dissolving rust, the same VD40 is perfect, as well as plastic clamps.
How the oxygen sensor will be replaced depends on the displacement of your car, since on the VAZ-2114 with 1.5 and 1.6 liter engines the DC is located in different places.
On fourteenths with a one and a half liter power unit, the DC is located on the intake manifold of the exhaust pipe. and you can only get to it by driving the car into a repair pit or overpass. Therefore, take care in advance of a place where you will be comfortable working.
Position of the DC on a VAZ 2114 with a 1.5 l engine
Fourteenths with a 1.6-liter engine have better access to the oxygen sensor. It is located in the engine compartment, on the exhaust manifold housing. Moreover, on the VAZ-2114 1.6 liter, the engine of which complies with the Euro-3 standard, two DCs are installed (on old Euro-2 engines - one). And if you need to replace the lambda probe, you must first determine which sensor is faulty.
Position of the DC on a VAZ 2114 with a 1.6 engine (Euro -3)
Replacing the VAZ 2114 lambda probe should be carried out exclusively with a cold engine, since during operation the lambda probe heats up to a very high temperature (300-400 degrees), making it impossible to dismantle it, even with protective gloves.
And so, if you need to change the oxygen sensor of a VAZ 2114, follow the following algorithm of actions:
- We drive the car into the repair pit (if you have a 1.5L engine). Open the hood and remove power from the battery;
- We determine the power wires that go to the DC; they are secured with plastic clamps to the cooling system pipe. The clamps must be cut using wire cutters and the wire block disconnected;
- Next you need to disconnect the sensor. It is fixed in the mounting socket with one 22-diameter nut (or 17 mm on 1.6 engines), which can be unscrewed with a wrench of the appropriate size.
Unscrewing the oxygen sensor is easy in theory, but in practice you will most likely encounter the fact that the fixing nut and the thread on the manifold body are firmly stuck to each other.
If this problem prevents you from removing the oxygen sensor, the threaded connection must be thoroughly treated with WD-40 or any other chemical rust solvent, wait 5-10 minutes, and then make repeated attempts to unscrew the nut.
If chemical treatment does not produce results, you need to resort to more severe methods. To begin, connect power to the battery and start the car. Let the engine idle for a while so that the manifold and the DC itself warm up a little. Next, put on protective gloves and try to unscrew the thread.
How to unscrew the lambda probe if this does not help? There is only one option left - “thermal shock”. You will need a gas torch or a blowtorch, which needs to warm up the threaded connection well, after which it needs to be cooled sharply with cold water.
When strongly heated, the metal will expand, and when cooled sharply, it will contract, as a result of which all the plaque will peel off and the connection will weaken. As you understand, it will not be possible to carefully remove the DC when using this method - even a normally functioning device after this is 100% likely to completely lose its functionality, so do this only as a last resort.
Once the thread has yielded to you, install the new sensor into the socket, tighten the connection (do not overdo it so as not to damage the device body) and connect power to the sensor. Use plastic clamps to secure the wiring to the cooling system tube.
Now you know how to replace the lambda probe of a VAZ 2114. Good luck with your driving without breakdowns!
Ways to deceive the electronic control unit
There are three more ways to restore the engine to its former performance without buying a new oxygen sensor. Without a doubt, they were invented by our craftsmen. And they consist in the fact that it is necessary to mislead the electronic control unit so that it does not notice errors in the operation of the sensor.
The first method is mechanical. To implement this, a special spacer (bushing) is screwed in between the lambda probe and the manifold body (intake pipe). Its use allows you to distance the sensor contacts from the exhaust gases. Thus, the amount of oxygen between them artificially increases, and the electronic control unit “remains satisfied” with the result obtained.
A similar VAZ 2114 lambda probe costs about 500 rubles. And if you have a lathe, you can make it yourself.
The next way to deceive the ECU is electronic. Its essence is to install a primitive converter in the sensor circuit, consisting of one resistor (1 MΩ) soldered into the gap in the blue wire of the connector and one capacitor (1 μF) connected between the blue and white wires. As a result of such a simple deception, the electronic control unit will constantly receive a signal of the required voltage and perceive the operation of the lambda probe as proper.
Alternatively, you can also reflash the controller by changing its software. But it is better to entrust such manipulations with the “brain” of the engine to specialists.
How to extend the life of a lambda probe
To ensure that your oxygen sensor lasts as long as possible, do not neglect the following tips:
- use only high-quality fuel;
- do not allow oil and other process liquids to get into the fuel;
- Monitor the operating temperature of the engine, do not allow it to overheat;
- carry out diagnostics of the oxygen sensor in accordance with the schedule of routine maintenance provided by the manufacturer;
- If you identify signs indicating problems with the lambda probe, do not delay diagnosis.
