Symptoms and malfunctions of the reverse sensor
You put the vehicle in reverse, but the rear lights do not work. There are three options here: the reverse light has expired, the power fuse has blown, or the sensor itself has failed. But how can you check the reverse sensor and make sure that it is the one that is faulty?
Take a few simple steps:
1. Remove the fuse and check its integrity. In the VAZ 2110 it has number 19 (rated current - 7.5 A). The mounting block itself is located under the instrument panel.
2. Make sure the lamp is intact. If there are also no complaints about it, then you can proceed directly to checking the sensor.
How to change?
- Place the VAZ 2110 in a pit or drive it on an overpass.
- Remove the engine protection, if any.
- Have a small container for the oil. Because when you open the sensor, oil will begin to flow out.
- Get under the car and disconnect the wires going to the part.
- Open the old sensor, immediately insert the container and screw in the new one.
- Add the leaked oil into the box.
- Stick in the wires, wipe the surfaces on which oil has gotten.
- Start the car and check if the lights come on when you put the vehicle in reverse.
How to check a reverse sensor
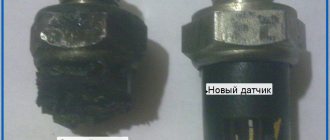
For reference: A new one is inexpensive - from 100 rubles. Usually at the factory they install them from the VAZ 2108.
Location and details of checking the sensor
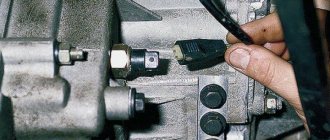
Many novice car enthusiasts do not know where the reverse sensor is located. In fact, everything is simple here. It is necessary to drive the car onto an overpass (pit) and go under it.
A sensor will be installed on the left side of the gearbox (looking towards the rear wheels of the car).
It is very difficult to confuse it with any other unit, because only this element of the gearbox has wires. Now let's move on to the verification.
The sequence of actions is as follows:
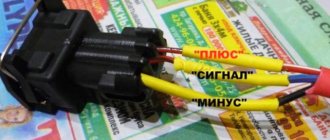
- Discard the terminal from the sensor;
- connect a multimeter to the connectors and set the switch to measure resistance;
- move the gearshift knob to the reverse gear position;
- turn on the ignition;
- look at the multimeter readings.
If the display shows a resistance of 0 Ohm and the beeper rings, then everything is normal. If the multimeter shows infinity, then the VAZ 2110 reverse sensor needs to be replaced.
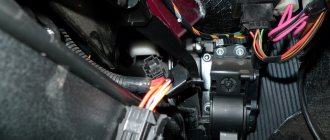
Blocks in the cabin
Fuse box
It is located on the left pillar under the instrument panel on the driver's side, behind the protective cover.
Scheme
Description
| A/BAG | 10A Airbag |
| TURN LAMP | 10A Turn signal lamp |
| METER | 10A Instrument cluster, reverse lamp, warning horn |
| ILLUMI | 10A Switch Light |
| POWER SOCKET | 15A Luggage compartment lamp, power socket |
| HAZARD | 15A Hazard warning lamp |
| STOP | 15A Brake light, ABS |
| TAIL (RH) | 10A Side light (right rear/left front), switch illumination |
| TAIL (LH) | 10A Side light bulb (left rear/right front) |
| CIGAR | 15A Cigarette lighter |
| AUDIO | 10A Audio system, power rear view mirror, clock |
| WIPER (FRT) | 15A Glass cleaner, washer (front), sunroof |
| WIPER (RR) | 15A Glass wiper (rear). Washer (rear) |
| WARMER | 15A Front seat heating |
| MIRROR DEF | 10A Heated outside rear view mirror |
| START | 10A Engine control unit, ECAT unit (electronically controlled suspension) |
Relay block
Attached behind the fuse box. The number of elements in it may vary and depends on the level of electrical equipment. The immobilizer module is located nearby.
Photo
There may be relays here such as: hazard warning and turn signal relays, signal relays, central locking relays, engine control relays, fog lamp relays, etc.
The nuances of replacing the reverse sensor VAZ 2110
Now let's look at how to replace the reverse sensor. Everything is simple here:
Attention! Before unscrewing the sensor, clean it from dirt and dust so that when unscrewing nothing gets into the gearbox oil.
- The machine is already installed on the pit (overpass). Let's leave it that way.
- Remove the crankcase protection.
- Find a small container (you will need it for oil). As a rule, when unscrewing the sensor, a small amount of lubricating fluid spills out.
- Throw wires away from the node.
- Unscrew the sensor and wait for the oil to drain.
- Install a new device.
- Add oil to the required level.
- Return the wires to their place.
- Check the operation of the device.
Repair methods
To repair the reverse signal, you can proceed in two ways. They differ in the way the sensor is accessed.
- Drive the car onto a lift or pit.
- Do the work by climbing under the car.
If you have already encountered a similar problem, then you will probably agree that replacing the DZH is best done using a pit or overpass. This makes access to the sensor as comfortable as possible, plus you minimize the risk of being splashed with oil from the gearbox.
Replacing the DZH is not the cleanest job
Of course, there is another cleanest way - sending the car to a car repair shop. But then you will have to pay not only for the sensor, but also for the services of the specialists. And this is another 2-3 times the cost of the sensor. The choice is yours anyway.
Self-replacement
It’s not difficult to get to and replace a failed DZH on your own. Follow the instructions, do not break the sequence of operations, and then the process will not take you much time and effort.
- Place the car on a pit or overpass. Be sure to apply the handbrake and place the transmission in first gear. This will help prevent your car from accidentally rolling away.
- Remove the protection from the contacts of your sensor, disconnect the contacts.
- Prepare a container into which the oil will be drained when unscrewing the DZH.
- When the container is ready, remove the sensor. In some cases, it may not be unscrewed by hand. In such a situation, use a 22 mm socket.
- Very rarely even the key cannot help, since the sensor becomes stuck to its location. Here you will have to arm yourself with a hammer and chisel and try to remove it as carefully as possible.
- Take out the failed device and insert a new one in its place.
- If oil gets on the gearbox housing, remove it with dry rags. There is no need for extra dirt. Plus, it can lead to a decrease in the efficiency of the device.
- Return all contacts to their places, put the protection back on.
- If a decent amount of lubricating fluid has spilled out of the box, be sure to top it up. Just use fresh ones. By the way, this is one of the reasons to completely change the oil in the gearbox if it has been there for more than the first season.
- The decision to change the oil will simplify the task when removing the sensor. If the liquid is drained in advance, it will not flow in different directions when the sensor is unscrewed. The work will be cleaner, plus you will kill two birds with one stone - replace the sensor and gearbox oil.
Removal and replacement
After completing the work, do not forget to check whether the reverse traffic warning system is now working. For this:
- Turn the ignition key, but do not start the engine;
- Engage reverse gear on your gearbox;
- See if the white lights turn on. If yes, everything went great.
How much it costs?
Many VAZ 2114 owners are often interested in the cost of certain spare parts. In the case of DZH, a new device will cost you up to 300 rubles. You can find devices for 100 rubles.
The price depends on the manufacturer, quality level and pricing policy of the auto parts store where you decide to shop.
Additionally, it wouldn’t hurt to purchase WD40, which can be used to clean contacts. Plus, the wires may need to be replaced. We do not recommend doing this on your own if you do not have the relevant experience.
If the culprit for the problem with the rear lights is the light bulbs themselves, replacing them will cost a pittance. Today they cost up to 50 rubles.
Loading …
Replacing the reverse frog on a VAZ 2110-2112 and video review
To show this process in the most accessible and visual way, a video was shot that shows all the intricacies of diagnosing and replacing this switch.
If you cannot open the video, regardless of the reason, then below is a photo report of this repair.
First of all, we drive the car into a pit, remove the engine protection and find our frog for turning on the reverse light there. Everything is shown clearly below:
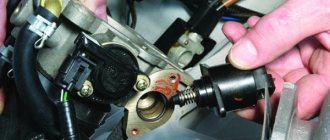
Disconnect the plug from the connector and move it to the side.
And now you can unscrew the frog itself using a 22 key, it is advisable to use a carob or cap:
And finally unscrew this switch by hand.
- Or do everything at a very high speed so that oil loss is minimal
- Or substitute the container and after all the repairs, add the losses back to the gearbox
In principle, if you do everything quickly, then the oil practically does not have time to flow out and no more than 10-20 ml can spill out, so place the container and go ahead. When everything is screwed into place, we connect the plug and that’s it. This procedure can be considered complete.
How to recognize a malfunction of the VAZ 2110 reverse sensor and replace it?
The operating principle of the regulator in question is very simple:
- the driver engages reverse gear;
- when turned on, the plug is pressed against the controller;
- the wire shorts;
- The lamp lights up, indicating that the vehicle is moving backwards.
During the daytime, the driver may not notice the malfunction. But at night it is clearly visible when the lamp does not light up when you engage reverse gear.
In this case, there are 3 causes of failure:
- blown fuse (common cause);
- the lamp burned out;
- The reverse regulator has failed.
In fact, damage to the sensor is much less common than blown bulbs and fuses. Another possible scenario could be damage to the integrity of the wires. Therefore, it is necessary to carry out the appropriate check.
Lada 4x4 3D Why! › Logbook › Question about a frog. Breaking.
There was a need to replace the brake light switch.
I bought it from Shniva. It turned out to be longer. Replaced it.
After a kilometer of driving, my brakes stuck. To my shame, I didn’t immediately understand what was going on, what was causing this sudden loss of power))) I barely crawled into the yard on the emergency gang. The discs hiss, there is a burning smell. I adjusted the frog and then drove normally. Why did it happen? Did you connect the wires wrong? The frog was changed due to a burning check and spontaneously lighting up stops. This constant illumination drains the battery. The diagnosis was made in two services, one of which is official. Alas, with the new frog and the check, the feet are still shining.
How to determine the cause?
At the first stage, the motorist needs to make sure that it is the controller that is damaged, and not the lamp or fuse. Therefore, you need to check the integrity of the fuse. On the “ten” it is located in the mounting block, directly under the dashboard. The switching device is designed for 7.5 A and is installed at No. 19. Then you need to check the light bulb and wires. If everything is in order with them, then you need to move on to checking the controller.
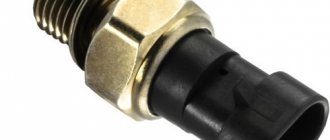
Before replacing the device in question, you need to determine its location.
To find the sensor you need to:
- drive onto the overpass;
- pay attention to the gearbox. On the left side of this assembly is the reverse controller;
- in this place there is only one sensor with wires from the gearbox. The motorist will not find any other elements in this unit.
Thus, finding the element you are looking for will not be difficult. But before replacing it, you need to make sure that there is no loss of performance.
To do this, you need to perform a number of actions:
- disconnect the terminal from the controller;
- use a multimeter, having previously turned it on in resistance measurement mode;
- connect a multimeter to the controller connectors;
- engage reverse gear;
- start the power unit.
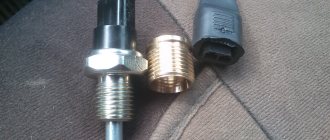
Description of DZH
Purpose
Reverse sensor for Lada Kalina
Let's start with the purpose. DZH is a device designed to activate white lamps, indicating that the car is in reverse gear. The device is used to turn on the reversing lights, which allows other road users to know the driver's intentions and the maneuvers he is about to perform.
When it's dark outside, white headlights will also help warn drivers behind you that your car is in their path. This, in turn, helps prevent possible incidents and emergency situations on the road. Where this device is located - the location may vary slightly, but as a rule, the controller is located on the gearbox.
Design and principle of operation
The DZH itself consists of a housing, contacts for connection, a rod, a moving ball, and a return spring.
As for the operating principle, it is as follows:
- The driver shifts the transmission lever to the reverse gear position.
- In this case, the gear shift fork is pressed against the controller.
- Next, the device shorts the cable to ground.
- After this, the light source installed in the rear lights is activated, which warns other drivers that the car has started to reverse.
Symptoms of a problem
What signs of malfunction may indicate a breakdown of the DZH:
- One of the problems that happens most often is oxidation of contacts on the terminals or wiring. This problem is relevant for many car owners. To solve this problem, it is necessary to thoroughly clean the contacts and then install them in place. When performing this work, the battery should be disconnected. If the contacts are inoperative due to the fact that they are burned out, then they will have to be changed in any case. But before making a replacement, it is necessary to find out why the burnout occurred; most likely, the essence of the problem lies in voltage surges in the on-board network.
- The device became loose in its seat. During vehicle operation, the controller may slightly move out of its installation location; this problem is usually caused by high vibrations. In this case, you will simply need to more securely fix the device at the installation site.
- Another reason for inoperability is the lack of contact with the on-board network in the gearbox. In this case, it is necessary to diagnose the condition of the contacts, as well as electrical circuits. If necessary, failed components must either be cleaned or replaced.
- The next problem is that there is no contact between the connection connector and the safety mounting block. In this case, you also need to diagnose the condition of the contacts, as well as clean and change the wires, if necessary.
- Failure of the safety device. In this case, the problem can only be solved by replacing the fuse. If this part often fails, then the reason may lie in the same voltage surges. It is necessary to check the electrical circuit more carefully.
- The reverse light may not turn on because the light source itself, that is, the lamp, has burned out. In this case, you will have to dismantle the optics cover in the trunk and replace the failed device.
- And finally, the last reason for inoperability is the breakdown of the DZH. In this case, you will not be able to repair it, since such devices, as a rule, cannot be repaired. The controller will need to be changed (the author of the video is the Do-It-Yourself Auto Repair channel).