Application of branded camber plates SS20, giving negative camber of the rear wheels, slightly increases their track. This has a positive effect on maneuverability.
Share with your friends
Applicability
- VAZ 2108-21099
- VAZ 2110-2112
- VAZ 2113-2115
- VAZ 1117-1119 (Lada Kalina)
- VAZ 2170-2172 (Lada Priora)
Advantages of camber plates (wheel alignment spacers) SS20
- increases camber to -1°;
- improves high-speed cornering;
- improves vehicle stability when exposed to lateral loads;
- improves vehicle grip on the road;
- reduces tire wear.
Guarantee
Many modern cars have negative camber on the rear axle, which is built into the design initially, and this angle reaches 2 or even more degrees. Owners of VAZ cars (except for the latest Grant and Kalina-2 models) have zero wheel camber on the rear axle of their cars. It is possible to establish negative camber of the rear wheels using camber plates , which are installed between the rear beam and the rear wheel hub axle.
As you know, when installing many camber plates widely available on the market, in addition to obtaining a camber of -1°, we also get negative toe-in of the rear wheels, which has a bad effect on handling. This result is obtained due to the fact that when designing these spacers, manufacturers do not take into account the angle of inclination of the rear beam arm. Negative toe-in of the rear wheels increases the likelihood of skidding when cornering, as the car receives excessive oversteer, and when driving in a straight line under the influence of road unevenness and lateral influences (for example, wind or when driving on a rut), the car requires constant steering and becomes excessively sharp and unstable .
When designing the SS20 spacers, the angle of inclination of the rear beam arm was taken into account. The axis of symmetry of the camber plate was shifted by an angle α' equal to the inclination of the beam lever. This solution allows you to maintain stable behavior of the car when turning and driving in a straight line. When installing SS20 camber plates, a -1° camber and a slight positive toe-in of the rear axle wheels are provided.
The use of branded SS20 spacers, which give negative camber to the rear wheels, slightly increases their track. This has a positive effect on maneuverability. A wider track allows you to increase cornering speed without the risk of tipping over.
In addition, increasing the camber to -1° improves high-speed cornering, since wheels with negative camber perceive a greater amount of lateral forces without “breaking” the tires, which reduces deviation from the trajectory.
When the body rolls in corners, the most loaded wheels with negative camber retain a larger contact patch and better grip. Toe compensation allows the wheel to roll with the least resistance and reduces tire wear.
The table shows recommended retail prices in Samara
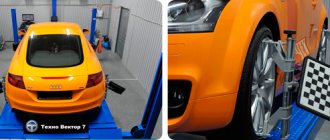
You can adjust the wheel alignment angles of your car with your own hands using available tools and simple devices. In this material we will talk about how to do wheel alignment yourself at home, and what difficulties are most often encountered when adjusting wheel alignment angles.
Incorrect alignment adjustment can cause, for example, rapid wear of tires, or the fact that when driving in a straight line, the car will pull to the left or to the right.
At the end of this article you will find a video that explains and shows in detail everything you need to know about wheel alignment.
Dzhiper89 › Blog › How to make wheel alignment with your own hands
You can adjust the wheel alignment angles of your car with your own hands using available tools and simple devices. In this material we will talk about how to do wheel alignment yourself at home, and what difficulties are most often encountered when adjusting wheel alignment angles.
Incorrect alignment adjustment can cause, for example, rapid wear of tires, or the fact that when driving in a straight line, the car will pull to the left or to the right.
At the end of this article you will find a video that explains and shows in detail everything you need to know about wheel alignment.
First, let's look at the theory: wheel alignment - what is it? What are the wheel alignment angles and how does the car’s behavior on the road depend on them?
Wheel alignment - what is it?
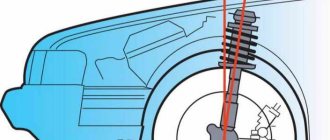
Camber is the angle between the vertical and the plane of the wheel. It ensures reliable contact of the tire with the road (see picture above).
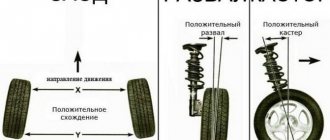
Toe is the angle between the direction of travel and the plane of rotation of the wheel. The stability of the car in corners and tire wear depend on it.
On rear-wheel drive cars, the wheels should be slightly turned towards each other - this is called positive toe. When moving, they move apart and become parallel. For front-wheel drive vehicles, on the contrary, the toe-in should be negative (see the diagram below). Caster is the longitudinal inclination angle of the king pin. This parameter very rarely needs adjustment, only on a newly assembled front suspension from new parts, so we will not consider its adjustment.
Repairing the suspension or steering (replacing the same shock absorbers or steering joint) leads to a significant change in the wheel alignment angles. Daily use of the car also makes adjustments to these parameters over time, so the need to adjust the wheel alignment periodically arises.
It is best to adjust wheel alignment twice a year, during seasonal tire changes. During this time, you will fall into a hole more than once or run over a curb, causing the chassis to become loose and the angles to change. Timely alignment adjustment will cost much less than a set of new tires.
In 1955, American engineer Lee Hunter developed the first wheel alignment stand. Sensors mounted on the wheels sent focused beams of light and accurately measured angles. That's why the stand was called optical. But already in 1969 it was connected to a computer, and in 1995, 3D technology was first used to measure and adjust angles.
general information
Before moving directly to the advantages and disadvantages, you must first understand what these angles are and what they can be.
So, camber is the location of the car’s wheels at an angle to the road. Wheel alignment affects the level of controllability, safety and how quickly the tires become unusable. Now there are a lot of car models, and each has its own optimal toe and camber angle. There are three types. These are zero angle, positive and negative camber.
A car wheel will have zero camber if it is perpendicular to the road surface. If the top of the wheel is directed towards the inside of the body, then the camber is considered negative. If the top of the wheel faces away from the body, then it is positive camber.
Adjusting the wheel alignment of a VAZ-2109 car
In order to ensure good handling and stability of the car, the wheels are installed at a certain angle relative to the car body. To set these angles there are three options:
Front wheel toe-in under load 320 kgf, mm - 0±1
Front wheel camber under load 320 kgf, deg – 0±30′
Longitudinal angle of inclination of the wheel rotation axis under a load of 320 kgf - 1°30'±30'
Checking and adjusting wheel alignment angles is carried out on special stands according to the instructions for the stand.
Checking the wheel alignment angles is mandatory if suspension parts are being replaced or repaired, which may result in a change in the wheel alignment angles.
Before adjusting wheel alignment, check:
– air pressure in tires;
– radial and axial runout of wheel disks: it should not exceed 1 mm for axial, 0.7 mm for radial;
– free play of the steering wheel;
– free play (play) in the bearings of the front wheel hubs;
– technical condition of suspension parts and assemblies (absence of deformation, destruction and wear of rubber-metal hinges, unacceptable settlement of the upper support of the suspension strut).
Correct any defects you notice.
After installing the car on the stand, immediately before checking the corners, “press” the car’s suspension, applying a force of 392–490 N (40–50 kgf) 2–3 times, directed from top to bottom, first on the rear bumper, and then on the front.
In this case, the wheels of the car must be parallel to the longitudinal axis of the car.
When checking and adjusting wheel alignment, first check and adjust the caster angle, then the camber angle, and lastly, the wheel toe.
Angle of longitudinal inclination of the axis of rotation
If the angle value does not correspond to the data given above, change the number of adjusting washers 23 installed on both ends of the suspension braces 29.
To increase the caster angle of the steering axis, reduce the number of washers on the extension in the front or rear part.
And, conversely, to reduce the angle, add a number of washers, but only in the rear part of the stretcher, since this is not always possible from the front due to the short threaded part of the stretcher.
When changing the number of washers on the brace, make sure that the chamfers on the washers are facing towards the thrust end of the brace.
Observe the same rule when installing the internal thrust washer of the rubber-metal hinge when the adjusting washers are completely removed.
Failure to comply with these requirements may result in loosening of the nuts securing the guy wires.
The number of adjusting washers on the extension should not be more than two at the front, four at the rear.
To ensure that the position of the brace 29 relative to the suspension arm 22 does not change when adjusting the longitudinal inclination of the steering axis, use a special device that fixes the brace relative to the lever, that is, it does not allow the brace to rotate under the influence of forces when tightening the nut securing the brace to the lever.
This requirement must be observed in order to prevent premature wear of the rubber-metal hinge and rubber cushion on which the ends of the extension rest.
When installing or removing one shim, the caster angle of the steering axis changes by approximately 19′.
Front camber angle
If the camber angle is different from the norm, then adjust it. To do this, loosen the nuts of the upper and lower bolts and, by turning the upper adjusting bolt 11, set the required camber angle.
After completing the adjustment, tighten the nuts to a torque of 88.2 Nm (9 kgf m).
Front wheel alignment
If the toe-in value does not correspond to the standard, loosen the nuts 4 and, by rotating the rods 5, set the required toe-in.
Then make sure that the plane “ A ” of the ball joint 2 is parallel to the plane “ B ” of the supporting surface of the swing arm 3, then tighten the nuts 4 to a torque of 121–150 Nm (12.3–15 kgf·m).
How to make the camber negative?
Before you start making adjustments, you should know whether such a camber is suitable for the car and whether the lateral and vertical stability of the car will be acceptable. Of course, if necessary, these figures can be increased.
To increase the level of stability, a stabilizer is installed in the front suspension. To increase vertical stability, change the springs to stiffer ones. To reduce the risk of skidding during high-speed turns, the rear suspension is lowered. Then the car will be pressed against the outside of the wheel and will not skid.
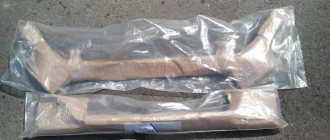
To adjust the negative camber of the front wheels, you need to purchase special camber adjustment plates. When buying a plate, you should start from the required angle. The plates are different.
Front wheel camber of VAZ 2109
Wheel alignment angles and their influence on vehicle handling
- camber, caster and toe - on the behavior of your car.
Possibly the easiest parameter of the three to understand.
Camber is the angle of the wheels relative to the road surface when looking at the car from the front. If you draw an imaginary line through the center of the wheel perpendicular to the road, then this will be zero camber.
If the top side of the wheels is directed inward (“house”), this is a negative camber angle.
If the top side of the wheels is directed outward, this is a positive camber angle.
INFLUENCE OF CAMBER ON VEHICLE BEHAVIOR
Camber values for sports cars are usually within
What are the advantages of this:
— When turning, the car body rolls, thereby creating positive camber and reducing the area of contact between the wheel and the road. Negative camber values compensate for this effect. As a result, more grip and more stability in corners.
— Negative camber on both wheels creates additional stability on a straight line, because a wheel with negative camber tends to roll inward (like a cone rolling in a circle around its apex)
— When turning, the inner wheel is unloaded and even sometimes rises completely, thereby allowing the support wheel to move the car even further into the turn.
Negative camber also has its disadvantages:
— Increased wear on the inner edge of the tire when driving in a straight line.
— Instability during acceleration and braking in a straight line (because the contact patch area is small)
The ideal would be to have the wheels mounted perpendicular to the road under all conditions. But, compared to racing cars, this is more difficult to achieve on ordinary civilian cars due to the softer suspension with longer travel, which creates greater roll when cornering. Tire wear also plays a big role - for a regular car it should be economical, and racers can afford to buy tires more often (at least I would like it to be so
Source
Negative camber
While reading the article, you became interested in why negative camber should be used on car wheels? It is negative camber that improves the quality of car control and, most importantly, allows you to easily take turns even at high speed, and also makes it possible to avoid the car skidding and capsizing. This means that negative camber is most often done on sports model cars.
If we consider this type of motorsport as drifting, then the use of a minus value is most relevant. This allows the car to literally cling to the road surface. For drifting, the value of negative wheel alignment can be in the range from -0.5 to -5.5 degrees. Also considered optimal is a minus indicator for circuit racing. Moreover, on the front axle the value must be greater than on the rear axle. This provides excellent traction and sharp handling.
Checking and adjusting the wheel alignment angles of the VAZ-2109
You can adjust the wheel alignment angles of your car with your own hands using available tools and simple devices. In this material we will talk about how to do wheel alignment yourself at home, and what difficulties are most often encountered when adjusting wheel alignment angles.
Incorrect alignment adjustment can cause, for example, rapid wear of tires, or the fact that when driving in a straight line, the car will pull to the left or to the right.
At the end of this article you will find a video that explains and shows in detail everything you need to know about wheel alignment.
Wheel alignment - what is it?
First, let's look at the theory: wheel alignment - what is it? What are the wheel alignment angles, and how does the car’s behavior on the road depend on them?
Camber is the angle between the vertical and the plane of the wheel. It ensures reliable contact of the tire with the road (see picture above).
Toe is the angle between the direction of travel and the plane of rotation of the wheel. The stability of the car in corners and tire wear depend on it.
Caster is the longitudinal inclination angle of the king pin. This parameter very rarely needs adjustment, only on a newly assembled front suspension from new parts, so we will not consider its adjustment.
Repairing the suspension or steering (replacing the same shock absorbers or steering joint) leads to a significant change in the wheel alignment angles. Daily use of the car also makes adjustments to these parameters over time, so the need to adjust the wheel alignment periodically arises.
It is best to adjust wheel alignment twice a year, during seasonal tire changes. During this time, you will fall into a hole more than once or run over a curb, causing the chassis to become loose and the angles to change. Timely alignment adjustment will cost much less than a set of new tires.
In 1955, American engineer Lee Hunter developed the first wheel alignment stand. Sensors mounted on the wheels sent focused beams of light and accurately measured angles. That's why the stand was called optical. But already in 1969 it was connected to a computer, and in 1995, 3D technology was first used to measure and adjust angles.
True, Soviet car enthusiasts managed without any stands or computers - using wrenches, calipers, thread and a plumb line, they adjusted the camber and toe angles with their own hands.
Minus camber
It would seem, why deviate from the manufacturer’s recommendations and install negative camber if the handling will change, and not necessarily for the better? In fact, handling improves slightly - it becomes possible to easily enter a turn even at high speed. In addition, skidding and rollover can be avoided. Most often, drivers of sports cars resort to this modification. For civilian driving, such tuning is useless - in the city the speeds are different.
Preparation and procedure for adjusting wheel alignment angles of VAZ 2107
Having a level area, balanced equal-sized wheels and tires with the required pressure are far from the only requirements. It is equally important to remove the decorative caps before starting the adjustment and ensure:
It is advisable to check and adjust the chassis by first placing 70 kg on each seat and 40 kg in the trunk. However, adjustments can also be made on an empty car. With the steering wheel in the direction of straight-line motion, you should remove all the play in the suspension by shaking each of the four bumpers several times.
Instructions for adjusting wheel alignment yourself
Before you begin adjusting the camber and toe angles, it is imperative to check the vehicle's chassis. If repairs are needed, then doing a wheel alignment is pointless. The steering and suspension must be in perfect order.
Pay attention to three points on which the wheel alignment angles on a car greatly depend:
Be sure to check the tire pressure before adjusting the wheel alignment and make sure that you haven’t accidentally forgotten a couple of bags of potatoes or cement in the trunk
As an example, we will describe how to do a wheel alignment with your own hands on a VAZ 2109 car.
To avoid unnecessary camber and toe adjustments after chassis repairs, before disassembling the suspension, all disconnected connections should be marked relative to each other. This is best done with a chisel, core or paint. It is also necessary to count the number of revolutions when turning the ends out of the tie rods.
We carry out the camber and alignment ourselves.
We will not repeat the importance of this operation. This process is important and must be taken seriously. To perform it you need tools and accessories:
- Availability of inspection hole.
- Plumb.
- Chalk or felt-tip pen.
- A set of keys.
- Sliding ruler with scale.
Carrying out the operation of checking and adjusting camber and toe for cars with front-wheel drive and “classics” have some differences. To perform this operation at home, it is necessary to ensure the presence of a flat, horizontal platform. Checking and adjustment is carried out in several stages:
- The car is installed on the site so that the front wheels are straight. There are two marks on the outside of the tire, one at the top and the other at the bottom.
- Apply a plumb line to the wing so that it is in the plane with the applied marks. Next, use a caliper or other measuring tool to measure the distance from the cord to the wheel disk near the upper and lower marks. If the difference is about 3 millimeters, this is normal.
- Next, you need to turn the wheels, rolling the car forward so that the applied marks are located horizontally.
- Again, measurements are taken from the cord to the wheel disk in the vertical plane.
- To obtain more accurate measurement data, this operation must be performed several times.
The difference in size between the upper and lower marks for cars with front-wheel drive should be no more than 1 mm, and for “classics” - 3 mm. If the obtained measurement results do not fit into these standards, adjustments are made. For cars with front-wheel drive, the desired result is obtained by moving the strut forward or backward, while for “classics” the shims for the lower control arm of the front suspension are added or removed. If the “classic” front suspension has a MacPherson strut, the strut is also moved for adjustment.
Wheel alignment is checked using a sliding ruler. To do this, make two marks on the inside of the wheels in front of the car and measure the distance. Next, you need to roll the car so that the marks are at the rear along the direction of the car. The measurement obtained between the marks should be approximately 1 mm larger than the previous one. This can be achieved by turning the steering rods.
How and what to measure
Caster angle cannot be measured. Decreasing it leads to the inability to take a turn at speed, and increasing it leads to a “heavier” steering wheel. Usually 2-3 degrees is considered a “sporty” option. This is what we need to build on.
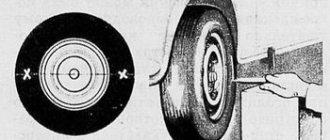
To measure toe and camber angles, it is enough to place a thread and a weight. Zero camber corresponds to the fact that the values of A and B are equal (Fig. 52).
Measuring with a thread
“Zero toe” is also easy to check: measure distance B (Fig. 51), knowing that the track of the front and rear wheels differs by 30 mm. The rear wheel is “recessed” inward compared to the front.
To accurately measure the toe angle, you will need equipment: a sliding ruler or a chain with a dynamometer. Only one thing is used.
Measuring the toe angle
The “measuring device” itself is brought in front and behind, then the obtained values are compared. For zero degrees, the two digits should not be different.
The car must be placed on a surface whose inclination angle is zero! In practice, to take measurements, plates are placed under the wheels. The steering wheel must be turned to the “0 degrees” position - this is also important.
How to make negative camber?
Let's now dig a little deeper and find out how to make negative camber yourself. Before making direct adjustments, you need to find out whether your car model will accept such a camber and whether lateral and vertical stability will be within normal limits.
The last two indicators can be artificially increased. To increase lateral stability, it is necessary to install a special stabilizer in the front suspension, but for the vertical one, replace the shock-absorbing springs with new ones that will be more rigid. And in order to eliminate the possibility of skidding when turning at speed, reduce the number of turns in the rear suspension springs. Then the car will press against the outer side of the wheel while turning, which means the rear axle will not drift.
Now let's move on to the adjustment process itself. To do this, you will definitely need special plates, which can be purchased at any auto store. Be sure to consider what angle you want when purchasing a plate because they come in different sizes. The algorithm of actions is identical for almost all brands and models of cars.
The car must be installed on a hard and level surface, then jacked up and the wheel removed. After this, the brake drum is removed along with the pads, and even the hub. Now you can put on the camber plate and assemble the dismantled elements back in the opposite order (hub-drum with pads-wheel). The same manipulations must be done with the second wheel, after which the work will be completed.
The work is actually very easy, but if you do not have the necessary equipment and desire, contact the service center, they provide such a service. With high-quality negative camber of the rear wheels, you will immediately notice that the car has become much more stable when turning.
everything useful is here
Adjusting the front wheel alignment angles
Rice. 1. Casting angle of the wheel axis
Rice. 2. Wheel camber angle
Rice. 3. Wheel alignment
To ensure good stability and controllability of the car, the front wheels are installed at certain angles relative to the body and suspension elements. Three parameters are adjusted: toe-in, wheel camber angle, and the longitudinal inclination of the steering axis.
Castor angle: measurement and adjustment
angle The angle between the vertical and the axis of rotation of the wheel when turning the steering wheel, which ensures automatic alignment of the tires due to movement, is 4º±30′ for a loaded car and 3º±30′ for an unloaded car.
The angle is measured using specialized templates. The parameter is adjusted by rearranging the washers on the bolts that fix the lower arm relative to its axis (located at the ends of the axis). The angle is increased by installing the washer on the bolt located closer to the interior.
Adjustment
If the caster angle changes, self-locking nuts M12x1.25 will be needed. VAZ has a suitable article number - 16105011. If the angle is reduced, washers “2108-2904225” (part 24) are also needed. Installing one washer leads to a decrease in caster by 19 arc minutes.
Stretch (saber) and lever
To adjust any parameter, the wheel is hung up and removed. And when adjusting the caster, each of the two wheels is hung in turn. In general, the work ahead is long.
Caster angle
To add or remove washers, you need to remove the stretcher: use a flat 24 wrench to hold the stretcher itself, and use another wrench to unscrew the nut.
Removing suspension braces
Having unscrewed the nuts on both sides, the part cannot be removed immediately. You also need to unscrew the fastening of the lever to the stabilizer link (key “17”). To knock out the mounting pin, use an aluminum spacer.
The maximum number of washers is two in front and four in back (near the fist). Recommended tightening force – 43-52 N*m (stabilizer thrust), 160-176 N*m (stretch).
Camber angle
On all Tens, including the VAZ-2112, the camber is easily adjusted. The upper bolt, which holds the fist, is equipped with an eccentric. The nut on the bolt needs to be loosened and then rotated with a wrench - the camber angle will change.
Adjusting the right wheel camber
Mark the standard position of the adjusting screw cap (Fig. 1). Loosen the nut on the bottom screw. The same must be done with the top screw - do not unscrew the nut completely! After completing the adjustment, tighten the fastener. You need two keys “19” (Fig. 2).
The recommended torque when tightening the nuts is 78-96 N*m.