Repair / From Alexander Smirnov
- Symptoms of a problem
- Diagnostics
Checking the electrical circuit
- Pressure check
- Video: how to distinguish an original from a fake
Fuel pump malfunction in VAZ 2114 and VAZ 2115 cars is a fairly common phenomenon. You can solve this problem yourself, without resorting to the services of a car service. The pump replacement procedure is quite simple. It will require only a few hours of free time and a standard set of tools.
Lada 2115 › Logbook › Algorithm for troubleshooting an electric fuel pump
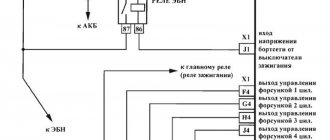
Hello to all subscribers! One of the common situations that happens, usually unexpectedly, is that the usual buzzing of the electric fuel pump in the rear of the car is absent when the ignition is turned on. As a result, the car engine refuses to start. I present an algorithm of actions if such a disaster suddenly happens. To begin with: photo 1 shows a fragment of the electrical circuit of the fuel pump.
Attention, working with electrical equipment is dangerous. If you are unsure, seek the help of a qualified professional.
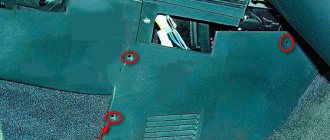
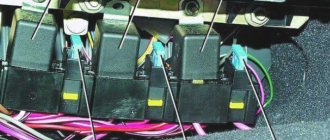
First of all, the driver should first remove the side console on the passenger side (there are 3 relays with fuses there). Our electric fuel pump relay is the lower one. (Some cars from 2007 have 2 relays, but the fuel pump relay is the top one - see the repair manual). Directly above the bottom relay is our fuse. The first step is to make sure that this fuse is working properly (photo stage 1).
If the fuse is working and its contacts and its connector are not oxidized, then you need to make sure that the relay is working properly. You can immediately install a known-good relay and turn on the ignition. If the situation is corrected, then install the side console and have a good trip. If nothing has changed, then it is necessary to determine where the problem arose. To do this, you need to have a voltmeter or multimeter or a probe. But we will not determine the voltage value with a probe, and in this situation you need to know the voltage value - I’ll tell you why later. The second step (photo step 2) is to determine whether there is control voltage at the fuel pump relay. We connect the multimeter, turn on the ignition and determine the voltage value. If there is no voltage, then there is an open circuit coming from the main relay or from the ECU. If there is tension, then move on.
Stage 3 (photo stage 3) is to determine whether the power goes further directly to the fuel pump itself. If the power does not come out, the culprit is most likely the relay due to possibly burnt contacts. If the voltage goes away, but its value is 10 volts, then most likely the relay contacts are also burnt. At this voltage, the pump motor will not start. We change the relay and check. If the power goes further and its value is 12 Volts, then the culprit is the wires going to the electric motor of the pump or the pump itself.
Next you will have to remove the rear seat to get to the electric fuel pump. We remove the hatch and see the fuel pump chip. There are 3 wires on the chip: 1-minus, 2-plus of the fuel level sensor, 3-plus of the fuel pump itself. Unfortunately, I won’t tell you the sequence and location on the chip yet. In any case, when the ignition is on, there should be 2 pluses and one minus. In photo 4 (photo stage 4) we connect one by one to the contacts of the fuel pump chip and look at the presence and magnitude of voltage. If there is voltage, then the culprit is the electric fuel pump itself, and without removing it, most likely the cause cannot be eliminated.
Be careful with electricians and remember that the fuel pump control circuit can also break a faulty security alarm relay. Smooth roads everyone.
Fuel pump in VAZ 2114/2115: identifying breakdowns and their causes, repair and replacement
Owners of cars from the Samara VAZ 2114/2115 family have nothing to complain about: their cars can handle the loads quite well and rarely fail. But in some cases, the problem becomes a breakdown of the fuel pump. This is the most important element of the system, the failure of which can lead to serious problems: the motor simply will not work.
What fuel pumps are installed on the VAZ 2114/2115
The gas pump (or fuel pump) pumps fuel from the gas tank to the engine. On models 14 and 15 of the VAZ family, the fuel pump is located in the fuel tank. The gas tank is located on the bottom of the car, in the rear. Therefore, in order to get to the fuel pump if necessary, you will need to remove the cushion from the rear seat in the cabin and find a small hatch hidden underneath.
The device is “hidden” under the rear seats, under an inconspicuous hatch in the car body
On cars of the Samara VAZ family (that is, on “fourteeners” and “tags”), “native” factory fuel pumps of the “Saratov” brand are installed. Their performance is average, but in terms of tightness they can let the driver down at any time. However, their main advantage is their low cost.
Each owner of a VAZ-2114/2115 can easily replace an unwanted fuel pump with a better one. For example, the domestic “DAAZ” or the time-tested “Pekar”.
The production of gasoline pumps is located in Dmitrovgrad
Foreign analogues: QH (England) and OTA (Italy) also fit perfectly into the fuel system of domestic cars, however, their cost is almost three times higher than the price for a Saratov fuel pump. However, unlike domestically produced pumps, QH and OTA products are equipped with only one membrane, but a very thick one. Therefore, when using foreign expensive gasoline pumps, the possibility of fuel getting into the oil is practically excluded.
Pekarov production was opened in St. Petersburg
Table: comparative characteristics of fuel pumps for VAZ 2114/2115
| Fuel pump test results | |||||
| Characteristic | "Baker" | DAAZ | Saratovsky | QH | OTA |
| Zero supply pressure (at a crankshaft speed of 2000 rpm), kgf/cm2 | 0,26 | 0,28 | 0,26 | 0,3 | 0,36 |
| Capacity for free drainage (at a crankshaft speed of 2000 rpm), l/h | 80 | 76 | 73 | 92 | 74 |
| Suction period at crankshaft speed 200 rpm, s | 4 | 13 | 12 | 9 | 6 |
| Valve tightness at a pressure of 0.3 kgf/cm2 (fuel leakage within 10 minutes), cm3 | 8 | 12 | 20 | 8 | 8 |
| Place | 3 | 4 | 5 | 1–2 | 1–2 |
How to check the performance of the fuel pump
Often, for those problems for which the car owner blames the fuel pump, other elements of the fuel system are to blame. To establish whether a fuel pump has failed, you will need to know the reasons why it might break.
Causes of fuel pump malfunctions
Most often, the device may fail while the vehicle is moving. The gas pump may simply refuse to pump fuel from the tank to the engine, or a leak may form, causing the device to malfunction. If the power supply is interrupted, the pump stops working completely.
The main causes of fuel pump malfunctions include the following:
lack of tightness in the pump itself (leakage);
damage to membrane surfaces;
the resource of the pump motor has been used up;
wiring or relay problems;
dirt and debris in the fuel tank, which, along with gasoline, enter the pump.
As you can see, there can be many reasons for a fuel pump to fail.
Dirt deposits on the filter mesh are a common cause of fuel pump malfunctions.
Symptoms of a problem
There are only four main signs by which you can diagnose malfunctions in the fuel pump without special tools:
The car simply won't start. Of course, the engine may not function for a number of other reasons, however, first of all, you will need to check the functionality of the fuel pump itself.
After the car starts, the characteristic buzzing of the fuel pump is inaudible. The whirring noise should be clearly audible in the rear of the cabin, as the fuel pump is located under the rear seats.
Recently, interruptions in the operation of the power unit have begun to be observed: the engine does not start the first time, while driving you can hear the engine straining.
The car starts to jerk when driving at low speed.
Repair of fuel pump VAZ 2114/2115
When repairing the fuel pump, we will proceed from the fact that we have already removed the fuel pump from the tank. How to properly dismantle the device will be written below, but we will dwell in more detail on the description of the progress of the repair work:
You will need to remove the protective cup from the module - to do this, you will have to pry the cup latches with a screwdriver, and the fuel pump will come out freely.
We unscrew the two screws from the fuel pump housing that secure the fuel level sensor, then disconnect the cable of wires coming from the sensor and put it aside.
Next, you will need to disconnect the filter mesh from the pump using a flat-head screwdriver.
To complete the disassembly, you need to remove the housing itself from the device - there is a cotter pin on the surface that needs to be pulled out.
You will need to carefully examine all parts of the device for cracks, tears and deformations. As a rule, most often some specific parts of the fuel pump fail, which are much easier and cheaper to replace than to buy a new device. Replacing membranes, rubber bushings or filters is not particularly difficult: use a screwdriver to pry off the old product and pull the new one in its place. The fuel pump mesh, float or fuel level sensor can also be easily mounted with a regular screwdriver.
The unit is reassembled in the reverse order.
Video: how to repair a fuel pump on a VAZ 2115 with your own hands
What to do if the fuel pump does not work
Before deciding anything regarding the repair or replacement of this device, it is worth remembering that the function of the gas pump is to create a certain pressure in the fuel system of the car. Accordingly, the first step is to measure the fuel pressure, quite possibly in order to accurately diagnose the failure of the fuel pump.
Measuring pressure in the fuel system
Normal atmospheric parameters in the VAZ-2114/2115 fuel system are as follows:
at idle - 2.5;
after turning on the ignition - from 3;
without pressure regulator tube - 3.3;
with pinched drain - 7;
after pressing the gas pedal - from 3 to 4.5.
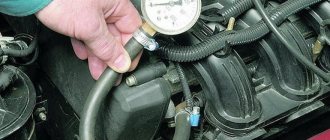
You will need to measure the pressure in five operating states of the fuel system at once in order to obtain accurate data. There is a pressure fitting under the hood of the car; you will need to unscrew the cap from it and attach a pressure gauge with a hose. By turning on the ignition, holding the drain, pressing the gas, it is necessary to take all five pressure measurements.
Using a pressure gauge, you can measure the fuel pressure and, based on this indicator, look for a malfunction
Wiring check
If the pressure readings are almost identical to normal, you will need to check the wiring for a short circuit. It is quite possible that the fuel pump itself is in working order, only the contacts that go to it have been damaged.
It is necessary to check the fuel pump wiring for short circuits.
You need to know that the wiring system, which goes directly to the fuel pump itself, has three wires: positive, negative and an indicator of the fuel level in the tank. You will need to take a regular light bulb with a power of no more than 12 V and attach its wires to the “+” and “-” contacts on the external connector of the pump. After starting the engine, if the lamp blinks, then there is contact.
If there is a flaw in the wire circuit, the light bulb will not light up. The internal contacts of the fuel pump are checked as follows:
one by one, the light bulb wiring is connected to the “+” and “-” connectors of the fuel pump, then to its ground and relay;
if the lamp blinks when connected to the negative contact, then the fuel pump contact is considered not working, and if it does not blink, then the “+” contact is not working.
After this, you will need to first check the relay and fuse: if they are normal, then the wiring is damaged somewhere between the pump and the relay.
Replacing the fuel pump on a VAZ 2114/2115
Before you begin work, you should relieve the fuel pressure in the system. Even when the pump is not working, the pressure can remain very high, which will lead to the pressure of a stream of gasoline during dismantling work.
Fuel pump fuse VAZ 2115
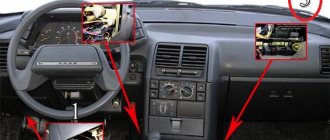
The fuel pump relay is located under the dashboard. On the passenger side, a side panel is opened that covers the beard on which the radio, on-board vehicle, and heater controls are mounted. We see a strip with three relays and fuses.
The pump relay is the lowest. Its fuse is also at the very bottom. When you turn the key, the relay turns on for 5 seconds in order to pump up pressure in the system and turns off. After the engine starts, control of the pump passes to the computer.
The mass of the pump (and fuel level sensor) is attached to the stud securing the handbrake to the body under the carpet. To get to it you need to remove the vestibule between the passenger and driver seats. There are 3 wires coming to the fuel pump: the first is +, the second is minus, the third is the fuel level sensor.
Where is
If we describe them from top to bottom, we get the following:
1. The fuse that controls the fuel pump. Its current strength is 15 amperes.
Lit
A fuse is a small element whose task in the design of electrical circuits is to melt in the event of an overload. The device melts and the current-carrying circuit opens.
Using the example of a solution from the popular VAZ Priora model, we can superficially examine the design and operating principle of the fuse. The device is small, the outer casing is made of plexiglass.
Electrical wiring contacts
There are three wires coming to the device. This is a positive cord, respectively, a negative cord and a fuel level sensor wire. One of the reasons why the pump refuses to work is a power failure. After applying pressure, it is worth checking the contacts.
This can be done using a light bulb. It is secured to the wires and attached to the external connector of the pump. After turning on the ignition, the light should blink. If it still doesn't work, you should check the internal contacts.
If, when testing the external contacts, the lamp did not light up, then in turn connect the negative and positive contacts, which are disconnected from the pump, to ground on the device, and then to the VAZ-2114 fuel pump relay. When the negative contact is connected to ground and the light blinks, the contact is faulty. If not, the positive contact does not work. If the contact is on the relay and the lamp lights up, then it is worth checking the wiring from the pump to the relay.
Where is the VAZ-2115 fuel pump relay located and how to find it
The domestic auto industry is one of the most controversial topics raised by car enthusiasts.
Yes, sales of the brainchild of Tolyatti engineers annually occupy leading positions in sales rankings, both on the new car market and on the secondary market. But everyone understands perfectly well that such indicators were achieved not thanks to the quality of the cars themselves, but because of the non-standard policy of the state itself in this regard, because of which foreign dealers, one by one, refuse to supply their new models to the Russian market. As for quality, this has never been a strong point. Of course, its cars are in the lowest price segment, which means they belong to the lowest class of cars, designed exclusively for moving from one place to another on good road surfaces. VAZ completely excludes any kind of comfort - all the technologies used date back to the 70-80s of the last century.
However, this also has its advantages. For example, the structure of such cars has long been studied and is familiar not only to technicians at service stations, but also to many ordinary car enthusiasts. Another positive point is the simplicity of the design. Unlike foreign cars, especially those produced in Germany, all their spare parts can be easily found on free sale and separately, and not assembled and at a much higher price. This way, users do not have to rack their brains over the location of parts in the car, and, accordingly, over their installation during repairs or scheduled maintenance.
VAZ-2115 - features
VAZ-2115 is perhaps one of the most unsuccessful examples produced by a domestic manufacturer. The body design was considered so unclaimed that it subsequently became the subject of numerous ridicule from owners of foreign cars. Inside, things are even worse, but the concept of this model was developed already in the early 90s, when the BMW 5-series E34, Mercedes-Benz W124, Audi 100 in the C3 body, etc. saw the light of day.
However, as was indicated, despite all the existing disadvantages, the VAZ-2115 was and is selling quite well, and, in addition to its reasonable price, it attracted potential buyers with its simplicity of design and, as a result, maintenance.
In order to thoroughly study this machine, several months of its daily use will be enough.
Knowing the VAZ-2115 device is necessary in order to understand what caused a particular malfunction, as well as to be able to troubleshoot problems in a timely manner, including on your own, if possible. In addition to the main components - the engine, gearbox and suspension - you need to know how other systems function and where their components are located. For example, if we talk about the fuel supply system, many people have an idea of what a gasoline pump is and how it is located in the plane of the car body, but not everyone knows where the relay for this same gasoline pump is located.
Location of the starter relay on the VAZ-2115
In fact, everything is quite simple - the fuel pump relay is located under the dashboard, on the passenger side. In the designated place, it is necessary to open the side panel, which covers the front part and through which the radio, on-board computer and heater radiators are mounted.
After removing the specified element, you can see a strip with three relays and fuses. The pump relay is located below the other two, just as its fuse is in the lowest position compared to the others.
Pinout BN VAZ 2108, 2109, 21099
The fuel pump activation relay (2) is shown by an arrow.
1 — nozzles; 2 — spark plugs; 3 — ignition module; 4 — diagnostic block; 5 - controller; 6 — block connected to the instrument panel harness; 7 - main relay; 8 - main relay fuse; 9 — electric fan relay; 10 — controller power supply fuse; 11- electric fuel pump relay; 12 — fuel pump power circuit fuse; 13 — mass air flow sensor; 14 — throttle position sensor; 15 — coolant temperature sensor; 16 — idle speed regulator; 17 — knock sensor; 18 — crankshaft position sensor; 19- oxygen sensor; 20- APS control unit; 21 — APS status indicator; 22 — speed sensor; 23 — electric fuel pump with fuel level sensor; 24 — solenoid valve for purge of the adsorber; 25 — block connected to the ignition system harness; 26 — instrument cluster; 27 — ignition relay; 28 — ignition switch; 29 — mounting block; 30 — electric fan of the cooling system;
A - to terminal “B+” of the generator; B - block connected to block K of the ignition system harness; C - block connected to block L of the ignition system harness; D - wire connected to the interior lamp switch; E - wire connected to the white and black wires disconnected from the interior lamp switch; F - to the “+” terminal of the battery; G1, G2 - grounding points; K - block connected to block B of the front harness; L — block connected to block C of the front harness.
On “nines” with a mechanical fuel pump, the most common malfunction is wear of the fuel pump diaphragm, as a result of which gasoline will leak through the drainage hole in the housing when it operates. The second reason for the failure of such a fuel pump is wear of the pusher, which transmits force from the camshaft cam to the fuel pump drive lever.
Causes of malfunction
- Fuses under the dashboard on the ECU. The top one is 15A (fuel pump) and the bottom one is 7.5 A (goes to the ECU, to the ignition module.
- Faulty fuel pump relay. It is located under the dashboard, the topmost relay (below the top fuse).
- Poor fuel pump ground. The ground for the fuel pump is attached under the dashboard, where the handbrake is. The mass needs to be cleaned and re-secured. If the mass falls off, the fuel level indicator also does not work.
- Lack of positive contact. We remove the rear seat and check the presence of contacts in the wiring block. If there is no positive, then it is either a relay or a fuse.
- Fuel pump motor not working.
On VAZ-2115 cars produced in 2000 and later, injection engines are installed, which means that the gas pump located in the fuel tank will be electric. The operation of such a fuel pump is checked every time before starting the engine. Moreover, the driver must do it correctly. When you turn on the ignition, you should hear the sound of the fuel pump turning on for a few seconds. You must wait until this noise stops and only then start the engine. This is done so that the power system has time to pass the test for its serviceability.
If, when turning on the ignition, the driver does not hear the noise of the fuel pump, then you can try to remove the negative terminal from the battery for a few minutes, this is done to reset errors in the control unit, and then turn on the ignition again. If these actions did not help get the fuel pump working, then you will have to remove the cover located on the console at the feet of the front passenger and check the condition of the 15-amp fuse, and at the same time the relay. They are located at the very bottom, of the three relays and fuses that are there.
Self-diagnosis and replacement of the fuel pump VAZ 2114/2115
Fuel pump malfunction in VAZ 2114 and VAZ 2115 cars is a fairly common phenomenon. You can solve this problem yourself, without resorting to the services of a car service. The pump replacement procedure is quite simple. It will require only a few hours of free time and a standard set of tools.
Models of fuel pumps for VAZ 2114/2115 cars
VAZ 2114/2115 cars are equipped with 1.5 cm 3 and 1.6 cm 3 gasoline engines with a distributed injection system. A submersible electric fuel pump is used to supply fuel. It is part of the fuel module installed at the top of the gas tank (under the rear seat). In addition to the pump, the module includes a fuel accumulator (cup), a coarse filter and a fuel level sensor with a float.
The VAZ 2114/2115 fuel pump is a conventional DC electric motor in a sealed housing with a one-way valve at the outlet. An impeller of a special shape is located on the electric motor shaft. Its rotation ensures the fuel supply.
The fuel pump is powered from the vehicle's on-board network. The electrical circuit of the pump, protected by a fuse, is closed using a separate relay.
Electric fuel pumps for VAZ cars are produced by both domestic (Utes, SAAZ, Pekar) and foreign companies. The latest modifications of the VAZ 2114/2115 are equipped with BOSH pumps, which are distinguished by their high reliability, long service life and relatively low price.
Catalog numbers of standard fuel pumps for VAZ 2114/2115:
- 2112–1139009–12 - for engines with a volume of 1.5 cm 3;
- 2112–1139009–01 - for engines with a volume of 1.6 cm 3;
- 580453453 (BOSH) - for engines with a volume of 1.5 and 1.6 cm 3.
These models differ in operating pressure. The former are capable of creating a pressure of 2.8–3.2 kPa in the fuel system, the latter - 3.7–3.9 kPa. BOSH fuel pumps are rated at 3.5 kPa.
Symptoms of a problem
A malfunction of the fuel pump of VAZ 2114/2115 cars can be diagnosed by the following symptoms:
- when the ignition is turned on, there is no sound of the pump running;
- the engine does not start or starts with difficulty;
- the power unit is unstable at idle, the speed “floats”;
- “dips” appeared during acceleration;
- the motor has lost power.
The same signs also appear when other elements of the fuel system malfunction.
Before you begin diagnosing or replacing the fuel pump, you should make sure that:
- the fine fuel filter is not clogged (it is changed every 7 thousand kilometers);
- the injectors and fuel pressure regulator are operating normally;
- The sensors for mass air flow, throttle position, and oxygen quantity are working properly.
If the detected malfunction is accompanied by the lighting of the “CHECK” lamp on the dashboard, you should set the error code and decipher it.
Diagnostics
A malfunction of the VAZ 2114/2115 fuel pump can be caused by:
- malfunctions in the device’s power supply circuit;
- failure of starting and protection elements (relay and fuse);
- wear of electric motor parts.
Checking the electrical circuit
At the beginning of the diagnosis, you should check the electrical circuit of the fuel pump. To do this you will need:
- car tester (multimeter);
- crosshead screwdriver;
- two pieces of wire about 2 m long.
Checking the electrical circuit is carried out in the following order:
- Turn on the ignition without starting the engine. When the key is in the first position, a click should be heard, characteristic of turning on the relay, followed by a slight whirring of the pump electric motor. If there is no click, the relay is faulty or is not receiving power. If there is a click, but no buzzing, the wiring coming from the relay or the pump motor itself is faulty.
- Under the glove compartment, find an additional mounting block consisting of three relays and three fuses. The pump relay is located in the middle, and the fuse is located to the left of it. Remove the fuse from its socket, test it with a multimeter, and if the result is negative, replace it. When replacing the fuse, please note that it is rated for a maximum of 15 A.
The relay and fuse for the fuel pump on the VAZ 2114/2115 are located in the mounting block under the glove compartment.
Set your multimeter to voltmeter mode. Connect one probe of the device to the relay terminal to which the pink wire fits, and the second to the car body. Turn on the ignition. The device should show the on-board network voltage in the range of 11.7–12.4 V. If there is no voltage, the problem may be a broken wiring or a malfunction of the ignition contact group. In this case, it is better to contact an auto electrician. If power is supplied, check that the relay is working. With the ignition on, use a screwdriver or a piece of wire to close the contacts to which the pink and gray wires go. This closes the circuit bypassing the relay. If the fuel pump works, replace the relay.
Pressure check
If the pump is working properly, but the engine begins to operate intermittently, you should check the fuel pressure in the system. For this you will need:
- pressure gauge (can be a tire gauge with a measurement limit of 5–7 kPa);
- petrol-resistant hose with a diameter of 10–12 mm and a length of 50–80 cm;
- two clamps for a hose of the appropriate diameter;
- Phillips screwdriver;
- nipple cap;
- dry rag.
In addition, the presence of an assistant is desirable.
The verification procedure is as follows:
- In the engine compartment on the engine fuel rail, locate the pressure measuring fitting (on the right side).
- Remove the plastic cap (plug) from the fitting.
Selecting and replacing the fuel pump
Russian car owners prefer BOSH fuel pumps. You should only buy a new pump in specialized stores. The original product must be packaged in thick plastic film filled with special preservative oil. At the same time, a branded BOSH pump cannot cost less than 2 thousand rubles.
Video: how to distinguish an original from a fake
To replace the electric fuel pump on a VAZ 2114/2115 you will need:
- screwdriver with Phillips bit;
- thin slotted screwdriver;
- key or head 7;
- key to 10;
- key to 17.
Video: dismantling the fuel pump
The sequence of actions is as follows:
- Using a 10mm wrench, remove the negative terminal from the battery.
- Open the gas tank cap to reduce the pressure in it.
- Remove the rear seat cushion and peel back the carpet and sound insulation.
Video: disassembling the fuel module
If, when disassembling the fuel module, it is discovered that the coarse filter is clogged, it should be replaced. The fuel level sensor with a float must also be replaced if the readings on the front panel do not correspond to reality.
Thus, diagnosing and replacing the fuel pump of a VAZ 2114/2115 car is quite simple. And in order for the pump to serve for a long time, always refuel only with high-quality gasoline.

