December 25, 2014 Lada.Online 156 043 131
The manufacturer installs audio systems of various types on Lada Kalina 2 and Lada Granta cars. In this review, we will look at the operation of the audio system (FM, USB, SD card, Bluetooth, Handsfree) with catalog number for Lada Granta: 2190-7900010-20 and Lada Kalina: 2190-7900010-40, the difference between them is only in the fastenings. These standard radios are Kalina 2 and Granta, installed on the “norm” package.
First impressions
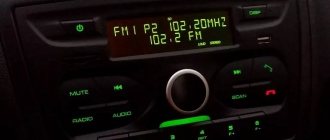
At first glance at the radio, you can say that it fits harmoniously into the interior of the car. There is nothing superfluous that would raise questions from a design point of view. The build quality is pleasing; it is worth noting the smooth, smooth movement of the buttons, the absence of backlash and the plastic of the radio that is pleasant to the touch. The radio backlight is green.
The radio is turned on by pressing a special button in the upper left corner of the radio. Loading occurs within a few seconds, during which the inscription “Lada Kalina” is briefly displayed on the display.
How to listen to music in the car via Bluetooth
One of the modern methods of connecting any mobile device to a car radio is the use of Bluetooth for this purpose. However, this method is not supported by every playing device. Multimedia systems with a touch screen most often have access to it.
There are absolutely no cords here - the user simply connects Bluetooth on both the smartphone and the multimedia system, after which they are paired. This connection ensures complete integration of devices. All control occurs via the radio.
Video: connecting a smartphone using bluetooth
Bluetooth is considered one of the most convenient options for connecting a gadget to a car player. Using the radio, you can not only listen to music, but also play video files. Many models provide the ability to use Bluetooth as an intercom. Receiving an incoming call and conducting negotiations is carried out through the radio, which eliminates the need to hold the phone near your ear.
The disadvantages of using this connection method include the fact that this function, as mentioned earlier, is not supported by all car radios. And even those that have this support do not connect to all smartphone models. In addition, there may be stuttering when playing large files.
Radio capabilities
On the right side of the radio there is a USB connector, which is designed to connect:
- USB Flash card (USB 2.0 and 3.0 up to 64 GB);
- USB Flash player with a memory capacity of at least 1024 MB;
- USB HDD with FAT32 file system;
- Mobile phone (only in charging mode).
On the left side of the radio there is a slot for SD cards. SD Memory Card Slot: Supports SD, SDHC cards of size 32 X 24 X 2.1 mm. SDHC up to 32 GB, SD up to 32 GB.
The file allocation table (FAT) of the connected device must be FAT16 (< 2 GB) or FAT32 (> 2 GB). The maximum number of primary partitions should be no more than 4. It is advisable that the directory tree of the connected device have no more than eight levels. There should be no more than 1000 files in one directory.
While playing files, the display shows all the necessary information about the track. The playback source is selected using the AUDIO button on the left side of the radio. The radio has equalizer presets (JAZZ, POP, CLASSICAL, VOCAL and USER). The range of timbre adjustments for bass, treble, balance, front/rear balance is from “-7” to “+7” units.
The radio has Bluetooth and Handsfree functions. You can connect your phone by long pressing the handset button. When pairing on the phone, the inscription “MMC12” should appear in the list of found devices, the default password is “0000”. After successful connection, the BT icon will appear on the display of the radio. There is no phone book on the Kalina 2 and Grant radio, but it is possible to save up to 6 numbers in the radio’s memory. The audio system also remembers the last outgoing and incoming calls. The manufacturer does not guarantee operation of a phone in Handsfree mode that uses two or more SIM cards.
The radio allows you to listen to audio files from your mobile phone. To do this, you need to connect your phone to the radio via Bluetooth and launch the player on your phone. The manufacturer states that certain cell phone models may not work correctly with this radio, but this is not a sign of a malfunction.
The Kalina 2 and Granta radio has its own battery, which allows you to save user settings after disconnecting the battery for 10 days.
Second installation option
There is another way to connect the radio, which will ensure that it is turned on not through the ignition switch, but using a separate button.
First, you should buy a suitable button and a contact block with the wires intended for it at any auto store. All this is not very expensive and will require no more than one and a half hundred rubles
Moreover, it doesn’t matter what the button is if the owner does not need order on the console. It can be from the main beam, or with a different image, the main thing is that it fits under the connector for spare buttons, where the plug is located
The only point is that it is advisable to choose a button with an indicator.
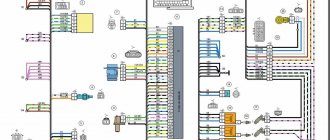
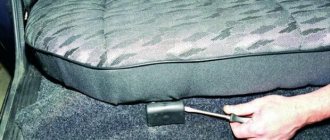
Mounting blocks for installing an audio system
If the wires of the block turn out to be short (and this often happens), it is better to extend them in advance by soldering. Twisting is not suitable here and should not be used.
The button is connected in the following way:
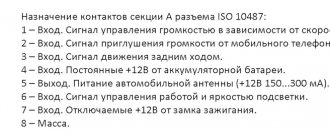
- connector A - for grounding;
- B - passes from the side lights illumination;
- C - removed from the block purchased with the button;
- D - powers the power indicator;
- 1 — battery wire (red);
- 2 - red radio wire.
In one block, two contacts should be soldered together - 2 and D. The button is installed without removing the console. It will be enough to pull out the corresponding plug.
Cut the wire that fits the contacts of the red wire of the radio and solder wires 1 and 2 into the cut. A and B should be connected to the same contacts from the rear window heating button or other similar buttons. Do not forget that during all electrical work the battery should be disconnected.
When everything is connected and soldered, you need to double-check the system and make sure that the circuit and connections are made correctly. Then the slides and the removable radio panel are installed in place. The last step is to check how everything works. Now you can turn the radio on and off with a new button, and you don’t have to worry about charging the battery. One of the nice features of this connection is that when you turn off the radio, all settings are saved.
If, out of habit, the radio was turned off with its original button, this is not a problem, because the indicator of the new button will still light up and remind you of the need to turn it off.
Source
Video review of the radio
The standard radio for Kalina 2 and Grant has all the necessary functions for a modern car. The audio system works flawlessly, there are no freezes, all operations are performed instantly. The build quality is at a high level. The only disadvantage is the lack of a CD/DVD drive, but nowadays discs are becoming a thing of the past. The standard radio of the Lada Kalina 2 and Granta without an LCD display is a good alternative for those who find physical buttons more convenient than a sensor.
Download the manual for operating the radio (from page 173): To download files you need to log in to the website
Let us remind you that on the “Lux” configuration AVTOVAZ installs radios with an LCD display.
Keywords: cassette player Lada Granta | cassette player Lada Kalina | torpedo Lada Granta | Lada Kalina torpedo
+12
Share on social networks:
Found an error? Select it and press Ctrl+Enter..
Do-it-yourself installation
Next, we will look in detail at how to correctly install the radio on the Lada Granta manually
If you are not a fan of the standard audio preparation of the Lada Grant, pay attention to this algorithm
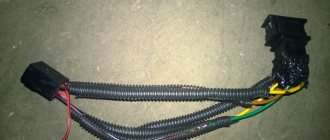
As stated earlier, the power wires are initially wired, and all that remains is to understand how to properly connect them to the radio.
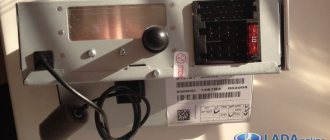
After removing the cover that covers the radio, two connectors will be visible in front of you. One connector is intended for connecting speakers in the doors, the second is for power supply.
The black and pink wires indicate ground and plus, and at the same time they are the main ones for power supply. If the connection is incorrect, the audio system will at least not work; in the worst case scenario, you will short-circuit the “–” and “+” terminals, which will result in the fuse blowing.
When connecting directly, be sure to insulate all wires, not just those used, to avoid a short circuit.
After connecting the necessary wires, we secure the speaker with self-tapping screws or screws and close the mesh.
It is recommended to install 5-inch speakers (12.5 cm) on the front doors of Lada Granta cars, but if desired, you can insert 16 cm, as a result of which the sound quality will only increase. Choose speakers so that the glove compartment can open completely. This problem often exists when owners choose larger speakers.
Some craftsmen cut out the trim on the rear doors and install pancakes (6x9), which sound even better. With this option, a teardrop-shaped mesh is purchased in the standard factory place for speakers, and speakers measuring 13 cm are installed.
After doing all this grant-audio preparation, all that remains is to turn on the speaker and wait for the radio to turn on.