02/09/2021 1,290 VAZ
Author: Ivan Baranov
An unpleasant situation when you urgently need to go, but you cannot start your car. The cause may be a breakdown of some component or part. The article discusses situations related to the starter, when a VAZ does not start, the starter does not turn, and others. Instructions are given for diagnosing, removing and repairing the starting device of VAZ cars.
[Hide]
Causes of unit malfunction
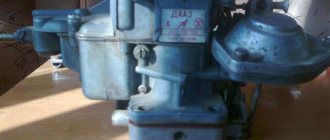
This is the car unit
Repair of the VAZ 21053 starter is carried out with your own hands or with the help of auto mechanics when various units fail. The power relay may not operate (and the starter does not turn) for the following reasons:
- battery is low,
- wires are oxidized or terminals are loosely tightened,
- short circuit in the winding of the VAZ starter relay,
- circuit break,
- the anchor gets stuck.
Repeated operation of the VAZ 2105 unit in question and its shutdown is associated with the following reasons:
- battery is low,
- wires are heavily oxidized,
- break or short circuit in the winding.
If the starter does not turn, you will need to disassemble it. An important point is to check the VAZ 21053 switch-on relay. To do this, you will need to install a gasket, the thickness of which is 12.8 mm, between the ring and the gear. The starter relay then turns on. The normal voltage reading is 9 V at a temperature of (20±5) °C. If the obtained values do not correspond to the norm, the VAZ 2105 starter relay will need to be replaced with a new one.
If the car is equipped with an ST-221 starter with a single-winding traction relay, the current consumption is checked. This figure should not exceed 23 A.
The starter does not turn or its mechanical data have deviated from the norm, the VAZ 21053 power relay has broken, the armature has failed - all these and some other reasons indicate the need for repair work. When checking mechanical indicators, you need to perform the following steps.
- Using a dynamometer, measure the spring pressure on the brushes. For new units, this figure should be 9.8 ± 0.98 N. If the value for worn ones reaches 12 mm, the parts are replaced with new ones.
- Move the VAZ 2105 starter drive along the splined end to make sure how freely it moves. What is important is its clear return from the operating position to the original one under the influence of the armature spring of the switching relay.
- If the gear rotates towards the armature, the last element must be in its place.
Return to contents
Starter malfunctions
- 68 16 85k
- 172 1 247k
When the starter does not work or works intermittently, starting the engine is very problematic and sometimes impossible. But before you start looking for the reasons why the starter does not turn, you need to remember that this unit works in tandem with other vehicle systems in a common starting-charging circuit (battery-start control mechanism-starter). Therefore, there can be both mechanical and electrical breakdowns, which have their own distinctive features. Each cause of the malfunction is determined by characteristic symptoms or as a result of testing.
Starter replacement rules
When the starter does not turn or the starter relay is faulty, these parts will need to be replaced. The process of replacing the starter is carried out using a key at “10”. They unscrew the bottom bolt that secures the heat shield. Use a wrench to “13” to tighten the nuts securing the shield, after which it is removed. Using the same key, the starter fixing bolts are unscrewed. The VAZ 2105 starter moves forward. Next, the block is disconnected from the traction relay terminal. After disconnecting the wires from the last unit to the battery, the main part is dismantled.
New equipment is installed in the reverse order. During installation, great attention should be paid to securely fixing the power wire of the VAZ 21053 starter relay. Disassembling this unit is considered a complex process. To do this, you will need keys for “13” and “10”. After unscrewing 3 screws, the starter relay is removed. The rod and spring are pulled out from the part body. For subsequent disassembly of the starter, a Phillips screwdriver is used. With its help, the screws are unscrewed and the cover is removed. The condition of the brushes can be checked after dismantling them.
When disassembling the part in question, special attention is paid to insulating the free winding terminals. After removing the retaining ring, you will need to remove the insulating tubes. At the same time, the condition of all windings and the VAZ 2105 commutator is visually checked. If the last element heats up slightly, the plates are cleaned using sandpaper. In case of strong heating, the armature is replaced.
The next step is to dismantle the rubber seal and remove the adjusting washer. The assembly process involves installing this element in its place. The anchor is removed along with the drive. When removing the lever, you need to take into account that the gear must rotate freely in a certain direction. The worn part is replaced with a new one.
Assembly of the unit is carried out in reverse order. The limiter is put on the shaft towards the stopper ring. To do this, use a hammer and a key set to “14”. An important point is to blow dust out of the VAZ 21053 starter. To lubricate the parts, use “Litol-24” or grease No. 158. The following parts are lubricated with engine oil:
Auto mechanics recommend inserting bolts into the required holes before the assembly process. When insulating the first bolt, the corresponding pipe is put on the element that touches the copper busbar. It is recommended to solve the problem due to which the starter does not turn as soon as possible.
Source
Starter - check and repair
To complete the work you will need a multimeter.
2. Clean the outer surface of the starter from dirt.
3. To check the traction relay, connect its terminal “50” to the positive terminal of the battery, and the starter housing to the negative terminal. In this case, for a working relay, the armature pushes the drive gear into the front cover window with a characteristic click.
4. To check the armature and stator windings, remove the rear cover of the starter and disconnect the brush assembly (see below, “Repair”).
5. By connecting one ohmmeter probe to the body, the other alternately
connect to the terminals of the stator windings, checking that they are not shorted to the housing.
If there is no short circuit, the ohmmeter should show a resistance of at least 10 kOhm.
6. Having connected the ohmmeter probes to the terminals of the stator windings, we check them for breaks.
If the resistance tends to infinity, the winding has broken.
7. Having connected one ohmmeter probe to the housing, we connect the other alternately to the armature contact plates, checking the short circuit of the armature windings to the housing.
If there is no short circuit, the ohmmeter should show a resistance of at least 10 kOhm.
13
mm
socket wrench , unscrew the nut and remove the stator winding lead from the contact bolt.
2. Using a slotted screwdriver, unscrew the three screws securing the traction relay.
3. Remove the traction relay with rod and spring.
4. Using a slotted screwdriver, unscrew the two screws securing the armature shaft casing.
5. Remove the casing with gasket, lock washer A of the rotor shaft and adjusting washers B.
10 mm socket wrench
Unscrew the two nuts securing the starter rear cover and remove it.
7. Disconnect the front cover from the body along with the tie rods and the anchor.
10 mm socket wrench
Unscrew the locking nut of the eccentric axis of the drive lever.
9. Using a slotted screwdriver, unscrew the lever axis.
10. Remove the eccentric shaft of the starter drive lever.
11. Remove the anchor from the tie rods of the body, disengaging the lever fork from engagement with the drive ring.
12. With the armature shaft resting on a wooden surface, use a suitable mandrel to press the restrictive ring off the retaining ring.
Device
A mechanism such as a starter plays a very important role in the starting system of the VAZ-2105. It is an electric motor with a voltage of 18 volts. The block consists of the following elements:
- starter anchor;
- collector plates;
- poles, or cores;
- overrunning clutch (Bendix);
- steel cylinder.
The device also includes 4 excitation windings located inside the walls of the block housing. The VAZ-2105 starter injector has a similar structure. The service life of this part may vary. Typically, breakdowns occur no earlier than the car has traveled 80-90 thousand km, and with regular maintenance this figure can be up to 150,000 km.
Which one is suitable, location, design?
A starter with a planetary gearbox manufactured by KZATE under number 5722.3708 is suitable for the VAZ-2105.
It is tightened with three bolts. Its rated power is 1.3 kW, current consumption is 290 A. The following control systems are also suitable:
- 3708 with end manifold;
- ST-221 with a cylindrical manifold and a special rear design.
The starter on the fifth VAZ model is bolted at three points to the clutch housing. It is located to the right of the internal combustion engine. The part is protected from the high temperature of the motor by a special heat-resistant shield.
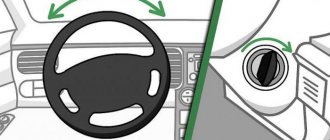
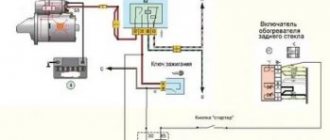
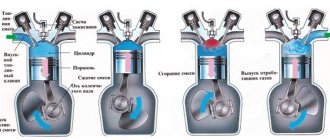
Principle of operation
The overrunning clutch is connected to the flywheel. It is secured in such a way that its movements are not limited. The VAZ-2105 starter relay, which produces pull-in and pull-out movements, is installed on the body. Power contacts are soldered inside this device, which drivers call nickels among themselves. This part consists of simple bolts pressed into the ebonite cover of the solenoid relay. There is also a moving contact in the form of a jumper.
All elements of the starter are connected to each other so that when torque is supplied to the overrunning clutch, the rollers of this element, which are located inside the separator, can fix the gear in the cage. The positive and negative contacts of the starter must be connected with the corresponding pole plates. As soon as the solenoid relay is activated, the core begins to push the bendix towards the flywheel. After this, the anchor spins the flywheel.
During the action of the core on the moving contact and the closure of the power pins, current is supplied from the battery. If the driver starts the engine by turning the key in the ignition switch, a moment may occur when the engine speed is higher than the starter speed. Then the Bendix overrunning mechanism will work.
Electrical causes of failure
If it is determined that the VAZ-2105 starter does not turn, or the speed is too low, then you must check the electrical circuit. Troubleshooting starts with the battery. The driver must ensure that:
- the battery is well charged;
- the wire connecting the terminals of the solenoid relay is securely fastened;
- the ignition switch contact group is not damaged;
- The wire between the starter and battery is good.
At this stage of identifying problems, you need to pay attention to how the retractor operates and the armature rotates. Sometimes the winding of the traction relay is damaged, at the same time a short circuit occurs between the turns. Then the VAZ-2105 does not start, but the starter turns. Another cause of starter failure, which is classified as electrical, is slow rotation of the flywheel.
If no visible problems are found, the starter will need to be removed for further inspection. Most likely, the commutator burned out due to the short circuit of the plates. Other electrical causes of starter failure are:
- failure of the traction relay;
- brushes that do not fit tightly to the commutator;
- armature commutator wear.
Troubleshooting problems that subsequently cause the VAZ 2106 starter to not turn
The search for starter problems should occur in several sectors.
These include the device itself, the battery and the electrical communication system. Therefore, if the VAZ 2106 starter does not turn, first of all you need to check the condition of the battery and determine its charge level. Next, you should clean all wiring contact connections and ensure its integrity. Then you need to check and clean all fuse contacts. If the cause of the malfunction was not identified during a routine inspection, the starter will have to be removed for subsequent disassembly. This will require a set of tools and some special skills.
When disassembling, it is important to pay attention to the following points:
- assess the condition of the contacts of the electrical wiring connections
- check the integrity of certain windings
- determine the presence of graphite brushes, as well as their production
- determine how efficient and worn out the bendix is.
All internal components of the electric motor are regularly exposed to various contaminations. This could be dirt, dust, erased graphite, grease, insulation. This fact can also cause it to work incorrectly. This may also be a consequence of burnt contacts, wear of individual parts, failure of a special relay, or sticking brushes.
When disassembling the starter, it is necessary not only to eliminate a specific malfunction or breakdown, but also to clean and also check all engine parts.
It is important to check the readings of the ammeter (optimally - no higher than 23 A) and voltmeter (no higher than 9 V). If the values exceed the norm, then there may be a short circuit in the electrical wiring
Using a tester you need to check the condition of the windings. Their coils must be dried and treated with insulating varnish. If there are scratches on moving parts, you need to remove them with sandpaper.
It must be remembered that collectors with worn plates cannot be repaired. If the insulation is damaged, it is better to replace it, as well as all parts whose wear rates exceed the established specifications. If the thread is torn or damaged, it can be restored with a new thread. If oxidized contacts are detected, it is recommended to clean them.
After all repair work has been carried out, the equipment is assembled in the manner prescribed by the instructions. It is best to regularly carry out preventive inspection and cleaning of starter parts. In this case, you can avoid serious damage in the future.
Mechanical problems
If you suspect that the problem is mechanical, you need to check spare parts such as the buffer spring, clutch ring, flywheel ring, lever. Typically, a driver can conclude that there has been a failure in the mechanical system if an unusual sound is heard while the starter is operating. Then it is recommended to look at it from the engine compartment. Such noise may indicate that the following elements have broken:
- bearing;
- starter mounting bolts;
- pole fastening.
In addition, the teeth may be damaged. A malfunction often occurs when the starter continues to spin without turning off. This occurs due to sticking of the traction relay drive lever or wear of the ignition switch return spring.
The starter clicks or hums, but the engine does not catch the root causes of the problem.
If there is a malfunction that manifests itself in the form of clicks from the starter when the engine starts, then analysis of the nature of the clicks can indicate the causes of the breakdown. If the starter traction relay clicks constantly:
- the battery is discharged, it is necessary to check the charging current;
- you should check the tightness of the battery terminals;
- there are problems with the “ground”, it is necessary to check the place of contact of the ground with the body or internal combustion engine, it may be necessary to implement additional demining;
We also recommend reading about what engine demining is. From this article you will learn about why it is necessary to install additional weight in a car and what advantages this solution has.
If the starter clicks only once and does not turn the engine, then the following are possible:
- insufficient fastening of the traction relay to the starter housing;
- the contacts in the starter traction relay burned out;
- the malfunction is due to poor ground contact;
- the starter has broken down;
If checking the fastening of the traction relay does not reveal any abnormalities, then the starter relay should be removed for inspection. A dismountable relay means that after disassembling the device, it is necessary to clean the power contacts. The non-separable traction relay must be clearly replaced if a breakdown is detected.
The absence of malfunctions in the starter traction relay will indicate that it is then necessary to remove the starter itself for detailed diagnostics. Note that the starter clicks, but does not turn, both due to breakdowns of the starter retractor relay, and as a result of its own malfunctions. The most common are:
- the power wire that goes from the starter windings to the traction relay may burn out;
- The starter brushes have become critically worn. In this case, the brushes require replacement;
- jamming of the starter armature occurs due to wear of the starter bushings. The starter bushings will need to be replaced;
- a short circuit occurs in the starter armature winding, as well as a break or short circuit in the stator windings;
An element such as the starter bendix should also be mentioned separately. The Bendix may be deformed or the Bendix drive fork may be damaged. Another problem associated with the starter bendix is damage to its teeth. The bendix teeth are jammed, meaning that the device cannot engage the teeth on the flywheel ring.
The bendix is also connected to the retractor core through a special fork. The absence of engagement of the bendix with the teeth of the flywheel ring means that in this case there will be no complete retraction into the winding of the traction relay at the moment of switching on. As a result, the so-called “nickel” will not be able to bridge the power contacts of the relay to supply power to the starter motor.
How to remove the starter on a VAZ 2107
The starter, like any other part, wears out and fails over time, so sooner or later any car owner may be faced with the need to dismantle it for the purpose of further repair or replacement. Today we will talk about how to remove the starter on a VAZ 2107 in a garage without the involvement of third-party specialists. If for some reason it is not possible to carry out this work yourself, then the car can be made available to the service station workers, but in this case you must be prepared for additional financial costs.
How to remove the starter
First you need to disconnect this unit from the battery. All conductive cables and terminals are removed from the solenoid relay. Now you can unscrew the mounting bolts. Usually there are only 2 or 3 of them. For this, take a hinged extension. Removing the starter on a VAZ-2105 is carried out in an inspection hole, since only this method is the most convenient for removing all the parts covering the device. Among the blocks that will have to be dismantled is also the engine compartment protection trim.
What else could happen?
It often happens that the car has barely left the workshop, and ignition problems are already making themselves felt. It goes without saying that drivers become indignant and want to punish careless specialists. However, there is no need to rush into a showdown! There can be several reasons for this phenomenon, and the most common of them are:
- valve clamping;
- incorrect ignition installation;
- Incorrect marking on the pulley and camshaft.
However, there is another, most common problem when the car does not start after replacing the piston rings. Outwardly, everything seems completely normal: the starter turns properly, but the engine still does not want to start. It is this state of affairs that confuses drivers. Everything works fine, why then do problems arise?
Expert advice in this case is quite simple: the spark plugs need to be unscrewed again, and 2 or 3 cubes of motor oil should be poured into the cylinders using an ordinary medical syringe. Next, you need to run the engine a little without spark plugs, and then screw them in and repeat the procedure. Now the car will definitely start moving!
Of course, after the engine grabs its share of oil, its “appetites” begin to increase, and nothing can be done about it. Of course, you can completely replace the motor part and components, but such a procedure is completely unjustified. It’s better to be content with what you have, because in general the VAZ 2105 car is quite economical, both in terms of operation and consumption. The main thing is to provide him with proper care. Then you won’t have to worry about breakdowns for a long time.
Removing the VAZ 2105 starter
Of course, to repair the starter, you first need to remove it from the car. This is what we will do:
Advice! Before removing the starter, ALWAYS (!) disconnect the negative terminal from the battery!
- We remove the air filter for convenience. If the car is fuel-injected, then you need to unscrew the intake manifold extensions.
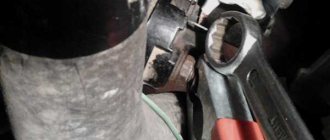
- Next, you will need to use a 10 mm wrench (the head is most convenient) to unscrew the bolt securing the starter shield.
- Then we take the key 13 and unscrew the wires from the starter solenoid relay so as not to tear them off during the removal process.
- Then unscrew the three bolts securing the starter. This operation is performed with the same key at 13.
- Unscrew the starter shield completely.
- Carefully remove the starter from the vehicle's engine compartment.
- The withdrawal is completed.
Advice! It is better to carry out work on a cold engine so as not to burn your hands on the manifold.
Diagnostics
To understand which part of the starter the breakdown occurred in, you should thoroughly clean it. First, the solenoid relay is checked. If it is working properly, a loud click will be heard. Another evidence of the serviceability of this mechanism is that the bendix moves slightly forward. The absence of a click indicates that the relay is broken and needs to be replaced with a new one.
If the problem is not in this part, then you need to make sure that all the insulation is in good condition. All damage can be restored with impregnating varnish and then checked with special electrical measuring instruments.
When, after a complete inspection, all parts are found to be in good condition, the rotor insulation must be checked. Traces of burning and soot on the anchor indicate that this device needs to be replaced. The collector must be clean, free of deposits, and if this defect is present, you can clean the element with sandpaper. After all procedures, the coupling is checked. It should spin freely in one direction and be locked in the other.
What to do if the engine does not start due to the starter?
If you discover that the starter does not spin when the car is ignited, you must immediately begin examining the engine compartment to detect breakdowns and malfunctions in the system. Some of the peripheral devices may be disabled, which ultimately leads to the system being blocked when the engine starts.
If in car models produced in 2000, the problem with the lack of movement in the starter had a specific explanation in the form of wear of the teeth, now modern models may not start even with the simplest blocking of any of the sensors in the on-board computer system. Let's look at the most common problems.
Starter power supply fault
If you have problems with your car’s engine due to problems with the starter spinning up, then first of all you should pay attention to faults in the power supply of this device. As a result, you will probably simply find that the battery is severely discharged or disconnected from the terminals. In this case, the starter will not be able to start, since electricity will not flow into the system.
Tip: A lack of power supply to the starter can occur when the car jerks at low speeds. Just check the condition of the terminals and battery.
If the battery is charged and the headlights are working properly, then the problem with the starter may be due to a breakdown or breaks in the connection of the electrical wires. They will either be completely disconnected from the battery in one of the engine components, or, as a result of wear, they will spark when the engine starts.
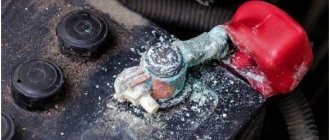
Often the problem with the wires is associated with severe oxidation of the terminals, which almost always occurs with any model of battery. To eliminate such problems with the starter power supply, it is necessary to perform the following set of works:
- First, remove the oxidized terminals of the car battery using a rubberized screwdriver;
- Using a small fine piece of sandpaper, clean all internal components of the terminals and connecting wires from the starter to the battery;
- Clean the contacts on the battery itself using sandpaper;
- Check the state of charge of the car battery using any of the universal chargers;
- Check by external inspection the integrity of the connecting wires that power and drive the starter;
- Secure the battery terminals with a screwdriver, additionally checking that they can be disconnected.
After the work has been done, try to turn on the engine again and watch the starter operate. If it was able to make at least one turn on the axis, and then made a loud sound and stopped again, then the problem lies in the battery. You may be facing the problem of a completely dead battery. In this case, just charge the battery for 10 hours or buy a new battery model. Installing a new battery under the hood of your car should not create any problems.
Malfunctions
There are several defects in the VAZ 2115 starter. Let's look at each of them in more detail.
- The starter does not respond at all to turning the key, it does not turn. Most often, this sign hints at a dead battery. It needs at least 12 volts to be able to crank the starter. Therefore, the battery is checked first. The best way to do this is to use a multimeter. Another reason is the solenoid relay. Several scenarios are possible here: the contacts are loose or oxidized, or there is a break in the winding.
- The starter turns sluggishly or does not work. Here the problem may also affect contacts - they need to be checked. Burning of the commutator or wear of the brushes should not be ruled out. You should also consider the option of breaking the anchor.
- Clicking sounds are heard, but the starter does not work. As a rule, this is accompanied by a strong voltage drop in the power circuit. First, the relay is checked; if it is OK, the condition of the circuit before it is tested. The goal is to find a place where contact periodically disappears. The possibility of a weak terminal clamp on the starter or battery cannot be ruled out.
- The starter rotates, but the flywheel does not. In this case, the overrunning clutch or bendix slips. The problem is solved by disassembling the device and replacing damaged parts.
- The starter makes a lot of noise when rotating. It is necessary to check the condition of the drive shaft and armature bearing shells. Replace severely worn parts immediately. It is also possible that the starter mount or the cover on one of its ends has broken. For this reason, the mechanism operates skewed, creating a lot of noise. The flywheel itself must also be carefully inspected. There should be no signs of wear on its gear, otherwise the part will need to be replaced. In some cases, the malfunction can be eliminated by treating the splines with oil.
Source
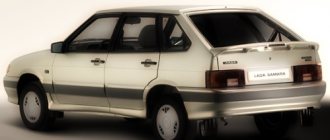
VAZ 2105: starter repair - tips and tricks
Today we are repairing a VAZ 2105 - its starter
Five stopped starting? This is a problem - you can’t go anywhere without it. Well, let's figure out together why the car won't start, what caused the starter to break down, and how to fix this problem. So, let's take it in order. In this article you will find everything you need to independently repair the starter on a VAZ 2105 car - photos, videos, detailed instructions, as well as many useful tips that will make your work easier and save you money.
- Tools
- Removing the VAZ 2105 starter
- Starter repair
- Disassembling the starter
- Defective starter VAZ 2105
- VAZ 2105 starter assembly
- Installation
The cause of a non-working starter can be many of its parts. So, if, when you try to start the engine, a characteristic click is heard, and then everything is quiet, you can conclude that the solenoid relay is faulty and before completely disassembling the starter, try replacing it. If the starter rotates, but the engine does not rotate, then the problem is in the bendix - the gear that engages the flywheel. Or the contacts on the starter could simply oxidize and it would refuse to work.
VAZ 2105. Doesn't grab, won't start. What's the matter?
Greetings! The problem is the following, there is a five with a carburetor. The starter turns, but does not engage. If it’s cold, then I depress the clutch, turn the key and at the same time start pressing on the gas as if I were pumping up the wheel and then, at the moment when it starts to seize, I pull out the choke. You have to push around quite a bit before it starts. If the engine is warmed up or after a short stop of 5-10 minutes, it also doesn’t catch and I do almost the same thing, but I just need to apply the gas a couple of times, it catches and there is no need to keep the choke. I think that the issue with the carber has nothing to do with it, although many people talk about it. Karber has just recently been filmed, cleaned and set up. Everything drove fine and did not cause any problems. And after that the problem described above appeared. Help me please! Tell me what's wrong or a travel service for jigs in Tomsk!
“Freedom is the right to tell people what they don’t want to hear”
I'm also thinking about the fuel pump. But the fuel filters are full of gasoline, if I try to start it normally, but it still doesn’t work? Or maybe there is not enough pressure?
Posted by
Rechtsanwaltthis is legal
forum.
Really?
Posted by
Rechtsanwaltthis is legal
forum.
Strange, I created it in general matters. Even a couple of people answered, and now their answers have disappeared, only yours remains. How to move a topic?
Change the fuel pump and spark plugs.
A better car would cost less
Check the hall sensor. Change the spark plugs. The needle may stick in the carburetor... hit it with something heavy, but gently