Some car sensors and sensors only manifest themselves in the event of a breakdown. For example, the operation of the VAZ 2115 speed sensor is invisible during operation. Many drivers do not know that in addition to speedometer readings and mileage tracking, this device performs several more functions:
- Idle speed is adjusted even when the car is moving, based on speed readings;
- control of air supply bypassing the throttle assembly;
- When the throttle valve is closed, the engine control unit receives signals from the speed and crankshaft speed sensors.
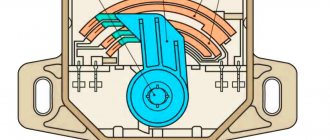
Design and principle of operation
The sensor is a complex of mechanical and electronic components operating according to the Hall principle.
The rotating parts convert the electrical signal into a chain of pulses that are multiples of the rotation of the sensor axis. Due to the mechanical connection of the sensor rod with the wheel hub, the rotational movement of the wheel is converted into the distance traveled.
- when the outer surface of the tire rotates 360°, the wheel moves horizontally a certain distance;
- this path is equal to the circumference of the tire, it is programmed into the engine ECU;
Important: Installing wheels of a non-standard size disrupts the operation algorithm of the VAZ 2115 speed sensor.
- the corresponding block in the speedometer panel determines the distance traveled;
- the distance traveled divided by the time of movement is nothing more than speed.
Both of these parameters are involved in the coordinated operation of the engine's electronic control unit.
Designations of light bulbs, indicators, icons and buttons on the instrument panel of VAZ 2114, 2115
First, let's look at the descriptions and meaning of the panel icons and buttons, regardless of whether the car is equipped with an injector or a carburetor.
Instrument panel diagram VAZ 2114, 2115
1 — A control sensor that measures the temperature of the coolant in the engine cooling system. During normal operation of the power unit, the antifreeze temperature should not exceed 90 degrees. But minimal deviations are sometimes acceptable. If you notice that the engine begins to overheat frequently, be sure to contact a car service center for help. Sometimes the sensor itself may give incorrect results.
2 — A device such as a tachometer processes information that comes from the crankshaft and displays it on the panel. The tachometer readings indicate the number of engine revolutions.
3,4 — Turn indicators. If the indicators flash simultaneously, but slowly, this may indicate a possible problem with the bulbs themselves or in the electrical wiring network.
5 — The most basic element of any instrument panel is the speedometer. Thanks to it, the driver can determine the speed of movement. A slight error in the indicators is allowed, but it should not exceed the indicator by more than 5 kilometers. If such readings differ significantly from the real ones, then most likely the problem is in the speedometer.
6 — Fuel level sensor in the fuel tank. When the level in the tank drops to 6-7 liters, a red light comes on, indicating that the car needs to be refueled.
7 — Low fuel level indicator.
8 — Symbol indicating that the light is turned on. It is triggered when the low beam and parking lights are turned on.
9 — The brake light indicates that the vehicle’s brake system is not working correctly. Most often it lights up if there is not enough brake fluid in the car.
10 — A blue light indicates that the high beam headlights are on.
11 — Button to reset the daily mileage. The total mileage of the car is shown at the top, and the daily mileage at the bottom.
12 — on-board computer display with mileage indicators.
13 — Alarm activation symbol (light). When the emergency light is turned on, the light begins to flash red.
14 — “Check” symbol. It is triggered in case of possible problems with the car’s power unit. There can be many reasons for this, from problems with mixing the combustible mixture with air, to breakdowns of various engine power components. In any case, you need to contact the service for computer diagnostics or repairs.
15 — External air temperature sensor and time indicators. The daily mileage reset button allows you to scroll from the temperature readings to the time readings when scrolling.
16 — Battery charge sensor. Most often it lights up when the battery is almost completely discharged. If the indicator light is very weak or, on the contrary, bright, then the problem may be in the generator.
17 — Handbrake activation icon. It lights up both when the engine is on and vice versa.
18 — An icon showing the engine fluid pressure. Usually its appearance indicates an insufficient amount of lubricating mixture. In such a case, be sure to check the oil level. Sometimes the problem can be caused by the oil pump not working properly.
19 — If the engine is equipped with an injector, then there is a reserve icon on the dashboard. Well, if the engine is carburetor, then this is a suction indicator.
Designations of warning lamps and instrument panel indicators of VAZ 2114, 2115. Video
Replacing instrument panel bulbs on VAZ 2114, 2115. Video
What happens if this sensor breaks?
Of course, the car will not stall, and you can continue driving it, but only to the place of repair.
Signs of malfunction:
- Absence or incorrect readings of the actual vehicle speed. The speedometer needle “hangs” at one mark, moves chaotically, or does not deviate from “zero” at all.
- On a moving vehicle, when the accelerator is released, interruptions in idle operation are observed.
- Floating idle speed when stopping.
- Unreasonably high fuel consumption.
- During intense acceleration, dips in traction occur: there is no increase in power in proportion to pressing the gas.
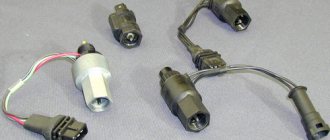
Self-replacement of the sensor
- Raise the hood and turn off the power by removing the ground terminal from the battery.
- For ease of operation, remove the air duct corrugation.
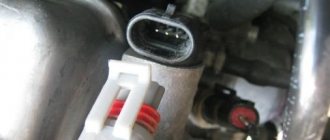
- When access to the sensor is open, disconnect the wires from it.
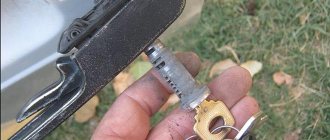
- Turn the sensor body counterclockwise by hand and unscrew it.
- If you suspect a malfunction of the drive, unscrew the nut securing it with a 10mm wrench and pry off the drive housing with a slotted screwdriver.
- Carefully remove the drive.
- Install the new drive and secure it.
- Install the new sensor and connect the wires.
Where is the speed sensor located and why does it break?
The sensor is located on the gearbox housing, in its upper part. To get to it, you need to lift the car on a lift, or use the inspection hole.
The device and its electrical wiring are affected by moisture, road reagents and temperature changes. The causes of the malfunction are the following:
- breakage of connecting wires;
- corrosion of the connector terminal block;
- mechanical failure of the rotating rod;
- failure of the electrical part.
The symptoms of any of the breakdowns are the same; the sensor itself cannot be repaired: only replaced. Only oxidized contacts or broken wiring can be restored.
Fault repair
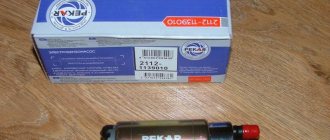
In fact, if the VAZ-2115 speedometer does not work, the reasons for which have already been established, no one repairs the speed sensor on these VAZ models. It is much faster and easier to replace this entire unit. Its cost is about 400 rubles, which is not that expensive. To begin the process of replacing the speedometer, you should drive the car into a pit and prepare:
- Screwdrivers.
- Pliers.
- Set of wrenches.
If there is no hole nearby, then you first need to remove the terminals from the battery, and then remove the air filter and only then the intake pipe. Next, remove the terminal from the speedometer sensor itself. However, if the car uses a cable drive for the speedometer, then it must also be removed.
Read more: Red light bulbs in dimensions
Next, you need to clean the work area of dust, debris and oil. Then proceed directly to replacing the part:
- Remove the terminal block using the buttons that deactivate the spring clip.
- Using a 21mm wrench, remove the speed sensor.
- Attach the new sensor so that its rod precisely hits the fixing sleeve.
- Tighten the thread back with a 21mm wrench. Do not overtighten, so as not to damage the integrity of the plastic speedometer housing.
Based on the results of the work done, the result can be assessed immediately: if the speedometer does not fit into the socket, it means that its rod has not moved into the bushing. Therefore, you will have to repeat the above procedure until success is achieved. When the speedometer is installed, you then need to return all the dismantled parts to their place, connect the power and check the operation of the new sensor while the car is moving.
I often get asked questions about connecting the speed sensor to the Europanel. I myself began to understand the circuits recently, but a detailed article with pictures will not harm anyone. In short, we screw the sensor into the box, connect it with power and ground, and output its signal to X7-7.
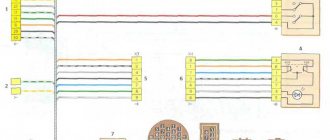
If in detail. We find a suitable electrical circuit diagram for the car. For example, circuit 21099 in a deluxe configuration - with a panel, wiring and an installer from four:
What to pay attention to!
If you install a 2114 instrument panel on a chisel, use 2114 sub-dash wiring and a 2114 fuse block, then the speedometer connection is made only
under the hood
.
You just need to connect three wires to the sensor. Then, through the block and wiring, everything will go where it needs to go. But
if you use under-torpedo wiring from 2109/2108 or left the old fuse box, then this article will help you only in general terms understand the essence of the connection, because the numbers of contacts and blocks will be different.
And so, connection. We take the diagram and look for the sensor itself on it. Position 27, found!
Now we follow the pattern where they lead. Orange
the wire goes down and connects to the brake fluid level sensor.
This is a common plus along one wire from the mounting block ( not a signal!
).
Power through this wire does not come constantly, but from the ignition. Now black
.
This is mass, minus, body - call it what you want. Connects locally or from any ground wire under the hood nearby. And the most interesting thing is the gray
wire. It sends a signal to the speedometer needle, which shows our speed. The mileage of the electronic odometer also rotates based on this signal. As you can see from the diagram, the gray wire turns into white - this is the wiring harness. To understand where it will now come out of this harness, simply run your finger along it until you see a wire of the same color. The direction of movement along the harness is shown by the outgoing wire at an angle of 45. Our gray wire goes up at this angle. That's right, let's go up! We protrude the sausage and slowly walk up the white rope:
Read more: How to repair a crack in a cylinder block
To complete the story, I’ll add what and where it goes next. Nearby, on the fuse block diagram, we are looking for our incoming X7-7.
As you can see, the gray wire also fits there. It is used for injection machines, that is, it goes to the ECU unit. I also have this wire, and it does not interfere with the operation of the speedometer. That's actually the whole connection chain! Let me remind you that in the European panel under-the-hood wiring in the cabin, this is all already laid out and connected, you just need to connect the sensor itself under the hood to the installer and everything will work!
When operating cars of the “tenth” family from AvtoVAZ, the question often arises as to why the speedometer needle does not work on the VAZ 2115. After all, not every car enthusiast has such a developed sense of speed to drive with a non-working indicator. But this feeling is well developed in security cameras that record speed limit violations. The car enthusiast himself can diagnose and fix this malfunction if he finds a little time.
How to check
First of all, we carry out a visual inspection. The wires must be intact and have no obvious kinks or damage to the insulation. The cleanliness of the contacts on the connector is also checked. After inspection, we check the electrical part of the device.
- You can jack up one of the front wheels of the car and spin it with the ignition on (we don’t start the engine). Voltage surges are checked using a multimeter at the information contact (central terminal).
- If you remove the sensor, you need a device to force the rod to rotate. A voltage of 12 volts is supplied to the power terminals, the tester is connected to the negative terminal and the signal contact. When rotating, we register impulses. If they are not there, the sensor needs to be changed.
To replace, you will need a 21 key. We replace the faulty part with the negative terminal of the battery reset.
Advice: You should not save money by buying a cheap sensor from a dubious manufacturer. A branded part is not so expensive that you risk a breakdown on the road, where there will be no way to diagnose and replace the speed sensor.
Speedometer doesn't work
I’ll say right away that the problem has already been solved. It all started simply on one day in February: morning, frost 32 degrees, which is rare in our area, warming up, trip to Belgorod (business and work, along the way I sharpened new Bauer-200r skates at the Orange Ice arena). On the way back, at first the speedometer jerked and then stopped working. It doesn't matter - there is a navigator. I arrived home, opened the hood - there was oil on the box, it was thrown out through the breather, although the oil level in the gearbox was normal, the wires were in place. Okay, let's leave it like that for now. I searched the Internet, maybe DS (speed sensor). 1. Replacing the DS
— February 16.
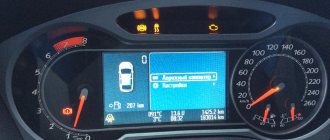
I took it off and looked. It's covered in oil, the axle is loose, it's probably him. On February 16, the opportunity arose to buy, I bought a DS with a metal axle from “Yellow Road” (they say it’s better than plastic, photos later). I put a new one (220r) near the store, removing the air filter. I drove off, the speedometer does not work, there is no indication on the trip computer and error 500 - no connection with the DS. 2. Checking the wires.
We read on the Internet, take a tester, check the voltage at the connector.
1-+, 2- readings (A), 3-minus. C + and - are simple, but we check the reading wire with an assistant: I short it to ground, the assistant watches the needle fly up to 200 km/h. This means the connector is alive. 3. I was sick.
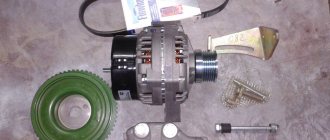
A break in the struggle, I read the options on the Internet, the only thing left is the speedometer drive in the gearbox, they come in 3 types, which means you just have to remove and buy.
4. Replacing the speedometer drive in the gearbox
. On March 15, the speedometer drive was removed, the teeth on the plastic gear were chipped, we counted the teeth and looked at the color of the gear. They come in 11 teeth (gray) - pair 3.7 12 teeth - pair 3.9 16 teeth (yellow) - 4.3. My brother removed the drive from the four-speed for a pair of 4.3, the teeth are small, it won’t work. I bought it again on the Yellow Road (oh, almost an advertisement, just less defective, although I got it too) - 100 rubles. I changed it near the house, although I couldn’t do it without a hammer, the ds sensor didn’t fit, you can see burrs inside the shaft. I carefully hammered the DS onto the shaft with the wooden handle of a hammer, lightly screwed the DS, and then put it in the box. The speedometer works, hurray. I will be glad if it helps anyone. I attached a photo. +there is a spare speed sensor left.
Sources
- drive2.ru/l/6041989/
- korchim.ru/biblioteka/ehlektrika/pochemu-na-vaz-2115-ne-rabotaet.html