03 February 2016 Lada.Online 79 903 1
Is the car jerking, loss of agility or the engine is difficult to start? One of the reasons for such malfunctions may be related to fuel pressure. Let's look at the instructions for measuring pressure in the fuel rail, as well as features that may arise during this activity.
Checking the fuel pressure is carried out similarly for all Lada cars (Granta, Kalina, Priora, Largus, Vesta, Niva 4x4 and XRAY), because All these models have the same type of engines.
What pressure should be in the VAZ 2110 fuel system?
On a VAZ 2110 with 1.6 liter engines, the pressure in the ramp is constant and amounts to 3.6-4.0 atm. Otherwise, the measurement technique is similar. Alternative ways:
- It is measured at the outlet fitting of the fuel pump module - this is the one with one tube. You will need a flexible gas-resistant hose with an internal diameter of about 8 mm and a pressure gauge (you need to remove the tube and put on a hose with a pressure gauge instead). The pressure should be 5-7 atm.
- Close the return line, as is done on an internal combustion engine with a drain ramp, but you must turn it off again at the fuel pump itself. We pull off the second hose (double) and insert a plug into the removed hose, made, for example, from an old fuel filter (saw off the nipple from it and plug it). A single hose must be put on the pump fitting, and now the measurement must be made at the fuel rail. According to the power system diagram, everything will be clear.
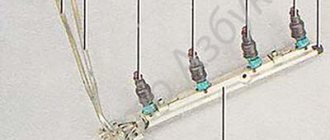
1 – fitting for checking the pressure in the power system; 2 – fuel rail; 3 – nozzles; 4 – fuel line; 5 – fuel tank; 6 – fuel pump module (in the fuel tank); 7 – fuel filter; 8 – tee.
Checking the RTD
So, your sensor is already in order, but there is excessive fuel consumption and other problems indicating that the regulator is acting up. First of all, check it.
This is done like this:
- You need to unscrew the plug of the fitting responsible for controlling the fuel pressure. Look, if the seal ring is torn or simply no longer elastic, it (or even the entire plug) needs to be replaced;
- Unscrew the spool from the fitting, this is done in exactly the same way as in any tire;
- Using a tire pressure gauge secured with a clamp to the fitting, measure the pressure while the engine is running. It should be within normal limits;
- When disconnecting the vacuum hose of the regulator, the pressure should increase slightly (by 0.2 - 0.5 kgf/cm2). If this does not happen, then there is only one solution for your VAZ 2110 - you need to replace the RTD. On average, the price of a standard RTD fluctuates around 300 rubles; an analogue of the SOATE RTD costs about 600 rubles.
Fuel pressure is an important parameter that must be constantly monitored. Its value directly affects the efficiency of the motor, its power and behavior in various modes. Consequently, every car owner who cares about the technical condition of his own car should periodically check the pressure. How to do this, read further in the article.
Fuel injector rail
The fuel rail (rail) is a mandatory element of the fuel system of an internal combustion engine with distributed injection. It is a section of a hollow tube, the ends of which are closed on both sides and are distinguished by the presence of bends for connecting tubes of smaller diameter. Through these tubes, fuel flows to the nozzles that are located on it. In addition, there is a pressure regulator on it. The fuel that enters the ramp is moved through injectors into the intake pipe. In addition to the outlet pipes, this design also contains a shut-off fitting and a hole.
Problems with the car's fuel system
are expressed by failures at high speeds, jerking of the car, or the car does not move when you need to accelerate sharply, and sometimes it simply stalls. Now knowing how to check the pressure in the fuel system of a car, we can diagnose the car ourselves. We can determine which component of the fuel system has failed (gasoline pump, fuel pressure regulator (FPR), injectors, filters, etc.), but first we need to understand how the fuel system works: The gas pump continuously pumps fuel while the engine is running. Excess gasoline is stupidly dumped through the RTD into the return line.
The pressure in the ramp changes (increases) not so much with the speed, but at the moment of accelerating (this is clearly visible in the video), because at this moment the vacuum (vacuum) in the receiver drops and the RTD adds pressure in the ramp.
If you turn off the engine, the pressure in the ramp will slowly begin to decrease exponentially. The rate of decline (from several minutes to several hours) depends on the quality of the check valve, which is located on the back of the fuel pump motor. When diagnosing, pressure measurements in the system are made in different ways:
- Measuring how much the needle jumps when the ignition is on
- Measured at XX
- Measurement with the tube dropped from the RTD
- Metering with pinched return
Signs of breakdown
If for some reason the fuel pressure regulator does not perform its functions, then this can be understood by the following signs:
- The engine's operation has become unstable, it may begin to stall when idling, although it would seem that the fuel level is sufficient and all systems are in working order;
- The crankshaft at idle speed has increased or, conversely, decreased speed;
- The engine, as they say, “loses throttle response”;
- While driving, dips and jerks occur in a running engine;
- Gasoline consumption increases compared to what it was before;
- The content of CO and CH in the exhaust increases;
- The engine starts with difficulty. Although this property does not always appear.
If the regulator has become completely unusable, then an increase in fuel pressure is observed. Instead of the norm for the VAZ 2110, which ranges from 2.5 to 3.3 kg/cm2, it reaches 4 – 5 and even more.
Consequently, the fuel pump supplies more gasoline by volume, which is not completely burned, and overconsumption is guaranteed. Of course, such a regulator needs replacement, and the sooner the better.
If the fuel pressure regulator does not provide the required pressure, or simply does not hold, then the lack of fuel pressure leads to the fact that normal supply does not occur, and the VAZ 2110 “chokes” when you need to increase the speed.
In addition, the starter cannot quickly spin the engine; it has to be turned on many times.
How to determine the status of the fuel pressure regulator (FPR)?
There are two ways to determine if an RTD is faulty:
- If the pressure with the engine not running with the fuel pump turned on is below 2.8 atm. To turn on the fuel pump directly without starting the engine, then on the diagnostic block we close the closest contacts to the gear shift lever.
- Turn off the fuel pump. The pressure in the ramp should drop by about 0.7 atm and remain at this level. If the pressure in the fuel system does not hold and immediately drops to zero, then the RTD or the pump check valve is faulty (located on the back side of the fuel pump motor; it is not advisable to change the pump because of it). Do not rule out cracks in the fuel line or poor condition of the injectors (gasoline flows in)
Preparatory work
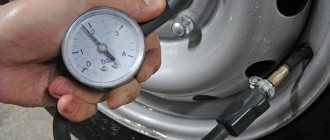
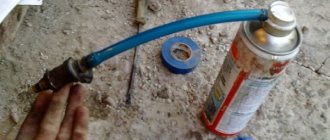
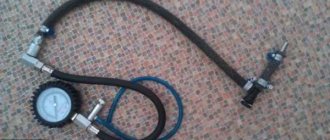
- We take a pre-prepared pressure gauge, and to prevent fuel spills and air leakage, we wrap flax or fum tape around the tip.
- We are preparing a hose with a maximum internal diameter of 9 millimeters, and clamps will be needed to secure them.
- We place the prepared rags on the engine in such a way that the hose and pressure gauge fixed on it cannot roll off the surface. This is done to prevent excess fuel from spilling over the surface of the engine.
- We wrap flax or tape around the pressure gauge, then fix the hose on it and tighten everything with a clamp.
- On the ramp, unscrew the spool valve from the nipple (in this case, fuel splashes are possible due to the presence of residual pressure - approx.).
A regular wheel cap came in handy.
- We put a hose with a pressure gauge on the ramp connections and secure everything with a clamp.
Pressure gauge with pipe assembly.
We place the pressure gauge on a previously prepared rag, and the preparatory work can be considered completed.
Measurement procedure
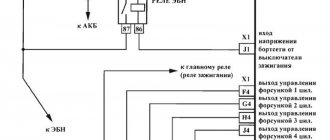
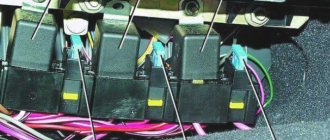
Before you start working, you can try to relieve the pressure in the fuel system. To do this, remove the fuel pump fuse (which is located on the right side of the panel, under the front passenger’s left foot - approx.). Where 3 relays and 3 fuses are located. In the photo below it is located under the number “5”. After removing the fuse, turn on the ignition and check by ear that the fuel pump is not pumping. We start the car and wait for the engine to stall.
Additional block
- After everything is ready, we check the already attached end of the pressure gauge with the hose for a secure connection.
- Next, start the engine and look at the readings that appear.
Thus, we diagnose the results that appear and compare them with the results of the norm.
After all the work has been done, unscrew the hose with the pressure gauge, screw in the spool and return everything to its original state.
Note!
The peculiarity of measuring pressure using a pressure gauge is such that its initial value on the scale has a certain inaccuracy. That is, when the air analogue has a measurement period of 15-20 atmospheres, and for fuel control the required maximum value is 5-7 atmospheres, then all measurements taken will have an error equal to the initial values on the device. Therefore, pressure testing should be carried out on a pressure gauge with maximum values of up to 8 atmospheres.
We measure the pressure in the system without a check valve
If it happens that your engine does not have a check valve, then you need to know that in such a ramp there is a constant pressure of 3.6 to 4.0 atmospheres. But the order of measurements in general is completely similar to what is described above.
How to determine the condition of the fuel pump?
In order to determine a fuel pump malfunction, you need to check the fuel pump “at the wall” (zero supply pressure or “at the plug”). In simple terms, this is the pressure that the fuel pump develops.
It is by this parameter that the service life of the fuel pump can be determined. As the pump wears out, this parameter gradually decreases. When the pressure is “into the wall”:
- about 3 atm - the car stalls
- 4 atm - the pump will still serve
- 5-7 atm – the state of the new pump (the Czech gas pump produces 7 atm)
Checking the fuel pump “for a plug” is quite simple; you need to pinch the return line with pliers (for 2-3 seconds) with the car running and watch the pressure gauge readings. Another way to check the fuel pump: smoothly raise the engine speed to 3000 rpm. If the pressure gradually drops, then this is a sign of a “dead” pump.
How to check the fuel pump for pressure and performance - Auto Moto Special
Cars of the VAZ family are equipped with carburetor and injection engines, the fuel pumps of which are fundamentally different from each other. Let's consider in order how to check the fuel pump of both types.
Mechanical fuel pump for carburetor engine
A mechanical fuel pump was installed on the VAZ 2109 and earlier models, and currently on the VAZ 2110, 2111. It pumps up a pressure of 20-30 kPa, pumping at least 60 liters per hour.
Gasoline pumps for carburetor and injection engines are fundamentally different
To check the functionality, disconnect the hose between the fuel pump and the carburetor - gasoline under slight pressure should spray out. Then direct the hose into any container and turn the engine with the starter - if it pumps half a liter in 30 seconds, then everything is in order. If not, then you need to restore the system.
To do this you need:
- Bleed the fuel line with compressed air (between the pump and the gas tank)
- Check the cleanliness of the valves and filter mesh in the fuel pump
- Remove the adjusting shim from under the fuel pump
THIS IS INTERESTING: How to remove the front bumper on a Priora
Injector
The two main causes of failure are electrical and mechanical.
There are several basic options for checking the fuel pump at home:
- Using a light bulb (checking power supply)
- Using a pressure gauge (check for mechanical wear)
- Using a measuring container
- Checking wiring with a light bulb (electrical)
If the fuel pump does not produce characteristic sounds when you turn on the ignition, you must first check whether voltage is supplied to it. A regular 12 V light bulb connected between the gray and black wires at the fuel pump terminal should light up when the ignition is turned on.
lesson on checking the fuel pump
If the light bulb does not light up, or does not light up at full intensity, you need to check all contacts:
- Plug blocks
- Relay
- Circuit breakers
Often the reason lies precisely in the little things. To check, the relay and fuse can be swapped with a known good one. The contacts in the plug blocks may have broken off or oxidized. It is advisable to clean them and test them with an ohmmeter.
On VAZ 2112, 2114, 2115, etc., with an injection engine, an alarm can be installed that turns off the power to the fuel pump. In this case, you can turn on the pump directly from the battery or dimensions (turn on the light - it works).
Using a pressure gauge
If in the event of a malfunction with the electrical supply of the fuel pump, everything is clear - either it works or not, then mechanical wear is more difficult to determine. There are several techniques for this.
The fuel pump may be faulty for two reasons - mechanical and electrical.
You can estimate the fuel pressure if you unscrew the fuel rail plug and drain gasoline from the spool. There should be a powerful jet. Next, we unscrew the spool itself and connect a pressure gauge, preferably a fuel one, but you can also use one that measures the air pressure in the tires. Turn on the ignition and see how much the pump has pumped. It must be at least 280 kPa, on some models 380 - 400 kPa. To make it clearer, this is 3.8 - 4 kgf/cm2.
Using a measuring container
If you don’t have a pressure gauge at hand, the performance of the gas pump can be assessed by the amount of gasoline pumped per unit of time. Also, having unscrewed the spool, we connect a hose to the ramp, which we lower into a container for measurement. On Kalina and Grant, the pump should pump 35 liters per hour, or 0.5 liters. in a minute. VAZ 2110 pumps 1 liter. in a minute.
If the result is unsatisfactory, all filters must be checked. Under the bottom, next to the gas tank, there is a high-pressure filter. It is recommended to change it every 20 - 40 thousand km. mileage But it may turn out that replacement will be required much earlier - it all depends on the quality of gasoline.
Another filter that needs to be checked is located in the tank on the fuel module.
In order to get it, you need:
- Raise the rear seat and unscrew the hatch
- Remove the fuel pump power wires
- Start the engine (to release the gasoline under pressure in the system)
- Remove the ground terminal from the battery
Only after the above steps can you finally disconnect the fuel module and remove it from the tank.
An important detail: if before the repair you refueled the car to capacity, you need to spend 10 - 15 liters before unscrewing the fuel module. Since the gasoline level will be higher, it will still spill onto the ground.
It is best to replace the intake mesh with a new one every 50 thousand km. vehicle mileage.
These are the main points regarding fuel equipment that every owner needs to pay attention to during maintenance of their car.
Source: https://avtomotospec.ru/sovety/kak-proverit-benzonasos.html
How to check the condition of the fuel system without a pressure gauge?
Unscrew the fuel supply line and apply power to the fuel pump. If everything is in order, then about 1.5 liters should flow in a minute. By the way, if the pressure in the fuel rail is only 1 atm and the sound of the pump is uneven. The reason is there is no gasoline in the tank! Now, if you stalled far from the city, then diagnosing the car yourself in the field is not a problem for you! Intense acceleration of the car without dips and jerks is the first sign of a serviceable fuel system of the car! If after such a diagnosis the problems remain, then pay attention to other points (compression in the cylinders, ignition module, etc.).
Types and symptoms of regulator malfunction
The types of RTD malfunctions are as follows. The valve does not hold - fuel begins to circulate freely throughout the fuel system, the pressure in which decreases because of this. As a result, the engine does not have enough fuel when the speed increases, and its power decreases; The pressure in the system should not change after stopping the engine, but since the valve is not able to hold it, when starting the engine, you have to work with the starter for a long time to create the required pressure.
A completely inoperative valve means fuel is not discharged into the tank, and because of this, the pressure in the system increases. As a result, the amount of fuel supplied to the combustion chambers through the injectors increases - there is overconsumption and incomplete combustion of gasoline.
Signs of a faulty RTD are the following engine operation:
- unstable;
- stalls at idle;
- insufficient pickup;
- cannot develop full power;
- the crankshaft rotates at idle speed with a reduced or increased frequency;
- dips and jerks while the machine is moving;
- difficult starting - not always;
- the content of CO and CH in the exhaust gases significantly exceeds the permissible standards;
- excessive consumption of gasoline.
Causes of malfunction
The main causes of malfunctions of the VAZ 2110 fuel pump are the low quality of the fuel being filled, low fuel supply pressure, the regular presence of a small amount of gasoline (less than 5 liters) in the fuel tank and improper operation when starting the engine - before starting the engine, you must wait after turning on the ignition 2-4 seconds to pump fuel into the engine power system.
It is also possible that the fuel pump as a part will naturally fail, depending on the mileage of 150 - 200 thousand km. or for a period of 4-5 years, but again this malfunction depends on the operating conditions of the car itself. Usually the factory fuel pump is replaced with a BOSCH one.
There are secondary malfunctions of the VAZ 2110 fuel pump failure - failure of the relay, blown power fuse, they are located in the fuse mounting block either under the hood or in the lower left part of the dashboard, front console, depending on the engine modification, and contamination of the fine filter mesh fuel cleaning (located directly on the fuel pump).
These faults can be fixed relatively quickly and without large financial investments. Fuel pump repairs are performed quite rarely, and the cost of repairs relative to the cost of the pump is insignificant.
What kind of fuel pumps are installed on VAZ 2110/2112 cars
VAZ 2110/2112 cars, depending on the year of manufacture and the type of engine installed, may differ in the method of supplying fuel to the cylinders.
Table: features of fuel supply systems to engine cylinders depending on vehicle modification
| Model/ modification | Year of issue | Engine volume, cm3 | Number of valves, pcs | Injection system |
| VAZ 21100 | 1996–2000 | 1500 | 8 | Carburetor |
| VAZ 21101 | since 2004 | 1600 | 8 | Injection |
| VAZ 21102 | since 2004 | 1500 | 8 | |
| VAZ 21103 | since 2001 | 1500 | 16 | |
| VAZ 21103M | since 2001 | 1500 | 16 | |
| VAZ 21104M | since 2001 | 1600 | 16 | |
| VAZ 21120 | 1999–2008 | 1500 | 16 | Injection |
| VAZ 21121 | 1999–2008 | 1600 | 8 | |
| VAZ 21122 | 1999–2008 | 1500 | 8 | |
| VAZ 21124 | 2004–2008 | 1600 | 16 | |
| VAZ 21128 | 2004–2008 | 1800 | 16 | |
| VAZ 21123 | 1999–2009 | 1600 | 16 |
Only the first modifications of the VAZ 2110 were equipped with a carburetor injection system. From the factory they were equipped with mechanical fuel pumps of the DAAZ brand (catalog number 2108–1106010). Previously, they had proven themselves well on cars of the Sputnik and Samara series.
A mechanical fuel pump was installed in the engine compartment of the VAZ 2110 to the right of the engine valve cover, and was driven by the camshaft.
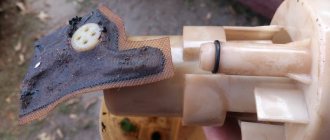
All injection VAZ 2110/2112 are equipped with submersible fuel modules. The design of such a module includes:
- electric fuel pump;
- coarse filter;
- fuel level sensor.
Troubleshooting
The main symptoms of a malfunction of the VAZ 2110 fuel pump are engine interruptions in various operating modes, lack of pressure in the fuel system, loss of acceleration dynamics, increased fuel consumption, or complete failure when trying to start the engine.
The first step is to check the functionality of the pump. When you turn on the ignition, you should hear a slight whirring sound from the pump under the rear seat for a few seconds.
If the engine is running, it is necessary to check the fuel supply pressure using a pressure gauge; the fuel supply pressure to the injector should be 3.5 - 4 atmospheres. If the sound of the fuel pump is not heard, if you have an electrical tester, you can check whether power is being supplied to the pump.
To do this, you need to remove the back seat of the VAZ 2110, the decorative cover, and the terminal from the fuel pump housing, turn on the key to crank the starter, if the tester does not receive power, you need to check the relay, fuse or wiring trace for a break! If there is power, the fuel pump needs to be replaced.
The serviceability of the relay can be checked by replacing it with a working one from the fuse box, for example the high beam headlight relay. When replacing a new relay, you need to pay attention to the manufacturer and the recommendations of a spare parts specialist in the store; it is better not to save on the cost of the relay.
How to replace the regulator?
To replace the regulator, you will need to do the following:
- Stop the engine. Do not perform any actions while the engine is running.
- Relieve pressure in the rail. Simply unscrew the spool valve from the fitting and wait until the pressure equalizes.
- Unscrew the nut that secures the return line pipe to the fuel pressure regulator on the VAZ-2110.
- Unscrew the bolts securing the device body to the fuel rail.
- Remove the regulator fitting from the hole.
- Disconnect the tube from the body.
- Remove the regulator completely.
All steps to install a new device occur in reverse order. Be sure to soak all rubber O-rings in gasoline before installation. All rubber elements that are damaged or have lost their original appearance must be replaced with new ones. Poor quality gaskets and seals will lead to the entire fuel supply system not working properly.
Replacement
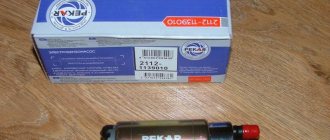
Replacing a fuel pump with a new one requires careful selection of the manufacturer; each pump has its own performance. The absolute leader in this area is BOSCH.
To replace or remove for repair the VAZ 2110 fuel pump we will need: a 17mm wrench, depending on the modification, a 10mm socket, pliers, a flat screwdriver. We remove the rear seat, it is advisable to unscrew the gas tank cap to relieve excess pressure in the system. Disconnect the plastic pump power terminal.
Depending on the modification, we remove the fuel supply and return hoses, or, by pressing the spring clip and pulling the hose, disconnect it from the fuel pump housing. In the second option, use a 17mm wrench to unscrew both fittings and disconnect the tubes.
In both cases, it is necessary to disconnect carefully, since the system is under pressure and when disconnected, the pressure will be released from the injector and a small amount of fuel will leak. If the performance of the old fuel pump is small, there will be no pressure in the system.
Unscrew the 8 nuts from the studs using a 10mm socket and remove the retaining ring with the seal. Carefully pull out the VAZ 2110 fuel pump housing at a slight angle so as not to damage the fuel level sensor; repairing it is unlikely. Using a screwdriver and pliers, remove the lower part of the fuel pump housing and remove the connectors and hoses from the pump. We dismantle the pump.
Assembly is carried out in reverse order. By the way, the original BOSCH fuel pump comes with a mesh. The new fuel pump has high performance, so after replacing it, when you turn on the ignition several times, there will be extraneous sounds when the system is pumped.
Procedure for replacing the fuel pump VAZ 2110
To replace the fuel pump, you will first need to dismantle the failed device; for this it is recommended to use the algorithm of actions described below:
Taking into account the peculiarities of the location of the fuel pump in the VAZ 2110, you will first need to remove the upper surface of the engine. A large amount of dust and other dirt often accumulates on the cylinder block and the pump itself, so they need to be wiped with a damp cloth or a brush with soft bristles; you can use special means.
It is recommended to prepare several bolts with a diameter of 8 mm in advance. They will be used as plugs for the hoses, and during the process of dismantling the pump there will be no time to search for them, since fuel will immediately begin to flow out of the holes.
At the incoming and outgoing hoses, you need to loosen the side clamps that secure them. This can be done using a screwdriver or a wrench specially designed for such purposes. Immediately after loosening their position, it will be possible to remove the clamps from the fittings and dismantle the injector.
The cylinder block will also need to be removed, since the device is securely fixed to it. This is quite easy to do if you unscrew a few nuts using a 13mm wrench.
Immediately after removing the nuts, the position of the fuel pump will weaken and it can be removed
It is also worth paying attention to the gasket located between the pump and the spacer - it has an extremely short service life, so it is best to replace it along with the main device.
The spacer is necessary to ensure reliable protection of the fuel pump from high temperatures; When replacing the device, it should be cleaned of accumulated dust and dirt. There is another gasket between the spacer and the cylinder block; it is also recommended to replace it due to rapid wear.
After removing the old fuel pump, you can proceed to installing a new device, for this you should use the instructions below:
- If the car has a mileage of 100,000 km or more, you will first need to check the minimum protrusion of the pusher - the location of the new fuel pump and the correct functioning of it will depend on it. Otherwise, there is an increased risk of a significant reduction in fuel injection, which can lead to diaphragm rupture. Changing the protrusions of the pusher usually does not cause difficulties; it is enough to simply select and install suitable gaskets that will be located between the spacer and the cylinder block.
- Once the correct minimum projection is set, you should start turning the crankshaft at a low speed. At this time, the spacer should be pressed tightly against the cylinders, which will make it possible to measure the indicator of the pusher protrusion. The value can be dynamic and fluctuate constantly, but only within 0.8–1.3 mm. The gasket is changed in cases where the pusher is outside the specified range: depending on whether the value is too small or too large, its thickness is also reduced or increased.
- At the final stage, all dismantled parts and devices are installed. This process is not difficult; to implement it, it is enough to use the previous instructions, repeating all the described steps in reverse order.
Bosch fuel pump performance - from 3 to 3.8 bar
The manufacturer Bosch produces its own fuel pump for each type of fuel system. Why, after the original fuel pump fails, do people install a Bosch fuel pump from a VAZ 2110? How does the pressure and performance of the fuel pump compare with the original one? If you put it with high pressure, will the flow rate increase?
Consumption does not increase due to the performance of the fuel pump, since on cars the return line is activated and excess fuel is returned to the tank, there is also a fuel pressure regulator, from the name it is clear, I think what function it performs.
Consequently, there was a 2.8 bar pump, they installed a Bosch VAZ 2110 fuel pump with 3.8 bar and it will only get better. Fuel consumption may increase if the fuel pump does not create sufficient pressure in the rail and the injectors begin to pour gasoline, which does not burn, rather than spray.
Replacing the fuel pump
The replacement process is quite easy. Just follow the instructions and you'll finish the job in no time.
- Disconnect battery power.
- Unscrew the fuel pump cap.
- Remove the connectors from the fuel pump.
- Loosen the clamp slightly, which is located directly on the fuel hose. It makes no sense to remove it completely.
- Unscrew both hoses through which fuel is supplied.
- Remove the gaskets. It is better to immediately replace them with new ones. These are consumable, cheap materials.
- The fuel pump is secured with 8 bolts. Unscrew them all and save the bolts.
- Remove the O-ring.
- Remove the fuel pump along with the float.
- Remove the seal, which is made of rubber.
- Replace the new fuel pump.
- Reassemble in reverse order.
It is hardly worth trying to repair an old fuel pump. It is difficult to vouch for the quality of the repairs performed, since one malfunction may lead to others. There is no point in taking risks. In addition, a new fuel pump is far from the most expensive pleasure for a VAZ 2110.
Doing the work yourself, the entire process of dismantling and installing the pump will take you about 20-30 minutes.
Follow the instructions, avoid any attempts at amateur activities. Please note that the cost of such a procedure at a service station will be even more expensive than purchasing the newest electronic fuel pump. Therefore, spending money on this makes no sense if everything can be done yourself.
The good thing about the VAZ 2110 is that the cost of its parts is incredibly affordable for domestic consumers. Plus, the design of the machine is quite simple, which allows you to carry out a number of repair work yourself, without fear of the consequences of incorrect repair.
Please note that if you do not have any experience in car repair and maintenance, it is not recommended to start your practice with such an activity as replacing a fuel pump. Practice on simpler tasks and over time you will learn all the joys of doing your own repairs.
Here's the thing - the car won't start. Unfortunately, this problem is often present among drivers of the VAZ 2110. And this is connected with nothing other than the fuel pump. Today, replacing a VAZ 2110 fuel pump is the most common type of repair. And a fuel pump replacement for a VAZ 2110, as this type of repair is called in auto repair shops, can be easily carried out on your own.
Characteristics of the Bosch fuel pump 0580453453
Especially for my readers, I got confused and measured the fuel pump that is on my display case. In fact, the characteristics of Bosch gasoline pumps differ in the length and very rarely in the diameter of the body. Why? The diameter of the body can be adjusted using a gasket made of petrol-resistant rubber.
Most often, the characteristics of fuel pumps (not only Bosch, but also from other manufacturers) may differ in length, pressure, location of terminal chips and that’s it :). The fuel pump mesh does not differ in seating, but it may differ in shape. The chip for the terminal can be remade or supplied from the same VAZ. The length of the fuel pump is important, since its operation depends on this when the fuel level in the tank is low, and if it is in the module, then you need a match to install it.
Fuel pump length:
- Bosch fuel pump 0580453453 - 105 mm
- Bosch fuel pump 0580453449 - 65 mm
- Bosch fuel pump 0580453465 - 90 mm
Mechanical replacement
If you find problems with the fuel pump, you can try to repair it yourself, or replace it with a new one. In the first case, it is better to buy a repair kit. It includes all the elements of the device that can fail: valves, gaskets, diaphragms and pusher.
If you decide to replace the pump assembly, it is even easier.
After dismantling the faulty device, you need to:
- Install new gaskets and pusher.
- Place the pump in place and secure it with nuts.
- Connect the fuel line hoses and secure them with clamps.
- Press the manual primer lever several times to fill the pump with fuel.
- Start the engine and check its operation.
Fuel pump VAZ 2110 and 2109 – characteristics, injector replacement +
Drawing a parallel with the human body and the structure of a car, the fuel pump really fits into the role of the “heart valve” of the engine. Fortunately, it is much easier to repair or even replace it and anyone can carry out such an operation.
According to the type of operation, there are two types of pumps - electric, which is used in injection and diesel cars with a distributed fuel injection system, and mechanical, which is used only in carburetor cars.
In the VAZ 2109 and VAZ 2110 cars of a later release (after 2006), a replacement took place - the carburetor was replaced with a modern injector, and accordingly, an electric fuel pump was installed.
Models manufactured before 2006 always have a mechanical carburetor and pump.
The VAZ 2109 and VAZ 2110 fuel pump (injector) of the electric type is located in the fuel tank of the car - this location is considered the most convenient for the operation of the device, but not very convenient for repair or cleaning. With this arrangement, the fuel system does not require an additional suction line, which is found in a mechanical type pump. The location of the pump in the fuel tank allows it to cool much faster.
There is also an internal fuel filter in the tank near the pump. The electric fuel pump consists of an internal strainer, a fuel flow float, 2 valves and a fuel intake mechanism. The characteristics of a pump of this type make it possible to maintain a pressure of up to 4 atmospheres, which is more than enough for normal operation of the car.
For a VAZ 2109 car (injector), a normal operating pressure is considered to be 2.4–3.3 atm; for a VAZ 2110 car, the working pressure should reach 3.6 atm.
An electric centrifugal pump is installed in the VAZ 2109/2110 tank (injector). One of the main components in the operation of the pump is the relay. In these car models, the relay is activated as a result of pulse signals that come from the central control unit, and only after that the pump is activated.
The mechanical type of pump is used only in models on which a carburetor is installed; it is not suitable for injection ones, and it cannot be used to operate on a diesel engine. The pump is located under the hood of the car, directly on its engine.
Consists of several parts that require infrequent but necessary maintenance. The pump body, which consists of two parts, contains a filter, two valves, a mechanically driven rod and a retractor spring. A special diaphragm is inserted between the body.
The mechanical fuel pump is driven by the camshaft, which transmits pressure using a lever with a pusher. On imported carburetor-type models, a slightly different operating scheme is implemented; it is based on a rocker arm with two arms and a lever.
Pump failure - how to determine the cause?
Like any part, sooner or later the fuel pump shows all signs of malfunction, or even fails altogether. It's best to replace or repair your pump before it breaks down completely. Most often the problem occurs due to the fuel pump relay. The relay is based on a fuse, which is what usually breaks.
Lift the back seat and find the chip under the trim; it is where the relay with the fuse is located. Replace the fuse with a new one and your pump should work.
However, do not forget that the cause of the malfunction may be the reduced performance of your battery. This problem occurs in a VAZ 2109/2110 car with an electric pump.
When a car engine is running, regardless of whether it has an injector or a carburetor, changes are always heard if there is a problem with the pump. The engine may even stall when idling.
In cars with a mechanical pump, the rod most often fails. Whether to make partial repairs or replace the mechanical fuel pump depends on the characteristics of the breakdown. As practice shows, it is enough to perform partial repairs on a VAZ 2109 car.
How to check the fuel pump on a VAZ 2110 - Online auto workshop
The non-pump is one of the key components of the VAZ 2114 fuel module. The gasoline pump helps ensure that gasoline is supplied to the engine at the required level of pressure.
Fuel pump for VAZ 2114
Any guarantees from the manufacturer with the actual service life of the fuel pump have little in common, since its durability directly depends on the operating conditions - even the highest quality VAZ fuel pump can quickly fail due to bad gasoline.
Operating principle and design features
The VAZ 2114 fuel pump is located inside the car’s gas tank, which is why access to it can be problematic if you don’t know which side to approach. To free up access to the fuel pump, you need to remove the rear seat from the fourteenth, under which you will find a rectangular hatch hiding access to the fuel module.
Just recline the back seat and see for yourself
In addition to the pump itself, the VAZ 2114 fuel module includes:
- A float sensor that monitors the fuel level in the gas tank;
- Chamber for fuel intake;
- Mesh filter for coarse cleaning.
The gasoline pump has a built-in electric motor, which pumps up the pressure of the pumped fuel. The motor itself is powered from the vehicle's on-board network. The VAZ 2114 gasoline pump is located so that even with a minimum level of fuel in the tank, it is constantly washed with gasoline, as this is necessary for normal cooling of the unit, which gets very hot during operation.
The main working element of a gasoline pump is a membrane, which during operation performs reciprocating movements. During normal operation, when the device is fully operational, the following pressure levels must be maintained in the fuel rail:
- For 1.5 l engine. – from 285 to 326 kPa;
- For 1.6 liter engine. – from 375 to 390 kPa.
As evidenced by reviews from owners of fourteenth VAZs, in practice BOSCH pumps have proven themselves to be the best.
Unlike domestically produced units, they cost almost 20-30% more, but at the same time they have an order of magnitude better build quality and reliability. The estimated cost of the fuel module for a 1.5 liter engine of the fourteenth is 2.5 thousand rubles, for 1.6 liters. – 2.6 thousand
However, rational savings are possible here - in most cases it makes sense to purchase a fuel pump separately, rather than the entire module, since, as a rule, the pump itself “dies”, and the remaining parts of the module remain in working order. Its cost, if taken separately, is 1-1.5 tr.
Signs of a fuel pump failure
A faulty fuel pump is quite easy to identify, since it is characterized by characteristic signs of failure.
For example: while driving, the car suddenly stalls - after turning it on again, the engine begins to make uncharacteristic sounds, while the starter does not stop turning. After the car starts up, the picture repeats itself - the fourteenth engine stalls again.
It is also possible that the car starts every once in a while - problems usually arise after sitting at neutral speed.
Let's determine the most typical signs of a fuel pump malfunction:
- The engine refuses to start. Of course, there can be many reasons for this problem - the same spark plugs, or the ECU, but the possibility of a fuel pump malfunction is also worth taking into account;
- The pressure level in the fuel relay differs from normal values;
- The motor is tripping. As a rule, if the fuel pump does not pump as it should, the engine begins to twitch quite noticeably because gasoline is not burned properly in the working cylinders;
- The engine growls at low speeds. One of the most truthful signs, which indicates either an immediate breakdown of the pump, or that the low-purity filter is clogged and the mesh needs to be replaced.
There are quite a lot of possible breakdowns that could cause the fuel pump to fail. The following parts of the unit design can present an unexpected surprise: fuse, fuel pump relay, ground, electric motor, contact system. Let's look at each of them separately.
Pressure level
In order to get most of the picture of what is happening, it is enough to measure the pressure in the fuel rail. For this, it is necessary to use a pressure gauge that has a small measurement range (preferably up to 7 atmospheres), since devices with a large range can produce significant inaccuracies.
Rail pressure measurement
Under the hood of the fourteenth there is a pressure fitting; unscrew its cap and connect the pressure gauge to it. Normal indicators should be as follows:
- When the engine is idling – 2.5 kPa;
- At the moment of ignition - 3 kPa;
- With a pinched drain hose – 7 kPa;
- When gaining speed - 2.5-3 kPa.
If the pressure gauge needle does not move when the ignition is turned on, then the gasoline pressure regulator is most likely broken. When there is no change as the speed increases, the fuel pump itself has failed, but if the needle moves very slowly, which indicates that the pump is pumping, but poorly, the fuel pump screen is clogged.
THIS IS INTERESTING: How to remove the bumper from a Priora
Checking wiring contacts
If the fuel pump does not work, do not rush to change it - perhaps the problem is in poor-quality wiring. There are 3 wires connected to the pump: to the gasoline level sensor, and positive and negative to power the motor.
No special tools are required to check the wiring - a regular 12-volt light bulb is enough. We connect the light bulb to the negative and positive wires of the pump, and turn on the car’s ignition - if the light blinks, then everything is fine with the wiring.
MOTOR
When you have determined that the external wiring of the fuel pump is normal, you need to move on to checking the motor. This is done with the same light bulb, the wires of which are connected to the external terminals of the motor. If the light comes on when you turn on the ignition, then you need to change the motor.
Fuel pump ground and relay
In the fourteenth, the mass of the fuel pump is fixed under the dashboard, next to the handbrake lever, during use of which the mass can be touched and shifted from its normal position. To fix this, remove the plastic around the handbrake, clean the ground contacts and reattach it.
Next to the ground there is a VAZ 2114 fuel pump relay. The relay is necessary so that during ignition the required pressure level is immediately created in the system.
A few words about where the fuel pump relay is located: after removing the plastic around the handbrake, you will immediately find 3 different relays - one of them is from the fuel pump.
It is better to immediately replace a broken relay with a new one; it is not expensive.
Checking the fuse
First, let's figure out where the VAZ 2114 fuel pump fuse is located: you can find it under the hood, on the windshield side. There is a drawer on the electronic control unit that needs to be opened. In the box we need a fuse that says Fuel Pump 15A above it. If the fuse for the VAZ 2114 fuel pump is blown, you need to install a new one.
The fuse blows due to incorrectly connected alarm contacts or the anti-theft system.
Changing the fuel pump yourself
If the fuel pump in the VAZ does not pump, and all of the above system components are normal, it is necessary to clean the filters, and, if necessary, completely replace the unit.
Before starting work, you must completely drain the fuel from the gas tank. To do everything with our own hands, we need a screwdriver and a set of keys. Replacing the VAZ 2114 fuel pump is carried out according to the following algorithm:
- We de-energize the car by removing the “-” terminal from the battery;
- We take out the rear row of passenger seats;
- Unscrew the plastic cap that covers the pump;
- Remove the power wires from the device and disconnect the fuel supply hoses;
- We dismantle the main fastenings of the fuel pump; for this we need the 7th key;
- Now you can remove the fuel pump on the VAZ 2114 and remove the device.
It must be removed carefully, since the float sensor for determining the fuel level is a very delicate structure that is easy to damage . Inspect the fuel pump - if necessary, clean or replace the strainer, however, it may be necessary to completely replace the unit.
Source: https://autogearspb.ru/uhod-za-avtomobilem/kak-proverit-benzonasos-na-vaz-2110.html