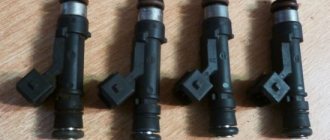
The injectors of both injection and diesel engines become clogged over time. This is due to the fact that the fuel contains small impurities that the filter is not able to leave on its housing (and even more so if it is old and/or of poor quality). There are injector cleaning products available on the market, but many of them are quite expensive and give questionable results. Therefore, car owners have come up with several simple methods that make it possible, using improvised means in a garage, to clean injectors, the quality of which is similar to professional cleaning at stands. If you have thoughts or your own suggestions on this matter, share them in the comments.
Method one - using carburetor cleaner
If instead of a special means for cleaning injectors you have carb cleaner lying around, then in a garage you can clean the gasoline injector yourself, even with a carburetor cleaner from a can, rather than buying liquid for the injector. Next we describe one of these methods. To work you will need:
- two pieces of clean rags;
- small-section copper insulated wire about a meter long;
- knife;
- plastic clamps (ties);
- awl;
- electric battery with a voltage of 9 V (the popular “Krona”);
- a piece of oxygen hose 4...5 cm long;
- insulating tape;
- carburetor cleaner (when choosing, pay attention to the working cap of the cylinder with a diameter that matches the inner diameter of the oxygen hose so that it can be inserted inside);
- safety glasses and gloves.
You need to work with carb cleaner carefully, using personal protective equipment, so you must first put on goggles and gloves . Work algorithm:
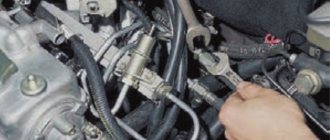
- remove the injector from the fuel manifold and clean it from the outside using a rag (it is better to first remove the rubber seals from it);
- cut a piece of wire into equal parts and clean the insulation on one side of the resulting wires using a knife;
- using electrical tape, connect the stripped ends of the wires to the battery;
- at the opposite ends of the wires, use an awl to slightly expand the insulation for further connection to the nozzle;
- make a hole in the carb cleaner cap using an awl in its upper part;
- insert the cap into the rubber hose (in this case, the “original” hole of the cap will be plugged with the hose) and clamp them with a plastic clamp;
- Install the resulting adapter onto the carb cleaner cylinder;
- Connect the nozzle, cleaned from the outside, to an adapter made of a rubber hose and tighten it with a clamp;
- connect the nozzle to the battery, you will hear a click indicating that the nozzle has opened;
- place the adapter with the nozzle onto the carburetor cleaner bottle;
- gently apply pressure (press);
- in this case, the carburetor cleaner will come out in a vertical stream through the nozzle (that's what glasses are for!).
Clean until the pattern is even. After one cleaning, you need to turn the nozzle upside down and repeat the operation. Next, you can move on to cleaning the remaining injectors.
How to properly clean injectors.
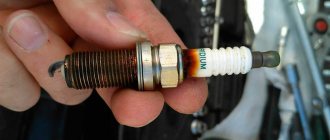
You need to stock up on enough liquid. For a medium-power passenger car and SUV with an engine capacity of up to 2.5 liters, 1 liter of fluid is sufficient. If the car is more powerful, 2 liters of flushing fluid is required. Simultaneously with cleaning the injectors, the spark plugs are replaced.
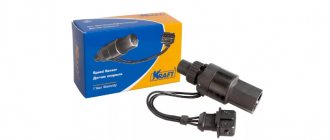
The second necessary component for flushing is a gasoline pump and a 1.5-2 meter long hose so that you can carry out the work comfortably.
It is also important to stock up on enough clamps to secure this structure and prepare a container for fuel. The fuel pump is connected using wires. It is better to use crocodile mounts to connect to the battery.
Attention! Most cars manufactured since 2003 may not have a fuel pressure regulator in the rail. Therefore, it is necessary to connect a special pressure gauge to the flushing system. The vehicle's fuel system is under high pressure even after the engine is turned off. Therefore, you should connect the equipment carefully.
Flushing fluid is also dangerous because it is highly flammable. Do not allow it to leak onto hot parts of the engine.
Method two - using a flush cylinder
This method can also be performed in the garage using improvised means; it is good because there is no need to dismantle the engine injectors, but as a cleaning composition you will need to purchase a solvent (Vince, Laurel, High Gear or another). To work you will need:
Cylinder with connected filter
- a clean two-liter plastic bottle with a tight-fitting cap;
- compressor (to be able to produce 3 atmospheres);
- flushing liquid (about one liter);
- drill and drill bit with a diameter of 13 mm;
- two clamps (12…14 mm);
- fuel filter;
- two automobile nipples;
- a hose with a diameter of 12 mm, about a meter long;
The operating algorithm is as follows:
- Drill a hole on both sides of the bottle (on the bottom and on the lid);
- Screw a nipple with a screwed-in valve into the bottom of the bottle;
- Screw the nipple into the lid without a valve;
Complete system - put the hose on the nipple located in the bottle cap and secure it with a clamp;
- connect the fuel filter to the second end of the hose and also secure it with a clamp;
- start the car engine and warm it up to a coolant temperature of +90…+95 degrees;
- turn off the engine and be sure to relieve pressure in the fuel line ;
- disconnect the connector from the fuel line;
- remove the gasoline supply hose to the injectors;
- put the mentioned chip on the fuel pump from the previously assembled system;
- pour cleaning liquid into the bottle and close it well;
- hang the bottle above the hood;
- a compressor hose is screwed into the nipple located at the bottom of the bottle (you can use a car booster pump);
- inflate the bottle to a pressure of 3 atmospheres.
After this, you should start the engine and let it idle for 15 minutes and rest for 15 minutes. Next, start the engine again and let it run until the cleaning liquid in the bottle runs out. When the engine stalls, you must carefully release the pressure from the bottle! This can be done either using a nipple or simply by carefully unscrewing the cap.
After this, you can disassemble the resulting system, connect the fuel hose in place, and return the chip to its original position. After everything is assembled, you need to start the engine and let the car run for 5...10 minutes. It is highly advisable to change the oil and spark plugs (especially spark plugs) after performing the described procedure.
The cleaning method is quite simple, but it has a significant drawback - the lack of visual monitoring of the condition of the injectors. It can be used for preventive purposes if there is a suspicion that the injectors are clogged.
What are the signs that indicate a problem with the injectors?
- car engine has difficulty starting
- The engine may run unevenly at idle
- when you press the gas pedal sharply, a sharp decrease in speed is possible
- the car takes longer to accelerate
- increase in the level of exhaust toxicity (checked at a service station)
- noticeable increase in fuel consumption
These problems are especially pronounced in the winter season. Low temperature additionally affects the fuel, making it more viscous, which reduces the throughput of the injectors.
Method three - adding acetone
On numerous forums on the Internet you can find many topics about whether you should add acetone to your gas tank. Despite the fact that official representatives of automakers and oil refining companies do not say a word about this, many domestic (and not only) car owners add a small amount of pure acetone to the gasoline they use.
This action leads, firstly, to an increase in the octane number of gasoline, and secondly, it causes a cleaning effect for the elements of the fuel system (washes away carbon deposits), and also binds the water in gasoline and removes it along with the exhaust gases. As a rule, the effect of using acetone is felt after it has been added to a full (or almost full) tank of gasoline, and this fuel has subsequently been burned while driving.
A few words about proportions. The amount of acetone added to gasoline depends, firstly, on the octane number, and secondly, on the quality of the fuel (admixtures of water and harmful impurities in it). If the gasoline is good, then it is enough to add 30 ml for every 10 liters of gasoline. As it worsens, the amount of acetone can increase to 150 ml per 10 liters of gasoline. However, don’t get too carried away with adding acetone! This is due to the fact that since this product increases the octane number, if its value is exceeded compared to what the engine is designed for, this can lead to gradual failure of the engine. And the greater the value it is exceeded, the faster the engine “knocks”.
Method four - use of Dimexide
To clean injectors, you can also use the popular drug Dimexide, which is sold in any pharmacy and is very inexpensive. So, for work you will need:
Washing unit
- the drug Dimexide (500 ml or more, depending on the degree of contamination);
- a clean container for liquid with a lid, such as a bottle with a tight-fitting lid of about 500 ml;
- two nipples;
- drill (screwdriver) and 13 mm drill (for nipple diameter);
- four containers in the form of test tubes, where contaminated liquid from the nozzles will be collected (separately for each nozzle);
- battery or power supply 12 V;
- air hose;
- clamps;
- Solvent solvent.
The cleaning procedure consists of the following steps:
- Dismantling the ramp with nozzles.
- Construction of a washing stand.
- Checking injectors for performance (mounted with a ramp on a stand with transparent containers to evaluate the spray pattern and the amount of fuel released).
- Soaking individual injectors in a container with dimexide (necessarily in a vertical position so that this aggressive agent does not get on the rubber seals).
- Rinsing injection nozzles with dimexide under pressure for 10-15 minutes.
- Flushing with solvent and blowing with compressed air (so that there is no product left in the nozzle).
Washing injectors with dimexide is carried out by analogy with the method using an installation with a cylinder. Therefore, first you will need:
- make some kind of structure to rigidly install the removed ramp on it;
- drill the lid of the empty container and install one of the nipples there;
- drill the bottom of the jar and also screw in the second nipple;
- connect the lower nipple with a rubber hose using a clamp, and connect the other end of the hose to the ramp;
- assemble a circuit using wires, bringing their ends out in parallel and connecting them to the terminals of the power supply, preferably through a button (normally open);
- fill the container with cleaning liquid and close the lid tightly;
- use a compressor to pump up the pressure to about 2 atmospheres;
The supply of cleaner is controlled by a button (in intermittent mode) to turn the nozzles on and off.
As practice and numerous experiments conducted by various car owners show, Dimexide allows you to get rid of contaminants even on very old and dirty injectors. However, remember that Dimexide also has harmful properties. In particular, heated Dimexide dissolves not only carbon deposits, but also paint, and is generally considered a rather aggressive substance.
Before installing the fuel rail in its original location, it is advisable to replace the lower o-rings. The fact is that over time they wear out and tear. It is also advisable to pre-apply silicone grease to them.
Conclusion
As you can see, cleaning injection nozzles yourself in a garage environment is quite acceptable and effective. However, it must be performed, firstly, provided that you are confident that you will do everything correctly, that is, you have experience in performing such repair work. Secondly, the degree of contamination of the injectors is medium or low. If the injector is very clogged, it makes sense to seek help from a car service center, where they will wash the injectors using a liquid or ultrasonic cleaning unit.